1
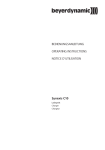
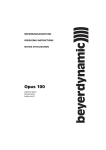
WA-CD
LADEGERÄT
CHARGER
CHARGEUR
Bedienungsanleitung
Operating Instructions
Mode d’emploi
WA-CD – Ladegerät
3
1.
Sicherheits- und Warnhinweise . . . . . . . . . . . . . . . . . . . . . . . . . . . . . . . . . . . 4
2.
Entsorgung . . . . . . . . . . . . . . . . . . . . . . . . . . . . . . . . . . . . . . . . . . . . . . . . . 4
3.
Funktionsübersicht . . . . . . . . . . . . . . . . . . . . . . . . . . . . . . . . . . . . . . . . . . . 5
4.
Anwendung. . . . . . . . . . . . . . . . . . . . . . . . . . . . . . . . . . . . . . . . . . . . . . . . . 5
5.
Bedienelemente . . . . . . . . . . . . . . . . . . . . . . . . . . . . . . . . . . . . . . . . . . . . . 5
6.
Netzanschluss. . . . . . . . . . . . . . . . . . . . . . . . . . . . . . . . . . . . . . . . . . . . . . . 6
7.
Sender laden . . . . . . . . . . . . . . . . . . . . . . . . . . . . . . . . . . . . . . . . . . . . . . . 6
8.
Ladeanzeigen . . . . . . . . . . . . . . . . . . . . . . . . . . . . . . . . . . . . . . . . . . . . . . . 7
9.
Netzwerkanschluss / Reset IP-Adresse . . . . . . . . . . . . . . . . . . . . . . . . . . . . . . 7
10 Ladeanzeigen . . . . . . . . . . . . . . . . . . . . . . . . . . . . . . . . . . . . . . . . . . . . . . . 7
11. Pflege . . . . . . . . . . . . . . . . . . . . . . . . . . . . . . . . . . . . . . . . . . . . . . . . . . . . 7
12. Service. . . . . . . . . . . . . . . . . . . . . . . . . . . . . . . . . . . . . . . . . . . . . . . . . . . . 7
13. Technische Daten . . . . . . . . . . . . . . . . . . . . . . . . . . . . . . . . . . . . . . . . . . . . 7
deutsch
Inhalt
WA-CD – Ladegerät
4
Sie haben sich für das Ladegerät WA-CD von beyerdynamic entschieden.
Vielen Dank für Ihr Vertrauen. Bitte lesen Sie diese Bedienungsanleitung vor Inbetriebnahme aufmerksam durch.
1. Sicherheits- und Warnhinweise
Allgemein
• LESEN Sie die Bedienungsanleitung.
• BEWAHREN Sie diese Bedienungsanleitung auf.
• BEFOLGEN Sie die aufgeführten Bedienungs- und Sicherheitshinweise.
Haftungsausschluss
• Die Firma beyerdynamic GmbH & Co. KG übernimmt keine Haftung für Schäden am Produkt oder Verletzungen
von Personen aufgrund unachtsamer, unsachgemäßer, falscher oder nicht dem vom Hersteller angegebenen Zweck
entsprechender Verwendung des Produkts.
Feuchtigkeit / Wärmequellen
• Setzen Sie das Gerät niemals Regen oder hoher Feuchtigkeit aus. Installieren Sie es daher nicht in unmittelbarer Nähe von Swimming Pools, Duschanlagen, feuchten Kellerräumen oder sonstigen Bereichen mit außergewöhnlich hoher Luftfeuchtigkeit.
• Stellen Sie niemals mit Flüssigkeiten gefüllte Gegenstände (z.B. Vasen oder Trinkgläser) auf das Gerät. Flüssigkeiten in den Geräten können einen Kurzschluss verursachen.
• Installieren und betreiben Sie das Gerät auch niemals in unmittelbarer Nähe von Heizkörpern, Beleuchtungsanlagen oder anderen wärmeerzeugenden Geräten.
Anschluss
• Verlegen Sie das Netzkabel stets so, dass es nicht durch scharfe Gegenstände geknickt oder gar durchgetrennt
werden kann.
• Nehmen Sie das Gerät bei einem Gewitter oder wenn Sie es längere Zeit nicht benutzen, vom Netz.
• Verwenden Sie nur von beyerdynamic lieferbares oder empfohlenes Zubehör.
• Nehmen Sie das Gerät bei Beschädigung des Netzkabels nicht in Betrieb.
Laden
• Laden Sie nie Hand- und Taschensender, wenn sie mit einer normalen Batterie bestückt sind! Bei dadurch entstehenden Schäden entfallen alle Garantieansprüche.
• Ein völlig neuer Akku muss eventuell mehrmals geladen und entladen werden, bevor er seine volle Ladekapazität
erreicht hat.
• Durch Selbstentladung können Standard-NiMH-Akkus in einem Monat bis zu 20% ihrer Kapazität verlieren. Nach
längeren Pausen sollte der Sender vor Gebrauch noch einmal geladen werden.
• Vermeiden Sie, die Sender mehrmals kurz hintereinander zu laden. Dies könnte zu einer Fehlermeldung beim
Ladevorgang oder zu einer Beschädigung des Akkus durch stetige Überladung führen.
• Werfen Sie verbrauchte Akkus/Batterien nicht in den Hausmüll, sondern geben Sie diese an den örtlichen
Sammelstellen ab.
• Hohe Umgebungstemperaturen während des Ladens (> +40 °C) wirken sich ungünstig auf die Effizienz des
Ladevorgangs und die Akkulebensdauer aus.
Reinigung
• Reinigen Sie das Gerät nur mit einem leicht feuchtem oder trockenem Tuch.
Service / Reparatur
• Im Innern des Ladegerätes befinden sich keine Komponenten, die vom Anwender gewartet werden können.
• Überlassen Sie alle Service- und Reparaturarbeiten autorisiertem Fachpersonal.
2. Entsorgung
•
Dieses Produkt darf am Ende seiner Lebensdauer nicht über den normalen Haushaltsabfall entsorgt
werden, sondern muss an einem Sammelpunkt für das Recycling von elektrischen und elektronischen
Geräten abgegeben werden. Das Symbol auf dem Produkt, der Gebrauchsanweisung oder der
Verpackung weist darauf hin.
WA-CD – Ladegerät
5
• Getrennte Aufladevorgänge für jeden einzelnen Sender.
• Es können Sender bestückt mit NiMH-Akkus sowie 2 x 2 NiMH-Akkus in den Ladefächern des Taschensenders
geladen werden.
• Der Ladezustand vor Ladebeginn ist ohne Bedeutung. Die Akkus, die im selben Ladefach geladen werden, sollten
jedoch die gleiche Kapazität und den gleichen Ladezustand haben, da sonst die Gefahr besteht, dass der Akku,
der stärker entladen ist, nicht vollständig aufgeladen wird und es zu einer Tiefentladung des Akkus kommen
kann, sobald der Sender wieder in Gebrauch ist.
• Überwachung der Akkuspannung während der gesamten Ladezeit durch einen Microcontroller.
• Sicherheitsstufen wie dU-Erkennung und Sicherheitstimer sind integriert.
• Ladezeiten in Abhängigkeit der Kapazität 2 bis 3 Stunden.
• Leuchtanzeigen des jeweiligen Ladestatus an jedem einzelnen Ladefach
4. Anwendung
Das Ladegerät WA-CD bietet vier Ladefächer und dient zum Laden der Akkus in den Sendern TG 1000 Beltpack
sowie TG 1000 Handheld und Quinta TH. Die Akkus verbleiben während des Ladens im jeweiligen Sender.
Die Ladefächer für den Taschensender bieten außerdem Lademöglichkeiten für 2 x 2 NiMH-Akkus.
Hinweis: NiMH-Akkus benötigen ca. 3 bis 8 Lade-/Entladevorgänge, bis ihre maximale Kapazität nutzbar ist.
5. Bedienelemente
Oberseite
�
�
Rückseite
�
�
�
�
�
�
�
�
�
�
�
�
�
�
�
�
�
�
Ladefach für Handsender
Ladeanzeige
Kombiniertes Ladefach für Taschensender und einzelne NiMH-Akkus
Ladeanzeige
DC-Netzanschluss
Ethernetanschluss zur Kommunikation mit Mediensteuerungen (TCP-IP basiertes Protokoll)
IP Reset-Taste (setzt IP-Adresse auf Standard zurück)
deutsch
3. Funktionsübersicht
WA-CD – Ladegerät
6
6. Netzanschluss
•
•
•
•
Montieren Sie zuerst den entsprechenden Netzsteckereinsatz auf den Netzadapter.
Schließen Sie den Netzadapter an das Ladegerät und ans Netz an.
Das Ladegerät verfügt über keinen separaten Ein- und Ausschalter und ist sofort betriebsbereit.
Die Ladeanzeigen in den Ladefächern leuchten weiß und zeigen so die Betriebsbereitschaft des Gerätes an.
7. Sender laden
• Setzen Sie den Hand- oder Taschensender bzw.die Akkus gemäß der Abbildung in das Ladefach ein. Eingeschaltete
Sender werden automatisch ausgeschaltet.
Achten Sie bei den Akkus darauf, dass Sie diese gemäß der +/- Kennzeichnung in die Ladefächer einsetzen.
Wichtig: Überprüfen Sie bitte vor dem Laden, dass keine nicht aufladbaren Batterien (Alkaline) im Sender
eingelegt sind. Eine Mischbestückung (Alkaline und NiMH) ist weder zum Betrieb der Sender geeignet, noch
dürfen mischbestückte Sender geladen werden, weil Sender und Ladegerät beschädigt werden könnten. In diesem Fall erlöschen alle Gewährleistungsansprüche.
• Vor jedem Ladevorgang führt das Gerät eine sogenannte Zelltyperkennung durch. Auch nach Beginn des Ladevorgangs prüft ein weiterer Sicherheitsmechanismus in der ersten Minute des Ladens erneut, ob der Sender mit
wiederaufladbaren Batterien bestückt ist.
Sollten sich im Sender keine wiederaufladbaren Batterien befinden, wird der Ladevorgang nicht gestartet bzw.
abgebrochen und der Fehler durch rotes Blinken angezeigt.
Handsender (mit NiMH-Akkus)
Taschensender
(mit NiMH-Akkus)
NiMH-Akkus
Ladegerät
WA-CD
Hinweis: Abgebildet sind der Handsender Quinta TH und der Taschensender TG 1000 Beltpack.
Alternativ zum Quinta TH kann auch der Handsender TG 1000 Handheld aufgeladen werden.
WA-CD – Ladegerät
7
Jedes Ladefach wird getrennt gesteuert. Die jeweiligen Ladeanzeigen dienen zur Kontrolle des Ladevorgangs.
Ladeanzeige leuchtet weiß . . . . . . . . .
Ladeanzeige leuchtet rot . . . . . . . . . .
Ladeanzeige blinkt grün. . . . . . . . . . .
Ladeanzeige leuchtet grün . . . . . . . . .
Ladeanzeige blinkt rot . . . . . . . . . . . .
Alle Ladeanzeigen blinken schnell rot .
.
.
.
.
.
.
.
.
.
.
.
.
.
.
.
.
.
.
.
.
.
.
.
.
.
.
.
.
.
.
Ladefach ist betriebsbereit. Der Sender kann eingesetzt werden.
Eingesetzte Zellen werden überprüft.
Akku wird geladen.
Ladevorgang beendet.
Fehler. Der Ladevorgang wird nicht gestartet bzw. unterbrochen.
Schwerwiegender Fehler. Ladegerät nicht verwenden!
Hinweis:
• Wenn eine Ladeanzeige rot blinkt, nehmen Sie den entsprechenden Sender aus dem Ladefach und überprüfen
Sie, ob sich im Sender Alkalinebatterien befinden bzw. ob die Akkus verpolt sind. Falls das Blinken trotz korrekter
Bestückung mit NiMH-Akkus fortbesteht, prüfen Sie, ob die Akkus bereits vollgeladen sind. Falls nicht, sind die
Akkus defekt und müssen ersetzt werden.
• Wenn alle Ladeanzeigen, egal ob mit Sendern bestückt oder nicht, schnell rot blinken, liegt ein schwerwiegender Fehler vor. Trennen Sie das Ladegerät vom Netz und prüfen Sie, ob sich ein metallischer Fremdkörper in
einem Ladefach befindet. Falls ja, entfernen Sie den Fremdkörper und schließen Sie das Ladegerät wieder am
Netz an. Sollten die Ladeanzeigen immer noch schnell blinken, liegt ein Defekt vor, den der Anwender nicht
selbst beheben kann. In diesem Fall setzen Sie sich mit dem autorisierten beyerdynamic Fachhändler in Verbindung.
9. Netzwerkanschluss / Reset IP-Adresse
•
•
•
•
Bei Bedarf verbinden Sie den Ethernetanschluss mit einer Mediensteuerung.
Die Standard IP-Adresse lautet: 192.168.0.100
Die IP-Adresse kann mit entsprechenden Befehlen an das vorhandene Netzwerk angepasst werden.
Falls notwendig, können Sie die IP-Adresse über die IP Reset-Taste wieder auf die Standard IP-Adresse zurücksetzen.
• Detaillierte Informationen zum Reset der IP-Adresse finden Sie in der separaten Anleitung zur Kommunikation
mit einer Mediensteuerung (Remote Communication). Siehe Internet unter: www.beyerdynamic.de
10. Firmware-Update
• Ein Firmware-Update für das Ladegerät WA-CD erfolgt ebenfalls über den Ethernetanschluss. Alle benötigten Informationen finden Sie unter: www.beyerdynamic.de
11. Pflege
• Reinigen Sie das Gerät nur mit einem trockenen Tuch.
• Um eine einwandfreie Funktion des Gerätes sicherzustellen, halten Sie die Kontakte frei von Verschmutzungen.
Reinigen Sie daher die Ladekontakte gelegentlich mit einem mit Alkohol oder Spiritus befeuchteten, weichen
fusselfreien Tuch.
12. Service
Im Servicefall wenden Sie sich bitte an autorisiertes Fachpersonal. Öffnen Sie das Ladegerät auf keinen Fall selbst,
Sie könnten sonst alle Gewährleistungsansprüche verlieren.
13. Technische Daten
Ladegerät WA-CD
Ladestrom. . . . . . . . . . . .
Ladedauer. . . . . . . . . . . .
Abmessungen (B x T x H) .
Gewicht (ohne Netzteil) . .
Umgebungstemperatur . . .
.
.
.
.
.
.
.
.
.
.
.
.
.
.
.
.
.
.
.
.
.
.
.
.
.
.
.
.
.
.
.
.
.
.
.
max. 1240 mA
2 bis 3 Std. (je nach Ladezustand und Kapazität des Akkus)
ca. 175 x 139 x 70 mm
ca. 1125 g
0 bis +40 °C
Netzadapter CA2458
Ausgangsspannung . . . . . . . . . . . . 15 V DC
Strom . . . . . . . . . . . . . . . . . . . . . . 1600 mA
Eingangsspannung. . . . . . . . . . . . . 100 - 240 V AC 50 / 60 Hz
deutsch
8. Ladeanzeigen
WA-CD – Charging Unit
9
1.
Safety information . . . . . . . . . . . . . . . . . . . . . . . . . . . . . . . . . . . . . . . . . . . 10
2.
Disposal . . . . . . . . . . . . . . . . . . . . . . . . . . . . . . . . . . . . . . . . . . . . . . . . . . 10
3.
Functions . . . . . . . . . . . . . . . . . . . . . . . . . . . . . . . . . . . . . . . . . . . . . . . . . 11
4.
Application . . . . . . . . . . . . . . . . . . . . . . . . . . . . . . . . . . . . . . . . . . . . . . . . 11
5.
Controls and indicators . . . . . . . . . . . . . . . . . . . . . . . . . . . . . . . . . . . . . . . 11
6.
Power connection . . . . . . . . . . . . . . . . . . . . . . . . . . . . . . . . . . . . . . . . . . . 12
7.
How to charge the transmitter. . . . . . . . . . . . . . . . . . . . . . . . . . . . . . . . . . . 12
8.
Charging indicators . . . . . . . . . . . . . . . . . . . . . . . . . . . . . . . . . . . . . . . . . . 13
9.
Network connection / reset IP address . . . . . . . . . . . . . . . . . . . . . . . . . . . . . 13
10. Firmware update . . . . . . . . . . . . . . . . . . . . . . . . . . . . . . . . . . . . . . . . . . . . 13
11. Maintenance. . . . . . . . . . . . . . . . . . . . . . . . . . . . . . . . . . . . . . . . . . . . . . . 13
12. Service. . . . . . . . . . . . . . . . . . . . . . . . . . . . . . . . . . . . . . . . . . . . . . . . . . . 13
13. Technical specifications . . . . . . . . . . . . . . . . . . . . . . . . . . . . . . . . . . . . . . . 13
english
Contents
WA-CD – Charging Unit
10
Thank you for selecting the WA-CD charger from beyerdynamic. Please take some time to read through this manual
carefully before using this product.
1. Safety information
General
• READ these instructions.
• KEEP these instructions.
• HEED all warnings and follow all instructions.
Exemption from liability
• beyerdynamic GmbH & Co. KG will not be liable if any damage, injury or accident occurs due to negligent,
incorrect or inappropriate operation of the product.
Humidity / heat sources
• Never expose the equipment to rain or a high level of humidity. For this reason do not install it in the immediate
vicinity of swimming pools, showers, damp basement rooms or other areas with unusually high atmospheric
humidity.
• Never place objects containing liquid (e.g. vases or drinking glasses) on the equipment. Liquids in the equipment
could cause a short circuit.
• Do not install near any heat sources such as radiators, heat registers, stoves or other apparatus (including
amplifiers) that produce heat.
Connection
• Protect the power cord from being walked on or pinched particularly at plugs, convenience receptacles, and the
point where they exit from the apparatus.
• Unplug the device during lightning storms or when unused for long periods of time.
• Only use attachments/accessories specified by the manufacturer.
• Do not use the equipment if the power cable is damaged.
Charging
• Never charge the handheld and beltpack transmitter with a normal battery! Damages caused by charging a
transmitter with normal batteries will invalidate the guarantee.
• A completely new rechargeable battery must be charged several times to achieve its full capacity.
• Rechargeable batteries loose 20% of their capacity within one month. If the transmitter is not used for some time,
recharging the battery is recommended.
• Avoid recharging the batteries inside the transmitters several times in a quick succession. This could create an
error while charging or damage the rechargeable battery.
• Do not throw used batteries into the domestic rubbish, but hand them in to local collection points.
• High ambient temperatures during charging (> +40 °C) affect the efficiency of the charging process and the
battery lifetime.
Maintenance
• Only clean the equipment with a dry cloth.
Trouble shooting and servicing
• Do not open the equipment without authorisation. You could receive an electric shock. No user serviceable parts
inside.
• Refer all servicing to qualified service personnel.
2. Disposal
•
This symbol on the product, in the instructions or on the packaging means that your electrical and
electronic equipment should be disposed at the end of its life separately from your household waste.
There are separate collection systems for recycling in the EU. For more information, please contact
the local authority or your retailer where you purchased the product.
WA-CD – Charging Unit
11
• Separate charging of each rechargable transmitter.
• Transmitters with a NiMH battery as well as 2 x2 NiMH batteries in the beltpack transmitter compartments can
be recharged.
• The charging status before start of charging is irrelevant. The batteries , however, that are charged in the same
charging compartment should have the same capacity and the same charging state, because otherwise the battery
that is higher discharged will not be recharged completely which can result in a deep discharge of the battery when
the transmitter is in use again.
• A microcontroller monitors the battery voltage during the complete charging time.
• Significance levels are integrated such as dU-recognition and safety timer.
• Charging time depending on capacity: 2 to 3 hours.
• Status lights with each charging compartement display the appropriate charging state.
4. Application
The WA-CD charger provides four charging compartments for charging the rechargeable batteries inside the TG 1000
Beltpack, TG 1000 Handheld and Quinta TH transmitters. The rechargeable batteries remain inside the transmitters
while charging. Furthermore the charging compartments for the beltpack transmitter provide options for charging
2 x2 NiMH batteries.
Note: NiMH batteries require approx. 3 to 8 charging/discharging cycles until they reach their maximum capacity.
5. Controls and indicators
Top view
�
�
Rear view
�
�
�
�
�
�
�
�
�
�
�
�
�
�
�
�
�
�
Charging compartment for handheld transmitter
Charging light
Combined charging compartment for beltpack transmitter and individual NiMH batteries
Charging light
DC power connection
Ethernet connection for the communication with media control systems (TCP-IP based protocol)
IP reset button (reset of the standard IP address)
english
3. Functions
WA-CD – Charging Unit
12
6. Power connection
•
•
•
•
Mount the appropriate power plug to the power adaptor.
Connect the power adaptor to the charger and to the mains.
The charger provides no separate on/off switch and will start up automatically.
The charging lights of the battery compartments will illuminate white to indicate the ready operating status of
the device.
7. How to charge the transmitter
• Put the handheld or beltpack transmitter or the NiMH batteries in the charging compartments as indicated in the
drawing. If the transmitter is turned on, it will be turned off automatically.
Make sure to insert the NiMH batteries into the charging compartments as indicated by the +/- marks.
Important: Before charging please make sure that there are not non-rechargeable alkaline batteries in the
transmitter. The simultaneous of different batteries (alkaline and NiMH) in one transmitter is not suitable for
operating the transmitter, furthermore these transmitters should not be charged, because transmitter and charger
could be damaged. In this case the guarantee will be invalidated.
• Before charging the device performs a so-called cell type detection. Even after the start of charging another
security mechanism checks the first minute of charging, if the transmitter is equipped with rechargeable batteries.
If there are no rechargeable batteries inside the transmitter, the charging process is not started or interrupted and
the error is displayed by flashing red.
Handheld transmitter
(with NiMH batteries)
Beltpack transmitter
(with NiMH batteries)
NiMH batteries
WA-CD charger
Note: In the picture you can see the Quinta TH handheld transmitter and the TG 1000 Beltpack transmitter.
Instead of the Quinta TH you can also recharge the TG 1000 handheld transmitter.
WA-CD – Charging Unit
13
8. Charging indicators
Indicator illuminates white . . . . . . .
Indicator illuminates red . . . . . . . . .
Indicator is flashing green . . . . . . . .
Indicator illuminates green . . . . . . .
Indicator is flashing red . . . . . . . . .
All indicators are flashing rapidly red
.
.
.
.
.
.
.
.
.
.
.
.
.
.
.
.
.
.
The charging compartment is ready for operation. Insert the transmitter.
The battery cells are checked.
The batteries are being charged.
The batteries are fully charged.
Error. The charging process is not started or interrupted.
Severe error. Do not use the charger!
Note:
• If an indicator is flashing red, remove the appropriate transmitter from the charging compartment and check, if
there are alkaline batteries inside the transmitter or if the NiMH have been inserted incorrectly. Should the
flashing persist even when using NiMH batteries, please check if the batteries are already fully charged. If not,
the batteries are defective and must be replaced.
• Should all the indicators flash rapidly red, no matter if there are transmitters in the charging compartments or
not, there is a severe error. Disconnect the charger from the mains and check if there is a metallic object in the
charging compartment. If yes, remove the object and connect the charger to the mains again. Should the
indicators still flash rapidly, there is a defect, which the user cannot fix. In this case, please contact an authorised
beyerdynamic dealer.
9. Network connection / reset IP address
•
•
•
•
•
If required, connect the Ethernet port to a media control system.
The default IP address is: 192.168.0.100
The IP address can be adapted to the existing network with appropriate commands.
If necessary, you can reset the IP address to the default address again by using the IP reset button.
You will find detailed information on the reset of the IP address in the separate manual about the communication
with media control system (remote communication). Refer also to: www.beyerdynamic.com
10. Firmware update
• The Ethernet port is also used for a firmware update of the WA-CD charger. You will find all the information you need
at: www.beyerdynamic.com
11. Maintenance
• For cleaning use a dry cloth only.
• In order to ensure a proper function of the charger, keep the charging contact clean. Use a lint-free soft cloth
moistened with alcohol or spirits to clean the charging contacts from time to time.
12. Service
Servicing must be carried out by qualified service personnel only. Dismantling the charger yourself will invalidate the
guarantee.
13. Technical specifications
WA-CD charger
Charging current . . . . . . . . . . .
Time of charge. . . . . . . . . . . . .
Dimensions (W x D x H) . . . . . .
Weight (without power adaptor) .
Ambient temperature . . . . . . . .
.
.
.
.
.
.
.
.
.
.
.
.
.
.
.
max. 1240 mA
2 to 3 hrs. (depending on the charging state of the battery)
approx. 175 x 139 x 70 mm
approx. 1125 g
0 to +40 °C
CA2458 power adaptor
Output voltage. . . . . . . . . . . . . . . . 15 V DC
Current . . . . . . . . . . . . . . . . . . . . . 1600 mA
Input voltage . . . . . . . . . . . . . . . . . 100 - 240 V AC 50 / 60 Hz
english
Each charging compartment is controlled separately. The appropriate indicators display the charging process.
WA-CD – Chargeur
15
1.
Avertissements et instructions de sécurité . . . . . . . . . . . . . . . . . . . . . . . . . . 16
2.
Mise au rebut . . . . . . . . . . . . . . . . . . . . . . . . . . . . . . . . . . . . . . . . . . . . . . 16
3.
Aperçu des fonctions . . . . . . . . . . . . . . . . . . . . . . . . . . . . . . . . . . . . . . . . . 17
4.
Application . . . . . . . . . . . . . . . . . . . . . . . . . . . . . . . . . . . . . . . . . . . . . . . . 17
5.
Eléments de commande. . . . . . . . . . . . . . . . . . . . . . . . . . . . . . . . . . . . . . . 17
6.
Connexion au secteur. . . . . . . . . . . . . . . . . . . . . . . . . . . . . . . . . . . . . . . . . 18
7.
Chargement de l’émetteur . . . . . . . . . . . . . . . . . . . . . . . . . . . . . . . . . . . . . 18
8.
Témoins indicateurs de charge . . . . . . . . . . . . . . . . . . . . . . . . . . . . . . . . . . 19
9.
Connexion réseau / Réinitialisation de l’adresse IP . . . . . . . . . . . . . . . . . . . . 19
10 Témoins indicateurs de charge . . . . . . . . . . . . . . . . . . . . . . . . . . . . . . . . . . 19
11. Entretien . . . . . . . . . . . . . . . . . . . . . . . . . . . . . . . . . . . . . . . . . . . . . . . . . 19
12. Service après-vente . . . . . . . . . . . . . . . . . . . . . . . . . . . . . . . . . . . . . . . . . . 19
13. Spécification techniques . . . . . . . . . . . . . . . . . . . . . . . . . . . . . . . . . . . . . . 19
français
Sommaire
WA-CD – Chargeur
16
Vous avez opté pour le chargeur WA-CD de beyerdynamic.
Nous vous remercions de votre confiance. Veuillez lire attentivement ces informations avant la mise en service du
produit.
1. Avertissements et instructions de sécurité
Généralités
• Veuillez LIRE la notice d’utilisation.
• ONSERVEZ cette notice d’utilisation.
• Veuillez SUIVRE les instructions d’utilisation et de sécurité.
Non-responsabilité
• La société beyerdynamic GmbH & Co. KG décline toute responsabilité en cas de dommages sur le produit ou
de blessures sur des personnes dus à une utilisation négligente, incorrecte ou contraire aux fins indiquées par
le
fabricant.
Humidité / Radiateurs
• N’exposez jamais l’appareil à la pluie ou à forte humidité. Ne l’installez jamais à proximité directe de piscines,
douches, caves humides ou autres zones présentant une humidité d’air exceptionnellement élevée.
• Ne jamais poser de récipient contenant un liquide (p.ex. vase, verre) sur l’appareil. Tout liquide pénétrant dans
l’appareil peut en effet provoquer un court-circuit.
• N’installez jamais et ne faites jamais fonctionner l’appareil à proximité directe de radiateurs, d’installations
d’éclairage ou autres appareils dégageant de la chaleur.
Raccordement
• Posez le câble secteur de façon à ce qu’il ne soit pas courbé, voire coupé pas des objets coupants.
• Débranchez l’appareil lors d’orages ou d’une non-utilisation prolongée.
• N’employez que des accessoires recommandés et pouvant être livrés par beyerdynamic.
• N’utilisez pas l’appareil en cas d’endommagement du câble secteur.
Chargement
• Ne chargez jamais d’émetteurs portables ou de poche si ces derniers sont équipés d’une pile normale ! Risque
d’explosion ! Dans ce cas vous perdrez vos droits de garantie.
• Veuillez impérativement éteindre les émetteurs avant le chargement.
• Un accumulateur neuf doit éventuellement être chargé deux à trois fois avant d’atteindre sa pleine capacité de
chargement.
• Par autodécharge, les accumulateurs perdent en un mois jusqu’à 20% de leur capacité. En cas de non-utilisation prolongée, veuillez recharger l’émetteur avant sa mise en service.
• Evitez de recharger les émetteurs successivement à intervalles rapprochés. Un message d’erreur pourrait sinon
s’afficher lors du chargement ou l’accu pourrait être endommagé suite à une surcharge constante.
Nettoyage
• Nettoyez l’appareil uniquement à l’aide d’un chiffon sec ou légèrement humidifié. N’utilisez jamais de solvants. Ces derniers peuvent endommager le dessus de l’appareil.
Dépannage
• L’intérieur du chargeur ne contient aucun composant susceptible d’être entretenu par l’utilisateur.
• Veuillez confier tous travaux de dépannage à un personnel agréé.
2. Mise au rebut
•
À la fin de sa durée de vie, cet appareil ne doit pas être jeté avec les ordures ménagères, mais doit
être déposé dans un point de collecte pour le recyclage des appareils électriques et électroniques.
Le symbole figurant sur le produit, la notice d’utilisation ou l’emballage y fait référence.
WA-CD – Chargeur
17
3. Aperçu des fonctions
4. Application
Le chargeur WA-CD comprend quatre compartiments de chargement et sert au chargement des accumulateurs des
émetteurs TG 1000 Beltpack ainsi que TG 1000 Handheld et Quinta TH. Durant le chargement, les accus restent
dans l’émetteur respectif. Les compartiments de chargement pour l’émetteur de poche offrent de plus des
possibilités de chargement pour 2 x 2 accus NiMH. Note : les accus NiMH nécessitent env. 3 à 8 cycles de décharge/chargement avant que leur capacité maximale soit utilisable.
5. Éléments de commande
Dessus
�
�
Face arrière
�
�
�
�
�
�
�
�
�
�
�
�
�
�
�
�
�
�
Compartiment de chargement pour émetteur portable
Témoin indicateur de charge
Compartiment de chargement combiné pour émetteur de poche et accus NiMH séparés
Témoin indicateur de charge
Connexion secteur DC
Connexion Ethernet pour la communication avec contrôleurs multimédia (protocole basé TCP-IP)
Touche de réinitialisation IP Reset (réinitialise l’adresse IP en réglage standard)
français
• Chargement séparé pour chacun des émetteurs.
• Des émetteurs dotés d’accus NiMH ainsi que 2 x 2 accus NiMH peuvent être chargés dans les compartiments
de chargement de l’émetteur de poche.
• Le statut de charge avant chargement est sans importance. Les accus chargés dans le même compartiment
doivent cependant présenter la même capacité et le même statut de charge.
Dans le cas contraire, il se peut que l’accumulateur le plus déchargé ne soit pas complètement rechargé et qu’il
se produise une décharge profonde de l’accu dès que l’émetteur est de nouveau utilisé.
• Contrôle de la tension des accumulateurs tout au long du chargement grâce à un microcontrôleur.
• Des seuils de sécurité tels que détection du delta V négatif et minuterie sont intégrés.
• Selon la capacité, le temps de chargement est de 2 à 3 heures.
• Témoins lumineux du statut de charge respectif sur chaque compartiment de chargement.
WA-CD – Chargeur
18
6. Connexion secteur
•
•
•
•
Veuillez tout d’abord monter l’insert de connecteur secteur correspondant sur l’adaptateur secteur.
Reliez l’adaptateur secteur au secteur et au chargeur.
Le chargeur n’est pas doté d’interrupteur de marche/arrêt séparé et peut être immédiatement mis en service.
Les témoins indicateurs de charge sont allumés en blanc et signalent la disponibilité de l’appareil.
7. Chargement de l’émetteur
• Insérez l’émetteur portable ou de poche, en l’occurrence les accus selon l’illustration dans le compartiment de
chargement. Les émetteurs allumés s’éteignent automatiquement. Veillez insérer les accus conformément à
l’indication +/- dans les compartiments de charge. Important : avant le chargement, veuillez vérifier qu’aucune pile
non rechargeable (alcaline) ne se situe dans l’émetteur. Une utilisation mixte (alcaline et NiMH) n’est pas appropriée
pour le fonctionnement des émetteurs ; des émetteurs dotés à la fois d’accus et de piles non rechargeables ne peuvent
pas non plus être chargés sans risque d’endommagement de l’émetteur et du chargeur. Vous perdriez dans ce cas
tous vos droits de garantie.
• Avant chaque chargement, l’appareil effectue une identification du type de cellule. Une fois démarré le processus
de chargement, un mécanisme de contrôle supplémentaire vérifie une nouvelle fois durant la première minute si
l’émetteur est doté de piles rechargeables. Si des piles non rechargeables se trouvent dans l’émetteur, le processus
de chargement n’est pas démarré, en l’occurrence est interrompu et l’erreur est indiquée par le bais d’un clignotement
en rouge.
Emetteur portable (avec accus NiMH)
Emetteur de poche
(avec accus NiMH)
Accus NiMH
Chargeur WA-CD
Note :
l’émetteur portable Quinta TH et l’émetteur de poche TG 1000 Beltpack sont ici illustrés. L’émetteur
portable TG 1000 Handheld peut également être chargé au lieu du Quinta TH.
WA-CD – Chargeur
19
8. Témoins indicateurs de charge
Chaque compartiment de chargement est piloté séparément. Les témoins servent au contrôle du chargement.
Le témoin de chargement est allumé en blanc
Le
Le
Le
Le
témoin
témoin
témoin
témoin
de
de
de
de
charge est allumé en rouge . . .
chargement clignote en vert . .
chargement est allumé en vert
chargement clignote en rouge .
.
.
.
.
.
.
.
.
.
.
.
.
.
.
.
.
Compartiment de chargement prêt à fonctionner. L’émetteur
peut être inséré.
Les cellules insérées sont en cours de contrôle.
Accu en cours de chargement.
Chargement terminé.
Erreur. Le processus de chargement n’est pas démarré ou est
interrompu.
Note :
• Lorsqu’un message d’erreur clignote en rouge, retirez l’émetteur correspondant du compartiment de chargement et
vérifiez si des piles alcalines se trouvent dans l’émetteur, en l’occurrence si les accus ont été insérés selon la bonne
polarité. Si, malgré une utilisation correcte d’accus NiMH, le clignotement persiste, vérifiez si les accus ne sont pas
déjà entièrement chargés. Si ce n’est pas le cas, les accus sont défectueux et doivent être remplacés.
• Si tous les témoins indicateurs de chargement, qu’ils soient ou non équipés d’émetteurs, clignotent rapidement en
rouge : une erreur grave s’est produite. Coupez le chargeur du secteur et vérifiez si un corps étranger métallique se
trouve dans le compartiment de chargement. Si oui, retirez le corps étranger et branchez de nouveau le chargeur sur
le secteur. Si les indicateurs de chargement continuent de clignoter rapidement : une erreur s’est produite, à laquelle
l’utilisateur ne peut pas lui-même remédier. Dans ce cas, contactez votre revendeur beyerdynamic agréé.
9. Connexion réseau / Réinitialisation de l’adresse IP
•
•
•
•
•
Le cas échéant, reliez la connexion Ethernet à un contrôleur multimédia.
L’adresse IP standard est 192.168.0.100
L’adresse IP peut, avec des ordres correspondants, être adaptée au réseau existant.
Si nécessaire, vous pouvez, via la touche IP Reset, réinitialiser l’adresse IP en réglage standard.
Vous trouverez des informations détaillées sur la réinitialisation de l’adresse IP dans les instructions séparées concernant
la communication avec un contrôleur multimédia (Remote Communication). Cf. sur Internet :www.beyerdynamic.de
10. Mise à jour de firmware
• La mise à jour de firmware pour le chargeur WA-CD s’effectue également via la connexion Ethernet. Vous trouverez
toutes les informations nécessaires sur www.beyerdynamic.de
11. Entretien
• Nettoyez l’appareil uniquement à l’aide d’un chiffon sec.
• Pour garantir un fonctionnement correct de l’appareil, veillez à ce que les contacts restent propres. Nettoyez
régulièrement ces derniers à l’aide d’un chiffon doux non peluchant, humidifié d’alcool dénaturé.
12. Dépannage
En cas de panne, veuillez vous adresser à un technicien agréé. N’ouvrez en aucun cas le chargeur vous-même, vous
risqueriez de perdre tous vos droits de garantie.
13. Spécifications techniques
Chargeur WA-CD
Courant de chargement . . . . . .
Durée de chargement . . . . . . . .
Dimensions (l x P x H) . . . . . . .
Poids (sans bloc d’alimentation)
Température ambiante . . . . . . .
.
.
.
.
.
.
.
.
.
.
.
.
.
.
.
max. 1240 mA
2 à 3 heures (selon le statut de charge et la capacité de l’accu)
env. 175 x 139 x 70 mm
env. 1125 g
de 0° C à +40 °C
Adaptateur secteur CA2458
Tension de sortie . . . . . . . . . . . . . . 15 V DC
Courant . . . . . . . . . . . . . . . . . . . . 1600 mA
Tension d’entrée . . . . . . . . . . . . . . 100 - 240 V AC 50 / 60 Hz
français
Tous les indicateurs clignotent rapidement
en rouge . . . . . . . . . . . . . . . . . . . . . . . . . . . . . . Erreur grave. Ne pas utiliser le chargeur !
Weitere Vertriebspartner weltweit finden Sie unter www.beyerdynamic.com
For further distributors worldwide, please go to www.beyerdynamic.com
DEF 1/BA WA.CD (04.15)/651.613 • Abbildungen nicht vertragsbindend. Änderungen und Irrtümer vorbehalten • Non-contractual illustrations. Subject to change without notice. • Illustrations non contractuelles. Sous réserve de modifications.
beyerdynamic GmbH & Co. KG
Theresienstr. 8 | 74072 Heilbronn – Germany
Tel. +49 (0) 7131 / 617 - 0 | Fax +49 (0) 7131 / 617 - 204
[email protected] | www.beyerdynamic.com