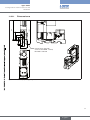
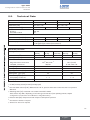
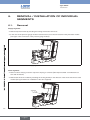
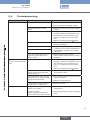
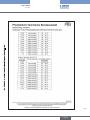
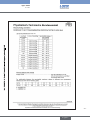
1
Type8650
AirLINE Ex
Electrical and Pneumatic Automation System
Operating Instructions
Bedienungsanleitung
Instructions de Service
We reserve the right to make technical changes without notice.
Technische Änderungen vorbehalten.
Sous resérve de modification techniques.
© 2006 - 2012 Bürkert Werke GmbH & Co. KG
Operating Instructions 1202/05_EU-EN_00804032
Type 8650
Contents
Electrical and Pneumatic Automation System Type 8650
GENERAL INFORMATION AND SAFETY INSTRUCTIONS.....................................................................................................5
1.
Operating Instructions.........................................................................................................................................................6
2.
Intended Use.............................................................................................................................................................................7
3.
Basic safety instructions.....................................................................................................................................................8
4.
General Information...........................................................................................................................................................10
SYSTEM DESCRIPTION............................................................................................................................................................................11
1.
General Description............................................................................................................................................................12
2.
Technical Data .....................................................................................................................................................................15
3.
System Accessories...........................................................................................................................................................17
CONFIGURATION AND FUNCTION....................................................................................................................................................19
1.
Configuration..........................................................................................................................................................................20
2.
Function....................................................................................................................................................................................25
CONFIGURATION AND FUNCTION OF THE MODULES.......................................................................................................27
1.
Supply Segments................................................................................................................................................................29
2.
Valve segments.....................................................................................................................................................................34
3.
Pneumatic Connector Module......................................................................................................................................41
4.
Basic Pneumatic Module.................................................................................................................................................43
5.
Terminal module...................................................................................................................................................................46
6.
Electronic Module................................................................................................................................................................48
7.
Valve that can be integrated..........................................................................................................................................51
INSTALLATION................................................................................................................................................................................................57
1.
Safety Instructions..............................................................................................................................................................59
2.
Installation Instructions....................................................................................................................................................61
3.
Installation on S7 Profile Rail .
(Pre-assembled System).................................................................................................................................................63
4.
Installation in the control cabinet................................................................................................................................65
5.
Configuration, Conversion and .
Expansion of an existing system with .
individual segments...........................................................................................................................................................66
6.
Removal / Installation of individual Segments....................................................................................................68
english
3
Type 8650
Contents
7.
Removal / Installation of the Cover flaps...............................................................................................................70
8.
Replacing a terminal or pneumatic module..........................................................................................................71
9.
Replacing a valve.................................................................................................................................................................72
10.
Connection of the Air Inlet and Exhaust Lines....................................................................................................73
COMMISSIONING.........................................................................................................................................................................................75
1.
Safety Instructions..............................................................................................................................................................76
2.
Initialization.............................................................................................................................................................................77
3.
SD Card / System Serialization Data.......................................................................................................................99
MAINTENANCE AND REPAIR............................................................................................................................................................. 101
1.
Safety Instructions........................................................................................................................................................... 102
2.
Maintenance........................................................................................................................................................................ 103
3.
Maintenance........................................................................................................................................................................ 104
STORAGE, PACKAGING, TRANSPORT, DISPOSAL............................................................................................................. 107
1.
Storage................................................................................................................................................................................... 108
2.
Packaging, Transport...................................................................................................................................................... 110
ANNEX.............................................................................................................................................................................................................. 111
1.
EC Declaration of Conformity..................................................................................................................................... 112
2.
EC-Type Examination Certificate Terminal modules...................................................................................... 118
3.
IEC-Ex Certificate of Conformity Terminal modules...................................................................................... 120
4.
EC-Type Examination Certificate Electronic modules................................................................................... 123
5.
IEC-Ex Certificate of Conformity Electronic modules................................................................................... 126
6.
EC-Type-Examination certificate .
11 mm-Valves Type 6104............................................................................................................................................. 129
7.
IEC-Ex Certificate of Conformity .
11 mm-Valves Type 6104............................................................................................................................................. 133
8.
EC-Type-Examination Certifcate .
16,5 mm-Valves Type 6106.......................................................................................................................................... 136
9.
IEC-Ex Certificate of Conformity .
16,5 mm-Valves Type 6106.......................................................................................................................................... 140
10.
EC-Type-Examintation Certificate .
11 mm-Valves Type 6144............................................................................................................................................. 143
11.
IEC-Ex Certificate of Conformity .
11 mm-Valves Type 6144............................................................................................................................................. 149
english
4
Type 8650
Allgemeine Informationen
Sicherheitshinweise
General Information and Safety Instructions
Contents
1.
OPERATING INSTRUCTIONS.........................................................................................................................................................6
1.1. Symbols.......................................................................................................................................................................................6
2.
INTENDED USE.....................................................................................................................................................................................7
2.1. Restrictions................................................................................................................................................................................7
3.
BASIC SAFETY INSTRUCTIONS..................................................................................................................................................8
4.
GENERAL INFORMATION..............................................................................................................................................................10
4.1. Contact address...................................................................................................................................................................10
4.2. Warranty....................................................................................................................................................................................10
4.3. Approvals.................................................................................................................................................................................10
4.4. Information on the Internet.............................................................................................................................................10
4.5. Trademarks.............................................................................................................................................................................10
5
english
Type 8650
Allgemeine Informationen
Sicherheitshinweise
1.
OPERATING INSTRUCTIONS
The operating instructions describe the entire life cycle of the device. Keep these instructions in a location which is easily
accessible to every user and make these instructions available to every new owner of the device.
WARNING!
The operating instructions contain important safety information!
Failure to observe these instructions may result in hazardous situations.
• The operating instructions must be read and understood.
1.1.
Symbols
DANGER!
Warns of an immediate danger!
• Failure to observe the warning may result in a fatal or serious injury.
WARNING!
Warns of a potentially dangerous situation!
• Failure to observe the warning may result in serious injuries or death.
CAUTION!
Warns of a possible danger!
• Failure to observe this warning may result in a moderately severe or minor injury.
NOTE!
Warns of damage to property!
1. Failure to observe the warning may result in damage to the device or the equipment.
designates additional significant information, tips and recommendations.
refers to information in these operating instructions or in other documentation.
→→designates a procedure which you must carry out.
6
english
Type 8650
Allgemeine Informationen
Sicherheitshinweise
2.
INTENDED USE
Incorrect use of the Type 8650 AirLINE Ex can be dangerous to people, nearby equipment and the
environment.
• The device is designed for use in explosive environments (precise classification see EC-Type Examination
Certificates in the Appendix). It may be used to control pneumatically operated devices.
• Ensure that the device is protected before using outdoors.
• Use according to the authorized data, operating conditions and conditions of use specified in the contract
documents and operating instructions. These are described in the chapter entitled “System Description AirLINE Ex” and “Technical Data”.
• The device may be used only in conjunction with third-party devices and components recommended and
authorised by Bürkert.
• Correct transportation, correct storage and installation and careful use and maintenance are essential for reliable and faultless operation.
• Use the Type 8650 AirLINE Ex 8793 only as intended.
The AirLINE Ex system Type 8650 was developed with due consideration given to accepted safety rules
and is state-of-the-art. Nevertheless, dangerous situations may occur.
2.1.
Restrictions
If exporting the system/device, observe any existing restrictions.
2.1.1.
Ex-Approval
The Ex approval is only valid if the modules and components approved by Bürkert are used in the manner
described in this operating manual.
The electronic modules may only be employed in combination with the pneumatic valve types approved by
Bürkert. Use in any other way will invalidate the Ex approval!
Unauthorized modifications to the system, the modules or components will also void the Ex approval.
7
english
Type 8650
Allgemeine Informationen
Sicherheitshinweise
3.
BASIC SAFETY INSTRUCTIONS
These safety instructions do not make allowance for any
• contingencies and events which may arise during the installation, operation and maintenance of the devices.
• local safety regulations; the operator is responsible for observing these regulations, also with reference to the
installation personnel.
Danger – high pressure!
• Before loosening the lines and valves, turn off the pressure and vent the lines.
Risk of electric shock!
• Before reaching into the device or the equipment, switch off the power supply and secure to prevent
reactivation!
• Observe applicable accident prevention and safety regulations for electrical equipment!
(It is permitted to replace electronic modules and valves even while the power is on.)
Verbrennungsgefahr/Brandgefahr bei Dauerbetrieb durch heiße Geräteoberfläche!
• Das Gerät von leicht brennbaren Stoffen und Medien fernhalten und nicht mit bloßen Händen berühren.
General hazardous situations.
To prevent injury, ensure that:
• Do not supply aggressive or inflammable media to the media connections of the system.
• Do not supply fluids to the media connections of the system.
• In low-pressure applications ensure that no flammable or explosive media are drawn into the AirLINE-Ex system.
• Do not subject the housing to mechanical loads (e. g. by placing objects on the housing or using the
housing as a step).
• Do not cover the ventilation slots in the housing.
• The system cannot be activated unintentionally.
• Installation and repair work may be carried out by authorised technicians only and with the appropriate tools.
• After an interruption in the power supply or pneumatic supply, ensure that the process is restarted in a
defined or controlled manner.
• The device may be operated only when in perfect condition and in consideration of the operating instructions.
• The general rules of technology apply to application planning and operation of the device.
8
english
Type 8650
Allgemeine Informationen
Sicherheitshinweise
NOTE!
Operate the system with direct current only!.
To avoid damaging the system, use only direct current as the power supply for the system.
Avoid pressure drop!.
To avoid a pressure drop, the compressed air supply to the system must be as large as possible.
Electrostatic sensitive components / modules!
• The device contains electronic components which react sensitively to electrostatic discharge (ESD). Contact
with electrostatically charged persons or objects is hazardous to these components. In the worst case scenario,
they will be destroyed immediately or will fail after start-up.
• Observe the requirements in accordance with EN 61340-5-1 and 5-2 to minimise or avoid the possibility of
damage caused by sudden electrostatic discharge!
• Also ensure that you do not touch electronic components when the power supply voltage is present!
9
english
Type 8650
Allgemeine Informationen
Sicherheitshinweise
4.
GENERAL INFORMATION
4.1.
Contact address
Germany
Bürkert Fluid Control System
Sales Centre
Chr.-Bürkert-Str. 13-17
D-74653 Ingelfingen
Tel. + 49 (0) 7940 - 10 91 111
Fax + 49 (0) 7940 - 10 91 448
E-mail: [email protected]
International
Contact addresses can be found on the final pages of these operating instructions.
And also on the internet at:
www.buerkert.com
4.2.
Warranty
The warranty is only valid if the AirLINE Ex Type 8650 is used as authorized in accordance with the specified application conditions.
4.3.
Approvals
The approval rating on the Bürkert labels refers to Bürkert products.
You can find more detailed information on the approvals in the Appendix of these operating instructions.
4.4.
Information on the Internet
The operating instructions and data sheets for Type 8650 can be found on the Internet at:
www.buerkert.com
4.5.
Type 8650
Trademarks
The listed designations are trademarks of the respective companies / associations / organizations.
10
ET 200iSP
Siemens AG
PROFIBUS
PROFIBUS Nutzerorganisation e. V.
english
Type 8650
System Description
System Description
Contents
1.
GENERAL DESCRIPTION..............................................................................................................................................................12
1.1. Product Description............................................................................................................................................................12
1.2. Characteristic Features and Benefits.......................................................................................................................13
1.3. Field of Application.............................................................................................................................................................14
1.4. Marking ....................................................................................................................................................................................14
2.
TECHNICAL DATA ............................................................................................................................................................................15
2.1. General Technical Data.....................................................................................................................................................15
2.2. Dimensions.............................................................................................................................................................................16
3.
SYSTEM ACCESSORIES...............................................................................................................................................................17
11
english
Type 8650
System Description
1.
GENERAL DESCRIPTION
1.1.
Product Description
AirLINE Ex Type 8650 (hereafter referred to as AirLINE Ex) is an electrical and pneumatic automation system in
protection class IP30 that has been developed for use in explosive environments.
In combination with modules from the Siemens SIMATIC ET 200iSP System, a full range of electronic and pneumatic components are available. As long as simple rules are observed, it permits pneumatic, electric and electronic modules with different functions can be combined with one another. The components are connected to
each other using screws or latches. In this way both the electrical and the pneumatic connections are made.
The pilot valves integrated on the pneumatic modules allow a wide range of different pneumatic actuators to be
controlled on site (e. g. process valves or pneumatic cylinders).
Fig. 1:
View of the overall system
(Siemens SIMATIC ET 200iSP and
Bürkert AirLINE Ex)
12
english
Fig. 2:
View of the Bürkert AirLINE Ex system
Type 8650
System Description
1.2.
Characteristic Features and Benefits
1.2.1.
Characteristic features of AirLINE Ex
• Simple operation
• Automatic set-up of supply and data circuits
• Open, flexible and modular structure
• Combination of different valve segments and different electrical I/O functions for space and application-optimized station configurations. • Seamless integration into Siemens SIMATIC ET 200iSP
• Operation is possible with oiled or unoiled compressed air, as well as with neutral and non-combustible gases.
1.2.2.
The benefits of AirLINE Ex • Flow-optimized valve design.
Pressure range of vacuum up to 10 bar (depending on the valve models used).
Flow of approx. 300 l/min and 700 l/min for a valve width of 10 mm and 16 mm respectively.
• Long service life with oiled and unoiled compressed air thanks to low-wear valve function.
• Central exhaust air exhaust.
• Replacement of valves and electronic modules during operation possible thanks to „intrinsically safe“
explosion-proof construction.
• Optional operation with auxiliary control air in extended pressure ranges (also see the chapter Configuration
and Function of the Modules / Integratable Valves)
• Simple combination of various functions, configurations and add-ons thanks to high modularity
• Numerous valve functions: 3/2-, 2 x 3/2- and 5/2-way combined with various circuit functions
• Wide range of connection possibilities
• Integration of pneumatic options possible (e. g. check valves)
• Optional emergency manual override of the valves
• Different pressure levels possible in one system
• Integration of pressure gauges for operating pressure display
• Central compressed air supply
13
english
Type 8650
System Description
1.3.
Field of Application
The AirLINE Ex System is designed for decentralized operation in industrial environments.
Thanks to the modular configuration, electronics and fluidics can be combined particularly simply and efficiently.
It complies with protection class IP30.
DANGER!
Risk of electric shock!
The terminal modules (with upright system wiring) are designed for the Ex-protection class “Ex-e” (increased
safety).
• Before working on the terminal modules, always switch off the operating voltage to the system.
Further information can be found in the handbook for the Siemens ET200iSP.
Danger of explosion!
If a system is installed in a control cabinet in the explosion-proof area, observe the following:
• The control cabinet must be authorized for use in the explosion-protected area.
• The control cabinet must be dimensioned large enough to ensure that the generated lost heat can be dissipated to the exterior in a suitable manner.
• The internal temperature of the control cabinet must not exceed the max. permitted ambient temperature for
the device.
1.4.
Marking
Type 8650
Ident no. 001xxxxxx
Serial no. 00001123
Fig. 3:
Location of the type label
Fig. 4:
Type label
Information about the labeling of the electronic and terminal modules can be found in the chapters
Configuration and Function of the Modules / Terminal Module / Labeling and
Configuration and Function of the Modules / Electronic Module / Labeling.
14
english
Type 8650
System Description
2.
TECHNICAL DATA
2.1.
General Technical Data
Medium
Clean, dry air (oiled or unoiled),
neutral gases (particle size max. 5 μm)
Max. power consumption
see table below “Power consumption of the active
modules”.
Ambient temperature during
operation
0 °C to +55 °C
Storage temperature
-20 °C to +60 °C
Relative humidity
5 to 95 %, non-condensing
Acceleration during operation
5 m/s2
Rated operating mode
100 % CDF ( continuous operation)
Operating voltage
24 V DC in EEx-e
(Details: see Siemens Power Supply Module)
Degree of protection
IP30
Protection class
3 (VDE0580)
Housing materials
Pneumatic modules and valves: PA (polyamide
electronic modules: PBT (polybutylene terephthalate)
Seal materials
Pneumatic modules and valves: NBR
electronic modules: PC (polycarbonate)
Approvals
A prerequisite for the authorized use of the total AirLINE-Ex system is the
installation in a suitable certified housing:
- Ex-e- or Ex-d-housing for Zone 1 respectively
- Ex-d-housing for Zone 21
FA prerequisite for FM-Ex in Zone 21 or Class II, III Div. 1,2 with the substance classes E, F & G is the operation in a suitable Ex-D housing.
• Electronic modules
ATEX:
ATEX II 2 G Ex ib IIC T4 (Zone 1 / 21)
IEC-Ex: IECEx KEM 07.0032
FM-Ex:Class II, III, Div. 1, 2, GP E, F, G
IS Class I, Div. 1 GP A, B, C, D T4
Class I, Div. 2 GP A, B, C, D T4
Class I, Zone 1, AEx ib IIC T4
• Terminal modules
ATEX: ATEX II 2 G Ex e [ia/ib] IIC T4 (Zone 1 / 21)
IEC-Ex: IECEx KEM 07.0033
FM-Ex: Class II, III, Div. 1, 2, GP E, F, G
IS Class I, Div. 1, GP A, B, C, D T4
Class I, Div 2, GP A, B, C, D T4
Class I, Zone 1 e [ia/ib] IIC T4
The AirLINE Ex satisfies the requirements of the EMC Act.
Interference resistance EN 50082-2
Emitted interference EN 50081-2
15
english
Type 8650
System Description
2.1.1.
Power consumption of the active modules, including the
mounted valves Modul type
max. power consumption
Ident-no.
4 channels 11 mm
max. 2.9 W
171 941
8 channels 11 mm
max. 3.6 W
171 942
4 channels 16,5 mm
max. 2.9 W
171 943
8 channels 16,5 mm
max. 3.6 W
171 944
Dimensions
2.2.1.
The Complete System
27,7
12,5
28,5
12,5
28,5
56
31,5
17
165
2.2.
5,5
10,5
24
11
3 x 11(=33)
16,5
3 x 16,5 (=49,5)
8,25
Connections optinally
Screw socket G3/8 + G1/8; NPT 3/8 + NPT 1/8
Plug-in coupling D8; 5/16
Screw socket G1/8 + NPT 1/8
Siemens S7
Profile rail
6ES7390
35
190
33
Plug-in coupling D6
Screw socket M5 + M7
44
44
66
44
88 + ( n x 44 + n x 66 )
nx44 = Number of modules overall width 44 mm
nx66 = Number of modules overall width 66 mm
16
Fig. 5:
Dimensions [mm] - The Complete System
english
Type 8650
System Description
3.
SYSTEM ACCESSORIES
System accessories
Ident-no.
Function plates for flange pattern 6524 / 6525.
(Installation instead of a simple 3/2-way or 5/2-way valve / 11 mm)
Blind plate complete for 3/2-way and 5/2-way valves
(for sealing an unused valve position)
650 373
Supply plate complete)
(for additional medium supply for high-consumption applications or for supplying separate media
circuits or pressure stages)
649 637
Breather plate complete)
(for additional exhaust for high-consumption applications or for exhaust of separate media circuits
or pressure stages)
655 166
Function plates for flange pattern 6524.
(installation instead of a 2x 3/2-way valve / 11 mm)
Blind plate complete for 2x 3/2-way valves
(for sealing an unused valve position)
661 092
Supply plate complete 1)
(for additional medium supply for high-consumption applications or for feeding separate media
circuits or pressure stages)
667 945
Breather plate complete 1)
(for additional exhaust for high-consumption applications or for exhaust of separate media circuits
or pressure stages)
667 947
Function plates for flange pattern 6526 / 6527.
(Installation instead of a 3/2-way or 5/2-way valve / 16.5 mm)
Blind plate complete for 3/2-way and 5/2-way valve
653 765
Supply plate complete
(for additional medium supply for high-consumption applications or for feeding separate media
circuits or pressure stages)
655 156
Breather plate complete
(for additional exhaust for high-consumption applications or for exhaust of separate media circuits
or pressure stages)
653 697
Further accessories
Set with various spare parts for valve and module installation (seals, screws, etc.)
186 877
Cap for plug-in valve contact
653 670
Plug for P channel shut-off (for configuration of several pressure stages or media circuits in a
system, Type 8650)
655 068
S7-Profile rail, lenght 482 mm
6ES7390-1AE80-0AA0 (Siemens)
655 982
S7-Profile rail, lenght 530 mm
6ES7390-1AF30-0AA0 (Siemens)
655 983
S7-Profile rail, lenght 585 mm
6ES7390-1AF85-0AA0 (Siemens)
671 701
S7-Profile rail, lenght 830 mm
6ES7390-1AJ30-0AA0 (Siemens)
671 702
S7-Profile rail, lenght 885 mm
6ES7390-1AJ85-0AA0 (Siemens)
671 703
S7-Profile rail, lenght 2000 mm
6ES7390-1BC00-0AA0 (Siemens)
--
Suitable Ex bus connector for Siemens IM152
e. g. 6ES7-972-0DA60-0XA0 (Siemens)
655 981
english
17
Type 8650
System Description
1) T
hese plates are installed instead of a valve and use the working ports of the respective valve position.
As these have smaller cross-sections than the ports on the supply segments, the possible flow rates are correspondingly lower!
For competent advice, please contact your local Bürkert sales partner.
18
english
Type 8650
Configuration and Function
Configuration and Function
Contents
1.
CONFIGURATION..............................................................................................................................................................................20
1.1. Maximum System Configuration.................................................................................................................................20
1.2. Configurator............................................................................................................................................................................20
1.3. Siemens SIMATIC ET 200iSP System Components.........................................................................................21
1.4. Bürkert AirLINE Ex - System Components............................................................................................................21
2.
FUNCTION.............................................................................................................................................................................................25
2.1. View of the Overall System............................................................................................................................................25
2.2. Functional representation of the AirLINE Ex-system.......................................................................................26
19
english
Type 8650
Configuration and Function
1.
CONFIGURATION
1.1.
Maximum System Configuration
No. of modules
up to 32 I/O modules / pneumatic modules
in the complete system Siemens SIMATIC ET 200iSP / Bürkert AirLINE Ex
At least 1 field bus interface module (IM152) and 1 power supply module each;
if required, these can be installed redundantly.
Valve positions
up to 48 with 11 mm valves Types 6524/6525 (with a middle supply segment)
up to 32 with 16.5 mm valves Types 6526/6527 (with a middle supply segment)
Mixing 44 mm / 66 mm valve segments is possible.
Maximum width
1095 mm including all Siemens modules (one power supply and one interface)
1185 mm including all Siemens modules (two power supply and two interfaces)
Other limitations are possible due to the installation position and power considerations (see the Simatic ET
200iSP manual).
1.2.
Configurator
With its high degree of modularity AirLINE Ex offers numerous degrees of freedom to adapt to a wide range of
application cases.
To adapt to your particular application as simply as possible, there is a PC-based configuration program available.
It is available from your Bürkert contact or you can download it directly from the Bürkert homepage (under Type
8650 software).
www.burkert.com
The configurator allows you
- to define the type and number of the required valve segments
- to define the required valve equipment
- to specify the required connections
- to use intermediate feed-ins
- to select options and accessories
- To add ET200iSP modules
At the same time the conformity is automatically checked with the applicable succession regulations.
As a result you will receive a storable parts list which you can use to inform your contact at Bürkert about the
exact configuration required.
Moreover, the configurator supplies technical basic data to the system which you require, e.g. weight, dimensions, power loss, etc.
20
english
Type 8650
Configuration and Function
1.3.
Siemens SIMATIC ET 200iSP System Components
Further information on the SIMATIC ET 200iSP system can be found in the manual ET 200iSP
(Siemens order No. 6ES7152-1AA00-8AA0) or on the Internet at
www.automation.siemens.com/simatic.
1.4.
Bürkert AirLINE Ex - System Components
1.4.1.
Module Terminology
In order to simplify the overview of the system structure, designations have been defined for the modules and
assemblies. The relationships are explained in the following illustrations.
Type 8650
AirLINE Ex
Type MK02
Module combination
segment
Fig. 1:
Typ ME04
Typ MP13
Modular electronics
Modular pneumatics
Typ ME04
Typ ME04
Ex-i valve types
Electronic module
Terminal module
6524 - 6527
Module Terminology
21
english
Type 8650
Configuration and Function
1.4.2.
Configuration of a complete AirLINE Ex system (example)
Legend
1 Supply segment, left
2 Valve segment 44 mm,
4 valve functions
3 Valve segment 44 mm,
8 valve functions
4 Supply segment, middle
(Intermediate supply)
5 Valve segment 66 mm,
4 valve functions
1
2
3
6 Valve segment 66 mm,
8 valve functions
(not yet available)
4
5
Fig. 2:
7
Configuration of a complete AirLINE Ex system (example)
1.4.3.
Valve and Supply Segments - Type MK02 (module combination)
Valve segment (44 mm)
Fig. 3:
7 Supply segment, right
6
Ventilscheibe (66 mm)
Valve and Supply Segments - Type MK02 (module combination)
22
english
Supply segment (44 mm)
Type 8650
Configuration and Function
1.4.4.
Electronics - Typ ME04 (modular electronics)
Electronic module
Cover flap
Terminal module
Fig. 4:
Electronics - Typ ME04 (modular electronics)
23
english
Type 8650
Configuration and Function
1.4.5.
Pneumatics - Type MP13 (modular pneumatics)
Valve type 652x EEx-i
Pneumatic module
Fig. 5:
Bild: Pneumatics - Type MP13 (modular pneumatics)
The detailed descriptions of the individual modules can be found in chapter Configuration and Function
of the Modules.
24
english
Type 8650
Configuration and Function
2.
FUNCTION
AirLINE Ex is an electric and pneumatic automation system with a modular structure. It has been developed in
cooperation with Siemens.
Supply, communication and electrical I/O functions are available via the Siemens SIMATIC ET 200iSP system.
The AirLINE Ex system can be seamlessly integrated into the Siemens system, with the modules of the AirLINE Ex
system functioning as digital outputs with integrated valves.
2.1.
Fig. 6:
View of the Overall System
View of the overall system (Siemens SIMATIC ET 200iSP and Bürkert AirLINE Ex Type 8650)
25
english
Type 8650
Configuration and Function
2.2.
Functional representation of the AirLINE
Ex-system
Central controller
(e. g.) PLC) with
PROFIBUS-master
DP-is -coupler
...
...
Electronic module
I/O
Electronic module
I/O
bus termination
module
Supply segment
right
Valve segment
...
Valve segment
PowerSupplyModul
Supply segment
left
Interface module
IM152
Electronic module
I/O
Station 1
AirLine Ex Type 8650.
Station 2
Station ...
Station n
1
2
3
4
5
Fig. 7:
6
7
Functional representation of an AirLINE Ex system (example)
Legend
1 Supply segment, left
5 Valve segment 66 mm, 4 valve functions
2 Valve segment 44 mm, 4 valve functions
6 Valve segment 66 mm, 8 valve functions
(not yet available)
3 Valve segment 44 mm, 8 valve functions
4 Supply segment, middle (Intermediate supply)
Bürkert components
AirLINE Ex
Siemens components
26
SIMATIC ET200iSP
english
7 Supply segment, right
Type 8650
Configuration and Function of the
Modules
Configuration and Function of the Modules
Contents
1.
SUPPLY SEGMENTS........................................................................................................................................................................29
1.1. Configuration and function.............................................................................................................................................29
1.2. Technical Data.......................................................................................................................................................................29
1.3. Pneumatic Connections...................................................................................................................................................32
1.4. Displays.....................................................................................................................................................................................32
1.5. Spare parts..............................................................................................................................................................................33
2.
VALVE SEGMENTS...........................................................................................................................................................................34
2.1. Configuration and Function............................................................................................................................................34
2.2. Technical Data.......................................................................................................................................................................35
2.3. Pneumatic Connections...................................................................................................................................................38
2.4. Displays.....................................................................................................................................................................................38
2.5. Channel Assignment..........................................................................................................................................................39
2.6. Diagnosis (Electronic Module).....................................................................................................................................39
2.7. Accessory.................................................................................................................................................................................39
2.8. Spare parts..............................................................................................................................................................................40
3.
PNEUMATIC CONNECTOR MODULE......................................................................................................................................41
3.1. Configuration and Function............................................................................................................................................41
3.2. Technical Data.......................................................................................................................................................................41
3.3. Pneumatic Connections...................................................................................................................................................42
4.
BASIC PNEUMATIC MODULE.....................................................................................................................................................43
4.1. Configuration and Function............................................................................................................................................43
4.2. Technical Data.......................................................................................................................................................................43
4.3. Pneumatic Connections...................................................................................................................................................45
4.4. Accessory.................................................................................................................................................................................45
5.
TERMINAL MODULE........................................................................................................................................................................46
5.1. Configuration and Function............................................................................................................................................46
27
english
Type 8650
Configuration and Function of the
Modules
5.2. Marking......................................................................................................................................................................................46
5.3. Technical Data.......................................................................................................................................................................47
6.
ELECTRONIC MODULE..................................................................................................................................................................48
6.1. Configuration and Function............................................................................................................................................48
6.2. Marking......................................................................................................................................................................................48
6.3. Technical Data.......................................................................................................................................................................49
6.4. Displays.....................................................................................................................................................................................50
6.5. Diagnosis..................................................................................................................................................................................50
6.6. Spare Parts..............................................................................................................................................................................50
7.
VALVE THAT CAN BE INTEGRATED........................................................................................................................................51
7.1. Pneumatic Valves Type 6524/6525 .
(station width 11 mm).......................................................................................................................................................52
7.2. Pneumatic Valves Types 6526/6527 .
(station width 16.5 mm)....................................................................................................................................................54
28
english
Type 8650
Configuration and Function of the
Modules
1.
SUPPLY SEGMENTS
1.1.
Configuration and function
An assembly consisting of a terminal module, function module and pneumatic module is referred to as a stackable
segment.
Supply segments are used for mounting the system on the profile rail and for connection of the fluidic supply and
exhaust lines. They are electrically passive (all lines are looped through 1:1) and are not planned in the programs
for hardware configuration (e. g. Siemens Step7).
As an option, versions with an integrated mechanical pressure gauge to display operating pressure are available.
Fig. 1:
Supply segment, left / middle / right (with / without pressure gauge)
1.2.
Technical Data
Power consumption
0 W (Module is electrically passive)
Pneumatic connections
G 3/8“, G 1/8“ oder NPT 3/8“, NPT 1/8“
Dimensions
ca. 50 (station width 44) x 190 x 120 mm
Material (Housing pneumatic)
PA, PBT, PC
Weight (without / with pressure gauge)
480 g / 520 g
29
english
Type 8650
Configuration and Function of the
Modules
1.2.1.
Overview
1
6
1
Storage compartment for SD card
2
Hinged cover flap
3
Clamping bolt (2x) for system mounting
7
4
Pneumatic ports
8
5
Unlocking slide, only installed on right-hand
supply segments;
10
6
Pressure gauge (optional) for displaying
operating pressure
9
7
Shut-off slide
8
Power-Bus plug
9
Inclined tie rods (2x);
not installed on left-hand supply segments
2
3
Legend
9
4
5
10 Plug for communication bus
Fig. 2:
Overview - Supply segments
30
english
Type 8650
Configuration and Function of the
Modules
Dimensions
31,5
27,2
17
56
164,5
137,3
1.2.2.
10,5
24
44
190
Connections optionally
screw socket G3/8 + G1/8,
NPT3/8 + NPT1/8
55,8
Fig. 3:
Dimensions [mm] - Supply segments
31
english
Type 8650
Configuration and Function of the
Modules
1.3.
Pneumatic Connections
Position Marking
1
Function
Exhaust air
3/8“
3/8“
1/8“
X
Control
• EXT: Auxiliary control air
• INT: Pilot exhaust air
1/8“
2
3
P/1
Compressed air supply
3/8“
3/8“
Pneumatic connections - Supply segment
Displays
Pressure gauge for displaying operating pressure
Fig. 5:
Operating pressure displayed on a pressure gauge of a supply segment
32
english
NPT
R/S-3/5
3
1.4.
G
1
2
Fig. 4:
Version
Type 8650
Configuration and Function of the
Modules
1.5.
Spare parts
Supply segment - Spare parts
Ident no.
Cover flap for 44 mm wide modules
667 898
Pressure gauge module
174 010
Blank module (without pressure gauge)
174 009
Terminal module, 44 mm, passive, without locking slide (for supply segment left and center) 173 368
Terminal module 44 mm, passive, with locking slide (for supply segment right)
173 369
Set with various spare parts for valve and module installation (seals, screws, etc.)
Pneumatic module
186 877
Preassembled groups of pneumatic module and corresponding terminal
module
Ask your Bürkert representative which versions or which options are suitable for your requirements.
33
english
Type 8650
Configuration and Function of the
Modules
2.
VALVE SEGMENTS
2.1.
Configuration and Function
An assembly consisting of a terminal module, function module and pneumatic module is referred to as a stackable
segment.
Valve segments function as digital output modules. They convert the electrical control signals of the interface
module into pneumatic output signals that control the fluid flow.
Two different versions (44/66 mm wide) for valves of different air capacity are available. The different valve functions can be freely combined.
Additional pneumatic functions can be integrated as options.
Valve segments are planned with the hardware configuration programs (e. g. Siemens Step7).
Fig. 6:
Valve segment
Further information can be found in the chapter Configuration and Function of the Modules / Electronic
Module and Configuration and Function of the Modules / Basic Pneumatic Module.
34
english
Type 8650
Configuration and Function of the
Modules
2.2.
Technical Data
11 mm Valves
Number of valve output ports
4
Dimensions [mm]
44 x 120 x 135
Weight with valves [g]
580
Material
Housing
Pneumatic module
PBT, PC
PA
Current consumption [mA]
16,5 mm Valves
8
4
8
66 x 120 x 135
690
1080
n/a
250
310
250
310
Power loss of the module [W]
max. 2.9
max. 3.6
max. 2.9
max. 3.6
Status display
1 LED (red) for the module status
1 LED (green) per channel (valve function)
Pneumatic power data
Valve type
6524
3/2-way
6525
5/2-way
6524
2x 3/2-way
6526
3/2-way
6527
5/2-way
Circuit functions1)
C/D
H
2x C
C/D
H
Stacking sizes [mm]
11
16.5
D45) , D6, D1/4“ 5)
D8 = (5/16“)
M5, M7
G 1/8“, NPT 1/8“
4
6
300
700
35
80
Pneumatic connections
Plug-and-socket connections
Threaded connections
Orifice [mm]
QNn [l/min]
2)
Opening time 10 % [ms]
3)
Closing time 10 % [ms]
3)
Pressure range4) [bar]
with auxiliary control air6)
45
90
2.5 ... 7
2 ... 8
1 ... 7
1 ... 8
Power [W]
0.3
C=NC (normally closed), D=NO (normally open)
1)
Flow rate QNn value air [l/min]: Measured at +20 °C, pressure 6 bar at the valve inlet and 1 bar pressure
difference
2)
Switching times [ms]: measured in accordance with ISO 12238
These values may differ, depending on the valve type and function (see operating manual, chapter
Configuration and Function of the Modules / Integrable Valves).
3)
Pressure data [bar]: Overpressure with respect to atmospheric pressure
4)
Connections variants on request
5)
Versions for vacuum on request
6)
35
english
Type 8650
Configuration and Function of the
Modules
2.2.1.
Overview Valve segments / Station width 44 mm and 66 mm
1
2
7
3
11
8
4
12
5
6
9
5
10
Legend
1
LED (red) for module status display
2
LEDs (green) for channel status display
3
Hinged cover flap
4
Valves
5
Inclined tie rods (2x)
6
Pneumatic service ports
7
Slip-in label strip
8
Shut-off slide (under the valves)
9
Power-Bus plug
10 Plug for communication bus
11 Valve ejector (only with station width 66 mm)
12 Valve number identification
Fig. 7:
Overview - Valve segments (example: station width 66 mm)
36
english
Type 8650
Configuration and Function of the
Modules
Dimensions
27,2
28,5
12,5
164,5
137,27
2.2.2.
11
3x11 (=33)
44
Connections optionally
Plug-in coupling D6
screw socket M5 + M7
190
5,5
56,6
Fig. 8:
Dimensions [mm] - Valve segment (example: station width 44 mm)
37
english
Type 8650
Configuration and Function of the
Modules
2.3.
Pneumatic Connections
WARNING!
Danger – high pressure!
A sudden escape of pressure medium may rapidly accelerate parts (hoses, small parts, …) and cause damage
or injuries.
If pressure changes occur, actuators may change their position and cause damage or injuries.
• Before working on pressure-operated devices, always depressurize and vent them.
• Mechanically secure actuators beforehand to prevent them from shifting.
Possible configuration of the service ports
Position Valves
Double valves
3/2-way
5/2-way
2x 3/2-way
6524/6526
6525/6527
6524/6526
1
not used
2
2 (valve 12)
2
2
4
4 (valve 14)
1
2
Fig. 9:
2.4.
Possible configurations of the service ports (example: station width 44 mm)
Displays
LED for module status display
(function like Siemens modules)
LEDs to display the channel status
(also see the chapter Configuration and Function of the Module / Valve Segments /
Channel Assignment)
38
Fig. 10:
Display elements of the valve segment
english
Type 8650
Configuration and Function of the
Modules
2.5.
Channel Assignment
2 bytes must be planned per valve segment / electronic module. These are allocated to the channels as shown
here:
Byte
High-Byte
Low-Byte
Bit
7
...
0
7
6
5
4
3
2
1
0
Channel number with
4-channel modules
X
X
X
X
X
X
X
3
2
1
0
Channel number with
8-channel modules
X
X
X
7
6
5
4
3
2
1
0
The channel status LEDs on the electronic module are assigned to the channel / valve numbers.
Service port assignment .
(8-channel module)
Valves
1 3 5 7
Valves
0 2 4 6
Valves 0 . . . 3 (4-channel module)
Valves
Fig. 11:
2.6.
1 ... 7
(8-channel module)
0 ... 6
Valve assignment
Diagnosis (Electronic Module)
Group fault display: Yes, locally at the electronic module (red LED)
Diagnostic functions (can be read out using Profibus):
• Channel status diagnosis (channel open, channel short circuited)
• Individual switching cycle counter for each channel with warning limits for pilot valve and connected actuator
2.7.
Accessory
Valve segment - Accessory
Ident no.
Plug to block P-channel
(to build up several pressure levels or medium groups in an AirLINE Ex system type 8650)
655 068
39
english
Type 8650
Configuration and Function of the
Modules
2.8.
Spare parts
Valve segment - Spare parts
Ident no.
Set with various spare parts for valve and module installation (seals, screws, etc.)
186 877
Cover flap for 44 mm wide modules
667 898
Cover flap for 66 mm wide modules
667 899
Label strip for electronic modules
667 917
Electronic module 4 channels 11mm (for valve segments 44 mm station width )
171 941
Electronic module 8 channels 11mm (for valve segments 44 mm station width)
171 942
Electronic module 4 channels 16.5 mm (for valve segments 66 mm station width)
171 943
Electronic module 8 channels 16.5 mm (for valve segments 66 mm station width)
171 944
Terminal module 44 mm, active (for valve segments 44 mm station width)
173 370
Terminal module 66 mm, active (for valve segments 66 mm station width)
173 371
Pneumatic modules
Preassembled groups of pneumatic module and corresponding terminal module
Ask your Bürkert representative which versions or which options are suitable for your requirements.
40
english
Type 8650
Configuration and Function of the
Modules
3.
PNEUMATIC CONNECTOR MODULE
3.1.
Configuration and Function
The pneumatic supply module forms part of the supply segment. It provides for the external connections to the
fluidic supply and exhaust of the system and passes this on to the valves.
Fig. 12:
3.2.
Pneumatic supply module (part of the supply segment)
Technical Data
Pneumatic connections
Dimensions
G 3/8“, G 1/8“ or NPT 3/8“, NPT 1/8“
Material
PA
Weight
150 g
ca. 50 (station width 44) x 70 x 75 mm
41
english
Type 8650
Configuration and Function of the
Modules
3.2.1.
Overview
Holes for clamping bolts (2x) for
system mounting
Pneumatic ports
Inclined tie rods
Fig. 13:
3.3.
Overview - Pneumatic supply module
Pneumatic Connections
1
2
Position
Marking Function
1
R/S-3/5 Exhaust air
2
X
3
P/1
Version
G
NPT
3/8“
3/8“
Control
• EXT: Auxiliary control air
• INT: Pilot exhaust air
1/8“
1/8“
Compressed air supply
3/8“
3/8“
3
Fig. 14:
Pneumatic Connections - Pneumatic supply modules
Supplementary information can be found in chapter Configuration and Function of the Modules / Supply
segments“.
42
english
Type 8650
Configuration and Function of the
Modules
4.
BASIC PNEUMATIC MODULE
4.1.
Configuration and Function
The basic pneumatic module is a part of the valve segment.
It holds the valves, provides their fluidic supply and exhaust and sets up the flow outlets.
Fig. 15:
4.2.
Basic Pneumatic Module (part of the valve segment)
Technical Data
Pneumatic connections
of the valve segment for
Valves with station width 11 mm
Plug-and-socket connection Ø 6 mm (4 mm, ¼“ on request);
Thread M5, M7
Valves with station width 16.5 mm
Plug-and-socket connection Ø 8 mm; Thread G 1/8“, NPT 1/8“
Dimensions
ca. 50 (station width 44 mm) x 70 x 55 mm
ca. 72 (station width 66 mm) x 70 x 55 mm
Material
PA, PBT, PC
Weight
140 g (station width 44 mm)
180 g (station width 66 mm)
43
english
Type 8650
Configuration and Function of the
Modules
4.2.1.
Versions
The variants differ according to station width, number of valve positions, connection pattern of the valves, configuration of the service ports and optional use of check valves and / or P shut-offs.
Types Pneumatic
MP13
Station width
11 mm
16 mm
Valve types
6524 - Ex-i
6525 - Ex-i
6526 - Ex-i
6527 - Ex-i
Port configuration
(basic pneumatic module)
Plug-and-socket connection Ø 4 mm
Plug-and-socket connection Ø 6 mm
Plug-and-socket connection Ø ¼“
Thread M5
Thread M7
Plug-and-socket connection Ø 8mm
( = 5/16“)
Thread G1/8“
Thread NPT 1/8“
check valves (optional)
without check valve
check valve in R channel
check valve in R+S channel
P shut-off (optional)
with P shut-off1)
not available
Only available for certain valve types and with functional limitations (see chapter Basic pneumatic modules with
integrated P shut-off)
1)
4.2.2.
Check Valve for Venting Ports
Because some applications require the use of a check valve, different versions are available:
• without a check valve
• check valve in R channel
• check valve in R+S channekl
4.2.3.
Basic Pneumatic Modules with Integrated P Shut-off
General description
For the basic pneumatic modules MP 13 in the version for valve types 6524 and 6525, a P shut-off integrated into
the module is available as an option. With this option, a valve to be replaced can be exchanged under pressure
without having to depressurize the complete valve island or system. During valve exchange the open cross-section
is reduced mechanically so much, that there is only slight residual leakage.
Features and limitations
The use of the P shut-off results in certain limitations with respect to the operating data of the complete system:
• The flow rate of the valves, Type 6524/6525, is reduced to approx. 60 %.
• For proper operation avoid back-pressures in the exhaust lines R and S (see chapter Installation / 10.2. Connection of the Exhaust Air).
• The possible operating pressure range is between 5 and 7 bar.
• Since the pressure supply for the pilot valves is not shut off when using valves with external auxiliary control air,
the use of the P shut-off is possible only in conjunction with the valves internal control air in the limited pressure
range.
44
• The P shut-off can be combined with the integrated check valves.
english
Type 8650
Configuration and Function of the
Modules
NOTE!
Pressure supply!
When using the P shut-off basic modules, ensure that the pressure supply to the valve islands is
configured with a sufficiently large volume. (Minimum hose diameter 8/6 mm)
4.2.4.
Overview
5
1
2
6
3
7
8
4
9
Fig. 16:
4.3.
Legend
1
check valve (optional)
2
Labeling of valve positions and installed
options
3
Inclined tie rods
4
Service ports
(assignment dependant on valve type)
5
Flange for valve
6
P shut-off (optional, only for certain versions)
7
X channel
8
R- & S channel
9
P channel
Overview - Basic pneumatic module (Station width: 44 mm, with the options check valves and P shut-off)
Pneumatic Connections
Possible configuration of the service ports
Double
valves
Valves
Position
3/2-way
5/2-way
2x 3/2-way
6524/6526
6525/6527
6524/6526
1
not used
2
2 (valve 12)
2
2
4
4 (valve 14)
1
2
Fig. 17:
4.4.
Possible configuration of the service ports - basic pneumatic module
Accessory
Basic pneumatic module - Accessory
Ident nr.
Plug to block P-channel
(to build up several pressure levels or medium groups in a AirLINE Ex system type 8650)
655 068
45
english
Type 8650
Configuration and Function of the
Modules
5.
TERMINAL MODULE
5.1.
Configuration and Function
All segments start out on a terminal module.
It anchors all attached components to the profile rail and contains the electric backplane (energy and data bus).
They can not be planned in the hardware configuration programs (e. g. Siemens Step7).
Fig. 18:
Terminal module
The EC type-examination certificate can be found in the Annex to this operating manual.
5.2.
Fig. 19:
Marking
General labelling
46
english
Fig. 20:
Identification and serial number
Fig. 21:
Location of
the marking
Type 8650
Configuration and Function of the
Modules
5.3.
Technical Data
Ident no. of the module
173 368
173 369
Application
Supply segment
left and middle
173 370
173 371
Valve segment
right
44 mm
66 mm
Dimensions [mm]
55 (station width 44 mm) x 190 x 45
66 x 190 x 45
Weight [g]
150
210
Housing material
PBT, PC
Power loss of the module [W]
0 (The module contains no electrically active components)
Type of protection
II 2 G Ex e [ia/ib] IIC T4
5.3.1.
Overview
1
2
2
5
Legend
1
Hinge contour for the electronic module
2
Plug connector for the power bus
3
Plug for the electronic module
(not with Identification No. 173 678 and
173 369)
4
Plug connector for the data bus
5
Abutment for the electronic module
6
Unlocking slide
(only with Identification No. 173 369)
3
4
6
Fig. 22:
Overview - Terminal module (Version: station width 44 / 66 mm)
47
english
Type 8650
Configuration and Function of the
Modules
6.
ELECTRONIC MODULE
6.1.
Configuration and Function
The electronic module forms part of the valve segment.
It contains the plug-and-socket connections for the valves and the electronics necessary to control the valves.
It is electrically active (function: Digital output module) and must be planned accordingly in the programs for the
hardware configuration (e. g. Siemens Step7).
During operations, the electronic modules can be exchanged individually (not more than one at a time).
Fig. 23:
Electronic module
• For 8-channel modules, have a look at the chapter, Commissioning / Non-cyclical Parameters of AirLINE
Ex-Module / The Number of Simultaneously Switchable Pilot Valves.
• The type examination certificate can be found in the Annex to this operating manual.
6.2.
Fig. 24:
Marking
General labelling
48
english
Fig. 25:
Identification and serial
number
Fig. 26:
Location of the
marking
Type 8650
Configuration and Function of the
Modules
6.3.
Technical Data
Ident no. of the module
171 941
171 942
171 943
171 944
Number of valve output ports
4
8
4
8
Dimensions [mm]
44 x 120 x 135 (for 11 mm valve)
66 x 120 x 135 (for 16.5 mm
valve)
Weight [g]
230
270
Material (Housing)
PBT, PC
250
290
Current consumption1) [mA]
250
310
250
310
Power loss of the module [W]
max. 2.9
max. 3.6
max. 2.9
max. 3.6
Power loss in the event of a system
error [W]
max. 4.2
Status displays
LED (red) for the module status
LED (green) per channel (valve function)
Type of protection
II 2 G Ex ib IIC T4
These values must be taken into account when calculating the max. total power consumption of the station
(see also Table 3-4 in the Siemens handbook ET 200 iSP).
1)
6.3.1.
Overview
Electronic module / station width 44 mm
1
2
3
4
Fig. 27:
5
Legend
1
LED (red) for module status display
2
LEDs (green) for channel status display
3
Hinged cover flap
4
Plug for connection of the valves
5
Slip-in label strip
Overview - Electronic module (Version station width 44 mm)
49
english
Type 8650
Configuration and Function of the
Modules
6.4.
Displays
Legend
1
1
LED for module status display
(function as for Siemens modules)
2
2
LEDs showing channel status
(also see the chapter Configuration and
Function of the Module / Valve Segments / Channel
Assignment)
Fig. 28:
6.5.
Operating / display elements of the electronic module
Diagnosis
Group fault display: Yes, locally at the electronic module (red LED)
Diagnostic functions (can be read out using Profibus):
• Channel status diagnosis (channel open, channel short circuited)
• Individual switching cycle counter for each channel with warning limits for pilot valve and connected actuator
6.6.
Spare Parts
Electronic module - Spare parts
Cover flap for 44 mm wide modules
Ident no.
Cover flap for 66 mm wide modules
667 899
Label strip for electronic modules
667 917
50
english
667 898
Type 8650
Configuration and Function of the
Modules
7.
VALVE THAT CAN BE INTEGRATED
Pilot Control
The pilot valves employed in the AirLINE Ex system essentially consist of two components:
• Component 1: the pilot control in protection class Ex-i.
The pilot control converts the supplied electrical energy into a pneumatic switching signal.
The EC-Type Examination Certificates for the pilot controls can be found in the Appendix of these operating instructions.
• Component 2: the amplifier.
The amplifier is a purely pneumatic element that increases the relatively low flow rate of the pilot control system
to the level necessary for the application.
Because, from an electrical point of view, only the pilot control is important, much information is based upon this,
e. g. boost time or approval-related facts.
The pilot control system is an independent module (e. g. Type 6104). In complete valves (e. g. Type 6525), it may
already be integrated.
Valves with auxiliary control air
When using valves in the auxiliary control air version, the exhaust air of the pilot control valve escapes into the
environment.
Valves with auxiliary control air cannot be combined with standard valves (internal auxiliary control air) on the valve
island, as the X port then has a different function.
Further information on the valves can also be found on the Internet under the respective type number.
www.burkert.com
51
english
Type 8650
Configuration and Function of the
Modules
7.1.
Pneumatic Valves Type 6524/6525 (station width 11 mm)
7.1.1.
Configuration and function
The pneumatic valves of Type 6524 and 6525 consist of an Ex-i pilot solenoid valve (Type 6104 or Type 6144)
and a pneumatic seat valve as an amplifier.
This operating principle enables high pressures to be controlled with low power consumption and short switching
times. Normally, the valves are equipped with an emergency manual override (versions without this feature are
available).
Fig. 29:
Pneumatic valves type 6524 and type 6525
7.1.2.
Technical Data
Housing material
PA (polyamide)
Gasket material
NBR
dry compressed air, oiled or oil-free
neutral gases (5 µm filter recommended)
Flange for MP13
Media
Line connection
Manual override
Type MP13 with thread M5, M7 or
Type MP13 with plug connector Ø 6 mm, (Ø 4 mm, Ø ¼“ on request)
yes (alternative versions without)
Rated power
0.3 W
Rated operating mode
100 % continuous operation
Electrical connection at the
valve
rectangular plug RM 5.08 mm
Installation
with 2 screws M2 x 20
Pneumatic module
52
english
Type 8650
Configuration and Function of the
Modules
4
Closing
C = NC (normally closed)
Switching
times
Opening
Orifice
Description
Pressure range
Ordering Chart
Rated power
7.1.3.
[l/min] [W]
[bar]
[ms]
[ms]
300
2.5 ... 7
35
45
QNn-.
value
air
0.3
184 766
186 8322)
2
12
0.3
10
1... 81)
35
45
0.3
3/2-way valve, pilot controlled, currentfree, outlet port 2 relieved
2 x C = NC (normally closed)
2
4
300
4
10
12
186 8311)
186 8331, 2)
3
1
1
Ident no.
35
45
186 8351)
2 x 0.3 2.5 ... 7
203)
25
182 086
2 x 0.3 1 ... 81)
203)
25
182 0881)
0.3
35
45
184 767
10
14
1
3
1 ... 7
3
3/2-way valve, pilot controlled,
current-free, outlet port 2 relieved
D = NO (normally open)
300
2.5 ... 7
184 7682)
2
12
10
1
4
3
2 x 3/2-way valve, pilot controlled,
current-free,
outlet port 2 and 4 relieved
H
4
4
2
14
300
0.3
2.5 ... 7
35
45
184 769
184 7732)
12
0.3
1 ... 7
35
45
186 8341)
5 1 3
5/2-way valve, pilot controlled,
current-free,
outlet port 1 with outlet port 2,
outlet port 4 vented
1)
Version with auxiliary control air
2)
Without manual override
) Please observe the information for the characteristics of the 8-channel modules in the chapter “Start-up”,
section “Acyclic parameters of the AirLINE Ex modules”!
3
5/3-way function with locked mid-position:
This function can be implemented with the delockable double check valve, Type 0498 (control is by 2x 3/2-way
function).
english
53
Type 8650
Configuration and Function of the
Modules
7.2.
Pneumatic Valves Types 6526/6527 (station width 16.5 mm)
7.2.1.
Configuration and Function
The valves of Type 6526 and 6527 consist of an Ex-i pilot solenoid valve (Type 6106) and a pneumatic seat valve
as an amplifier.
The operating principle enables high pressures to be controlled with low power consumption and short switching
times.
Normally, the pilot control valves are equipped with an emergency manual override (versions without this feature
are available)
Fig. 30:
7.2.2.
Pneumatic valves type 6526 and type 6527
Technical Data
Housing material
PA (polyamide)
Gasket material
NBR
dry compressed air, oiled or oil-free
neutral gases (10 µm filter recommended)
Flange for MP13
Media
Line connection
Manual override
Type MP13 with G 1/8“, NPT 1/8“ or
Type MP13 with plug-and-socket connection Ø 8 mm
yes (alternative versions without)
Rated power
0.3 W
Rated operating mode
100 % continuous operation
Pneumatic module
Electrical connection at the valve rectangular plug RM 5.08 mm
with 2 screws M3 x 30
Installation
54
english
Type 8650
Configuration and Function of the
Modules
Opening
Closing
Switching
times
[l/min]
[W]
[bar]
[ms]
[ms]
6
700
0.3
2 ... 10
80
90
Description
C = NC (normally closed)
Rated power
QNn-.
value
air
Pressure range
Ordering Chart
Orifice
7.2.3.
175 634
175 6742)
2
12
0.3
10
-0,9 ... 8
80
90
175 6731)
175 7231,2)
3
1
Ident no.
3/2-way valve, pilot controlled, current-free,
outlet port 2 relieved
D = NO (normally open)
6
700
0.3
1 ... 8
80
90
175 7311)
0.3
2 ... 8
80
90
175 725
175 7262)
2
12
10
1
3
3/2-way valve, pilot controlled, current-free,
outlet port 2 pressurized
H
6
4
2
14
700
0.3
2 ... 8
80
90
175 727
175 7282)
12
0.3
1 ... 8
80
90
175 7291)
5 1 3
5/2-way valve, pilot controlled, current-free,
outlet port 1 with outlet port 2,
outlet port 4 vented
1)
Version with auxiliary control air
2)
Without manual override
55
english
Type 8650
Configuration and Function of the
Modules
56
english
Type 8650
Installation
Installation
Contents
1.
SAFETY INSTRUCTIONS...............................................................................................................................................................59
2.
INSTALLATION INSTRUCTIONS................................................................................................................................................61
2.1. Unpacking pre-assembled systems..........................................................................................................................61
2.2. Installation Tools and Torques......................................................................................................................................61
2.3. Position of the Assemblies.............................................................................................................................................62
3.
INSTALLATION ON S7 PROFILE RAIL .
(PRE-ASSEMBLED SYSTEM)......................................................................................................................................................63
3.1. Removing a System from a Profile Rail .................................................................................................................63
3.2. Installation/Removal of the ET 200iSP-Modules ..............................................................................................64
4.
INSTALLATION IN THE CONTROL CABINET......................................................................................................................65
5.
CONFIGURATION, CONVERSION AND .
EXPANSION OF AN EXISTING SYSTEM WITH .
INDIVIDUAL SEGMENTS...............................................................................................................................................................66
5.1. System Configuration ......................................................................................................................................................66
5.2. Conversion and Expansion.............................................................................................................................................67
5.3. Assembly..................................................................................................................................................................................67
6.
REMOVAL / INSTALLATION OF INDIVIDUAL SEGMENTS..........................................................................................68
6.1. Removal....................................................................................................................................................................................68
6.2. Installation...............................................................................................................................................................................69
7.
REMOVAL / INSTALLATION OF THE COVER FLAPS.....................................................................................................70
7.1. Installation...............................................................................................................................................................................70
7.2. Removal....................................................................................................................................................................................70
8.
REPLACING A TERMINAL OR PNEUMATIC MODULE...................................................................................................71
9.
REPLACING A VALVE......................................................................................................................................................................72
9.1. Installation instructions....................................................................................................................................................72
57
english
Type 8650
Installation
9.2. Installation...............................................................................................................................................................................72
10.
CONNECTION OF THE AIR INLET AND EXHAUST LINES..........................................................................................73
10.1. Connection of the Pressure Supply...........................................................................................................................73
10.2. Connection of the Exhaust Air......................................................................................................................................73
10.3. Pilot Exhaust Air / Auxiliary Control Air...................................................................................................................73
10.4. Plug to Block P-channel...................................................................................................................................................74
58
english
Type 8650
Installation
1.
SAFETY INSTRUCTIONS
DANGER!
Risk of injury from high pressure!
• Before loosening the lines and valves, turn off the pressure and vent the lines.
Risk of electric shock!
• Before reaching into the device or the equipment, switch off the power supply and secure to prevent
reactivation!
• Observe applicable accident prevention and safety regulations for electrical equipment!
WARNING!
Risk of injury from improper installation!
• Installation may be carried out by authorised technicians only and with the appropriate tools!
Risk of injury from unintentional activation of the system and an uncontrolled restart!
• Secure system from unintentional activation.
• Following assembly, ensure a controlled restart.
CAUTION!
Escape of medium and malfunction!
If the seals are seated incorrectly, leaks and malfunctions may occur due to pressure losses.
• Ensure that the seals are seated correctly in the area of the electronics and pneumatics.
Short circuit, malfunction
The electrical connection requires exact contacting.
• Do not bend contacts.
• If connections are damaged or bent, replace the affected components.
• Do not switch on the system unless the components are in perfect working order.
59
english
Type 8650
Installation
NOTE!
Operate the system with direct current only!.
To avoid damaging the system, use only direct current as the power supply for the system.
Avoid pressure drop!.
To avoid a pressure drop, the compressed air supply to the system must be as large as possible.
Electrostatic sensitive components / modules!
The device contains electronic components which react sensitively to electrostatic discharge (ESD). Contact
with electrostatically charged persons or objects is hazardous to these components. In the worst case scenario,
they will be destroyed immediately or will fail after start-up.
• Observe the requirements in accordance with EN 61340-5-1 and 5-2 to minimise or avoid the possibility of
damage caused by sudden electrostatic discharge!
• Also ensure that you do not touch electronic components when the power supply voltage is present!
Restrictions!.
Observe the applicable restrictions for the conversion / expansion of systems.
• Read about this in the chapter “Structure and function of the AirLINE Ex system”, section “Maximum
system expansion”).
60
english
Type 8650
Installation
2.
INSTALLATION INSTRUCTIONS
NOTE!
Incorrectly installed systems (e.g. inclined tie rods not tightened properly) may leak.
• Prior to start-up, always firmly seal all open attachments and locking devices.
• The blue cover flaps of the individual segments can be removed if required.
• If moving from a cold to a warm environment, do not install the system until it has adjusted itself to the
ambient temperature in order to prevent condensation!
2.1.
Unpacking pre-assembled systems
NOTE!
Important – take module correctly out of the packaging!
To prevent damage to the pre-assembled system when taking it out of the packaging, observe the following:
→→Take hold of the system by the pneumatic connection modules and take it out of the packaging (see figure
“Holding points”).
Holding points
Fig. 1:
Holding points for removal of pre-assembled systems
2.2.
Installation Tools and Torques
Application
Type and size of the tool
Torque
Actuation of the locking elements
Plain screwdriver, size 5
-
Screw the clamping bolts onto the supply modules,
screw fitting of terminal module - pneumatic module
Plain screwdriver, size 7
1.3 ... 1.5 Nm
Installation / removal
of the valves with 11 mm station width
Cross-head screwdriver
Size 0
0.2 Nm
Installation / removal
of the valves with 16.5 mm station width
Cross-head screwdriver
Size 1
0.3 Nm
Tightening of the inclined tie rods
Allen key (3 mm)
0.6 Nm
61
english
Type 8650
Installation
2.3.
Position of the Assemblies
Clamping bolts
Screws for mounting the valves
Locking element
Unlocking slide
Fig. 2:
Position of the modules to be screwed on
Inclined tie rods
Fig. 3:
Position of the tie rods on the installed system
Inclined tie rod pocket
62
Fig. 4:
Two inclined tie rod pockets of one segment
english
Type 8650
Installation
3.
INSTALLATION ON S7 PROFILE RAIL (PRE-ASSEMBLED SYSTEM)
3.1.
Removing a System from a Profile Rail
→→Loosen all clamping bolts (1) on the connection modules (turn counter-clockwise)
→→Swivel system out of the profile rail.
→→Bring all clamping bolts (1) on the connection modules to the home position (by turning them counterclockwise all the way).
→→Hook the system in the required position on the upper edge of the profile rail and swivel open.
→→Tighten all clamping bolts (1) by turning them clockwise (stipulated torque 1.5 Nm).
Fig. 5:
Mounting on to the profile rail
63
english
Type 8650
Installation
3.2.
Installation/Removal of the ET 200iSP-Modules
Installation
→→The ET 200iSP™ modules (terminal modules and bus termination modules) can be placed onto the profile rail
and latched to the AirLINE Ex System.
→→Modules, which are attached to the right supply segment, interlock with the supply segment.
Removal
→→Using a cross-head screwdriver, remove the unlocking slide (2) from the supply segment. This will release the
engaged module.
→→Push module to the right.
1
1
Clamping bolts 1
Unlocking slide 2
Fig. 6:
Clamping bolts / Unlocking slide
64
english
Type 8650
Installation
4.
INSTALLATION IN THE CONTROL CABINET
The distances to be observed for installation in the control cabinet can be found in the handbook for the SIMATIC
ET200iSP.
To facilitate replacement of an electronic module, the minimum distance indicated in the picture below is
recommended.
Distance to the control cabinet wall
60 mm
Fig. 7:
Distance to top of the control cabinet wall
65
english
Type 8650
Installation
5.
CONFIGURATION, CONVERSION AND EXPANSION OF AN EXISTING SYSTEM WITH INDIVIDUAL SEGMENTS
5.1.
System Configuration
Two inclined tie rods (3) connect the modules to each other.
→→To assemble modules, place two modules on the profile rail and push together.
→→Now screw the right module to the left one with two inclined tie rods.
(Hexagon-socket wrench 3 mm, torque 0.6 Nm)
→→Other modules can be installed on the right in the same way.
→→Finally, tighten all clamping bolts (1) by turning them clockwise (stipulated torque 1.5 Nm).
1.
Clamping bolts
Fig. 8:
Adding segments
66
english
Type 8650
Installation
5.2.
Conversion and Expansion
→→Loosen the clamping bolts (1) on the right supply segment.
→→Loosen the two inclined tie rods (3)
→→Push the supply segment to the right.
→→In the same way more segments can be moved until the position is reached in which the system is to be
changed.
→→When a segment is added, first hook it into the upper edge of the profile rail.
→→Swivel in the segment and push it to the left up to the existing subsystem.
3.
Inclined tie rods
Fig. 9:
5.3.
Dock the segment to the system
Assembly
→→Reassemble the system in reverse order.
67
english
Type 8650
Installation
6.
REMOVAL / INSTALLATION OF INDIVIDUAL
SEGMENTS
6.1.
Removal
Supply segments
→→Release required module by actuating the locking element and swivel out.
→→In the case of the pressure gauge module ensure that the hose is disconnected from the pneumatic module
(see figure: Hose connection of the pressure gauge module).
Fig. 10:
Removal / installation of a supply segment
Valve segments
→→Remove valves and any protective caps from the plug-in contacts (either depressurized or all affected locations with P-shutoff).
→→Release the electronic module by actuating the locking element in the direction of the arrow and swivel out the
module (see figure: Removal / installation of the valve segment).
entrieg
eln
68
Fig. 11:
Removal / installation of a valve segment
english
Type 8650
Installation
6.2.
Installation
Supply segment
Pressure gauge module:
→→In the case of the pressure gauge module connect the hose to the pneumatic module before hooking in the
module (see figure: Hose connection of the pressure gauge module).
→→Hook module into the terminal module and swivel in until it engages.
→→Valve segment
→→Hook electronic module into the terminal module.
→→Actuate locking element in the direction of the arrow and swivel in the module all the way.
→→Screw on valves (either depressurized or all affected locations with P-shutoff).
Hose connection
Fig. 12:
Hose connection of the pressure gauge module
69
english
Type 8650
Installation
7.
REMOVAL / INSTALLATION OF THE COVER
FLAPS
7.1.
Installation
To install the cover flap, attach it in the half swiveled open position and then push it into the hinge contour until
it engages.
Fig. 13:
7.2.
Attaching the cover flap
Removal
Swivel open the cover flap and carefully lift the hinge plate over the hinge contour (e.g. using a small crosshead screwdriver).
Fig. 14:
Engaging the cover flap
The cover flaps have no effect on the function of the system and can be omitted or removed if required.
70
english
Type 8650
Installation
8.
REPLACING A TERMINAL OR PNEUMATIC
MODULE
For installation of the terminal-pneumatic module subassembly, the modules are aligned to each other during production. The alignment ensures compliance with all tolerances on the interfaces (profile holder - plug –
fluidic ducts).
Mount the pneumatic module itself on a terminal module and, when integrating it into the system, ensure that all
interfaces (profile holder - plug – fluidic ducts) interlock without difficulty. Otherwise, proceed as follows:
→→Take the subassembly out of the system again.
→→Slacken the three screws on the back of the terminal module.
→→Re-align the pneumatic module on the terminal module.
→→Tighten the three screws again.
Instructions for conversion or expansion of the system.
Grease sealing rings!
To facilitate installation and to prevent damage, the sealing rings of the pneumatic modules should be
greased during the installation work (e.g. with Centoplex 2 from Klüber Lubrication).
Serial numbers and identification number of the system lose their validity!
During conversion or expansion work the serial and identification numbers of the pre-assembled systems
lose their validity.
In this case we recommend removing the identification plate and affixing a suitable note to the device.
71
english
Type 8650
Installation
9.
REPLACING A VALVE
DANGER!
Risk of injury due to pressure change!
When the valve is removed, only the P-channel is shut off. As a result, the pressure at the service outputs A or
B is reduced. A connected actuator is therefore also depressurized and may move as a result.
• If there is a fairly large volume on the actuator side, provide a shut-off option for the service ports to prevent
the actuator from moving.
9.1.
Installation instructions
Before replacing the valve, ensure that the relevant equipment is in an electrically safe state.
If the respective valve position does not feature a P-shutoff, first depressurize the system.
If the valves mounted on modules with P-shutoff are changed under pressure, only a maximum of four valves may
be removed at the same time.
When the valve is being removed, a relatively large amount of air is initially released, as the P-shutoff cannot close
until the required pressure difference is reached. However, as the automatic shut-off considerably reduces the
exhaust air, only a low residual leakage remains when the P-shutoff is closed.
9.2.
Installation
→→When installing the valve, ensure that the seal has been inserted correctly.
→→Tighten the valve to the tightening torques indicated in the operating instructions.
→→When installing the valve, ensure that the service ports are also pressurized in the corresponding rest position
of the valve until it switches over. As a result, a connected actuator can perform a movement according to the
pressurization.
→→Ensure that these actuator movements cannot cause any damage or unwanted operations in the equipment.
72
english
Type 8650
Installation
10.
CONNECTION OF THE AIR INLET AND
EXHAUST LINES
Exhaust air
Pilot exhaust air / auxiliary control air
Compressed air supply
Fig. 15:
Connections of the air inlet and exhaust lines
10.1. Connection of the Pressure Supply
→→Connect the compressed air supply to the P/1 connections on the connection modules.
DThe supply should be fed via the largest possible lines to prevent pressure drops.
In larger AirLINE Ex systems and high-consumption applications the supply should be connected for the right
and left supply segment, optionally also via additional supply segments in the middle
→→Seal the unused P/1 connections with a plug.
10.2. Connection of the Exhaust Air
→→Connect the exhaust air to the R/S 3/5 connections on the connection modules.
The exhaust air should be conveyed along the largest possible lines and, if required, via silencers at high flow
rates in order to prevent back pressures.
The exhaust air should be connected for the right and left supply segment, optionally also via additional supply
segments in the middle.
10.3. Pilot Exhaust Air / Auxiliary Control Air
Depending on which valves you operate on the AirLINE Ex system, port X is used as follows:
10.3.1. Standard Valves
In this case the exhaust air from the pilot control valves is exhaust separately from the R/S 3/5 port to port X. This
avoids problems in the event that higher back-pressures occur in the R/S 3/5 channel.
This should be done using the largest possible lines if necessary with mufflers for high flow rates in order to avoid
back-pressure.
73
english
Type 8650
Installation
10.3.2. Valves with Auxiliary Control Air
In the case of valves that are to be employed for a wider range of pressures, the pilot control valve is supplied
with air via a separate pressure port. This should be connected to port X.
10.4. Plug to Block P-channel
Optionally, the pressure supply of the system can be segmented using a partition in the central P-channel
between two pneumatic modules. This allows different pressure levels or different media to be used in the same
system.
With pre-assembled systems, the position for the partition is indicated on the appropriate pneumatic module.
74
english
Type 8650
Commissioning
Commissioning
Contents
1.
SAFETY INSTRUCTIONS...............................................................................................................................................................76
2.
INITIALIZATION...................................................................................................................................................................................77
2.1. Communication Connection..........................................................................................................................................77
2.2. Configuration of the Hardware Using Siemens Step7 ..................................................................................77
2.3. Access to the Acyclic Parameters with the Siemens PDM...........................................................................81
2.4. Example with Two Different Function Modules...................................................................................................86
2.5. Acyclic Parameters of the AirLINE Ex Modules...................................................................................................89
2.6. Use of “HSP” and “SUP” under Siemens Step7 / PCS7................................................................................93
2.7. Software Update Package (SUP) for PCS7...........................................................................................................97
3.
SD CARD / SYSTEM SERIALIZATION DATA.......................................................................................................................99
3.1. Serialization Data Record................................................................................................................................................99
75
english
Type 8650
Commissioning
1.
SAFETY INSTRUCTIONS
DANGER!
Risk of injury from high pressure!
• Before loosening the lines and valves, turn off the pressure and vent the lines.
Risk of electric shock!
• Before reaching into the device or the equipment, switch off the power supply and secure to prevent
reactivation!
• Observe applicable accident prevention and safety regulations for electrical equipment!
WARNING!
Risk of injury from improper operation!
Improper operation may result in injuries as well as damage to the device and the area around it.
• Before start-up, ensure that the operating personnel are familiar with and completely understand the contents
of the operating instructions.
• Observe the safety instructions and intended use.
• Only adequately trained personnel may operate the equipment/the device.
Risk of injury from unintentional activation of the system and an uncontrolled restart!
• Secure system from unintentional activation.
• Following assembly, ensure a controlled restart.
NOTE!
Operate the system with direct current only!.
To avoid damaging the system, use only direct current as the power supply for the system.
Avoid pressure drop!.
To avoid a pressure drop, the compressed air supply to the system must be as large as possible.
Electrostatic sensitive components / modules!
• The device contains electronic components which react sensitively to electrostatic discharge (ESD). Contact
with electrostatically charged persons or objects is hazardous to these components. In the worst case scenario,
they will be destroyed immediately or will fail after start-up.
• Observe the requirements in accordance with EN 61340-5-1 and 5-2 to minimise or avoid the possibility of
damage caused by sudden electrostatic discharge!
• Also ensure that you do not touch electronic components when the power supply voltage is present!
76
english
Type 8650
Commissioning
2.
INITIALIZATION
2.1.
Communication Connection
The valve segment communicate with the interface module IM152 via the backplane bus system of the ET
200iSP. This exchanges not only input / output data but also parameter, configuration and diagnostic data with a
central master (controller) via PROFIBUS-DP-is.
Many PROFIBUS masters (controllers) require a program that describes the hardware configuration (e. g.
Siemens Step7 for the S7 controllers). These programs require the equipment master data file (GSD file) that
contains the equipment-specific information.
For the use of acyclic services, an EDD file is also required. Programs such as the Siemens PDM permit access
to extensive additional information (I&M data, switching cycle counters, etc.).
A current version of both of these files is available on CD or on the internet.
Because these files for communicability are taken care of by Siemens, when you look on the Bürkert homepage
you will not find the information directly. Instead, you will find a link leading you to the appropriate current
versions.
Siemens Step7 & Siemens PCS7:
If Siemens Step7 is used, an alternative to the method stated above is the option of linking AirLINE Ex by means
of a Hardware Support Package (“HSP”) or, analogously, by means of a Software Update Package (“SUP”) in
Siemens PCS7.
This method has the following advantages:
The acyclic functions of AirLINE Ex can be parameterized directly in HW config.
Extended functions of the ET200iSP can be used (e.g. redundancy).
Hardware-specific diagnoses can be displayed in PCS7.
You can download “HSP” and “SUP” from the Bürkert homepage (under Type 8650 software) or receive them
directly from Bürkert.
Supply segments are electrically passive (logically transparent) and are not taken into consideration in the
configuration tools.
2.2.
Configuration of the Hardware Using Siemens
Step7
A software program such as Step 7 from Siemens is necessary for the configuration of the bus master.
Use the program Step7 from Siemens in version 5.3 or higher to ensure hardware compatibility.
77
english
Type 8650
Commissioning
Configuration:
→→Before the AirLINE Ex system can be accessed, the corresponding GSD (file package) must be imported into
the hardware catalog of the tool.
Fig. 1:
Select ET 200iSP
→→Select ET 200iSP in the hardware catalogue and drag it onto the Profibus.
78
english
Type 8650
Commissioning
Fig. 2:
ET 200iSP on the Profibus
→→Select the desired modules from the catalogue listings of the ET200iSP and drag the selection onto the
respective slot of the ET 200iSP station.
79
Fig. 3:
Determine module and slot
english
Type 8650
Commissioning
The active AirLINE Ex pneumatic modules can be found in the same part of the hardware catalogue. They are
handled in the same way as a digital electric output module
Supply segments are passive and are not planned (see also chapter Configuration and Function of the
Modules / Supply segments!
80
english
Type 8650
Commissioning
2.3.
Access to the Acyclic Parameters with the
Siemens PDM
A software program such as e. g. Siemens Process Device Manager (PDM) is required for accessing the acyclic
parameters of the modules.
Use the PDM program from Siemens (version 6.0 or higher) to ensure compatibility with the hardware.
The corresponding EDDL (file package) must be imported into the device catalogue of the tool before the AirLINE
Ex modules can be accessed.
→→When the S7 Manager has started, select “Extras / SIMATIC PDM / Manage device catalog” via the menu
bar.
→→Using “Search”, indicate the source directory in which the EDDL file is stored. Then select the device type ET
200iSP and acknowledge with OK.
The data of the ET 200iSP system is now included in the device catalog.
The following screenshots indicate how a new station is structured in the PDM.
→→To insert a new object, select the object type
Fig. 4:
Selecting a new object
81
english
Type 8650
Commissioning
→→Insert the new object.
Fig. 5:
Inserting a new object
→→To insert a new device, first select the device type.
82
Fig. 6:
Selection of a new device
english
Type 8650
Commissioning
→→Define the station designation and address.
Fig. 7:
Defining the station designation and address.
→→Add the function modules.
Fig. 8:
Addition of the function modules
83
english
Type 8650
Commissioning
→→Define the desired number of identical modules.
Fig. 9:
Defining the number of identical modules
→→Select the module type via the menu “Allocate”.
84
Fig. 10:
Selecting the module type
english
Type 8650
Commissioning
→→Terminate the module selection with OK.
Fig. 11:
Terminating the module selection
85
english
Type 8650
Commissioning
2.4.
Example with Two Different Function Modules
→→Select the head station.
Fig. 12:
Selection of the head station
→→Open the station for access to the acyclic functions.
86
Fig. 13:
Opening the station
english
Type 8650
Commissioning
→→Select the access mode (specialist: full access; maintenance staff: limited access).
Fig. 14:
Selection of the access mode
→→Select the head station to obtain the interface module parameters and to get an overview of the station
configuration
Fig. 15:
Parameters of the interface module and overview of the station configuration
87
english
Type 8650
Commissioning
Fig. 16:
Parameters of an AirLINE Ex pneumatic module
88
english
Type 8650
Commissioning
2.5.
Acyclic Parameters of the AirLINE Ex Modules
2.5.1.
Parameters that can be displayed or modified by modules
Name
Value
Unit
Status
1: PDM
-
Initial value
4 DO Bürkert 11 mm
PDM_ConfigurationTool
# Identification
# # Operating unit
TAG
4 DO Bürkert 11 mm
-
Description
Initial value
# # Device
Manufacturer
BUERKERT
Device designation
BUERKERT-ID00171941
Device serial number
00001234
Hardware revision
0
Software revision
A 0.0.4
Static revisions no.
3
Installation date
-
-
-
Initial value
# Module
Slot number
14
Module type
4 DO Bürkert 11 mm
-
-
# 4 DO Bürkert 11 mm
Data format
S7
Initial value
Module type
4 DO Bürkert 11 mm
(BUERKERT-ID00171941)
-
Enable switching cycle counter diagnosis
enable
Switching cycle counter warning limit
1000000
Number of simultaneously switchable pilot
valves
4
Boost time for the pilot valves
300
-
Initial value
-
89
english
Type 8650
Commissioning
2.5.2.
Access rights maintenance staff / specialist
Some of the parameters described below can only be modified when access is made in the PDM as a
SPECIALIST.
Further information on read and write rights can be found in the online Help for the Siemens PDM
program.
2.5.3.
Functions of the parameters
• Enable switching cycle counter diagnosis (read / write).
Defines whether a diagnosis message is to be generated when the warning limit for a pilot valve switching
cycle counter is exceeded.
• Switching cycle counter warning limit(read / write).
Defines the value of the pilot valve switching cycle counter at which a diagnosis message is to be generated as
a warning.
• Number of simultaneously switchable pilot valves – only relevant for the 8-channel module – (read). Indicates how many pilot valves can be simultaneously activated (also see boost time) (depending on the type and
amount of pilot valves, the total amount of current at actuation might be higher than the maximum the electronic
module can provide).
With the 8-channel module, valves 0 to 3 and/or 4 to 7 each make up a group.
If more than 4 valves are activated at once (including the previously activated valve), the following
might occur:
• Situation 1: No valves are activated in group 0 to 3. Then, the co-activated valves of group 4 to 7 are
immediately activated.
• Situation 2: Additional valves of group 0 to 3 are activated. Then the co-activated valves of group 4
to 7 are only activated after the boost time has elapsed.
• Boost time for the pilot valves (read / write).
When switching on, the pilot valves receive a higher current. At the end of the boost time, the current is
reduced in order to minimize the power loss and to optimize the current balance in the electronic module.
Module
Value „Boost time“
00171941 (4 channels 11mm)
500
00171942 (8 channels 11mm)
300
00171943 (4 channels 16.5mm)
800
00171944 (8 channels 16.5mm)
300
• Date of the last switching cycle counter reset (read only).
Indicates the last reset of the actuator switching cycle counter.
• Enable switching cycle counter diagnosis (read / write).
Defines whether a diagnosis message is to be generated when the warning limit for the switching cycle counter
is exceeded.
90
english
Type 8650
Commissioning
2.5.4.
Parameters that can be displayed or modified by channels
Name
Value
Unit
Status
-
Initial value
# # Channel 0
Channel enable
enable
Behavior at CPU/Master-STOP
switching alternative value
Alternative value
0
# # # Pilot valve
Switching cycle counter reset
inactive
ID number of the pilot valve
0
Current number of the switching cycles
74766
Initial value
-
Initial value
-
# # # Actuator
Enable switching cycle counter diagnosis
enable
Switching cycle counter warning limit
0
Switching cycle counter reset
inactive
Date of the last switching cycle counter reset
-
Current number of switching cycles
74766
-
Initial value
-
# # # Diagnosis
Group diagnosis
Broken wire
-
barred
-
Short circuit
2.5.5.
Functions of the channel parameter (general)
• Enable channel (read / write).
Defines whether or not the channel is enabled for use.
• Behavior at CPU/Master STOP (read / write).
Defines which value the channel assumes when the master is set to STOP.
• Alternative values (read / write).
Defines the alternative value for the case „Switch alternative value at master STOP“.
2.5.6.
Functions of the parameter actuator (that are connected to
the pilot valve (of this channel)
• Switching cycle counter reset.
Initiates a reset of the actuator switching cycle counter.
• ID number of the pilot valve (read / write).
You can enter the ID number of the pilot valve used here. This makes it quickly available if replacement or preventive maintenance are forthcoming.
• Current number of switching cycles (read only).
Indicates how many switching cycles the pilot valve has performed since the last counter reset.
english
91
Type 8650
Commissioning
2.5.7.
Functions of the actuator (connected to the pilot valve of
this channel)
• Enable switching cycle counter diagnosis (read / write).
Defines whether a diagnosis message is generated when the warning limit for the switching cycle counter is
exceeded.
• Switching cycle counter warning limit (read / write).
Defines the value of the switching cycle counter at which a diagnosis message is generated as a warning.
• Switching cycle counter reset
Triggers a reset of the corresponding switching cycle counter.
• Date of the last switching cycle counter reset (read only)
Indicates when the switching cycle counter of the actuator was reset the last time.
• Current number of switching cycles (read only).
Indicates how many switching cycles the actuator has performed since the last reset of the counter.
2.5.8.
Functions of the diagnosis parameter
• Group diagnosis (read / write).
Indicates whether group diagnostic messages should be generated.
• Broken wire (read / write)
Indicates whether a diagnosis message is generated when an output port is open.
• Short circuit (read / write)
Indicates whether a diagnosis message is generated in the event of a short circuit of the output port.
2.5.9.
Why separate switching cycle counters for pilot valve and
actuator?
Each electronic module provides two independent switching cycle counters (1x for pilot valve, 1x for actuator) for
each channel, as the two devices (pilot valve on the island, actuator in the field) can also be serviced or replaced
independently of each other.
Example:
On a process valve in the field the diaphragm and stuffing box packing are replaced in line with preventive
maintenance.
• Actuator switching cycle counter can be reset;
• However, the pilot valve and its current number of switching cycles remain unaffected.
92
english
Type 8650
Commissioning
2.6.
Use of “HSP” and “SUP” under Siemens Step7 /
PCS7
2.6.1.
Hardware Support Package (HSP) for STEP7
From STEP7 V5.3 SP2 the HSP2033 can be re-installed for the hardware catalog.
The HSP2033 supplements the Decentralized Peripheral ET 200iSP with the 4 and 8-channel valve modules
from AirLINE Ex.
2.6.2.
Installation of the HSP2033:
→→The “hsp2033.zip” file is saved and extracted in a directory of your choice.
→→Open “HW config” in STEP 7.
→→Select the “Install extras / HW updates” menu command
→→In the subsequent dialog select and execute “Copy data carrier” (see screenshots “Installing HW updates”
step 1-2).
Fig. 17:
Installing HW updates, step 1
93
english
Type 8650
Commissioning
Fig. 18:
Installing HW updates, step 2
→→When the copying process is complete, close the dialog field.
→→Now select the HSP with the number 2033 and acknowledge with install.
94
Fig. 19:
Installing HW updates, step 3
english
Type 8650
Commissioning
When the installation is complete, the AirLINE Ex 8650 valve modules are included in the hardware catalog.
Fig. 20:
HW updates, completely installed
95
english
Type 8650
Commissioning
Changing the parameters
→→The parameters of a module can be changed via its “Object properties”.
Fig. 21:
Changing the parameters of a module
Currently the settings of the switching cycle counters can be changed via SIMATIC PDM only.
96
english
Type 8650
Commissioning
2.7.
Software Update Package (SUP) for PCS7
By installing the Software Update Package for AirLINE EX 8560, the full functional range of the Decentralized
Peripheral ET 200iSP can also be used in PCS7 (from V6.1 SP1).
2.7.1.
Installation of the HSP2033:
→→The “Buerkert_Pack.zip” file is saved and extracted in a directory of your choice.
→→Prior to setup, end all SIMATIC applications.
→→Start the “Buerkert_ET200iSP_SM.exe” file by double clicking and follow the instructions for setup.
The installation program checks whether the required STEP 7 programs or whether PCS 7 V6.1 + SP1 are
available.
When the installation is complete, the AirLINE Ex 8650 valve modules are included in the hardware catalog of
HW config.
Fig. 22:
Software Update Package
Currently the settings of the switching cycle counters can be changed via SIMATIC PDM only.
97
english
Type 8650
Commissioning
The installation of the Software Update Package is recorded and can be checked under Start > SIMATIC > Information >“- Installed software”.
Fig. 23:
SIMATIC Software
98
english
Type 8650
Commissioning
3.
SD CARD / SYSTEM SERIALIZATION DATA
The serialization data of completely installed systems of type 8650 can be provided as a data record.
The record includes the serial numbers of the valves, the electronic modules and the terminal module. The order
always refers to the system configuration from left to right (serial number of the valve island – serial number of all
electronic modules – serial number of all valves – serial number of all terminal modules)
The structure of a serialization data record is provided as an example in the chapter; Commissioning /
SD-card / System Serialization Data / Serialization Data Record
The data record is on an sd-card, which is located in the storage compartment of the pressure gauge module.
The data is in common .xml format and can be easily worked on (i.e. for your facilities records) using a variety of
tools (e.g. a simple text editor, browsers or a spreadsheet program).
3.1.
Serialization Data Record
The following is an example of the structure of a serialization data record.
99
english
Type 8650
Commissioning
Valve island ID number
Valve island serial number
ID number of the first electronic module
Serial number of the first electronic module
ID number of the second electronic module
Serial number of the second electronic module
ID number of the first valve
Serial number of the first valve
Data of the valves 2 - 7 hidden
ID number of the last valve
Serial number of the last valve
ID number of the first terminal module
Serial number of the first terminal module
Data of the valves 2 and 3 hidden
ID number of the last terminal module
Serial number of the last terminal module
100
Example of a serialization data record
english
Type 8650
Maintenance and Repair
Maintenance and Repair
Contents
1.
SAFETY INSTRUCTIONS............................................................................................................................................................ 102
2.
MAINTENANCE................................................................................................................................................................................ 103
2.1. Module Maintenance....................................................................................................................................................... 103
2.2. Cleaning................................................................................................................................................................................. 103
2.3. Diagnosis Function.......................................................................................................................................................... 103
3.
MAINTENANCE................................................................................................................................................................................ 104
3.1. Changing Valves During Operation......................................................................................................................... 104
3.2. Changing Electronic Modules During Operation............................................................................................. 104
3.3. Troubleshooting................................................................................................................................................................. 105
3.4. Repair...................................................................................................................................................................................... 106
101
english
Type 8650
Maintenance and Repair
1.
SAFETY INSTRUCTIONS
DANGER!
Risk of injury from high pressure in the equipment!
• Before loosening the lines and valves, turn off the pressure and vent the lines.
Risk of injury due to electrical shock!
• Before reaching into the system, switch off the power supply and secure to prevent reactivation!
• Observe applicable accident prevention and safety regulations for electrical equipment!
(It is permitted to replace electronic modules and valves even while the power is on.)
WARNING!
Risk of injury from improper repair work!
• Maintenance may be carried out by authorized technicians only and with the appropriate tools!
Risk of injury from unintentional activation of the system and an uncontrolled restart!
• Secure system from unintentional activation.
• Following maintenance, ensure a controlled restart.
NOTE!
Operate the system with direct current only!.
To avoid damaging the system, use only direct current as the power supply for the system.
Avoid pressure drop!.
To avoid a pressure drop, the compressed air supply to the system must be as large as possible.
Electrostatic sensitive components / modules!
• The device contains electronic components which react sensitively to electrostatic discharge (ESD). Contact
with electrostatically charged persons or objects is hazardous to these components. In the worst case scenario,
they will be destroyed immediately or will fail after start-up.
• Observe the requirements in accordance with EN 61340-5-1 and 5-2 to minimise or avoid the possibility of
damage caused by sudden electrostatic discharge!
• Also ensure that you do not touch electronic components when the power supply voltage is present!
102
english
Type 8650
Maintenance and Repair
2.
MAINTENANCE
2.1.
Module Maintenance
The modules of the AirLINE Ex system are maintenance-free when operated in accordance with the
instructions in this operating manual.
2.2.
Cleaning
DANGER!
Danger of explosion caused by electrostatic charge!
If there is a sudden discharge from electrostatically charged devices or persons, there is a danger of explosion in
the EX area.
• Clean the device surface of the solenoid valve by gently wiping it with a damp cloth only.
Clean the system with a damp, lint-free cloth only.
Solvents or alcohol are not suitable for cleaning. They may attack the plastic parts.
2.3.
Diagnosis Function
2.3.1.
Switching Cycle Counter
The current counter readings are stored in the modules at regular intervals where they are safe even in the event
of a power failure.
If the operating voltage is frequently switched off, it is possible that individual switching cycles are not
recorded in the remanent memory so that the stored number of switching cycles is slightly lower than the
actual number of switching cycles performed.
Details of this can be found in the chapter Configuration and Function of the Modules / Electronic
Modules and Commissioning / Initial Start-up.
103
english
Type 8650
Maintenance and Repair
3.
MAINTENANCE
DANGER!
Risk of injury from high pressure in the equipment!
• Before loosening the lines and valves, turn off the pressure and vent the lines.
3.1.
Changing Valves During Operation
3.1.1.
Installation instructions
Before replacing the valve, ensure that the relevant equipment is in an electrically safe state.
If the respective valve position does not feature a P-shutoff, first depressurize the system.
If the valves mounted on modules with P-shutoff are changed under pressure, only a maximum of four valves may
be removed at the same time.
When the valve is being removed, a relatively large amount of air is initially released, as the P-shutoff cannot close
until the required pressure difference is reached. However, as the automatic shut-off considerably reduces the
exhaust air, only a low residual leakage remains when the P-shutoff is closed.
3.1.2.
Replacement
→→Loosen the two screws on the valve and remove the valve.
→→When installing the new valve, ensure that the seal has been inserted correctly.
→→Tighten the valve to the tightening torques indicated in the operating instructions.
→→When installing the valve, ensure that the service ports are also pressurized in the corresponding rest position
of the valve until it switches over. As a result, a connected actuator can perform a movement according to the
pressurization.
→→Ensure that these actuator movements cannot cause any damage or unwanted operations in the equipment.
3.2.
Changing Electronic Modules During Operation
Corresponding with the Siemens electric I/O modules, the electronic modules of the AirLINE EX system can be
changed during operation.
The interface module only permits the removal of one electronic module. If several electronic modules are
removed at the same time, the station signals a malfunction.
If changing the electronic modules during operation, proceed as follows:
→→To replace an electronic module, first remove all valves connected to it (as described above). In the case of
unused valve positions, remove the cover flaps from the electric contacts if required.
→→Remove electronic module. The procedure is described in the chapter “Installation / Removal of Individual
Segments”.
104
→→The replaced module is installed in reverse sequence.
english
Type 8650
Maintenance and Repair
3.3.
Troubleshooting
Fault
Possible cause
Remedy
Valves do not switch
No or insufficient operating voltage.
→→Check the electrical connection.
Manual override not in neutral
position.
No or insufficient pressure supply.
→→Ensure the correct operating voltage.
→→Move the manual override to the neutral
position.
→→Design the pressure supply system with
as large a volume as possible (also with
upline devices such as pressure regulators, air conditioners, shut-off valves,
etc.)
Minimum operating pressure 2.5 bar
Incorrect configuration.
→→Use the corresponding module from the
hardware catalogue.
Channel not enabled for use.
Too low value set for “Boost time”.
Fuse in the module tripped due to
a short circuit (can only occur in
extreme cases).
Valves switch with a delay No or insufficient pressure supply.
or blow off at the exhaust
ports.
(compare section “Acyclic parameters of
the AirLINE Ex modules” in the chapter
“Start-up”)
→→Replace the electronic module.
Check whether related valves are faulty or
damaged.
→→Design the pressure supply system with
as large a volume as possible (also with
upline devices such as pressure regulators, air conditioners, shut-off valves,
etc.)
Minimum operating pressure 2.5 bar
Valves are not in their normal
position (current-free) during the
pressure build-up.
→→Pressurize the valve block before
Inadequate venting of the exhaust
air ducts due to too small or soiled
silencers (back pressures).
→→Use adequately dimensioned silencers or
Contamination or foreign matter in
the pilot control or main valve.
Valve blocks leaking.
→→Change setting of the parameters
switching the valves!
expansion vessels.
→→Clean any soiled silencers.
→→Replace the valve.
Missing or pinched O-rings
between the modules.
→→Determine the location or the leaks or
Missing or wrongly
positioned profile seals between
valves and basic pneumatic module.
→→Install missing seals or replace damaged
missing seals.
seals.
105
english
Type 8650
Maintenance and Repair
Fault
Possible cause
Remedy
SF LED lights up.
Wrong configuration.
→→Use the corresponding module from the
hardware catalogue.
Valve diagnosis trips (short circuit,
open outlet port).
→→Check the proper installation of the valve.
→→Replace defective valves.
→→Deactivate the diagnosis for valve positions not in use.
Module does not start due to
internal current limit (short circuits at
the outlet ports).
→→Remedy the short circuits (defective
valves at the outlet ports)
→→Carry out a voltage reset of the module /
system.
If an ET200iSP station has started once with Profibus address X, the address can be changed as follows:
→→Switch off the station.
→→Set the address 0 (all DIP switches in position OFF).
→→Switch on the station and wait approx. 10 seconds.
→→Switch off the station and wait approx. 10 seconds again.
→→Set the desired new address Y.
→→Switch on the station.
The new address is stored.
3.4.
Repair
If a repair is necessary, send the module to your local Bürkert subsidiary or contact our After-Sales Service.
Address and telephone number can be found in the chapter „General Information / Scope of Supply“.
106
english
Type 8650
Storage, Packaging,
Transport, Disposal
Storage, Packaging, Transport, Disposal
Contents
1.
STORAGE............................................................................................................................................................................................ 108
1.1. Storage Conditions for Modules in Original Packaging.............................................................................. 108
1.2. Shutdown.............................................................................................................................................................................. 109
2.
PACKAGING, TRANSPORT........................................................................................................................................................ 110
2.1. Transport Conditions for Modules in Original Packaging........................................................................... 110
107
english
Type 8650
Storage, Packaging,
Transport, Disposal
1.
STORAGE
NOTE!
Incorrect storage may damage the device.
• Store the device in a dry and dust-free location!
• Storage temperature: -40 … 70 °C
1.1.
Storage Conditions for Modules in Original
Packaging
The following information applies to modules transported in their original packaging.
Requirement
Admissible range
Free fall
≤1 m
Temperature
-40 to +70 °C
Temperature change
20 K/h
Atmospheric pressure
1080 to 660 hPa (corresponding to an altitude of -1000 m to +3500 m)
Relative humidity
5 to 95 %, non-condensing
AirLINE Ex surpasses the requirements of IEC 61131-2 regarding transport conditions.
108
english
Type 8650
Storage, Packaging,
Transport, Disposal
1.2.
Shutdown
1.2.1.
Safety Instructions
DANGER!
Risk of injury from high pressure in the equipment!
• Before loosening the lines and valves, turn off the pressure and vent the lines.
Risk of injury due to electrical shock!
• Before reaching into the system, switch off the power supply and secure to prevent reactivation!
• Observe applicable accident prevention and safety regulations for electrical equipment!
(It is permitted to replace electronic modules and valves even while the power is on.)
WARNING!
Risk of injury from improper installation!
• Removal may be carried out by authorized technicians only and with the appropriate tools!
Risk of injury from unintentional activation of the equipment and an uncontrolled restart!
• Secure equipment to prevent unintentional activation.
1.2.2.
Shutting down the system
→→Vent the system.
→→Switch off the power supply.
→→Remove the modules. The procedure is described in the chapter “Installation / Removal of Individual
Segments”.
→→Keep the modules in their original packaging or in similar protective packaging.
1.2.3.
Restarting the system
→→Unpack and acclimatize the modules before restarting the system.
→→Start-up is described in the chapter “Commissioning / Initialization”.
109
english
Type 8650
Storage, Packaging,
Transport, Disposal
2.
PACKAGING, TRANSPORT
NOTE!
Transport damages!
Inadequately protected equipment may be damaged during transport.
• During transportation protect the device against wet and dirt in shock-resistant packaging.
• Avoid the action of heat and cold which can lead to temperatures above or below the admissible storage
temperature.
• Protect the electrical interfaces and pneumatic connections from damage by placing protective caps on them.
2.1.
Transport Conditions for Modules in Original
Packaging
The following information applies to modules transported in their original packaging.
Requirement
Admissible range
Free fall
≤1 m
Temperature
-40 to +70 °C
Temperature change
20 K/h
Atmospheric pressure
1080 to 660 hPa (corresponding to an altitude of -1000 m to +3500 m)
Relative humidity
5 to 95 %, non-condensing
AirLINE Ex surpasses the requirements of IEC 61131-2 regarding transport conditions.
3.
DISPOSAL
→→Dispose of the device and packaging in an environmentally friendly manner.
NOTE!
Damage to the environment caused by device components contaminated with media.
• Observe the relevant disposal and environmental protection regulations.
Note:
Observe national waste disposal regulations.
110
english
Type 8650
Annex
Annex
Contents
1.
EC DECLARATION OF CONFORMITY.................................................................................................................................. 112
1.1. Standards used for CSA-, FM-Ex and IEC-Ex-certification........................................................................ 115
1.2. Set-Up of the Type 8650 System for Certification Conformity................................................................ 116
1.3. Certificates........................................................................................................................................................................... 117
2.
EC-TYPE EXAMINATION CERTIFICATE TERMINAL MODULES............................................................................. 118
3.
IEC-EX CERTIFICATE OF CONFORMITY TERMINAL MODULES.......................................................................... 120
4.
EC-TYPE EXAMINATION CERTIFICATE ELECTRONIC MODULES....................................................................... 123
5.
IEC-EX CERTIFICATE OF CONFORMITY ELECTRONIC MODULES.................................................................... 126
6.
EC-TYPE-EXAMINATION CERTIFICATE .
11 MM-VALVES TYPE 6104....................................................................................................................................................... 129
7.
IEC-EX CERTIFICATE OF CONFORMITY .
11 MM-VALVES TYPE 6104....................................................................................................................................................... 133
8.
EC-TYPE-EXAMINATION CERTIFCATE .
16,5 MM-VALVES TYPE 6106................................................................................................................................................... 136
9.
IEC-EX CERTIFICATE OF CONFORMITY .
16,5 MM-VALVES TYPE 6106................................................................................................................................................... 140
10.
EC-TYPE-EXAMINTATION CERTIFICATE .
11 MM-VALVES TYPE 6144....................................................................................................................................................... 143
11.
IEC-EX CERTIFICATE OF CONFORMITY .
11 MM-VALVES TYPE 6144....................................................................................................................................................... 149
111
english
Type 8650
Annex
1.
EC DECLARATION OF CONFORMITY
We hereby declare that the products with the designation:
Electrical and Pneumatic Automation System AirLINE Ex Type 8650
satisfy the requirements which are specified in the Council Directives to approximate the laws of the member
states:
• Low Voltage Directive (LVD) (2006/95/EC)
• Electromagnetic compatibility Directive (2004/108/EC)
• Pressure Equipment Directive (97/23/EC)
• ATEX-Directive (94/9/EC)
One or several of the following standards were used to assess the products concerning compliance with the Low
Voltage Directive (2006/95/EG):
EN 50178
Electronic equipment for use in power installations
EN 60730-1
Automatic electrical controls for household and similar use - Part 1: General requirements
EN 60664-1
Insulation coordination for equipment within low-voltage systems - Part 1: Principles, requirements and tests
EN 60204-1
Safety of machinery – Electrical equipment of machines - Part 1: General requirements
EN 60529
Degrees of protection provided by enclosures (IP code)
EN 61010-1
Safety requirements for electrical equipment for measurement, control and laboratory use - Part
1: General requirements
Additional requirements for solenoid valves:
DIN VDE
0580
Electromagnetic devices and components - General specifications
One or several of the following standards were used to assess the products concerning the Directive on Electromagnetic Compatibility (2004/108/EC):
EN
61000-3-2
Electromagnetic compatibility (EMC) - Part 3-2: Limits - Limits for harmonic current emissions
(equipment input current <= 16 A per phase)
EN
61000-3-3
Electromagnetic compatibility (EMC) - Part 3-3: Limits - Limitation of voltage changes, voltage
fluctuations and flicker in public low-voltage supply systems, for equipment with rated current
<=16 A per phase and not subject to conditional connection.
EN
61000-6-2
Electromagnetic compatibility (EMC) - Part 6-2: Generic standards - Immunity for industrial
environments
EN
61000-6-4
Electromagnetic compatibility (EMC) - Part 6-4: Generic standards - Emission standard for
industrial environments
112
english
Type 8650
Annex
One or several of the following standards have been used to assess the products with respect to Pressure
Equipment Directive (97/23/EG):
EN 60730-1
Automatic electrical controls for household and similar use - Part 1: General requirements
EN
60730-2-8
Automatic electrical controls for household and similar use - Part 2-8: Particular requirements
for electrically operated water valves, including mechanical requirements
The products have been subjected to the following conformity assessment procedure:
Module A
Internal production control
The Pressure Equipment Directive for products with a nominal voltage < 50V is applied to the CE mark only
for equipment which has a nominal width > 25 mm and controls gases belonging to Group 1 or vapour or
equipment which has a nominal width > 32 mm and controls gases belonging to Group 2 and the product is
within the range > 1,000 and < 3,500 for the calculation nominal pressure x nominal width.
The products with a nominal voltage >= 50V with respect to Pressure Equipment Directive (97/23/EC) are
assessed in Article 1 Paragraph 3.6 of this directive, according to which the equipment is measured by the Low
Voltage Directive and therefore does not drop below the scope of the Pressure Equipment Directive.
For the assessment of the products according to the ATEX directive (94/9/EC) one or several of the following
standards were used. The used standards are listed in the EC Type Examination Certificate.
EN 60079-0
Electrical apparatus for explosive gas atmospheres - Part 0: General requirements
(replaced EN 50014)
EN 60079-1
(replaced EN 50018)
EN 60079-7
Electrical apparatus for explosive gas atmospheres Part 1: Flameproof enclosures „d“
Explosive atmospheres - Part 7: Equipment protection by increased safety „e“
(replaced EN 50019)
EN 60079-11
Explosive atmospheres - Part 11: Equipment protection by intrinsic safety „i“
(replaced EN 50020)
EN 60079-15
(replaced EN 50021)
EN 60079-18
(replaced EN 50028)
Electrical apparatus for explosive gas atmospheres - Part 15: Construction, test and
marking of type of protection „n“ electrical apparatus
Electrical apparatus for explosive gas atmospheres - Part 18: Construction, test and
marking of type of protection encapsulation „m“ electrical apparatus
EN 61241-0
(replaced partially
EN 50281-1-1)
Electrical apparatus for use in the presence of combustible dust Part 0: General requirements
EN 61241-1
(replaced partially
EN 50281-1-1)
Electrical apparatus for use in the presence of combustible dust Part 1: Protection by enclosures „tD“
113
english
Type 8650
Annex
The following standards were also used to assess non-electrical equipment and equipment in the filling station
area:
EN 13463-1
Non-electrical equipment for potentially explosive atmospheres Part 1: Basic method and requirements
EN 13617-1
Petrol filling stations - Part 1: Safety requirements for construction and performance of
metering pumps, dispensers and remote pumping units
The production of electrical equipment, for which an EC-type examination certificate is available, is monitored by;
Physikalisch Technische Bundesanstalt
Bundesallee 100
38116 Braunschweig
Such units are labeled with CE0102.
The EC-type examination certificate comes with the operations manual, where the number can also be found. As
a general
rule, the standards found in the EC-type examination certificate are valid.
Corporate Quality, Uwe Schlauch
Bürkert Werke GmbH & Co. KG
Christian-Bürkert-Straße 13-17
74653 Ingelfingen | Germany
Ingelfingen, 02. 02. 2007
(This document was issued electronically and is therefore valid without signature)
114
english
Type 8650
Annex
1.1.
Standards used for CSA-, FM-Ex and
IEC-Ex-certification
For the CSA-certification, the following standards have been applied:
CAN/CSA 22.2 No. 157-92
CAN/CSA 22.2 No. 213-M1987
CAN/CSA 22.2 E-60079-0 -07
CAN/CSA 22.2 E-60079-7 -03
CAN/CSA 22.2 E-60079-11 -02
ANSI/ISA-60079-0 (12.00.01)-2005
ANSI/ISA-60079-7 (12.16.01)-2002
ANSI/ISA-60079-11 (12.02.01)-2002
For the FM-Ex-certification, the following standards have been applied:
FM Class 3600-1998
FM Class 3610-2007
FM Class 3611-2004
FM 3810 - (ANSI/ISA-82.02.01-2004)
For the IEC-Ex-certification, the following standards have been applied:
IEC 60079-0 : 2004
IEC 60079-7 : 2006
IEC 60079-11 :1999
115
english
Type 8650
Annex
1.2.
Set-Up of the Type 8650 System for Certification
Conformity
Observe the following regulations to ensure that the configuration of the system is authorized:
When converting or expanding a system, check whether the satisfied approvals are affected.
A type 8650 system can be placed at any chosen location between IM152 and the bus termination module of a
SIMATIC ET200iSP station.
Set-up conformity for the type 8650 system is based on a left to right assembly order:
1. The left side of the system is to be capped with a terminal segment. This is based on the certified terminal
module (Id.-Nr. 00173368).
2. After this, there are one or more valve segments – the 44 or 66 mm wide versions can be freely combined –
based on the terminal modules (44 mm wide: id.-no. 00173370 or. 66 mm wide id.-no. 00173371).
Details about the valve segments is found in the section Valve Segments.
3. The right side of the system is to be capped with a terminal segment.
This is based on the certified terminal module (Id.-Nr. 00173369).
4. For larger systems or systems with larger flow volumes, additional terminal segments can be used between
the valve segments.
These are based on the certified terminal module (Id.-Nr. 00173368).
Valve segments
Valve segments 44 mm wide / 4-channel version:
The above mentioned terminal module is to be equipped with an electronic module (Id.-Nr. 00171941). This is to
control the ex-i certified type 6104 or 6144 pilot valve.
If a valve slot is not in use, it must be equipped with a covering cap (Id.-Nr. 653670).
Valve segments 44 mm wide / 8-channel version:
The above mentioned terminal module is to be equipped with an electronic module (Id.-Nr. 00171942). This is to
control the ex-i certified type 6144 pilot valve.
If a valve slot is not in use, it must be equipped with a covering cap (Id.-Nr. 653670).
Valve Segments 66 mm wide / 4-channel version:
The above mentioned terminal module is to be equipped with an electronic module (Id.-Nr. 00171943). This is to
control the ex-i certified type 6106 pilot valve.
If a valve slot is not in use, it must be equipped with a covering cap (Id.-Nr. 653670).
116
english
Type 8650
Annex
1.3.
Certificates
• Terminal module (permit designation: KEMA 06ATEX0092)
• Electronic module (permit designation: KEMA 06ATEX0093)
• Valve type 6144 Ex-i (permit designation: PTB 07ATEX2048)
• Valve type 6104 Ex-i with solenoid”G1 642 735“ (permit designation: PTB 01 ATEX2173)
• Valve type 6106 Ex-i with solenoid ”AC21“ (permit designation: PTB 01 ATEX2175).
1.3.1.
Overview of the valves which can be used depending on
the required approval and the electronic modules used
Electronic
module
171941
(4 channel 11mm)
171942
(8 channel 11mm)
Max. zulässige .
Umgebungstemp.
°C1)
Approval
ATEX
IEC-Ex
FM-Ex
55
6104, 6144
6104, 6144
In preparation
50
6144 (double valve
model)
-
-
55
6106
6106
In preparation
171943
(4 channel 16.5
mm)
171944
(8 channel 16.5
mm)
Module not yet available
Depending on the installation position, the limit may be lower – for details see EC-Type Examination Certificates
1)
117
english
Type 8650
Annex
2.
EC-TYPE EXAMINATION CERTIFICATE
TERMINAL MODULES
(Certificate number: KEMA 06ATEX0092, Issue Number: 2)
118
english
Type 8650
Annex
119
english
Type 8650
Annex
3.
IEC-EX CERTIFICATE OF CONFORMITY
TERMINAL MODULES
(Certificate Number: KEMA IECExKEM07.0033 , Issue Number: 0)
120
english
Type 8650
Annex
121
english
Type 8650
Annex
122
english
Type 8650
Annex
4.
EC-TYPE EXAMINATION CERTIFICATE
ELECTRONIC MODULES
(Bescheinigungs-Nummer: KEMA 06ATEX0093, Ausgabe Nummer: 3)
123
english
Type 8650
Annex
124
english
Type 8650
Annex
125
english
Type 8650
Annex
5.
IEC-EX CERTIFICATE OF CONFORMITY
ELECTRONIC MODULES
(Certification Number: KEMA IECExKEM07.0032 , Issue Number: 0)
126
english
Type 8650
Annex
127
english
Type 8650
Annex
128
english
Type 8650
Annex
6.
EC-TYPE-EXAMINATION CERTIFICATE 11 MM-VALVES TYPE 6104
(Certification Number: PTB 01ATEX2173)
129
english
Type 8650
Annex
130
english
Type 8650
Annex
131
english
Type 8650
Annex
132
english
Type 8650
Annex
7.
IEC-EX CERTIFICATE OF CONFORMITY 11 MM-VALVES TYPE 6104
Certification Number: PTB06.0101)
133
english
Type 8650
Annex
134
english
Type 8650
Annex
135
english
Type 8650
Annex
8.
EC-TYPE-EXAMINATION CERTIFCATE 16,5 MM-VALVES TYPE 6106
Certification Number: PTB 01ATEX2175)
136
english
Type 8650
Annex
137
english
Type 8650
Annex
138
english
Type 8650
Annex
139
english
Type 8650
Annex
9.
IEC-EX CERTIFICATE OF CONFORMITY 16,5 MM-VALVES TYPE 6106
(Certification Number: PTB06.0102)
140
english
Type 8650
Annex
141
english
Type 8650
Annex
142
english
Type 8650
Annex
10.
EC-TYPE-EXAMINTATION CERTIFICATE 11 MM-VALVES TYPE 6144
(Certification Number: PTB 07ATEX2048)
143
english
Type 8650
Annex
144
english
Type 8650
Annex
145
english
Type 8650
Annex
146
english
Type 8650
Annex
147
english
Type 8650
Annex
148
english
Type 8650
Annex
11.
IEC-EX CERTIFICATE OF CONFORMITY 11 MM-VALVES TYPE 6144
(Certification Number: IECEx PTB07.0063)
149
english
Type 8650
Annex
150
english
Type 8650
Annex
151
english
Type 8650
Annex
152
english
Type 8650
Annex
153
english
Type 8650
Annex
154
english
www.burkert.com