1
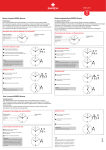
Schnellkorrektur Datum
1*
Krone in Position III herausziehen.
(Uhr bleibt stehen).
2 Krone drehen bis die aktuelle Zeit
angezeigt wird.
3 *Krone zurück in Position I drücken.
1
Minutenzeiger
Minute hand
Sekundenzeiger
Second hand
2
3
1
Hinweis
2
zustellen, muss 1 bei der Sekundenzeigerstellung „60“gezogen werden.
Nach der Einstellung des Stundenund Minutenzeigers muss 3
sekundengenau in Position I zurückgedrückt werden.
I
Datum
Date
II
III
Stundenzeiger
Hour hand
Setting the time
3
1 *Pull
out the crown to position III.
(the watch stops)
2 Turn the crown until you reach the
correct time.
3 *Push the crown back into position I.
Please note
*In order to set the time to the exact
second, 1 must be pulled out when
the second hand is in position “60”.
Once the hour and minute hands
have been set, 3 must be pushed
back into position I at the exact
second.
XEN GmbH
Otto-Hahn-Str. 9
D–49525 Lengerich (Germany)
fon +49 54 81. 30 69 0
fax +49 54 81. 30 69 21 00
I
II
- Datum „17“, Uhrzeit „01:25“
- Aktuelles Datum „4“, Uhrzeit „20:30“
III
1
2
3
Pull out the crown to position II.
(the watch continues to run)
Turn the crown until the correct
date appears.
Push the crown back into position I.
Please note
During the date changing phase
between 9 PM and 12 PM; the date
must be set to the date of the
following day. An extreme acceleration in setting the date with quick
mode can induce a false date
indication. The synchronization is reestablished by setting the date
from 01 till 31 (crown in position II).
Einstellung Datum /Zeit
Setting the date / time
Wir freuen uns, dass Sie sich für eine Uhr
der Marke XEN entschieden haben.
Krone in Position II herausziehen.
Krone drehen bis der Vortag des
aktuellen Datums „3“erscheint.
3 Krone in Position III herausziehen.
4 Krone drehen bis das aktuelle
Datum „4“ erscheint.
5 *Krone weiter drehen bis die aktuelle Zeit „20:30“ angezeigt wird.
6 Krone zurück in Position I drücken.
Stundenzeiger
Hour hand
Sekundenzeiger
Second hand
Je besser Sie mit Ihrer Uhr vertraut sind,
desto mehr Freude werden Sie an Ihrem
ganz persönlichen Zeitobjekt erleben.
1
Lesen Sie die in dieser Betriebsanleitung
zusammengefassten Informationen, um
Ihre Uhr korrekt einzustellen.
1
2
1
I
2
II
Datum
Date
Hinweis
*24-Stundenrhythmus beachten.
I
Viel Freude mit Ihrer Uhr wünscht Ihnen
I
Datum
Date
II
Please note
*Observe the AM / PM clock rhythm.
We have included directions on how to
set your watch properly.
We hope you enjoy wearing this timeless piece for many years to come.
XEN
Minutenzeiger
Minute hand
Bedienungsanleitung
2
I
Example
- Date “17”, time “1:25 AM”
- Present date “4”, time “8:30 PM”
1 Pull out the crown to position II
(the watch continues to run).
2 Turn the crown until yesterday’s
date appears “3”.
3 Pull out the crown to position III
(the watch stops).
4 Turn the crown until the correct date
“4” appears.
5 *Continue to turn the crown until the
correct time “8:30 PM” appears.
6 Push the crown back into position I.
Congtatulations on your new XEN purchase. You have become the owner of a
state of the art European design watch.
XEN
II
Setting the date / time
3
Setting the date
(quick mode)
10
Einstellung Datum /Zeit
Beispiel
Krone in Position II herausziehen.
(Uhr läuft weiter)
Krone drehen bis das aktuelle
Datum erscheint.
Krone zurück in Position I drücken.
Hinweis
In der Kalenderschaltphase von
21:00 bis 24:00 Uhr muss das
Datum des folgenden Tages eingestellt werden. Extreme Beschleunigung in der Schnellkorrektur kann zu
einer falschen Datumsanzeige
führen. Durch Schalten des Datums
von 01 bis 31 wird die Synchronisation wieder hergestellt.
*Um die Zeit sekundengenau ein-
Schnellkorrektur Datum
Setting the date (quick mode)
XQ 0201-0204
II
Operating Instructions
3
I
II
III
4
6
5
Seite: 1;Datum: 17. Apr 2013 15:20:39;ASURA ***Low-PDF***
Einstellung Zeit
Setting the time
Einstellung Zeit
Display and
control buttons
Chronograph: Grundfunktion
1
2
Anzeigeelemente
Display elements
Bedienelemente
Control buttons
Sekundenzeiger
Second hand
Minutenzeiger
Minute hand
Stundenzeiger
Hour hand
Minutenzähler
Minute counter
3
Drücker A
Push-button A
⁄10 Sekundenzähler
Std.-Zähler nach 30 Min.
1
⁄10 Centre stop-second
Hour counter after 30 min.
1
Datum
Date
Sekundenzähler
Centre stop-second
1
2
Drücker A
Push-button A
Minutenzähler
Minute counter
Chronograph:
Aufaddierte Zeitmessung
Krone
Crown
1
Drücker B
Push-button B
3
Start / Stop / Reset
Start: Press push-button A.
Stop: to stop the timing, press pushbutton A once more and read the
4 chronograph counters:
“4 h / 20 min / 5 sec / 7⁄10 sec”
Zero positioning:
Press push-button B.
The 4 chronograph hands will
be reset totheir zero positions.
(This usage is also valid for
“accumulated timing” and for
“intermediate or interval timing”.)
Beispiel
Start (Zeitmessung starten)
2 Stopp (z.B.15 Min. 5 Sek. nach 1 )
3 Restart (Zeitmessung wieder freigegeben)
4 *Stopp (z.B.10 Min. 5 Sek. nach 3 )
= 25 Min.10 Sek.
(Aufaddierte Messzeit wird angezeigt)
Hinweis
*Nach 4 kann die Aufaddierung der
⁄10 Sekundenzähler
Std.-Zähler nach 30 Min.
1
⁄10 Centre stop-second
Hour counter after 30 min.
1
Zeitmessung über Drücker A fortgesetzt werden.
Nullstellung: s. Chronograph Grundfuntion.
Chronograph:
Accumulated timing
3
Drücker B
Push-button B
Aufaddierte Zeitmessung
Accumulated timing
1
4
3
2
Drücker A
Push-button A
Miutenzähler
Minute counter
Beispiel
Start (Zeitmessung starten)
2 Zwischenzeit anzeigen
(z.B.10 Min. 10 Sek, die Zeitmessung läuft im Hintergrund weiter.)
3 *Messzeit aufholen
(die 4 Chronographenzeiger werden im Schnelllauf auf die weitergelaufene Messzeit nachgeführt.)
4 Stopp (Endzeit wird angezeigt)
1
⁄10 Sekundenzähler
Std.-Zähler nach 30 Min.
1
⁄10 Centre stop-second
Hour counter after 30 min.
Hinweis
*Nach 3 können über Drücker B
weitere Zwischenzeiten angezeigt
werden. Nullstellung: s. Chronograph Grundfunktion.
1
Chronograph: Intermediate
or interval timing
Zwischenzeitmessung
Intermediate or interval timing
Example
Start (start timing)
2 Stop (e.g.15 min 5 sec following 1 )
3 Restart (timing is resumed)
4 *Stop (e.g.10min 5 sec following 3 )
= 25min 10 sec
(The accumulated measured time is
shown)
Sekundenzähler
Centre stop-second
1
Please note
*Following 4 , the accumulation
of the timing can be continued by
pressing push-button A.
Zero positioning: please refer to
basic function of chonograph.
Chronograph:
Zwischenzeitmessung
Sekundenzähler
Centre stop-second
1
Chronograph: Basic function
2
Zentrumstoppsekunde
Centre stop-second
Start / Stopp / Nullstellung
Start: Drücker A drücken.
Stopp: Um die Zeitmessung abzubrechen, Drücker A nochmals
drücken und die 4 Chronographenzähler ablesen:
„4 h / 20 Min./ 5 Sek./ 7⁄10 Sek.“
Nullstellung: Drücker B drücken.
Die 4 Chronographenzeiger werden
in ihre Nullstellungen zurückgestellt.
(Diese Anwendung gilt auch für
die „Addierte Zeitmessung“ und
„Zwischenzeitmessung“.)
Chronograph: Grundfunktion
Chronograph: Basic function
1
4
Drücker A
Push-button A
Drücker B
Push-button B
2
Minutenzähler
Minute counter
3
⁄10 Sekundenzähler
Std.-Zähler nach 30 Min.
⁄10 Centre stop-second
Hour counter after 30 min.
1
1
Example
Start (start timing)
2 Display interval (e.g.10 min 10 sec,
timing continues in the background.)
3 *Making up the measured time
(the 4 chronograph hands are
quickly advanced to the ongoing
measured time.)
4 Stop (Final time is displayed)
1
Please note
*Following 3 , further intervals or
intermediates can be displayed by
pressing push-button B.
Zero positioning: please refer to
basic function of chonograph.
Ausrichtung der Chronographzeiger auf Nullposition
Adjusting the chronograph
hands to zero position
Beispiel
Einer oder mehrere Chronographzeiger sind nicht in ihren korrekten
Nullpositionen und müssen ausgerichtet werden (z.B. nach Batteriewechsel).
1 Krone in Position III herausziehen.
(Alle 4 Chronographenzeiger stellen
sich in ihre korrekte bzw. nicht
korrekte Nullposition.)
2 Drücker A und B gleichzeitig mindestens 2 Sekunden drücken.
(Der Zentrumstoppsekundenzeiger
dreht um 360° – Korrekturmodus ist
aktiviert.)
Ausrichtung der Zentrumstoppsekunde
- Einzelschritt: Drücker A 1 x kurz
- Kontinuierlich: Drücker A lang
- Nächsten Zeiger ausrichten:
Drücker B
Ausrichtung des 1⁄10 Sekundenzählerzeigers (Pos. 6h)
- Einzelschritt: Drücker A 1 x kurz
- Kontinuierlich: Drücker A lang
- Nächsten Zeiger ausrichten:
Drücker B
Ausrichtung des Minutenzählerzeigers (Pos. 9h)
- Einzelschritt: Drücker A 1 x kurz
- Kontinuierlich: Drücker A lang
3 Krone in Position I zurückdrücken.
Example
One or several chronograph hands
are not in their correct zero positions and have to be adjusted
(e.g. following a battery change).
Pull out the crown to position III.
(all 4 chronograph hands are in their
correct or incorrect zero position.)
Keep push-buttons A and B depressed simultaneously for at least
2 seconds. (The centre stop-second
rotates by 360° – corrective mode is
activated.)
Adjusting the centre stop second
-Single step: push-button A 1x short
-Continuous: push-button A long
-Adjusting the next hand:
push-button B
Adjusting the 1⁄10 second counter
hand (position 6h)
-Single step: push-button A 1x short
-Continuous: push-button A long
-Adjusting the next hand:
push-button B
Adjusting the minute counter
-Single step: push-button A 1x short
-Continuous: push-button A long
Returning the crown to position I.
Abschluss der ChronographzeigerAusrichtung. (jederzeit möglich)
1
2
3
Ausrichtung der Chronographzeiger
auf Nullposition / Adjusting the
chronographhands to zero position
Sekundenzähler
Centre stop-second
Drücker A
Push-button A
1
I
II
III
⁄10 Sekundenzähler
Std.-Zähler nach 30 Min.
⁄10 Centre stop-second
Hour counter after 30 min.
1
Minutenzähler
Minute counter
1
2
I
II
III
Drücker A
Push-button A
Drücker B
Push-button B
Termination of the chronograph
hands adjustment (can be carried
out at any time).
3
I
II
III
Seite: 2;Datum: 17. Apr 2013 15:20:40;ASURA ***Low-PDF***
Anzeige- und
Bedienelemente