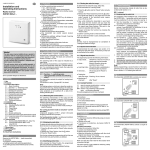
1
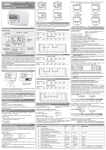
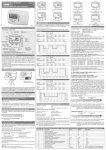
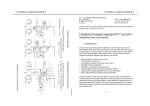
U 468 931 003 267-1
This thermostat can be used in all EU and EFTA countries.
The manufacturer hereby declares that this device conforms with the basic and other relevant requirements laid
down by directive R&TTE 1999/5/EC.
The declaration of conformity can be downloaded from
„www.funk868MHz.de“.
Installation and
Operating Instructions
Radio frequency
receiver
INSTAT 868-a4…
Contents:
1. Application
2. Features
3. Function description
3.1 Function – Switching mode –
3.2 Function – Pump logic –
3.3 Function – Time switch function –
3.4 Function – Master/Slave –
3.5 Heating/Cooling changeover
3.6 Deleting the radio link
3.7 Testing the radio distance
3.8 Identifying active radio links
3.9 Lamp function
3.10 Bridge function
4. Installation
5. Commissioning
5.1 Establishing the radio link
5.2 Valve test
5.3 Power failure
5.4 Quit/Reset
5.5 Faults
5.6 Troubleshooting
6. Technical data
7. Dimensions
8. Wiring diagrams and examples
9. Brief operating instructions
Warning!
This unit must not be opened and installed except by authorized persons and in compliance with the circuit diagram provided on the pcb. It is mandatory in all work on
the unit to observe the current safety regulations.
In order to classify for protection class II it is necessary to
take adequate installation measures.
This separately mounted unit is designed for temperature
control exclusively in dry and closed rooms with standard
environment. This electronic device is created according
EN 60730, it is working according operation principle 1C.
3. Function description
The INSTAT 868-a4 receiver converts radio signals from a
transmitter, for instance, INSTAT 868-r, into control signals
for loads. The loads are switched by means of a relay with
changeover contacts. The switching condition is indicated by
the respective signal lamp.
For relay switching characteristics, see Installation instructions for the transmitter under Item “Function description“.
For controlling loads, the output can be configured in different ways. The functions subsequently listed can be combined
in an INSTAT 868-a4.
3.1 Function – Switching mode –
“One transmitter controls one
switching output“
Up to 4 transmitters control one output each (channels 1…4)
for heating ON/OFF (possibly, channel 4 lights up, see Section 3.2). One or more actuators can be connected to each
output. For example, see Fig. 1.
3.2 Function – Pump logic –
Up to 3 transmitters control one output each (channels 1…3)
for heating ON/OFF. Channel 4 output serves as a common
pump logic output.
The pump is switched off, LED 4 extinguishes (if none of the
available transmitters has not called for heat (for more than
approx. 10 minutes). The pump is switched by the break
contact of the relay. This means that “emergency operation”
of the heating system is possible in the event of a power failure if ”normally open” actuators are used.
By parallel connection of the channel 4 outputs, the pump
logic can be extended to several receiving modules. To avoid
short circuits in the slave units, remove bridges BR 4, BR 5.
Supply slave units via terminal 7, 8 of the master unit, see
Fig. 2.
This function is always activated, as long as channel 4 is not
programmed to a transmitter.
Reactivation is possible only via Item 3.6 ”Delete radio links”.
3.3 Function – Time switch output –
”One transmitter controls one switching and
an associated time switch output”
1. Application
This module of the INSTAT 868-family converts the information from a transmitter, e.g. INSTAT 868-r…, into control
signals for the loads.
2. Features
• Ready to plug-in, for immediate connection to a 230 V
conduit box
• 230 V actuators can be directly connected
• 24 V actuators switchable via volt free contacts (separate
transformer required)
• 4 receive channels in one housing
• or 3 receive channels and one output for pump logic, e.g.
for switching off the circulating pump when all valves are
closed
• or 2 receive channels, each with one associated time switch
output
• Master/slave function (master dictates switching times)
• Changing Heating/Cooling mode
• Valve test function
• Radio link test and system demonstration
• One transmitter can control several receive modules
• Self-learning address setting due to ”Learning mode“ in the
transmitter
• One push-button per output for setting functions
• One signal lamp per output to indicate relay status, faults,
etc.
• One reset button
• Acoustic signal in case of faults
• Monitoring valid addresses
• Monitoring the transmitter (if no signal has been received
from the transmitter for an extended period of time, for instance, when the battery is empty, the output is switched on
for 30% of the time and the signal lamp flashes).
(Not possible with INSTAT 868-r1)
One transmitter controls one output for heating ”ON/OFF”
and one time switch output for temperature setback. Two
adjacent outputs respectively are combined to form pairs,
the one with the lower number switches the actuator, the
one with the higher number serves as a time switch output,
see Fig. 3.
The time switch output switches ”ON” if the controlled temperature t 3 (night) is active on the transmitter and the warmup period has not yet started.
This output can, for instance, be used to control the temperature setback input for other controllers. Outputs which are
not used for temperature setback, can be freely assigned to
other transmitters. The time switch function is independent
of the transmitter operating mode.
For ‘party’ and ‘manual operation’ in the transmitter, the
switching times of the weekly program apply. In frost protection the time-switching output is always active If the daily
program is active, its respective switching times apply.
3.4 Function – Master/Slave –
In the case of this function, the slaves follow the master
switching times.
Master/Slave is activated, if:
Channel 1
= Master
(INSTAT 868-r, clock thermostat)
Channels 2…4
= Slave (INSTAT 868-r1)
Only slaves in the automatic mode follow the master.
Only one master is possible. It must always be assigned to
channel 1. If other INSTAT 868-r are assigned to higher channels, these do not follow the master (the slaves do). In case of
masters failing, the slave receive channels provide control to
the comfort temperature, set on the slave controllers. For example, see Fig. 4. Party- and manual mode of the master has
no influence to the slaves
3.5 Changing Heating/Cooling mode
With this function the INSTAT 868-a4 can be used for heating
or for cooling. The switching behaviour of all outputs will be
reversed (in case activated pump logic will be maintained
without reverse). The function ”time switch“ ist not reversed.
For cooling mode (summer time)
1. Button at channel 3 and ”reset“ button pressing at the
same time.
2. At first release button ”reset“ then button ”channel 3“
For heating mode (winter time) (as delivered condition)
1. Button at channel 4 and ”reset“ buttton pressing at the
same time.
2. At first release button ”reset“ and then button ”channel 4“
3.6 Deleting the radio link
To delete all radio links:
1. press push-button at channel 1 and reset button simultaneously.
2. release reset button first, then channel 1 push-button.
This deletes all radio links.
Any necessary links must be established new (see Item 5.1).
Now, after having pressed the reset button, none of the
lamps must light up briefly see 3.8..
3.7 Testing the radio distance
To determine the distance of the radio link, the following procedure has to be followed:
On the transmitter:
Set the transmitter to Learning mode
Then on the receiver:
1. Press the channel 2 push-button and reset button simultaneously.
2. Release the reset button first, then the channel 2 pushbutton.
Channel 2 signal lamp lights up. The signal tone and the
relay operate in the switching mode., approx. 2 sec. ”ON”,
approx. 8 sec. ”OFF”.
Now, while holding the transmitter in your hand, walk
away from the receiver until you reach the point where
the signal tone can no longer be heard and the relay is
about to stop operating. This is the maximum possible radio link distance.
After a certain period, the transmitter automatically ceases to
operate in the ”Learning mode”. Always terminate the radio
link test in the receiver by pressing the reset button.
Any other channels are not affected by the radio test.
3.8 Identifying active radio links
Having pressed the reset button, the programmed channels
are indicated by the respective channel lamps briefly lighting
up.
3.9 Lamp function
The signal lamps provide information about the respective
channel:
• Heating ”ON/OFF” In normal operating mode, steady
light is possible
• Faults
Flashing, 1 sec. interval, number varies
depending on type of fault s. 5.5
• Learning mode
Permanently ”ON”
• Valve test
”ON” until push-button is pressed
• Radio test
Flashing, 10 sec. interval
3.10 Bridge function
BR 1:
BR 4, 5:
Opening for switching beeper OFF (single-pole
plugging prevents loss of bridge)
Opening for double-pole insulation of the supply
voltage from the switching voltage
4. Installation
Mounting: for instance
• In the distribution board on DIN rail
• In the heating circuit distributor on DIN rail
• Mounting position: any
• The unit must not have contact with water.
Electrical connection of operating voltage:
Insert plug into conduit box. If a direct connection is required, cut the plug off and clamp the wires.
Connecting the actuators:
Before inserting the cables, make a hole in the nipple using a
round, pointed object.
Electrical connection:
(switch off mains supply)
See diagram on the printed circuit board and Item 8. In the
as-supplied condition, the unit is designed for switching
230 V actuators. The actuators are simply connected to the
terminals (a-c [normally-open] and b-c [normally-closed]) of
the respective channels by means of both leads (terminals 7,
8 are not connected).
For switching a second voltage of up to 230/400V max.
(also for 24 V actuators):
Remove bridges BR 4 and BR 5 completely.
The second voltage is fed via terminals 7, 8 (between channels 2 and 3). Example, see Fig. 3.
By removing bridge BR 3, channels 3/4 can be operated with a
voltage different from that of channels 1/2 (via terminals 7, 9).
Note:
Having removed bridge BR 3 channels 3/4 remain connected
as a single-pole connection to channels 1/2.
Volt free contacts with the required safety clearance can only
be obtained after complete removal of bridges BR4, 5
A suitable transformer is required for 24 V.
Mount cover in volt free condition only
5. Commissioning
Delete all channels before commissioning, see Section 3.6.
5.1 Establishing the radio link
On completion of the installation work, a link between the
INSTAT 868-r… transmitter and the respective output (channels 1…4) must be established.
This must be carried out in the following sequence:
a) Set the transmitter to learning mode (see Transmitter
operating instructions)
b) 1. For function – switching mode –.
Set the required switching output of the receiver to
learning mode. To do this:
Briefly press the push-button for the desired output. A
signal sounds, the associated signal lamp lights up and
the output switches ON briefly.
When the transmitter is identified, the signal tone ceases
to sound and the associated signal lamp switches off.
2. For function – pump logic –
As with b1, however, a transmitter must not be assigned
to channel 4.
3. For function – time switch output –
Set the desired switching output of the receiver and the associated time switch output to learning mode. To do this:
press both the push-button for the desired switching
output (channels 1,3) and the push-button for the time
switch output (channels 2,4) (e.g. press 1, 2). A signal
sounds, the associated two signal lamps light up and the
two outputs switch on briefly.
c) When the transmitter is identified, the signal tone ceases
to sound and the associated signal lamps extinguish.
d) Terminate the learning mode on the transmitter
e) Testing the established radio link, see Section 3.8.
It is not possible to assign one transmitter to several outputs
in the same unit. However, one transmitter can control several outputs in different receiving modules. To establish the radio link, only one transmitter must be in the learning mode.
5.2 Valve test
When the push-button of an associated output is pressed:
• the associated output switches ON (as long as the push-button is pressed),
• the signal lamp lights up,
• the signal tone sounds.
After releasing the output button, the reset button must be
pressed within 10 sec.
As a result of this, the signal lamp extinguishes and the signal
tone ceases to sound.
After 10 sec., the learning mode starts; a link would be
established to a transmitter which happens to be in the
learning mode.
5.3 Power failure
If there is a power failure in the transmitter or in the receiver,
all data will be saved. When power supply is restored, normal
operation is resumed.
5.4 Quit/Reset
see wiring diagram
To • quit the learning mode or
• acknowledge a failure or
• terminate the radio link distance test or
• terminate the valve test or
• in the event of any other inexplicable phenomena
press the reset button. This switches the relays to the OFF
status. When new actuating signals are received (possibly
after 10-20 min.), they will continue to work.
Any existing radio link will be maintained.
5.5 Faults
If faults occur, an alarm is triggered. In this case, the signal
lamp flashes with varying duration, if necessary, a signal tone
sounds.
5.5.1 Double addressing
In this case the signal lamp flashes permanently two times
short one after the other. The signal sounds be cancelled by
re-learning one of the both transmitters. The output is
switched with 30% capacity (3 minutes ON, 7 minutes OFF).
5.5.2 Brief losses of the transmission signal
If the transmitter fails to receive an actuating signal within a
period of 1 and up to ~10 hours, the signal lamp shows a permanent one brief flash. No signal tone sounds.
The output is switched with 30% of the manipulated variable
(3 min. ON, 7 min. OFF).
Upon the transmission signal recurring, the alarm automatically ceases.
5.6 Troubleshooting
1. Valve does not open:
➜ Has it been properly wired up?
➜ Has the radio link been established? (see Section 5.1)
➜ See table 1 up from item 3.
➜ Press the reset button (see Section 5.4)!
2. The signal lamp for a radio channel flashes and possibly a beeper is sounding
➜ For basic fault procedures, see Section 5.5
➜ Learning mode, valve test, radio range test have not
been interrupted (see Sections 5.1, 5.2, 3.7, 5.4)!
➜ Two transmitters are transmitting with the same address; reprogram the associated radio link (see Section 5.5.1)!
➜ No radio link, see Item 7 in the Table1 !
➜ One or more channels which are not in use are flashing.
These channels have lost their transmitter.
Proceed as described under Section 3.6 ‘Deleting the
radio link’. Re-lern needed links.
3. The channel 4 signal lamp lights up, although no
transmitter has been programmed.
• Channel 4 serves as a pump logic, see Section 3.2.
In the case of inexplicable faults it is recommended to press
the reset button on the receiver and, if necessary, on the
transmitter.
8. Wiring diagrams and examples
Fig. 1
Each transmitter
controls a switching
output for heating ON/OFF.
No master/slave.
Graphical representation of
230 V actuators.
Fig. 2
Each transmitter controls a switching output for heating ON/ OFF. Additional pump logic. No master/slave.
Graphical representation of 230V actuators/pump.
Extension of pump logic
to two receiving modules
Base Unit
Extension Unit
6. Technical data
5.5.3 Longer losses of the transmission signal
If the transmitter has not received an actuating signal for
more than 10 hours, the signal lamp shows permanent one
short flash. The signal tone sounds.
The output is switched with 30% of the manipulated variable
(3 min. ON, 7 min. OFF).
Upon the transmission signal recurring, the alarm automatically ceases.
Note:
• In the case of heating systems that are in stand-by mode
even in the summer, e.g. electric heaters, the valve protection (in the transmitter) must be switched off.
In the other case the output would be switched On for 3
minutes each day!
• The signal tone can be switched off permanently by removing bridge BR 1.
For all types of faults, the following applies:
• Function – Switching mode – A fault at one output will not
affect the other outputs.
• Function – Pump logic – A pump keeps ON operating in the
alarm mode (already after one transmitter has failed).
• Function – Time switch output –: The faulty behaviour also
applies to the associated time switch output.
• Function – Master/Slave – In the case of the master failing,
the slaves are switched to comfort mode.
• A flashing signal lamp indicates the alarm status, not the
switching status of the output.
• After a power failure in the transmitter or in the receiver,
normal operation is resumed.
• Under unfavourable local conditions it is possible that the
radio link between the transmitter and the receiver is insufficient, for instance, if the receiver is installed in an interference-proof metal housing. Please check whether the situation improves when the transmitter is arranged in a different position. For checking the radio link, see Section 3.7.
Type
Article-No.
Operating voltage
Power consumption
Ambient temperature
INSTAT 868-a4
0536 40 140 …
230 V (195…253 V) 50/60 Hz
< 3 VA
0…+50°C
(without condensation)
Storage temperature
–20…+60°C
Aerial
Internal
Push-button: for programming 4
for reset
1
Lamps:
for programming 4
for operating volt.
1
Load circuit:
4 changeover contacts,
6 A cos ϕ = 1; 2 A cos ϕ = 0.6**
24 ... 230 V AC volt free*
Number of actuators per contact:***
3 W each electrothermal
230 V
10*** max.
24 V
4*** max.
Double-pole insulation voltage
when bridges BR 4, 5 are
opened
400 V* max.
Single-pole insulation voltage
when bridge BR 3 is opened
230 V* max.
Protection class of housing
IP 40 / insulated
Software class
A
Rated impulse voltage
2.5 KV
Brinell test temperature
75°C
Voltage and current for EMC 230 V, 6 A
emitted interference testing
Weight
~530 g
*) After complete removal of bridges BR4, 5, a creepage distance and clearance of 8 mm between the operating voltage and the relay terminals is
guaranteed. The unit is therefore suitable for switching safety extra-low
voltage (SELV). After removal of bridge BR 3, the two switching units
(channels 1/2 against channels 3/4) show a 230 V basic insulation.
**) Total of all currents <= 10 A With a total of all currents of >2 A, install as
described under ”Switching a second voltage” (see Item 4, Installation).
***) A maximum of 10 x 4 = 40 (230 V) actuators or 4 x 4 = 16 (24 V) actuators
respectively can be controlled by an INSTAT 868-a4 at one time.
Four actuators can be mechanically connected to the six-point terminal. If
there are more actuators, provide external terminal points.
Fig. 3
Each master controls one switching
output (channel 1) and an associated time
switch output (channel 2) for temperature
setback of other controllers.
Slaves on channels 3, 4.
Graphical representation
of 24 V actuators
Fig. 4
One master (channel 1) with 2 slaves (channel 2, 3).
Additional pump logic (channel 4).
A third slave can be programmed at
channel 4. Connect a valve instead
of a pump.
Graphical representation
230 V actuators
9. Brief operating instructions for the INSTAT 868-a4 radio frequency receiver
Deleting the radio links
3.6
Testing the radio distance
3.7
Establishing the radio link
Function
”Switching mode”
5.1
or 3.1
Table 1: When the radio link does not work…
Check the following:
1. Receiver: Is signal lamp ‘Power’ lighting up?
Yes
Continue with 2
No
Check power supply possibly the
unit is defective
2. Receiver: Is a channel 1…4 signal lamp flashing?
Double addressing see Section 5.5.1 Continue with 5
Can the warning tone be heard?
or transmission signal is missing
(possibly only after one hour)
Continue with 3
3. Press the reset button
Continue with 4
Transmitter not programmed
Are the required channel signal lamps lighting up briefly?
Reprogram, see Section 5.1
See Item 3.8
4. Transmitter: Is the battery OK?
Continue with 5
Insert new batteries
5. Transmitter: Adjust to 30°C. Is the relay switched on after Continue with 6
Relay was already switched on
~30 sec? (signal lamp lights up). .
Continue with 6 or transmission
signal is missing, continue with 7
6. Transmitter: Adjust to 5°C. Is the relay switched off
Everything OK
Transmitter signal is missing,
after ~30 s (signal lamp does not light up)
continue with 7
7. Transmitter-receiver-actuator: Check wiring, if
Everything OK
Continue with 8, if necessary,
necessary, reprogram connection to radio receiver.
check radio link distance,
see Section 3.7
Are Items 5 and 6 now successful?
“Testing the radio link distance“
8. Reduce distance between receiver and transmitter
Transmitter and receiver are
Transmitter or radio receiver are
to ~2 m (not less). Are Items 5 and 6
working properly
defective
now successful?
Note: In individual cases it may not be possible to establish a permanent radio link between radio transmitter and radio receiver. The reason for this is not to be attributed to our radio control, but to the radio distance to be used. Therefore, we recommend checking its proper functioning at the respective place of installation.
7. Dimensions (for INSTAT 868-a4 )
Function
pump logic
3.2
Function
3.3
Switching and time switch output
Function
3.4
Master/slave
Changing Heating/Cooling mode 3.5
Heating
Cooling
Displaying programmed channels 3.8
Valve test
5.2
Signal lamp - Fault messages
– Brief double flash
– Brief single flash +
no signal tone
with signal tone
• Press the channel 1 button + the reset button simultaneously
• Release the reset button, then the channel 1 button
• Set transmitter to Learning mode
• Press the channel 2 button + reset button simultaneously
• Release the reset button, then the channel 2 button
• Channel 2 signal lamp lights up
• Signal tone + relay are operating in the switching mode (brief ON - extended OFF)
• When the switching mode ceases to operate, the radio distance is exceeded
• Press the reset button for termination
• Transmitter: switch off Learning mode
• Set transmitter to Learning mode
• Briefly press the channel button!
• Signal lamp lights up + signal tone sounds
• When transmitter is identified, signal lamp + tone will stop
• Transmitter: switch off Learning mode - press the OK button
• Channels 1, 2, 3 Switching mode - Channel 4 Pump logic
• Function is active, as long as channel 4 is not programmed
• Like function "Switching mode"
• Set Transmitter to Lerning mode
• Briefly press channel 1 + 2 or channel 3 + 4 buttons
• Signal lamps light up + signal tone sounds
• When transmitter is identified, signal lamp extinguishes and signal tone ceases
to sound
• lower number = switching output (actuator)
• higher number = time switch output
• Transmitter: switch off Learning mode
• Slaves follow master switching times
• Assign master to channel 1, program slaves to following channels
• Winter mode (as-delivered condition)
• Press the channel 4 + the reset button simultaneously
• Release the reset button, then the channel 4 button
• Summer mode
• Press the channel 3 button + the reset button simultaneously
• Release the reset button, then the channel 3 button
• Press the reset button – programmed channels will be briefly displayed
• Press the channel button
• As long as the channel button is pressed, the output switches On
• Press the reset button within 10 sec. after releasing the channel button
5.5
• Double addressing - reprogramming the transmitter
• Brief losses of transmitter signal (1h up to 10h)
• Extended losses of transmitter signal (more than 10h)
Output receives 30% of the manipulated variable (3 min. ON - 7 min. OFF)