1
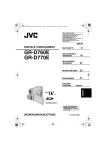
BEDIENUNGSANLEITUNG
ERSATZTEILKATALOG
OPERATING INSTRUCTIONS
SPARE PARTS CATALOGUE
20
10
30
0
ba
r
40
KDCNV-200/KDCNV-400
TIPPER TIE technopack GmbH, Otto-Hahn-Str. 5, D-21509 Glinde/Hamburg
Tel: (040) 72 77 04-0, Fax: (040) 72 77 04-77, E-Mail: [email protected]
01/02
Doppelclip-Halbautomat KDCNV-200/KDCNV-400
Semi-Automatic-Double-Clipper KDCNV-200/KDCNV-400
Der Vorwärtshub (zur Clipmaschine) sollte bei weicherem Brät ungefähr der Füllgeschwindigkeit der
Portion entsprechen. Die Einstellung der Geschwindigkeit erfolgt an dem Drosselrückschlagventil am
Darmbremszylinder (Abb. 5c). Die Geschwindigkeit
des Rückhubs (zur Füllmaschine) wird am Drosselventil am Schaltkasten (Abb. 5d) reguliert. Um ein
Rückziehen des Darms zu verhindern, darf der Rückhub nicht zu schnell erfolgen.
Die Füllmaschine wird immer dann gestartet, wenn
das Rollenhebelventil (C) (Abb. 6) bei geöffnetem
Raffer durchgeschaltet ist, und der Schalter „Automatisch Füllen” in Stellung „EIN” steht. Das Rollenhebelventil löst darüber hinaus die Bewegung der
Darmbremse aus.
Um den korrekten Zeitpunkt des FüllmaschinenStarts und der Darmbremsbewegung einzustellen,
gehen Sie wie folgt vor:
1. Lösen Sie den
Sterngriff (A) im
Langloch der Schaltkurve (B).
2. Verschieben Sie die
Schaltkurve (B) im
Langloch in die
gewünschte SchaltC
stellung.
3. Ziehen Sie den
Sterngriff (A) wieder
A
fest.
5.3
GmbH
The forward stroke as well as the return
stroke have to be completed before any
subsequent machine movements start!
5.2
Einstellen des Schaltpunkts für Füllmaschinenstart und Darmbremsrückhub
®
For soft products, the forward stroke (to the clipping
unit) should be approximately the same as the
stuffing speed. The speed is adjusted via the throttle
non-return valve on the casing brake cylinder (fig.
5c). The speed of the return stroke (to the stuffer) is
adjusted via the throttle non-return valve on the
switch box (fig. 5d). In order to prevent a retraction
of the casing, the return stroke must not be too fast.
Für den Vorwärts- und den Rückwärtshub
gilt: Vor Beginn der nachfolgenden
Maschinenbewegungen müssen sie jeweils beendet sein!
5.2
®
Setting the switching point for the
stuffer start and the return stroke of the
casing brake
The stuffing machine is always started when the
roller lever valve (C) (fig. 6) was connected with the
gatherer opened, and the switch "Automatic Stuffer"
is in position "ON". In addition, the roller lever valve
actuates the movement of the casing brake.
In order to set the correct moment of the stuffer start
and the casing brake movement, proceed as follows:
1. Loosen the star knob
(A) in the oblong
hole of the switching
cam (B).
2. Push the switching
cam (B) into the
B
required switch
position in the
oblong hole.
3. Fasten the star knob
(A).
Auswählen und
5.3 Selecting and
loading the clips
The selection of the
Abb. 6: Einstellen des Schaltpunkts
Fig. 6: Setting the switching point
2
deutsch/englisch
01/02
®
Doppelclip-Halbautomat KDCNV-200/KDCNV-400
Semi-Automatic-Double-Clipper KDCNV-200/KDCNV-400
Einfüllen der Clips
®
GmbH
correct clips (fig. 8a and 8b ) depends on two factors:
Die Auswahl der richtigen Clips (Abb. 8a und 8b) ist
von zwei Faktoren abhängig:
•
The size of the clip must be sufficient to take up
the volume of the casing,
•
Die Größe des Clips muss ausreichen, um das
Volumen des Darms aufzunehmen,
•
•
die Härte des Clips muss ausreichen, um dem
während der thermischen Behandlung entstehenden Überdruck standzuhalten.
the hardness of the clip must be sufficient to
withstand the pressure developing during the
thermal treatment.
Haben Sie den geeigneten Clip ausgewählt, füllen
Sie die Clips in die Magazinstangen ein, wie in Abb.
7a und 7b dargestellt.
After selecting the correct clip, load the clips into the
magazine rods as shown in fig. 7a and 7b.
The higher number of a clip type indicates the
increased hardness of the clip material (e.g. the clip
G201 is harder than the clip G200).
a
a
b
Abb. 7b: Einfüllen der Clips
Fig. 7b: Loading the clips
Abb. 7a: Entfernen des Gewichts
Fig. 7a: Removing the weight
Die ansteigende Endziffer der Clipreihen drückt die
höhere Härte des Materials aus (der Clip G201 ist
härter als der Clip G200).
G175
G176
G200
G201
5.6
Adjusting the knife
The pneumatic knife is started manually with the
G225
G228
370
Abb. 8a: Cliptypen für KDCNV-200
Fig. 8a: Clip types for KDCNV-200
390
400
Abb. 8b: Cliptypen für KDCNV-400
Fig. 8b: Clip types for KDCNV-400
releasing lever. Remove the locking pin from the
01/02
deutsch/englisch
3
®
Doppelclip-Halbautomat KDCNV-200/KDCNV-400
Semi-Automatic-Double-Clipper KDCNV-200/KDCNV-400
5.6
Einstellen des Messers
Das pneumatische Messer wird manuell über den
Auslösehebel gestartet. Sollen die Portionen manuell geschnitten werden, ziehen Sie den Dorn aus der
Hebelarretierung (Abb. 13b). Mit dem Handballen
kann jetzt das Messer an der gewünschten Stelle
nach dem Clippen ausgelöst werden. Soll automatisch im Dauerbetrieb geschnitten werden, muss der
Dorn wieder eingesteckt
werden (Abb. 13c).
®
GmbH
releasing lever if the portions shall be cut manually
(fig. 13 b). With the palm of your hand the knife can
now be actuated after the clipping process. If the
portions shall be cut automatically after every portion
reinsert the pin (fig. 13c).
The knife speed can be
lowered pneumatically at
the throttle non-return valve
for the knife (fig. 13a). Use
a screw driver to turn the
Die Messergeschwindigkeit
screw on the valve
kann am Drosselrückclockwise in order to lower
schlagventil des Messers
the speed. For thin casings
(Abb. 13a) pneumatisch gea lower speed may be used.
drosselt werden. Dazu dreThe cutting delay can be
hen Sie die Schraube im
adjusted by means of the
Uhrzeigersinn. Bei dünnen
throttle non-return valve
Abb. 13a: Einstellung von Messerverzögerung
Därmen kann mit kleineren
(exhaust throttle) in the
und Messergeschwindigkeit
Geschwindigkeiten gefahsignal line between clipping
Fig. 13a: Adjustment of knife delay
ren werden.
cylinder and PE-converter
and knife speed
Die Messerverzögerung kann
(only on machines with
am Drosselrückschlagventil
counter). The moment, when the knife cuts, is
(Abluftdrossel) in der Signalleitung zwischen Clipzylinder
adjusted. If it cuts too early, the casing slips out of the
und PE-Wandler eingestellt werden (nur bei Maschinen
clip. If it cuts too late, time is lost.
mit Zählwerk). Eingestellt wird der Zeitpunkt, wann das
Messer schneidet. Schneidet das Messer zu früh, rutscht
der Darm aus dem Clip. Schneidet das Messer zu spät,
geht Zeit verloren.
5.7
Adjusting the thread dispenser
The adjustment of the thread dispenser has to be
done in the described order:
5.7
Einstellen des Fadenspenders
Abb. 13b: Einstellung: Einzelauslösung des Messers
Fig. 13b: Setting: Knife cuts individually
4
Abb. 13c: Einstellung: Dauerschneiden des Messers
Fig. 13c: Setting: Knife cuts continuously
deutsch/englisch
01/02
®
Doppelclip-Halbautomat KDCNV-200/KDCNV-400
Semi-Automatic-Double-Clipper KDCNV-200/KDCNV-400
Die Einstellung des Fadenspenders erfolgt in der
nachfolgend beschriebenen Reihenfolge:
1. Nehmen Sie die Abdeckung (A) des Fadenspenders
ab (Abb. 14a). Legen Sie die Garnrolle (Spezialgarn, siehe Anhang I „Technische Daten“) in den
Fadenkorb.
2. Ziehen Sie den Faden aus dem Rollenkern, und
legen Sie ihn im Fadenspender und durch das
Fadenleitblech in die Clipöffnung ein, wie in Abb.
14b dargestellt.
3. Die Fadenlänge wird durch Versetzen des Anschlagbolzens (B) in den vier Bohrungen (Abb. 14b)
1.
2.
3.
4.
®
GmbH
Remove the cover (A) of the thread dispenser (fig.
14a). Put the thread roll (special thread, see Annex
I "Technical data") into the thread holder.
Pull the thread out of the roll core, and insert it into
the thread dispenser and through the threadguiding plate into the clip opening, as shown in
fig. 14b.
The length of the thread is determined by plugging
the thread bolt (B) into one of the four provided
bores (fig. 14b). Fig. 14b shows the adjustment
on delivery.
Depending on the product to be processed, the
B
20
10
30
0
ba
r
40
A
C
D
Abb. 14a: Einlegen der Garnrolle
Fig. 14a: Inserting the thread roll
4.
5.
5.8
Abb. 14b: Einstellung Fadenspender
Fig. 14b: Adjusting the thread dispenser
eingestellt. Abb. 14b zeigt die werkseitige Einstellung.
Entsprechend des zu fahrenden Produkts muss die
Geschwindigkeit des Vor- und Rückhubs des Fadenspenders bestimmt werden. Nehmen Sie diese
Einstellung an den Drosselrückschlagventilen am
Vorschubzylinder vor (Abb. 14b). Die Geschwindigkeit des Vorhubs wird am oberen Drosselrückschlagventil (C), die des Rückhubs am unteren
Drosselrückschlagventil (D) durch Drehen gegen
den Uhrzeigersinn erhöht.
Schließen Sie die Abdeckung des Fadenspenders,
und überprüfen Sie die Einstellung im „Trockendurchlauf”.
Einlegen des Schlaufenbandes
(manuelle Schlaufe TEBE)
01/02
5.
5.8
speed of the forward and the return stroke of the
thread dispenser has to be determined. The
adjustment is done via the throttle non-return valves
on the feeding cylinder (fig. 14b). The speed of
the forward stroke is increased by turning the
upper throttle non-return valve (C) counter-clockwise,
the speed of the return stroke is increased by
turning the lower throttle non-return valve (D)
counter-clockwise.
Close the cover of the thread dispenser, and check
your settings in a "dry run".
Inserting the loop tape
(manual loop TEBE)
Insert the loop tape as described below:
deutsch/englisch
5
®
Doppelclip-Halbautomat KDCNV-200/KDCNV-400
Semi-Automatic-Double-Clipper KDCNV-200/KDCNV-400
Legen Sie das Schlaufenband wie folgt ein:
1. Stecken Sie die Schlaufenbandrolle auf die Halterung. Stellen Sie dabei sicher, dass das Schlaufenband vorn abgewickelt wird. Sichern Sie die Rolle
mit der Klammer (Abb. 15a).
2. Führen Sie das Bandende, auf dem sich keine
Schlaufen befinden, unter dem Auflageblech
durch, und fädeln Sie es durch die Halterung am
Auflageblech (Abb. 15b).
3. Soll eine Schlaufe in den Clipverschluss
eingeclippt werden, ziehen Sie die vordere
Schlaufe ab (Abb. 15c), und legen Sie sie über
die beiden linken Rafferbleche (Abb. 15d).
6
1.
2.
3.
®
GmbH
Plug the loop tape roll onto the holder. Make sure,
that the loop tape is reeled off on the front side. Fix
the roll by means of the clamp (fig. 15a).
Lead the end of the tape that does not carry loops
underneath the supporting plate, and thread it
underneath the holder on the supporting plate
(fig. 15b).
If a loop is to be clipped into the seal, pull off the
first loop (fig. 15c), and apply it above the two
left-hand gatherer plates (fig. 15d).
Abb. 15a: Einfädeln des Schlaufenbandes
Fig. 15a: Threading the loop tape
Abb. 15b: Einfädeln des Schlaufenbandes
Fig. 15b: Threading the loop tape
Abb. 15c: Abziehen der Schlaufe
Fig. 15c: Pulling off the loop
Abb. 15d: Einlegen der Schlaufe
Fig. 15d: Inserting the loop
deutsch/englisch
01/02
®
Doppelclip-Halbautomat KDCNV-200/KDCNV-400
Semi-Automatic-Double-Clipper KDCNV-200/KDCNV-400
5.9
1.
Einrichten des Schlaufenautomaten
mit elektrischem Zähler
Schieben Sie eine volle Schlaufenrolle (A) auf
die Rollenaufnahme. Achten Sie darauf, dass
das Schlaufenband richtig herum abläuft, wie in
Abb. 16a, Detail a, gezeigt.
Stellen Sie Schalter 3 auf das Symbol für „Haltezylinder“ (ganz links). Der Haltezylinder wird
entriegelt.
2.
4
2.
Setting up the automatic looper
equipped with electrical counter
Slide a new loop roll (A) onto the roller support
. Take care that the loop tape is reeled off in the
correct position as shown in fig. 16a, detail a.
Set switch 3 to the symbol for "holding cylinder".
The holding cylinder is unlocked.
8
0
1x
1.
GmbH
6
2
0 1 2
15
3
14
4
13
5
12
6
11
7
10 9 8
5.9
®
bar
10
1
0
2
A
a
Stop
Start
3
D
F
b
E
Abb. 16a: Vorderansicht
Fig. 16a: Front view
01/02
deutsch/englisch
7
®
Doppelclip-Halbautomat KDCNV-200/KDCNV-400
Semi-Automatic-Double-Clipper KDCNV-200/KDCNV-400
I
K H G
4.
Legen Sie das Schlaufenband in der mit Pfeilen
gekennzeichneten Reihenfolge ein: Führen Sie
das Leerband (ohne Schlaufen) zunächst durch
den Haltezylinder (D). Fädeln Sie es dann von
unten um das Führungsblech und den Stift (E) und
führen
Sie
es,
wie
in
Abb. 16a gezeigt, zurück über die Umlenkrolle
(F) nach oben und durch den Bügel der oberen
Umlenkung (Abb. 16b) nach hinten in Richtung
Transportrolle (Igel) (G). Das Leerband liegt
dabei an der Umlenkung an.
Führen Sie das Leerband nun über die Umlenkrolle (H) und um den Igel (G), so dass die Stifte
des Igels in die Löcher des Vorlaufbandes greifen (Abb. 16c).
a
b
GmbH
G
K
H
Abb. 16c: Draufsicht
Fig. 16c: Top view
Abb. 16b: Seitenansicht von rechts
Fig. 16b: Right side view
3.
J
®
3.
4.
Insert the loop tape in the order marked by
arrows: Insert the empty tape (without loops)
through the holding cylinder (D). Thread it first
from underneath and then back over the guide
plate and under the pin (E). From there, as shown
in fig. 16a, guide it backwards and upwards via
the deflection roller (F) and through the bracket
of the upper deflection (fig. 16b) to the rear
towards the taper foot roller (G). The empty tape
is aligned closely to the guider.
Guide the emtpy tape over the deflection roller
(H) and around the taper foot roller (G), so that
the spikes of the roller grip into the perforation of
the tape (fig. 16c).
c
d
e
Abb. 17: Einlegen des Leerbandes
Fig. 17: Inserting the empty tape
8
deutsch/englisch
01/02