1
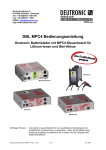
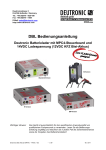
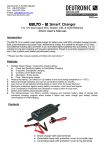
Tel.:
Tel. Sales:
Fax:
E-Mail:
Internet:
+49 (0)8707/920-0
+49 (0)8707/920-199
+49 (0)8707/1004
[email protected]
www.deutronic.com
Operating instructions
DBL 1700 / 2300
Charging computer for 12V lead batteries
Output current: DBL1700: 120A / DBL2300: 150A
Before initial operation of the charging computer read the
operating instructions carefully. Operate the unit according to
the instructions.
Deutronic DBL1700 / DBL2300
S. 1 / 18
Stand: 04 / 2005
Battery Charger DBL
For 12V-Lead-Acid Batteries only
OPERATION FOR TRAINED AND AUTHORISED PERSONS ONLY
Suitable for use with on-board electronic systems
USER INFORMATION
1. Before using the battery charger, read the operating instructions carefully.
2. Connect Network cable to specified voltage.
Connect charger cable to the battery terminal.
3. Turn on mains supply voltage.
Display shows status.
4. Start the charge process by pushing the Start/Stop-button.
The charging process is in operation and is indicated by the LED
The charging jaws may not be disconnected in this
operational state due to danger from sparking.
5. The charging process ends when the LED begins to blink.
The operation mode change to float charging mode automatically.
6. The charger unit can be stopped by pushing the Start/Stop-button.
The LED’s darken.
The charging cable can now be detached without any danger.
In case of malfunction or alarm messages, read operation instruction.
The display text depends on individual settings and software-versions.
Read operation instructions carefully.
Warranty: Deutronic has a 1 year warranty on the charging unit as long as the unit is used in
correspondence with specifications and corresponding regulations. This warranty is limited to
material and functional defects. Wear and tear through use of the unit is not covered under the
warranty, as well as all parts that are subject to wear-out failure (for example cables, jaws etc.).
No liability: The customer is responsible for the use of the unit according to specifications.
Regardless of the type, Deutronic is not liable for damage incurred through the use of the unit.
Deutronic DBL1700 / DBL2300
S. 2 / 18
Stand: 04 / 2005
CONTENTS
UNIT CHARACTERISTICS AND PERFORMANCE FEATURES
4
GENERAL SAFETY INFORMATION
4
INITIAL OPERATION
5
Operation Mode Battery Charger
5
Operation Mode Power Supply
5
Operation Mode Battery Charger
5
Turning off the unit
6
Error messages and error correction
6
Short Circuit Detection
6
Transmitting Status Messages to Remote Apparatus
7
Cable compensation
7
Defect Battery Detection
7
Charging Stand-Alone Batteries
8
Special Functions
8
Control elements
8
OPERATING INSTRUCTIONS SOFTWARE VERSION 2.1 DBL1700
Adjustable parameters (settings):
9
9
Procedures for changing the parameters (settings):
10
Parameter survey
16
Deutronic DBL1700 program flow chart for Software 2.1
17
Deutronic DBL1700 / DBL2300
S. 3 / 18
Stand: 04 / 2005
UNIT CHARACTERISTICS AND PERFORMANCE FEATURES
• Charging units for starter batteries from Deutronic were developed in consideration of all knowledge on the
requirements of modern batteries and vehicles. The charging procedure is controlled by a micro-processor
dependent on the charge state of the battery. Overvoltage of the battery and consequently danger from gas
emission is therefore excluded, the on-board electronics are protected.
• After charging, the unit switches over to float charging automatically guaranteeing a fully charged battery, ready for
use and assures optimal battery efficiency.
• The unit recognises operational malfunctions such as short circuits, reversed polarity, overvoltage or undervoltage of
the battery, contact problems and interruptions on the charging jaws automatically as well as overheating through
insufficient heat dissipation, fan failure and phase-loss of the 3-phase mains voltage. Charging power is discontinued
immediately (reduced) and automatically and the indicator shows the cause.
• Malfunction signals as well as interference immunity are verified according to current standards.
• The build-up of the charging current is carried out after testing the polarity so that sparking caused by a short-circuit
or reversed polarity is not possible.
• The unit operates with a permanent charge current maximum of 120 amps at 25°C ambient temperature.
• Units have a built-in fans without a fresh air intake into the internal of the charger, to avoid dust from entering into the
inside of the unit.
• Remote control of the unit is provided and allows for operation remote from location of the unit.
• All charging units from Deutronic are capable of being integrated to the on-board power supply and can assume the
energy supply of the on-board power supply if the batteries are detached. Therefore, a data loss in the on-board
computer is avoided. The on-board operation is guaranteed for all operational situations even during the attachment
and detachment of the jaws to the battery. Therefore, since the battery does not have to be removed for charging
there is, for example, a substantial cost savings in the manufacture of the automobile.
• A higher efficiency of the unit enables optimal energy storage in the battery and shorter charging times. Less energy
is consumed, creating less pollution of the environment.
• Small dimensions, ergonomically design and a low weight are distinguishing features of the Deutronic charging unit
as well.
• Operational modes: Charging unit or auxiliary power supply.
• Charging current can be read from the LCD indicator, additional information is available by pressing the Start/Stop
button.
• The start-up of the charging current has an integrated delay which can be set. (Factory set: 3 seconds.)
• The charging current is automatically turned off when the jaws from the charging cable are detached.
• Charging cable, remote control, and mains cable are plug-in units. Changing defective cables without opening the
unit is possible.
Accessories:
Different mounting brackets, charging cable, mains connector, remote switch
GENERAL SAFETY INFORMATION
•
•
•
•
•
•
•
•
•
Only use the charging unit for its intended application!
The unit may not be opened, opening the unit will result in the invalidation of the test certificate.
Attention: During battery charging explosive gases can be emitted. Avoid fire, open flames and sparking!
Only charge the batteries in well ventilated rooms!
Observe the guidelines of the battery manufacturer! Do not charge freshly loaded or defective batteries.
Only connect 12 Volt voltage rated batteries!
Power supply cables should show no defects. Replace cables which show defects immediately.
Batteries may under no circumstances be charged in the operational power supply mode (PS-Mode) !
The charger unit contains devices with the danger of arc forming and sparking. It is necessary during the charge
operation to place the unit in a special charger room or housing.
• Keep the charging unit away from dampness and wetness!
• Don’t connect not rechargeable batteries to the charger unit!
• The batteries must have a minimum rated capacity of 1 amp hour
Deutronic DBL1700 / DBL2300
S. 4 / 18
Stand: 04 / 2005
INITIAL OPERATION
Operation Mode Battery Charger
The unit only starts if the battery voltage is greater than 8 volts (adjustable: 2V to 15V), the current
consumption greater than 10 mA and the charging cable's polarity is correct. The charging current
and the charging voltage are shown in this operation on the display. If the Start/Stop button is
pressed longer than 3 seconds, additional information is shown on the display.
Operation Mode Power Supply
The unit starts without batteries attached as well, and in general the conditions valid in the
operational mode charging are valid here as well. (Unit works as a mains power supply). In this
operational mode the message "Power Supply - Mode" (second line) as well as the output voltage
(upper right) and outgoing current (upper left) are shown.
The switchover between the operation modes as well as the change of basic settings are taken
from the section on settings in the parameter menu.
Operation Mode Battery Charger
1. Connect only to power supply system after the voltage is adjusted to the data on the type plate.
2. Attach the charging cable and the network cable to the unit.
3. Connect the mains voltage to on, the digital display blinks the message standby and the second
message battery error, if no battery is attached.
4. Attach charging jaws to the battery and/or charging points and make sure they are secure. The
output voltage (battery voltage) is shown in the upper right in the display.
5. Start the unit by pressing the Start/Stop button [6] or remote switch, the green LED [2] lights up,
the message standby appears and the actual charging current is shown in the display. All other
consumers connected must be turned off so that the value shown corresponds to the charging
current. Output current = charging current + current consumption of the additional consumers.
6. The unit starts after a 3 second delay. If this is not the case please read „Error Messages and
Error Correction“ on page 3.
ATTENTION: T h e c h a r g i n g j a w s m a y n o t b e d e t a c h e d i n t h i s
operational state due to danger from sparking.
7. By pressing the Start/Stop button longer than 3 seconds additional information in 3 different
info-levels is shown in the display.
Info-level 0:
Info-level 1:
Info-level 2:
Output current and output voltage
Peak-value of the output current and current limit
Charging time and ampere hours
8. The charging process is ended when the LED begins to blink. The charging computer has now
switched over to float charging. To change the individual output values, timer and indicators,
please read the operating instructions of the software.
To change the settings or readings, please read operation instruction of the software.
Deutronic DBL1700 / DBL2300
S. 5 / 18
Stand: 04 / 2005
Turning off the unit
1. Turn off the unit by pressing the Start/Stop button [6] or remote switch, the green LED in
function [2] disappears, the message standby appears in the display.
2. The charging cable can now be detached without any danger.
3. To continue the process see step 4 under Initial Operation.
4. If work with the unit has been completed, disconnect the mains voltage to off. The indicators will
remain active for 15 seconds until the unit’s stored energy is let off.
Error messages and error correction
Indicator
Short circuit
Polarity reversed
Over voltage
Meaning
Short-circuited at output
The polarity connectors on the
battery are reversed.
On the output a voltage of more
than 16 V has appeared longer
than 5 seconds
Battery problem
Unit is switched to „battery
charger“, no battery attached.
Power Supply
Unit is switched to „auxiliary
power supply“
Fan No.1 defective
Fan No.2 defective
One phase of the 3 phases of
the mains is gone. The output
current is limited to 10A
FAN 1
FAN 2
PHASE LOSS
Troubleshooting
Remove charging cable, correct short circuit
Connect red jaw to plus, black jaw to minus
1. Consumer attached to error test (incorrect
battery)
2. Disconnect the mains voltage
3. Wait 20 seconds [till the indicator is gone]
4. Turn on the mains again
If the error appears again, the unit is
defective and must be repaired.
- Battery voltage < 8V *
- Charging jaws not
connected.
- Charging cable defective.
If battery is charged switch unit over in
parameter menu to charge mode.
Turn unit off and give it to repair
Turn unit off and give it to repair
Check all phases and connections of the
mains installation
The error messages FAN1, FAN2, PHASE LOSS can also be shown in combination together
* = Factory setting, changeable
Short Circuit Detection
The unit can be used to supply all 12VDC-components from a vehicle without any connected
battery in the power supply mode.
In case of short circuit in that operation mode flows an output current of more than 120 /150 Amps
(or the preset current limit value) for a short time. The unit detects overcurrent and the output
voltage collapse. If the output voltage falls under a special value (adjustable from 0V to 12V;
factory setting: 10 V) detect the unit short circuit and reduces the output current to 10 amps. If the
short circuit disappears the unit set the adjusted output voltage again. The re-entering to normal
operation can be programmed to individual load situations.
Deutronic DBL1700 / DBL2300
S. 6 / 18
Stand: 04 / 2005
Transmitting Status Messages to Remote Apparatus
3 pairs of insulated (SELV only) relais change-over contacts are provided. Configuration can be
done via software according to user requirements. Specific status or errors can be provided to
external controllers. As the following example shows, classification into 3 groups could be
accomplished: (other assignments are possible)
Relais 1
Status
Standby / under duty (charging, operation in power supply mode)
Relais 2
Error external
Performance is limited due to external reasons:
Phase loss, overload, short circuit etc.
Relais 3
Error internal
Performance is limited due to internal reasons:
Fan failure, over temperature etc.
Cable compensation
The indicated output voltage in the display is the voltage between the two output connectors in the
front of the unit and not the voltage between the two charger jaws because of the voltage drop
over the charger cables. The power supply operation with long cables forces extreme voltage
drops. To avoid voltage drops and errors it is possible to compensate the cable resistance. For a
successful cable compensation please read the operation instruction under [18] Cable Comp. After
Compensation is the indicated voltage at the display is the voltage between the two charging jaws.
Cable compensation is only possible in the Power Supply Mode.
Defect Battery Detection
To detect defect batteries it is necessary to adjust the maximum amps hours (under [2] Operation
Instruction) before the charge operation starts.
The adjusted ampere hours should be not smaller than the written ampere hours on the battery.
The unit stops charging before the battery is charged high enough.
The best way to detect defect batteries is to adjust the ampere hours 10 to 20% higher than the
written ampere hours on the battery. For example a battery with 50 ampere hours should be
adjusted in the charger unit with 60 ampere hours.
In any case should the ampere hours in the charger unit be adjusted even when the „Defect
Battery Detection“ is „Off“, because the ampere hours - menu limits the charge process and avoids
over charging.
If the „Defect Battery Detection“ is active the charge process is stopped twice for 30 seconds
automatically. During that breaks the charger makes measurements from the battery voltage and
an internal computer separates good and bad batteries. In case of defect batteries stops the
charging process and in the display appears „DEFECT BATTERY“.
Deutronic DBL1700 / DBL2300
S. 7 / 18
Stand: 04 / 2005
Charging Stand-Alone Batteries
For reasons of direct access to on-board electronic systems, it is mandatory in operation mode
„Battery Charger“ not to exceed a maximum value of charging voltage. This voltage is 14.2V. It is
not possible to fully (100%) charge batteries with this relatively low value.
By selecting „Stand Alone Battery“ (general configuration menu), the charger switches to so called
„TOP-Mode“ instead to reduced FC-voltage, if the battery is fully charged. After charging to
maximum value the display shows „Battery full“.
In this special cold-charging technique short increases of output voltage are performed. The actual
agreed maximum values for on-board electronic systems are exceeded by a small amount (15.2V).
For this reason it is recommended in this operation mode, to disconnect the battery at least with
one pole, if there is the fear of interference with on-board electronic systems.
On the other hand, the low charging capability in regular charging configuration (85% full), is
sufficient for practical use. After starting the combustion motor, the generator takes care for further
charging the battery.
Special Functions
For reasons of continued improvement of the product, new measurement functions and regulation
functions are added to the package from time to time. The prefered field of application is
professional automobil manufacturing and maintenance. Detailed descriptions can be found at the
actual operating instructions for software of Deutronic battery chargers.
Control elements
[1] LCD display
[2] LED
[3] Interface
[4] Battery cable connector (black jaw - negative)
[5] Battery cable connector (red jaw + charging point)
[6] Start/Stop button
[7] Menu button
8
[8] Reduce button
7
[9] Increase button
6
[10] Enter button
[11] Jack for mains cable
1
9
10
2
11
3
5
4
Deutronic DBL1700 / DBL2300
S. 8 / 18
Stand: 04 / 2005
OPERATING INSTRUCTIONS SOFTWARE VERSION 2.1 DBL
Adjustable parameters (settings):
[1] Language
[2] Automatic Start
Charge Configuration
[3] Charging Voltage
[4] FC Voltage
[5] Starting Voltage
[6] Current Limit
[7] FC Current
[8] Re-start Current
[9] Ampere Hours
PS-Configuration
[10] PS Voltage
[11] PS Current
[12] PS-Timer
[13] PS-Timer Time
[14] ZRT-Current limit
[15] ZRT-Current limit Time
[16] ZRT-Time out Time
General Configuration
[17] Power On Mode
[18] Ext. Mode change
[19] Voltage Read-out
[20] Current Read-out
[21] Settings Lock
[22] Defkt.Bat.Detec.
[23] Short Circuit V
[24] Ah-Settings
[25] Stand-Alone Battery
[26] Timer 1
[27] Timer 2
[28] Timer 3
[29] Cable Comp
Factory Settings
[30] Factory Settings
[31] Inf. Selection
Deutronic DBL1700 / DBL2300
Not used (only English version).
Unit starts automatically when the Line voltage and Battery
have been correctly attached.
Output voltage during charging operations.
Float charging voltage
Starting sequence-threshold voltage: minimal battery
voltage at which the charging process begins
Maximum charging current
Charging current value at which the float charge operation
mode is initialised.
Current at which the charging process is re-started.
Maximum ampere hours in charging operation
Output voltage for Power Supply operation
Maximum output current in Power Supply operation
Time sequence mode
Setting of time interval length
Setting the value of current limit during time interval
Setting the current limit time duration during time interval
Setting the dead time after the time interval
BC mode :
Unit functions as a Battery Charger
PS mode:
Unit functions as auxiliary Power Supply
Switchover of Operational mode between PS and BC
modes after pressing the menu button 3 times
Number of digits after decimal point (1,2,3)
Number of digits after decimal point (1,2)
Option to lock control panel buttons with present settings
Defective Battery detection
Determines the Short circuit voltage level for shut down.
Ampere hours settings
Stand-Alone Battery. Charging with TOP-Mode.
Start delay after pressing the start button to the beginning
of the charging process
Time interval after which the earliest switchover to float
charging is carried out
Time interval after which the latest switchover to float
charging is carried out.
Measures and compensates for losses in the output cables.
Reset all parameters to factory settings
Determines type of information to be displayed as standard.
0: Charging current and Charging voltage
1: Current - peak value and Current limit
2: Summary:
Charge current output in (Ah)
Start time in (hh:mm)
Charge time in (hh:mm)
S. 9 / 18
Stand: 04 / 2005
Procedures for changing the parameters (settings):
MENUE-Button
"←" or "→"
ENTER
PO
P
Working through the menu step by step, only in forward direction. Following new
beginning. After end of submenu, reentering main menu
Entrance to the submenu
Leaving the menu
The display flashes PO in the bottom left hand corner, meaning that this settings will
not be activated on the next start-up of the unit.
The display flashes P in the bottom left hand corner, meaning that this settings will
be immediately actvated.
Important hint:
The software is a multitasking system. Changes of settings are allowed during simultaneous work off
of a preset mode.
[0] Preparing the charger unit:
1.
Connect only to an Input voltage rating as differentiated on the specifications label.
2.
Attach the network cable and charging cables to the unit.
3.
Connect the mains voltage to on, the digital display flashes the message Standby and
a second message Battery failure, if no battery is attached.
4.
By pushing the buttons "←" and "→" simultaneously, you enter the parameter menu which
is indicated by a flashing " P " in the lower left corner.
[1] Language
Not used (only English version)
[2] Automatic Start (on/off):
Prepare charger unit (see [0] steps 1 to 4)
5.
Press the "menu" button until Automatic Start is shown on the display.
6.
Select the desired operation parameter with the "← " or "→" button.
7.
Press "enter" button in order to leave the menu. The question Save settings Yes/No will appear in
the display (←= Yes and →= No). Selecting No, the value is only stored until the unit is turned off.
Selecting Yes, the value is stored in memory and will be available when the unit is turned on again.
With No, the message Caution! Are values synchron appears for a short time in the display
Entrance to the Charge Config. Menu
5.
6.
Prepare charger unit (see [0] steps 1 to 4).
Press “menu“ button until Charging Voltage is shown on the display.
With the buttons "←" or "→" you enter the charge menu. The message Charging Voltage will appear
in the display.
[3] Changing Charging Voltage:
See entrance to the Charge Config. Menu steps 1 to 6.
7.
Set the desired value with the "← " or "→" button.
8.
Press "enter" button in order to leave the menu. The question Save settings Yes/No will appear in
the display (←= Yes and →= No). Selecting No, the value is only stored until the unit is turned off.
Selecting Yes, the value is stored in memory and will be available when the unit is turned on again.
With No, the message Caution! Are values synchron appears for a short time in the display
[4] Changing FC Voltage (Float Charging Voltage):
See entrance to the Charge Config. Menu steps 1 to 6.
7.
Press “menu“ button until FC Voltage is shown on the display.
8.
Set the desired value with the "← " or "→" button.
9.
Press "enter" button in order to leave the menu. The question Save settings Yes/No will appear in
the display (←= Yes and →= No). Selecting No, the value is only stored until the unit is turned off.
Selecting Yes, the value is stored in memory and will be available when the unit is turned on again.
With No, the message Caution! Are values synchron appears for a short time in the display
Deutronic DBL1700 / DBL2300
S. 10 / 18
Stand: 04 / 2005
[5] Changing Starting Voltage:
See entrance to the Charge Config. Menu steps 1 to 6.
7.
Press the "menu" button until Starting Voltage is shown on the display.
8.
Set the desired value with the "← " or "→" button.
9.
Press "enter" button in order to leave the menu. The question Save settings Yes/No will appear in
the display (←= Yes and →= No). Selecting No, the value is only stored until the unit is turned off.
Selecting Yes, the value is stored in memory and will be available when the unit is turned on again.
With No, the message Caution! Are values synchron appears for a short time in the display
[6] Changing Current Limit (max. charge / output current):
See entrance to the Charge Config. Menu steps 1 to 6.
7.
Press the "menu" button until Current Limit is shown on the display.
8.
Set the desired value with the "← " or "→" button.
9.
Press "enter" button in order to leave the menu. The question Save settings Yes/No will appear in
the display (←= Yes and →= No). Selecting No, the value is only stored until the unit is turned off.
Selecting Yes, the value is stored in memory and will be available when the unit is turned on again.
With No, the message Caution! Are values synchron appears for a short time in the display
[7] Changing FC Current (float charging current):
See entrance to the Charge Config. Menu steps 1 to 6.
7.
Press the "menu" button until FC Current is shown on the display.
8.
Set the desired value with the "← " or "→" button.
9.
Press "enter" button in order to leave the menu. The question Save settings Yes/No will appear in
the display (←= Yes and →= No). Selecting No, the value is only stored until the unit is turned off.
Selecting Yes, the value is stored in memory and will be available when the unit is turned on again.
With No, the message Caution! Are values synchron appears for a short time in the display
[8] Changing Re-start Current :
See entrance to the Charge Config. Menu steps 1 to 6.
7.
Press the "menu" button until Re-start Current is shown on the display.
8.
Set the desired value with the "← " or "→" button.
9.
Press "enter" button in order to leave the menu. The question Save settings Yes/No will appear in
the display (←= Yes and →= No). Selecting No, the value is only stored until the unit is turned off.
Selecting Yes, the value is stored in memory and will be available when the unit is turned on again.
With No, the message Caution! Are values synchron appears for a short time in the display
[9] Changing Ampere Hours limit:
See entrance to the Charge Config. Menu steps 1 to 6.
7.
Press the "menu" button until Ampere Hours is shown in the display.
8.
Set the desired value with the "← " or "→" button.
9.
Press "enter" button in order to leave the menu. The question Save settings Yes/No will appear in
the display (←= Yes and →= No). Selecting No, the value is only stored until the unit is turned off.
Selecting Yes, the value is stored in memory and will be available when the unit is turned on again.
With No, the message Caution! Are values synchron appears for a short time in the display.
Entrance to the PS-Config. Menu
5.
6.
Prepare charger unit (see [0] steps 1 to 4).
Press “menu“ button until PS-Config is shown on the display.
With the buttons "←" or "→" you enter the PS-Config menu. The message PS Voltage will appear
in the display.
[10] Changing the PS Voltage (Power supply output voltage):
See entrance to the PS-Config. Menu steps 1 to 6.
7.
Press the "menu" button until PS Voltage is shown in the display.
8.
Select the desired value with the "← " or "→" button.
9.
Press "enter" button in order to leave the menu. The question Save settings Yes/No will appear in
the display (←= Yes and →= No). Selecting No, the value is only stored until the unit is turned off.
Selecting Yes, the value is stored in memory and will be available when the unit is turned on again.
With No, the message Caution! Are values synchron appears for a short time in the display.
Deutronic DBL1700 / DBL2300
S. 11 / 18
Stand: 04 / 2005
[11] Changing the PS Current (Power Supply Current):
See entrance to the Charge Config. Menu steps 1 to 6.
7.
Press the "menu" button until PS Current is shown in the display.
8.
Set the desired value with the "← " or "→" button.
9.
Press "enter" button in order to leave the menu. The question Save settings Yes/No will appear in
the display (←= Yes and →= No). Selecting No, the value is only stored until the unit is turned off.
Selecting Yes, the value is stored in memory and will be available when the unit is turned on again.
With No, the message Caution! Are values synchron appears for a short time in the display
[12] Changing PS-Timer (=ZRT-Timer derived from: Zeit-Raster-Timer)
See entrance to the Charge Config. Menu steps 1 to 6.
7.
Press the "menu" button until PS Timer is shown in the display.
8.
Select the desired option with the "← " or "→" button.
Function:
The ZRT-Timer (PS-Timer) gives the option, to monitoring a presetable current limit inside a
presetable time window. Exceeding the current limit longer than the preset time will turn off the unit.
[13] Changing PS-Timer Time
See entrance to the Charge Config. Menu steps 1 to 6.
9.
Press the "menu" button until PS Timer Time is shown in the display.
10.
Set the desired value with the "← " or "→" button.
Preset range: 1-999 seconds (total time of interval)
After expire of select value the unit switches to standby.
Restart of ZRT-Time (PS-Time) via STAR/STOP-Button.
[14] Changing ZRT-Current limit
See entrance to the Charge Config. Menu steps 1 to 6.
9.
Press the "menu" button until ZRT-Current limit is shown in the display.
10.
Select the desired option with the "← " or "→" button.
Yes:
ZRT-Current limit is preset current limit (PS Curent) reduced by 300 mA.
No:
ZRT-time interval ends after expire of preset ZRT-time.
[15] Changing ZRT-Current limit Time
See entrance to the Charge Config. Menu steps 1 to 6.
9.
Press the "menu" button until ZRT-Current limit Time is shown in the display.
10.
Set the desired value with the "← " or "→" button.
Preste range: 1-25 seconds (interval length of current limit monitoring)
Function: only valid inside ZRT-Interval
As soon as the load current equals the selested ZRT-Current limit, the monitoring timer gets started.
If the load current maintains the current limit value until the monitoring time expires, the unit switches
to STOP. Additional displays the message: „SG-Error“ (SG=Strom Grenze=Current limit).
Restart of new ZRT-Interval via START-Button (or remote control unit)
Reduction of load current below ZRT-Current limit before monitoring timer expires (short current
pulse) is disregarded (reset of timer).
Once more crossing the ZRT-Current limit restarts the monitoring timer from zero.
[16] Changing ZRT-Time out Time
See entrance to the Charge Config. Menu steps 1 to 6.
9.
Press the "menu" button until ZRT-Time out Time is shown in the display.
10.
Set the desired value with the "← " or "→" button.
Preset range: 1-120 seconds (interval length of dead time)
Function: only valid inside ZRT-Interval
A dead time can be selected after expire of ZRT-interval, or premature shut down because of SGError. No reaction of unit to START-button during this time.
Deutronic DBL1700 / DBL2300
S. 12 / 18
Stand: 04 / 2005
Entrance to the General Config. Menu
5.
6.
Prepare charger unit (see [0] steps 1 to 4).
Press “menu“ button until General Config is shown on the display.
With the buttons "←" or "→" you enter the General Config menu. The message Power ON Mode will
appear in the display.
[17] Changing the Power ON Mode
See entrance to the General Config. Menu steps 1 to 6.
7.
Press the "menu" button until Power ON Mode is shown on the display.
8.
Select the desired operation with the "← " or "→" button.
(← = PS and → = BC-mode) hold the button longer than 1 second.
BC-Modus operation as charging unit
PS-modus operation as auxiliary Power Supply
9.
Press "enter" button in order to leave the menu. The question Save settings Yes/No will appear in
the display (←= Yes and →= No). Selecting No, the value is only stored until the unit is turned off.
Selecting Yes, the value is stored in memory and will be available when the unit is turned on again.
With No, the message Caution! Are values synchron appears for a short time in the display
[18] Enabling Ext. Mode Change (External Mode Change) (yes/no):
See entrance to the General Config. Menu steps 1 to 6.
7.
Press the "menu" button until Ext. Mode Change is shown on the display.
8.
Select (Yes or No) with the "← " or "→" button
9.
Press "enter" button in order to leave the menu. The question Save settings Yes/No will appear in
the display (←= Yes and →= No). Selecting No, the value is only stored until the unit is turned off.
Selecting Yes, the value is stored in memory and will be available when the unit is turned on again.
With No, the message Caution! Are values synchron appears for a short time in the display
[19] Voltage Read-out variation in indication :
See entrance to the General Config. Menu steps 1 to 6.
7.
Press the "menu" button until Voltage Read-out is shown on the display.
8.
Select with the "← " or "→" button the desired number of digits (1;2;3) after the decimal point.
9.
Press "enter" button in order to leave the menu. The question Save settings Yes/No will appear in
the display (←= Yes and →= No). Selecting No, the value is only stored until the unit is turned off.
Selecting Yes, the value is stored in memory and will be available when the unit is turned on again.
With No, the message Caution! Are values synchron appears for a short time in the display
[20] Current Read-out variation in indication :
See entrance to the General Config. Menu steps 1 to 6.
7.
Press the "menu" button until Current Read-out is shown on the display.
8.
Select with the "← " or "→" button the desired number of digits (1;2) after the decimal point.
9.
Press "enter" button in order to leave the menu. The question Save settings Yes/No will appear in
the display (←= Yes and →= No). Selecting No, the value is only stored until the unit is turned off.
Selecting Yes, the value is stored in memory and will be available when the unit is turned on again.
With No, the message Caution! Are values synchron appears for a short time in the display
[21] Settings Lock :
ATTENTION: If the Settings Lock is activated with "←"(Yes), It can only be deactivated with a
Code connector plug (available at Deutronic Elektronik GmbH)
See entrance to the General Config. Menu steps 1 to 6.
7.
Press the "menu" button until Settings Lock is shown on the display.
8.
Set the desired operation with the "← " or "→" button (← = Yes and → = No).
9.
Press "enter" button in order to leave the menu. The question Save settings Yes/No will appear in
the display (←= Yes and →= No). Selecting No, the value is only stored until the unit is turned off.
Selecting Yes, the value is stored in memory and will be available when the unit is turned on again.
With No, the message Caution! Are values synchron appears for a short time in the display
Deutronic DBL1700 / DBL2300
S. 13 / 18
Stand: 04 / 2005
[22] Short Circuit Detection variation:
See entrance to the General Config. Menu steps 1 to 6.
7.
Press the "menu" button until Short-Circuit-Detec. is shown on the display.
8.
Connect the charger cables together (Short Circuit)
9.
Switch the unit on („Start/Stop“-button);
If the value of the short circuit voltage is already adjusted properly high, the display shows an Output
Current of IO = 10A; (upper trace left)
If the value of the short circuit voltage is adjusted to low, the display shows the actual Output
Current (IO = Current Limit [4]) and the voltage drop along the charger cables. (bottom trace, right)
Select with the "→" button the desired Short Circuit Voltage until the output current in the display
shows IO = 10A.
The Short Circuit Voltage depends only on the charger cables (Short Circuit during the test routine
on the cables). To detect short circuits exactly it is recommended to adjust the value of the short
circuit voltage higher by 1V (Press button "→").
Variation of short circuit detection only possible in PS-Mode.
[23] Defect Battery Detection :
To test defect batteries it is necessary to adjust the Ampere Hours [2] (Ampere Hours are written on the
battery) before the charge process starts. The detection of defect batteries is out of function if the value of
the ampere hours from the charge computer is smaller than the written value on the battery. The detection
works exactly if the value is up to 20% higher than the value of the battery.
For example: battery 50Ah, settings 60Ah.
If the detection is active, it stops the charging process twice for 30 seconds. During that breaks the charge
computer makes measurements. If the battery is defect, it stops the charge process and the display shows
„DEFECT BATTERY“ indicated.
See entrance to the General Config. Menu steps 1 to 6.
7.
Press the "menu" button until Defect Battery Detection is shown on the display.
8.
Press the "→" button to start the detection.
Press the "←" button to stop the detection
9.
Press "enter" button in order to leave the menu. The question Save settings Yes/No will appear in
the display (←= Yes and →= No). Selecting No, the value is only stored until the unit is turned off.
Selecting Yes, the value is stored in memory and will be available when the unit is turned on again.
With No, the message Caution! Are values synchron appears for a short time in the display
[24] Ah-Settings:
See entrance to the General Config. Menu steps 1 to 6.
7.
Press the "menu" button until Ah-Settings is shown on the display.
8.
Set the desired value with the "← " or "→" button .
9.
Press "enter" button in order to leave the menu. The question Save settings Yes/No will appear in
the display (←= Yes and →= No). Selecting No, the value is only stored until the unit is turned off.
Selecting Yes, the value is stored in memory and will be available when the unit is turned on again.
With No, the message Caution! Are values synchron appears for a short time in the display
[25] Stand-Alone Battery:
See entrance to the General Config. Menu steps 1 to 6.
7.
Press the "menu" button until Stand-Alone Bat. is shown on the display.
8.
Set the desired value with the "← " or "→" button .
9.
Press "enter" button in order to leave the menu. The question Save settings Yes/No will appear in
the display (←= Yes and →= No). Selecting No, the value is only stored until the unit is turned off.
Selecting Yes, the value is stored in memory and will be available when the unit is turned on again.
With Yes, comming down from regular charging current, the unit switches to so called „TOP-Mode“
after the charging current equals the preset float charge limit (FC-Current).
With No, the message Caution! Are values synchron appears for a short time in the display
[26] Changing Timer 1 :
See entrance to the General Config. Menu steps 1 to 6.
7.
Press the "menu" button until Timer 1 is shown on the display.
8.
Set the desired value with the "← " or "→" button.
9.
Press "enter" button in order to leave the menu. The question Save settings Yes/No will appear in
the display (←= Yes and →= No). Selecting No, the value is only stored until the unit is turned off.
Selecting Yes, the value is stored in memory and will be available when the unit is turned on again.
With No, the message Caution! Are values synchron appears for a short time in the display
Deutronic DBL1700 / DBL2300
S. 14 / 18
Stand: 04 / 2005
[27] Changing Timer 2:
See entrance to the General Config. Menu steps 1 to 6.
7.
Press the "menu" button until Timer 2 is shown on the display.
8.
Set the desired value with the "← " or "→" button.
9.
Press "enter" button in order to leave the menu. The question Save settings Yes/No will appear in
the display (←= Yes and →= No). Selecting No, the value is only stored until the unit is turned off.
Selecting Yes, the value is stored in memory and will be available when the unit is turned on again.
With No, the message Caution! Are values synchron appears for a short time in the display
[28] Changing Timer 3:
See entrance to the General Config. Menu steps 1 to 6.
7.
Press the "menu" button until Timer 3 is shown on the display.
8.
Set the desired value with the "← " or "→" button.
9.
Press "enter" button in order to leave the menu. The question Save settings Yes/No will appear in
the display (←= Yes and →= No). Selecting No, the value is only stored until the unit is turned off.
Selecting Yes, the value is stored in memory and will be available when the unit is turned on again.
With No, the message Caution! Are values synchron appears for a short time in the display
[29] Cable Compensation :
See entrance to the General Config. Menu steps 1 to 6.
7.
Press the "menu" button until Cable_Comp. is shown on the display.
8.
Set the desired option with the "← " or "→" button.
9.
Connect the charger cables together (Short Circuit)
10.
Press „→„ button.
11.
Switch the unit on („Start/Stop“-button);
After a few seconds the value of the compensation is shown in the display.
12.
Press the „ENTER“ button to save the settings.
[30] Change all parameters to Factory Settings :
Prepare charger unit (see [0] steps 1 to 4)
5.
Press the "menu" button until Factory Settings is shown in the display.
6.
Select (Yes or No) with the "← " or "→" button
7.
Press "enter" button in order to leave the menu. The question Save settings Yes/No will appear in
the display (←= Yes and →= No). Selecting No, the value is only stored until the unit is turned off.
Selecting Yes, the value is stored in memory and will be available when the unit is turned on again.
With No, the message Caution! Are values synchron appears for a short time in the display.
[31] Changing the Inf. Selection:
Prepare charger unit (see [0] steps 1 to 3)
4.
Press the "menu" button until Inf. Selection is shown on the display.
5.
Set the desired selection type with the "← " or "→" button.
0: Charging current and Charging voltage
1: Current-peak-value and Current limit
2: Summary
Charge load in (Ah)
Starting time in (hh:mm)
Charge time in (hh:mm)
Changing several parameters consecutively
Prepare charger unit (see [0] steps 1 to 4)
5.
Press the "menu" button until the desired parameter is shown in the display.
6.
Set the desired value with the "<- " and/or "->" button.
7.
Move to the next value to be changed with the "menu" button and follow the same procedure.
8.
Press "enter" button in order to leave the menu. The question Save settings Yes/No will appear in
the display (←= Yes and →= No). Selecting No, the value is only stored until the unit is turned off.
Selecting Yes, the value is stored in memory and will be available when the unit is turned on again.
With No, the message Caution! Are values synchron appears for a short time in the display
Important:
All parameters can be changed during the charging process or operation as
auxiliary power supply.
To change the settings from cable compensation and short circuit detection it
is necessary to switch over into Power Supply Mode.
Deutronic DBL1700 / DBL2300
S. 15 / 18
Stand: 04 / 2005
Parameter survey
Parameter
Automatic Start
Charging voltage
FC Voltage
Starting Voltage
Current Limit
FC Current
Recharge current
Ampere-hours
PS Voltage
PS Current
PS-Timer
PS-Timer Time
ZRT-Current limit
ZRT-Current limit Time
ZRT-Time out Time
Power On Mode
Ext. Mode change
Voltage Read-out
Current Read-out
Settings lock
Defect Batt. Detec.
Short Circuit Volt.
Ah-Settings
Stand-Alone Battery
Timer 1
Timer 2
Timer 3
Cable Comp.
Info Selection
Factory settings
Factory settings
yes
14,2 V
13,2 V
8,00 V
30,0 A
2,5 A
3,5 A
250 Ah
13,52 V
120 A
inactive
60sec
active
2 sec
20 sec
PS-mode
no
Digits: 1
Digits: 1
no
active
10V
no
no
3 sec.
15 min.
600 min.
no
0
not applicable
Minimum value
Maximum value
2,00 V
2,00 V
2,00 V
0,0 A
1,1 A
0,0 A
0 Ah
2,00 V
0A
15,5 V
15,5 V
14,7 V
120 A / 150A
10,0 A
31,0 A
6.000 Ah
15,5 V
120 A
1 sec
999 sec
1 sec
1 sec
25 sec
120 sec
0V
12V
0,5 sec.
1 min.
1 min.
60 sec.
240 min.
3000 min.
Resolution
yes, no
0,02 V
0,02 V
0,02 V
0,05 A
0,02 A
0,02 A
10 Ah
0,02 V
0,1 A
yes, no
1 sec
yes, no
1 sec
1 sec
BC/PS mode
yes, no
Digits: 1 - 3
Digits: 1 or 2
yes, no
yes, no
0,1V
yes, no
yes, no
0,1 sec.
1 min.
1 min.
yes, no
0,1,2
yes, no
Technical changes and errors reserved.
Deutronic DBL1700 / DBL2300
S. 16 / 18
Stand: 04 / 2005
Deutronic DBL program flow chart for Software 2.1
Program run
Charge Mode / Power Supply Mode
Sure?
Entrance to the Menu
⇐ and ⇒
Press Buttons for 3 seconds
Automatic-Start
Save settings Yes/No
To enter the submenu
press button for 1 sec
ENTER
⇐ or ⇒
MENUE-Button
Charge Config
Steps in submenu with the
„MENUE“ - Button
press⇐ or ⇒
press⇐ or ⇒
MENUE-Button
General Config
•
•
•
•
•
Charging Voltage
FC-Voltage
Starting Voltage
Current Limit
FC-Current
Re-Start-Current
Ampere Hours
•
•
MENUE-Button
PS-Config
Yes/No
press⇐ or ⇒
MENUE-Button
Factory Settings
•
•
•
•
•
•
•
PS-Voltage
PS-Current
PS-Timer N/Y
PS-Timer Time:XX
ZRT-Current limit N/Y
ZRT-Current limit Timet:XX
ZRT-Time out Time:XX
• Power On Mode PS/BC
• ext. Mode Change N/Y
• Voltage Read-Out, digit after
colon 1,2,3
• Current Read Out, digit after
colon 1,2
• Settings-Lock
• Short-Circuit Voltage (USC-Volt)
• Defect Battery Detection On/Off
• AH - Settings On/Off
• Stand-Alone Battery N/Y
• Timer 1/2/3
• Cable-Compensation
MENUE-Button
Yes/No
Deutronic DBL1700 / DBL2300
S. 17 / 18
Stand: 04 / 2005
Contact:
Deutronic Elektronik GmbH
Deutronicstrasse 5
D-84166 Adlkofen / Germany
Tel.: +49 (0)8707 / 920-0
Fax: +49 (0)8707 / 1004
E-Mail: [email protected]
http://www.deutronic.com
DC Nr. 33434
All data at nominal input, full load and 250 C ambient temperature, if not marked otherwise.
Technical modificationses and mistakes reserved.
Products are described by information contained in catalogs and data-sheets.It is not be considered as assured
qualities.Stresses listed under „Maximum Rating“ (one at a time) may be applied to devices without resulting in
permanent damage. The operation of the equipment for extended periods may affect device reliability. Limiting value
tolerance are subject to usual fluctuation margins.
Deutronic DBL1700 / DBL2300
S. 18 / 18
Stand: 04 / 2005