1
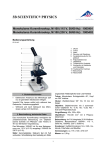
www.daylightcompany.com
WWI0710
ENGLISH
FRANCAIS
DEUTSCH
NEDERLANDS
ITALIANO
ESPAÑOL
ENGLISH (USA)
ESPAÑOL (USA)
FRANCAIS (USA)
D21098 / E21098 / U21098 / A21098
Ultimate Floorstanding Lamp
Instructions / Anweisungen / Instructies / Istruzioni / Instrucciones
K
M
C1
L
N
P
P
N
C2
Fig. 1
Fig. 2
ENGLISH
REMOVING ACCESSORY SUPPORTS
Thank you for purchasing this Daylight product. To register your
purchase and read more information about your guarantee,
please go to www.daylightcompany.com
To enhance the look of the lamp the Accessory Supports P
used to hold the magnifier and clip may be removed. Pull the
flexible arms
&
out of the supports. Pull the End Caps N
off the supports then unscrew and remove them. Re-fit the End
Caps M to the Lower Mount . Re-assemble in the reverse
order.
To ensure correct and safe operation please read the following
and retain for future reference.
GENERAL INFORMATION
CLEANING
The Ultimate Floorstanding Lamp provides light, magnification,
chart/pattern holding facility and a storage tray. The accessories
may be removed when not required converting the lamp into an
attractive sitting room lamp. It is supplied in self assembly form
– Please follow the instructions below for quick and easy
assembly.
SETTING UP YOUR LAMP
Weighted Base
Base Pole
C2
.
• If the shade becomes dirty remove the bulb and the shade.
Clean the shade with a soft cloth or in warm soapy water.
Thoroughly dry the shade before re-fitting.
• The tray may be cleaned with a soft cloth or in warm soapy
water. Thoroughly dry before re-fitting to the lamp.
• Do not use metal polish or spray cleaners on your lamp as
they will damage the surface.
Lamp Shade
REPLACING THE DAYLIGHT BULB
Shade Securing Ring
• Always switch off and remove the plug from the mains supply
and allow the lamp to cool before changing the bulb. NEVER
touch the bulb while the lamp is switched on.
20w ES(E27) Energy Saving Bulb
Flexible Arm with 1.75X magnification lens.
• The lamp is supplied with a 20w watt (equivalent to a 100w
Tungsten Bulb), E27 screw fitting Low Heat Daylight
Simulation Bulb. (This type of bulb is more suitable for
detailed work rather than a hot tungsten bulb)
Flexible Arm with chart/pattern holder clip.
Storage Tray with transparent lid.
• Assemble the lamp as follows:
- Screw the Base Pole
on to the thread on the Base
taking care not to cross the threads. Ensure that the pole is
tight.
- Screw the short pole
• If the lamp requires cleaning simply dust it to keep it clean.
• Take particular care when cleaning the high quality acrylic
lens. To avoid scratches use only a soft cloth dampened with
warm soapy water. NEVER USE AN ABRASIVE CLEANER.
Take care not to touch the lens with sharp objects.
• Carefully unpack the lamp. You should have the following
parts:
Main Assembly C1 with a detached short pole
An electrical cable fitted with a foot switch and plug
passes through C1 and C2 .
CAUTION: BEFORE CLEANING UNPLUG THE LAMP FROM
THE ELECTRICAL SUPPLY.
C2
on to the Main Assembly
C1
C1
C2
- Screw the Main Assembly (
&
) on to the
Base Pole . Ensure the assembly is screwed tight. Also
take care not to tangle the cable. If it does get tangled
make sure it is untangled before the lamp is used.
THE MAXIMUM WATTAGE BULB THE LAMP CAN ACCEPT IS
A 60W TUNGSTEN BULB - DO NOT USE BULBS OF A HIGHER
WATTAGE , THIS WILL DAMAGE YOUR LAMP AND INVALIDATE
YOUR GUARANTEE.
• Replacement Daylight Simulation Bulbs can be obtained
direct from your local stockist. Code No: D15200.
• Simply unscrew the old bulb and screw in the new bulb.
GRIP THE BULB BY THE PLASTIC BASE NOT THE GLASS
PART. DO NOT OVERTIGHTEN.
- Unscrew the Shade Securing Ring
from the lampholder
at the end of the curved pole
and place the shade
into position. Replace and tighten the Shade Securing
Ring
• The old bulb should be re-cycled where local facilities are
available.
- Screw in the 20w Energy Saving Bulb
GRIP THE BULB
BY THE PLASTIC BASE NOT THE GLASS PART. DO NOT
OVERTIGHTEN.
WARNING: DO NOT LEAVE THE LENS UNATTENDED IN DIRECT
SUNLIGHT AS THIS CONSTITUTES A FIRE HAZARD. ALWAYS
REMOVE THE LENS FLEXIBLE ARM WHEN NOT IN USE.
- If required, insert the flexible arms with lens
and clip
attachments into the holes on the Accessory Supports P
either side Lower Mount
CAUTION: Never touch the bulb when the lamp is switched on,
or position it so it may come into contact with curtains or drapes.
- If required, fit the Tray
to the pole as shown in Fig. 2 .
The tray should be offered up to the pole at 45°, hooked
on to the pole, rotated to a horizontal position and locked
in place with the latch. It should be fitted to the Fixed Pole
and the
L at any height between the Lower Mount
Upper Mount K
- Your lamp is now ready for use.
OPERATION
Plug the lamp into a convenient electrical socket and switch on
using the footswitch. The height may be adjusted by pressing in
the button M and moving the pole up or down as required.
SAFETY
CAUTION: Take care not to raise the pole too high. The lower
pole C2 should not come out of the Lower Mount
as the
lamp may become unstable if this occurs.
CAUTION: The shade fitted to this lamp is specially designed to
suit its maximum wattage, changing the shade could affect your
lamp's electrical safety.
CAUTION: Take care not get the flexible cord tangled around the
weighted base or pole during assembly and during use.
CAUTION: If the external flexible cable of this luminaire becomes
damaged, it should be exclusively replaced by a suitably
qualified person in order to avoid hazard.
IN CASE OF DOUBT CONSULT A QUALIFIED ELECTRICIAN
DAYLIGHT GUARANTEE/WARRANTY
This product is guaranteed against mechanical and electrical defects. For full Daylight guarantee Terms & Conditions
please refer to the Daylight website. Faulty products should be returned to the place of purchase and proof of purchase
must be presented. Please quote the model number in all correspondence. Returned products damaged by poor
packaging are the responsibility of the sender. During the guarantee period, Daylight will repair or replace the product
free of charge provided the fault was not caused by misuse, improper handling, negligence, normal wear and tear,
accidental damage, or by any modifications made by the purchaser. The guarantee does not cover consumables such
as bulbs, tubes or batteries. This guarantee does not affect your statutory rights.
GARANTIE DAYLIGHT
Ce produit est garanti contre tout défaut mécanique ou électrique. La version complète des conditions de garantie de
Daylight se trouve sur le site Internet de Daylight. Les produits défectueux doivent être renvoyés au magasin auprès
duquel ils ont été achetés, avec preuve d'achat à l'appui. Veuillez préciser la référence du produit dans toutes vos
correspondances. Tout dommage causé par un mauvais conditionnement du produit renvoyé demeure à la charge de
l’expéditeur. Pendant la période de garantie, Daylight s’engage à réparer ou remplacer gratuitement le produit
défectueux à condition que le mauvais fonctionnement ne soit pas dû à une mauvaise utilisation, à une mauvaise
manipulation, à une négligence, à une usure normale, à un accident ou à une modification effectuée par l’acquéreur. La
garantie ne couvre pas les consommables tels que les ampoules, les tubes et les batteries. Cette garantie n’affecte pas
vos droits statutaires.
DAYLIGHT GARANTIE
Der Hersteller übernimmt für dieses Produkt eine Garantie. Die vollständigen Daylight Garantiebedingungen sind auf der
Daylight Website abrufbar. Diese Garantie bezieht sich auf Fehler mechanischer und elektrischer Art. Fehlerhafte
Produkte müssen an den Verkaufsort zurückgesandt bzw. -gebracht werden und ein Kaufnachweis muss vorgelegt
werden. Bitte geben Sie bei sämtlicher Korrespondenz die Modellnummer an. Der Absender übernimmt die
Verantwortung für Warenrücksendungen, die durch mangelhafte Verpackung beschädigt werden. Während des
Garantiezeitraums wird Daylight das Produkt kostenlos reparieren oder ersetzen, vorausgesetzt, der Mangel ist nicht
durch falschen Gebrauch, unsachgemäße Handhabung, Unachtsamkeit, normale Abnutzung, versehentliche
Beschädigung oder durch vom Käufer vorgenommene Produktveränderungen entstanden. Die Garantie gilt jedoch nicht
für Verbrauchsteile wie Glühbirnen, Röhren und Batterien. Ihre gesetzlich vorgeschriebenen Rechte bleiben von dieser
Garantie unberührt.
DAYLIGHT GARANTIE
Dit product wordt gewaarborgd tegen mechanische en elektrische defecten. Voor de volledige garantievoorwaarden
van Daylight verwijzen we naar de website van Daylight. Defecte producten moeten met een aankoopbewijs worden
teruggebracht naar de plaats van aankoop. Het modelnummer moet in al uw briefwisseling worden vermeld.
Productbeschadigingen als gevolg van een slechte verpakking behoren tot de verantwoordelijkheid van de afzender.
Gedurende de garantieperiode zal Daylight het product gratis herstellen of vervangen op voorwaarde dat het defect niet
werd veroorzaakt door verkeerd gebruik of verkeerde behandeling, nalatigheid, normale slijtage, accidentele schade of
wijzigingen aangebracht door de koper. De garantie is niet van kracht voor verbruiksartikelen zoals lampen, buizen of
batterijen. Deze waarborg tast uw wettelijke rechten niet aan.
DAYLIGHT GARANZIA
La garanzia del prodotto copre i guasti meccanici ed elettrici. Per i Termini e le Condizioni integrali della garanzia,
consultare il sito web Daylight. I prodotti difettosi dovranno essere restituiti presso il punto vendita in cui sono stati
acquistati, presentando la prova d'acquisto. Specificare il numero di modello nella corrispondenza. Il mittente sarà
responsabile dei danni ai prodotti resi, dovuti a imballaggio inadeguato. Durante il periodo di garanzia, Daylight riparerà
o sostituirà gratuitamente il prodotto, purché il guasto non sia stato causato da abuso o uso improprio, negligenza,
normale usura, danno accidentale o eventuali modifiche apportate dall’acquirente. La garanzia non copre i prodotti
deteriorabili come lampadine, neon o batterie. La presente garanzia non compromette i diritti statutari.
GARANTIA DAYLIGHT
Este producto está garantizado contra defectos mecánicos y eléctricos. Para consultar los términos y condiciones
completos de la garantía Daylight, visite el sitio web de Daylight. Se deben devolver los productos defectuosos al punto
de compra y se debe presentar con él un comprobante de la compra. Cite el número de modelo en toda la
correspondencia. Las devoluciones que resulten dañadas por defectos de embalaje son responsabilidad del remitente.
Durante el periodo de garantía, Daylight reparará o sustituirá el producto de forma gratuita siempre que el fallo no haya
sido causado por un uso indebido, una manipulación incorrecta, negligencia, uso y desgaste normal, daño accidental
o modificaciones realizadas por el comprador. La garantía no cubre elementos consumibles como bombillas, tubos o
baterías. Esta garantía no afecta a sus derechos legales.
FRANÇAIS (USA)
Nous vous remercions d’avoir acheté ce produit Daylight.Visitez
www.daylightcompany.com pour enregistrer votre achat et obtenir de
plus amples informations sur votre garantie.
Afin de garantir une utilisation correcte, nous vous prions de lire
attentivement les instructions suivantes et de les conserver
soigneusement.
NETTOYAGE
ATTENTION : AVANT TOUT NETTOYAGE, DEBRANCHEZ LA LAMPE.
• La lampe doit simplement être dépoussiérée pour rester propre.
INFORMATIONS GENERALES
La lampe Prestige sur pied est accompagnée des accessoires
suivants : une lampe, une loupe, une pince à patron et un plateau de
rangement. Lorsqu’ils ne sont pas utilisés, les accessoires peuvent
être démontés pour que la lampe devienne une superbe lampe de
salon. La lampe doit être assemblée. Nous vous conseillons de suivre
les instructions ci-dessous pour un montage rapide et facile.
INSTALLATION DE LA LAMPE
• Enlevez l’ampoule et l’abat-jour si ce dernier est sale. Nettoyez l’abatjour à l’aide d’un chiffon doux ou d’une solution savonneuse tiède.
Essuyez soigneusement l’abat-jour avant de le remettre en place.
• Faire particulièrement attention lors du nettoyage de la lentille
acrylique. Pour éviter toute éraflure, utilisez un chiffon doux
légèrement humide imprégné d’une solution savonneuse.
N’UTILISEZ JAMAIS DE DETERGENT ABRASIF. Ne mettez jamais la
loupe en contact avec des objets pointus.
• Nettoyez le plateau de rangement à l’aide d’un chiffon doux ou
d’une solution savonneuse tiède. Essuyez-le soigneusement avant
de le remettre sur la lampe.
• Déballez la lampe en prenant les précautions nécessaires.
L’emballage doit contenir les pièces suivantes :
Base lestée
• N’utilisez pas de produits d’entretien pour métaux ou d’aérosols.
Cela risque d’endommager la surface de la lampe.
Tige inférieure
REMPLACEMENT DE L’AMPOULE DAYLIGHT
Composant principal C1 avec tige courte détachable C2
Cordon électrique avec interrupteur au pied et prise passant
dans C1 et C2
• Avant de changer une ampoule, vous devez toujours éteindre,
débrancher la lampe et attendre que l’ampoule refroidisse. NE
TOUCHEZ JAMAIS l’ampoule lorsque la lampe est allumée.
Abat-jour
• La lampe est fournie avec une ampoule à vis E26 de 20 W, lumière
de jour, basse température (aussi puissante qu’une ampoule
standard de 100 W). (Ce type d’ampoule est plus adéquat qu’une
ampoule au tungstène pour tous les travaux minutieux.)
Bague de sûreté
Ampoule à vis (E26) 20 W à économie d’énergie
Col de cygne avec loupe 3 dioptries
SEULES DES AMPOULES EQUIVALENTES A DES AMPOULES AU
TUNGSTENE DE 60 W OU MOINS DOIVENT ETRE UTILISEES.
L’UTILISATION D’UNE AMPOULE PLUS PUISSANTE RISQUE
D’ENDOMMAGER LA LAMPE ET D’INVALIDER LA GARANTIE.
Col de cygne avec une pince à patron
Plateau de rangement à couvercle transparent
• Assemblez la lampe de la manière suivante :
• Les ampoules lumière du jour de rechange sont disponibles auprès
de votre revendeur local. Réf. : D15200.
- Vissez la tige inférieure
sur le filet de la base
en prenant
soin d’aligner les filets correctement. Assurez-vous que la tige
est bien fixée.
- Vissez la tige courte
les capsules terminales N des supports et dévissez ces derniers pour
les enlever. Replacez les capsules terminales (M) sur la fixation
inférieure . Le remontage s’effectue dans le sens inverse.
C2
sur le composant principal
C1
.
- Vissez le composant principal ( C1 et C2 )sur la tige
inférieure . Assurez-vous que l’ensemble est parfaitement
vissé. Faites attention à ne pas entortillé le cordon. Si le cordon
est entortillé, désentortillez-le avant toute utilisation de la lampe.
- Dévissez la bague de sûreté
qui se trouve à l’extrémité de la
tige incurvée
et positionnez l’abat-jour . Replacez et serrez
la bague
- Vissez l’ampoule 20 W économie d’énergie
SAISISSEZ
L’AMPOULE PAR SA BASE EN PLASTIQUE, PAS PAR LA
PARTIE EN VERRE. VEILLEZ A NE PAS TROP SERRER LA
VIS.
- Si besoin, insérez les cols de cygne avec la loupe
et la pince
dans les orifices des supports pour accessoires P de
chaque côté de la fixation inférieure
- Si besoin, installez le plateau de rangement (Cf. Fig. 2 ). Pour
être emboîté, le plateau doit être présenté à 45° par rapport à la
tige. Ensuite, faites-le tourner en position horizontale et
maintenez-le en position à l’aide de l’attache. Il doit être installé
sur la tige fixe L entre la fixation inférieure
et la tige
supérieure K
- Votre lampe est prête à l’emploi.
FONCTIONNEMENT
Branchez la prise sur le secteur et allumez la lampe à l’aide de
l’interrupteur au pied. La hauteur peut être ajustée en appuyant sur le
bouton M et en faisant coulisser la tige vers le haut ou le bas en
fonction des besoins.
DEMONTAGE DES SUPPORTS POUR ACCESSOIRES
Pour transformer l’apparence de la lampe, les supports pour
accessoires P utilisés pour la loupe et la pince à patron peuvent être
démontés. Retirez les cols de cygne
et
des supports. Retirez
• Dévissez simplement l’ampoule usagée et vissez l’ampoule neuve.
SAISISSEZ L’AMPOULE PAR SA BASE EN PLASTIQUE, PAS PAR
LA PARTIE EN VERRE. VEILLEZ A NE PAS TROP SERRER LA VIS.
• L’ampoule doit si possible être recyclée.
SECURITE
AVERTISSEMENT : NE LAISSEZ JAMAIS LA LOUPE DANS UN
ENDROIT OÙ ELLE EST DIRECTEMENT TRAVERSEE PAR UNE
SOURCE DE LUMIERE. CELA POURRAIT PROVOQUER UN
INCENDIE. TOUJOURS ENLEVER LE COL DE CYGNE DE LA LOUPE
S’IL N’EST PAS UTILISE.
ATTENTION : Ne touchez jamais l’ampoule quand la lampe est allumée
et ne positionnez jamais la lampe de manière à ce que l’ampoule soit
en contact avec des rideaux ou des doubles rideaux.
ATTENTION : Ne surélevez pas la tige. Si la tige inférieure
de la fixation inférieure
la lampe devient instable.
C2
sort
ATTENTION : L’abat-jour installé sur cette lampe est conçu spécialement
pour supporter la puissance maximum de la lampe. Tout changement
d’abat-jour risque de compromettre la sécurité électrique de la lampe.
ATTENTION : Pendant l’utilisation de la lampe, n’entortillez pas le
cordon électrique autour de la base lestée ou de la tige.
ATTENTION : La lampe portative a une prise détrompée (une broche est
plus large que l'autre) afin de réduire les risques d'électrocutions. Cette
prise s'enclenche dans une prise murale dans un seul sens. Si la prise
ne s'enclenche pas correctement, essayer dans l'autre sens. Si elle ne
s'enclenche toujours pas, merci de contacter un électricien qualifié.
NE JAMAIS UTILISER AVEC UNE CABLE D'EXTENSION SI LA PRISE
NE S'ENCLENCHE PAS JUSQU'AU BOUT.
NE PAS MODIFIER OU OUVRIR LA PRISE DE LA LAMPE
NE PAS ESSAYER D'UTILISER LA LAMPE AVEC UN VARIATEUR
ELECTRONIQU
EN CAS DE DOUTE, VEUILLEZ CONSULTER UN ELECTRICIEN QUALIFIE.
FRANÇAIS
DEMONTAGE DES SUPPORTS POUR ACCESSOIRES
Nous vous remercions d’avoir acheté ce produit Daylight.Visitez
www.daylightcompany.com pour enregistrer votre achat et obtenir de
plus amples informations sur votre garantie.
Pour transformer l’apparence de la lampe, les supports pour
accessoires P utilisés pour la loupe et la pince à patron peuvent être
démontés. Retirez les cols de cygne
et
des supports. Retirez les
capsules terminales N des supports et dévissez ces derniers pour les
enlever. Replacez les capsules terminales (M) sur la fixation inférieure
. Le remontage s’effectue dans le sens inverse.
Afin de garantir une utilisation correcte, nous vous prions de lire
attentivement les instructions suivantes et de les conserver
soigneusement.
NETTOYAGE
INFORMATIONS GENERALES
La lampe Prestige sur pied est accompagnée des accessoires
suivants : une lampe, une loupe, une pince à patron et un plateau de
rangement. Lorsqu’ils ne sont pas utilisés, les accessoires peuvent
être démontés pour que la lampe devienne une superbe lampe de
salon. La lampe doit être assemblée. Nous vous conseillons de suivre
les instructions ci-dessous pour un montage rapide et facile.
ATTENTION : AVANT TOUT NETTOYAGE, DEBRANCHEZ LA LAMPE.
• La lampe doit simplement être dépoussiérée pour rester propre.
• Enlevez l’ampoule et l’abat-jour si ce dernier est sale. Nettoyez l’abatjour à l’aide d’un chiffon doux ou d’une solution savonneuse tiède.
Essuyez soigneusement l’abat-jour avant de le remettre en place.
• Faire particulièrement attention lors du nettoyage de la lentille
acrylique. Pour éviter toute éraflure, utilisez un chiffon doux
légèrement humide imprégné d’une solution savonneuse.
N’UTILISEZ JAMAIS DE DETERGENT ABRASIF. Ne mettez jamais la
loupe en contact avec des objets pointus.
INSTALLATION DE LA LAMPE
• Déballez la lampe en prenant les précautions nécessaires.
L’emballage doit contenir les pièces suivantes :
Base lestée
• Nettoyez le plateau de rangement à l’aide d’un chiffon doux ou
d’une solution savonneuse tiède. Essuyez-le soigneusement avant
de le remettre sur la lampe.
Tige inférieure
Composant principal C1 avec tige courte détachable C2
Cordon électrique avec interrupteur au pied et prise passant
dans C1 et C2
• N’utilisez pas de produits d’entretien pour métaux ou d’aérosols.
Cela risque d’endommager la surface de la lampe.
Abat-jour
REMPLACEMENT DE L’AMPOULE DAYLIGHT
Bague de sûreté
• Avant de changer une ampoule, vous devez toujours éteindre,
débrancher la lampe et attendre que l’ampoule refroidisse. NE
TOUCHEZ JAMAIS l’ampoule lorsque la lampe est allumée.
Ampoule à vis (E27) 20 W à économie d’énergie
Col de cygne avec loupe 3 dioptries
• La lampe est fournie avec une ampoule à vis E27 de 20 W, lumière
de jour, basse température (aussi puissante qu’une ampoule
standard de 100 W). (Ce type d’ampoule est plus adéquat qu’une
ampoule au tungstène pour tous les travaux minutieux.)
Col de cygne avec une pince à patron
Plateau de rangement à couvercle transparent
• Assemblez la lampe de la manière suivante :
SEULES DES AMPOULES EQUIVALENTES A DES AMPOULES AU
TUNGSTENE DE 60 W OU MOINS DOIVENT ETRE UTILISEES.
L’UTILISATION D’UNE AMPOULE PLUS PUISSANTE RISQUE
D’ENDOMMAGER LA LAMPE ET D’INVALIDER LA GARANTIE.
- Vissez la tige inférieure
sur le filet de la base
en prenant
soin d’aligner les filets correctement. Assurez-vous que la tige
est bien fixée.
- Vissez la tige courte
C2
sur le composant principal
C1
C1
.
C2
et
)sur la tige
- Vissez le composant principal (
inférieure . Assurez-vous que l’ensemble est parfaitement
vissé. Faites attention à ne pas entortillé le cordon. Si le cordon
est entortillé, désentortillez-le avant toute utilisation de la lampe.
- Dévissez la bague de sûreté
qui se trouve à l’extrémité de la
tige incurvée
et positionnez l’abat-jour . Replacez et serrez
la bague
• Les ampoules lumière du jour de rechange sont disponibles auprès
de votre revendeur local. Réf. : D15200.
• Dévissez simplement l’ampoule usagée et vissez l’ampoule neuve.
SAISISSEZ L’AMPOULE PAR SA BASE EN PLASTIQUE, PAS PAR
LA PARTIE EN VERRE. VEILLEZ A NE PAS TROP SERRER LA VIS.
• L’ampoule doit si possible être recyclée.
SECURITE
- Vissez l’ampoule 20 W économie d’énergie
SAISISSEZ
L’AMPOULE PAR SA BASE EN PLASTIQUE, PAS PAR LA
PARTIE EN VERRE. VEILLEZ A NE PAS TROP SERRER LA
VIS.
AVERTISSEMENT : NE LAISSEZ JAMAIS LA LOUPE DANS UN
ENDROIT OÙ ELLE EST DIRECTEMENT TRAVERSEE PAR UNE
SOURCE DE LUMIERE. CELA POURRAIT PROVOQUER UN
INCENDIE. TOUJOURS ENLEVER LE COL DE CYGNE DE LA LOUPE
S’IL N’EST PAS UTILISE.
- Si besoin, insérez les cols de cygne avec la loupe
et la pince
dans les orifices des supports pour accessoires P de
chaque côté de la fixation inférieure
ATTENTION : Ne touchez jamais l’ampoule quand la lampe est allumée
et ne positionnez jamais la lampe de manière à ce que l’ampoule soit
en contact avec des rideaux ou des doubles rideaux.
- Si besoin, installez le plateau de rangement (Cf. Fig. 2 ). Pour
être emboîté, le plateau doit être présenté à 45° par rapport à la
tige. Ensuite, faites-le tourner en position horizontale et
maintenez-le en position à l’aide de l’attache. Il doit être installé
sur la tige fixe L entre la fixation inférieure
et la tige
supérieure K
- Votre lampe est prête à l’emploi.
FONCTIONNEMENT
Branchez la prise sur le secteur et allumez la lampe à l’aide de
l’interrupteur au pied. La hauteur peut être ajustée en appuyant sur le
bouton M et en faisant coulisser la tige vers le haut ou le bas en
fonction des besoins.
ATTENTION : Ne surélevez pas la tige. Si la tige inférieure
de la fixation inférieure
la lampe devient instable.
C2
sort
ATTENTION : L’abat-jour installé sur cette lampe est conçu spécialement
pour supporter la puissance maximum de la lampe. Tout changement
d’abat-jour risque de compromettre la sécurité électrique de la lampe.
ATTENTION : Pendant l’utilisation de la lampe, n’entortillez pas le
cordon électrique autour de la base lestée ou de la tige.
ATTENTION : Si vous constatez que le cordon électrique de la lampe
est endommagé, faites-le remplacer par un électricien qualifié afin
d’éviter tout accident.
EN CAS DE DOUTE, VEUILLEZ CONSULTER UN ELECTRICIEN QUALIFIE.
DEUTSCH
Vielen Dank, dass Sie sich für dieses Daylight Produkt entschieden
haben.Bitte registrieren Sie Ihr gekauftes Produkt unter
www.daylightcompany.com. Dort können Sie auch weitere
Informationen zu Ihrer Garantie nachlesen.
Beachten Sie bitte die folgenden Hinweise und bewahren Sie diese
zum späteren Nachschlagen auf, um einen sachgemäßen und sicheren
Gebrauch zu gewährleisten.
ALLGEMEINE INFORMATIONEN
Die ultimative Standleuchte ist eine mit einer Lupe, einem Musterhalter
und einer Ablage ausgestattete Lichtquelle. Die Leuchte kann nach
Abnehmen des Zubehörs als attraktive Wohnzimmerleuchte dienen. Die
Leuchte wird zerlegt geliefert. Für einen schnellen und einfachen
Aufbau die folgenden Anweisungen befolgen.
AUFBAU IHRER LEUCHTE
• Die Leuchte vorsichtig auspacken. Im Lieferumfang enthalten sind:
Schwerer Standfuß
Ständerstange
Hauptteil C1 mit abgenommener kurzer Stange C2
sowie einem Stromkabel mit Fußschalter und Stecker, das
durch C1 und C2 hindurchführt.
Leuchtenschirm
Schirmbefestigungsring
20-W-Energiesparbirne mit E27-Sockel
Schwenkbarer Arm mit Lupe (1,75fache Vergrößerung)
Schwenkbarer Arm mit Clip zum Halten von Mustern bzw.
Vorlagen
Ablage mit transparenter Abdeckung
• Die Leuchte wie folgt zusammensetzen:
- Die Ständerstange
auf das Gewinde des Standfußes
drehen. Dabei darauf achten, dass die Gewinde nicht schief
eingedreht werden. Sicherstellen, dass die Stange festsitzt.
- Die kurze Stange C2 in den Hauptteil C1 einschrauben.
- Den Hauptteil C1 & C2 auf die Ständerstange
aufschrauben. Sicherstellen, dass alle Komponenten fest
verschraubt sind. Ebenfalls darauf achten, dass sich das Kabel
nicht verheddert. Falls dies doch geschehen sollte, unbedingt
vor dem Gebrauch der Leuchte entheddern.
- Den Schirmbefestigungsring
von der Fassung am Ende der
gebogenen Stange
abschrauben und den Schirm
in die
gewünschte Position bringen. Dann den Schirmbefestigungsring
wieder einschrauben und fest anziehen.
- Die 20-W-Energiesparbirne
einschrauben.
- Falls erforderlich, die schwenkbaren Arme mit der Linse
und
dem Clip
in die Löcher der Zubehöraufnahmen P auf
beiden Seiten der unteren Halterung
einsetzen.
- Falls benötigt, die Ablage
wie in Fig. 2 gezeigt an der
Stange befestigen. Die Ablage in einem 45°-Winkel an die
Stange heranführen und dann durch Einhaken befestigen.
Anschließend in eine horizontale Position bringen und mit dem
Riegel in der korrekten Position sichern. Sie sollte an dem
feststehenden Ständer L zwischen der unteren Halterung
und der oberen Halterung K befestigt werden.
- Die Leuchte ist jetzt einsatzbereit.
BETRIEB
Den Stecker in eine geeignete Steckdose stecken und das Gerät mit
dem Fußschalter einschalten. Die Höhe kann durch Betätigung der
Taste M und das Hinauf- bzw. Herunterschieben der Stange eingestellt
werden.
Abschlusskappen N von den Aufnahmen entfernen. Diese
anschließend abschrauben und abnehmen. Die Abschlusskappen M
wieder auf der unteren Halterung
anbringen. Beim Wiederanbringen
in umgekehrter Reihenfolge vorgehen.
REINIGUNG
ACHTUNG: VOR DER REINIGUNG DEN STECKER DER LEUCHTE
AUS DER STECKDOSE ZIEHEN!
• Verschmutzungen können einfach mit einem Staubtuch entfernt
werden.
• Bei Verschmutzung des Schirms die Glühbirne und den Schirm
entfernen. Den Schirm mit einem weichen Tuch oder mit warmer
Seifenlauge reinigen. Den Schirm vor dem Wiederanbringen
gründlich reinigen.
• Die hochwertige Acryllinse mit besonderer Vorsicht reinigen. Um
Kratzer zu vermeiden, unbedingt ein weiches, mit warmer
Seifenlauge angefeuchtetes Tuch verwenden. KEINESFALLS
SCHEUERMITTEL VERWENDEN! Darauf achten, dass die Linse
nicht mit scharfen Gegenständen in Berührung kommt.
• Die Ablage kann mit einem weichen Tuch oder mit warmer
Seifenlauge gereinigt werden. Vor dem Wiederanbringen an der
Leuchte gründlich trockenreiben.
• Keine Metallpolitur oder Sprühreiniger verwenden, da sonst die
Leuchtenoberfläche beschädigt werden kann.
AUSTAUSCH DER DAYLIGHT GLÜHBIRNE
• Vor dem Austauschen der Glühbirne immer zuerst die Leuchte
ausschalten, den Stecker ziehen und die Leuchte abkühlen lassen.
KEINESFALLS die Glühbirne berühren, solange die Leuchte
eingeschaltet ist.
• Im Lieferumfang der Leuchte ist eine 20-WattTageslichtsimulationsglühbirne mit geringer Wärmeentwicklung
(entspricht einer 100-Watt-Wolframglühbirne) enthalten, die über
einen E27-Sockel verfügt. (Dieses Leuchtmittel eignet sich besser
für Feinarbeiten als eine heiße Wolframglühbirne.)
MIT DIESER LEUCHTE KÖNNEN WOLFRAMGLÜHBIRNEN MIT
MAXIMAL 60 WATT VERWENDET WERDEN. DURCH DEN EINSATZ
VON GLÜHBIRNEN MIT HÖHEREN WATTZAHLEN WIRD DIE
LEUCHTE BESCHÄDIGT UND DIE GARANTIE VERLIERT IHRE
GÜLTIGKEIT!
• Ersatztageslichtglühbirnen können Sie direkt bei The Daylight
Company oder bei Ihrem nächstgelegenen Fachhändler beziehen.
Referenznummer: D15200
SICHERHEIT
WICHTIGER HINWEIS: NIEMALS DIE LINSE UNBEOBACHTET DEM
DIREKTEN SONNENLICHT AUSSETZEN. BRANDGEFAHR! DEN
SCHWENKBAREN ARM MIT DER LINSE BEI NICHTGEBRAUCH
STETS ENTFERNEN!
ACHTUNG: Niemals die Glühbirne bei eingeschalteter Leuchte
berühren. Von Gardinen oder Vorhängen fernhalten!
ACHTUNG: Darauf achten, dass die Stange nicht zu hoch eingestellt
ist. Die untere Stange C2 sollte nicht aus der unteren Halterung
herausgenommen werden, da die Leuchte sonst an Stabilität verlieren
könnte.
ACHTUNG: Der Schirm eignet sich speziell für die maximal zulässige
Wattzahl der Leuchte. Durch die Verwendung eines anderen Schirms
könnte die Sicherheit der elektrischen Komponenten der Leuchte
beeinträchtigt werden.
ACHTUNG: Achten Sie darauf, dass sich das Stromkabel beim
Zusammenbau bzw. Betrieb der Leuchte nicht mit dem beschwerten
Fußbodenständer oder der Ständerstange verheddert.
ENTFERNEN DER ZUBEHÖRAUFNAHMEN
ACHTUNG: Wenn das Kabel dieser Leuchte beschädigt wird, sollte es
aus Sicherheitsgründen nur von einem qualifizierten Fachmann
ausgetauscht werden.
Zur optischen Aufwertung der Leuchte können die Zubehöraufnahmen
P für die Lupe und den Clip entfernt werden. Dazu die schwenkbaren
Arme
&
aus den Aufnahmen herausnehmen. Die
WENDEN SIE SICH IM ZWEIFELSFALL AN EINEN
ELEKTROFACHMANN!
ESPAÑOL (USA)
Gracias por adquirir este producto Daylight. Para registrar su compra
y saber más sobre la garantía de su producto, visite
www.daylightcompany.com
LIMPIEZA
PRECAUCIÓN: ANTES DE LIMPIARLA, DESENCHUFE LA LÁMPARA
DE LA RED ELÉCTRICA.
Para un funcionamiento correcto y seguro, lea las siguientes
instrucciones y consérvelas para futuras consultas.
• Si hubiera que limpiar la lámpara, basta con quitarle el polvo para
mantenerla limpia.
INFORMACIÓN GENERAL
• Si la pantalla se ensucia, quite la bombilla y la pantalla. Limpie la
pantalla con un paño suave o en agua jabonosa templada. Seque a
fondo la pantalla antes de volver a colocarla.
La lámpara de pie Ultimate proporciona iluminación, aumento, y la
capacidad de sujetar muestras/patrones y poner cosas en su
bandeja de depósito. Los accesorios pueden desmontarse cuando
no hagan falta, convirtiéndose el producto en una atractiva lámpara
de salón. El usuario deberá montar la lámpara. Siga estas
instrucciones para montarla fácil y rápidamente.
• Tenga especial cuidado al limpiar la lente acrílica de gran calidad.
Para evitar arañazos, use un paño suave humedecido con agua
jabonosa templada. NUNCA UTILICE LIMPIADORES ABRASIVOS.
Tenga cuidado de no tocar la lente con objetos afilados.
• La bandeja puede limpiarse con un paño suave o en agua jabonosa
templada. Séquela a fondo antes de volver a colocarla en la
lámpara.
MONTAJE DE LA LÁMPARA
• Desembale la lámpara con cuidado. Debería tener las siguientes
piezas:
Base lastrada.
• No use en la lámpara productos de limpieza en aerosol ni para
pulido de metales ya que podrían dañar la superficie.
Fuste de base
SUSTITUCIÓN DE LA BOMBILLA DAYLIGHT
Conjunto principal C1 con fuste corto separado C2 .
Un cable eléctrico provisto de interruptor de pie y enchufe que
pasa por C1 y C2 .
• Apague siempre la lámpara, desconecte el enchufe de la corriente
eléctrica y deje que la lámpara se enfríe antes de proceder a
cambiar la bombilla. No toque NUNCA la bombilla cuando la
lámpara esté encendida.
Pantalla de lámpara.
• La lámpara lleva una bombilla de simulación Daylight enroscable de
bajo calentamiento de 20 vatios (equivalente una bombilla de
tungsteno de 100 W) E26 (este tipo de bombillas es más adecuado
para trabajos minuciosos que la bombilla de tungsteno).
Aro de fijación de pantalla.
Bombilla de bajo consumo ES(E26) de 20 W.
Brazo flexible con lente de aumento x1,75.
Brazo flexible con pinza para sujeción de muestras/patrones.
LA BOMBILLA DE MÁS POTENCIA QUE PUEDE ADMITIR LA
LÁMPARA ES UNA BOMBILLA DE TUNGSTENO DE 60 W. NO
UTILICE BOMBILLAS DE MAYOR POTENCIA, YA QUE DAÑARÁ LA
LÁMPARA Y LA GARANTÍA QUEDARÁ INVALIDADA.
Bandeja de depósito con tapa transparente.
• Arme la lámpara de la siguiente forma:
- Enrosque el fuste
en la rosca de la base
con cuidado de
que no se trasrosque. Cerciórese de que el fuste esté apretado.
- Enrosque el fuste corto
C2
en el conjunto principal
C1
.
- Enrosque el conjunto principal ( C1 y C2 ) en el fuste de
la base
. Asegúrese de que el conjunto quede bien apretado.
Tenga también cuidado de no enredar el cable. Si se enredase,
asegúrese de desenredarlo antes de usar la lámpara.
• Las bombillas de simulación de luz diurna pueden adquirirse
directamente en los comercios locales. Núm. código: D15200.
• Sólo tiene que desenroscar la bombilla vieja y sustituirla por la nueva.
AGARRE LA BOMBILLA POR LA BASE DE PLÁSTICO, NO POR LA
PARTE DE CRISTAL. NO LO APRIETE EN EXCESO.
• Las bombillas antiguas deben reciclarse en las instalaciones locales
que estén disponibles.
- Desenrosque el aro de fijación de la pantalla
del
portalámparas en el extremo del fuste curvo
y coloque la
pantalla
en posición. Vuelva a colocar y apretar el aro de
fijación de la pantalla .
SEGURIDAD
- Enrosque la bombilla de bajo consumo de 20 W
AGARRE
LA BOMBILLA POR LA BASE DE PLÁSTICO, NO POR LA PARTE
DE CRISTAL. NO LO APRIETE EN EXCESO..
PRECAUCIÓN: No toque nunca la bombilla cuando la lámpara esté
encendida, ni la ponga donde pueda entrar en contacto con cortinas o
visillos.
- Si hace falta, introduzca los brazos flexibles con la lente
y la
pinza
en los orificios de los soportes de accesorios P de
cualquier lado de la fijación inferior .
PRECAUCIÓN: Tenga cuidado de no subir el fuste demasiado. El fuste
inferior C2 no debe salirse de la fijación inferior
ya que la
lámpara podría desestabilizarse si eso sucediera.
- Si hace falta, coloque la bandeja en el fuste como muestra la
Fig. 2 . La bandeja debería acercarse al fuste en un ángulo de
45°, engancharse en éste, girarse a una posición horizontal y
bloquearse en su sitio con el enganche. Debe colocarse en el
fuste fijo L a cualquier altura entre la fijación inferior
y la
fijación superior K .
LA BOMBILLA DE MÁS POTENCIA QUE SE PUEDE UTILIZAR EN LA
LÁMPARA ES UNA BOMBILLA DE TIPO A DE 60 W O MENOR
POTENCIA. NO UTILICE BOMBILLAS DE MAYOR POTENCIA, YA QUE
DAÑARÁ LA LÁMPARA Y LA GARANTÍA QUEDARÁ INVALIDADA.
- La lámpara ya está lista para utilizarse.
UTILIZACIÓN
Enchufe la lámpara en una toma de corriente eléctrica adecuada y
enciéndala con el interruptor de pie. La altura puede ajustarse
pulsando el botón M y subiendo o bajando el fuste lo necesario.
DESMONTAJE DE SOPORTES DE ACCESORIOS
Para mejorar el aspecto de la lámpara, pueden desmontarse los
soportes de accesorios P empleados para sujetar la lupa y la pinza.
Saque los brazos flexibles
y
de los soportes. Extraiga las
cofias (N) de los soportes, desenrósquelos y desmóntelos. Vuelva a
poner las cofias N en la fijación inferior . Para volver a montar,
siga el orden inverso.
ADVERTENCIA: NO DEJE NUNCA LA LENTE SIN VIGILANCIA BAJO
LA LUZ SOLAR YA QUE PODRÍA PROVOCAR UN INCENDIO. RETIRE
EL BRAZO FLEXIBLE DE LA LENTE SIEMPRE QUE NO LO UTILICE.
PRECAUCIÓN: La pantalla que lleva esta lámpara está especialmente
diseñada para la máxima potencia admitida, si se cambia la pantalla, la
seguridad eléctrica de la lámpara podría verse afectada.
PRECAUCIÓN: Tenga cuidado de que no se enrede el cable flexible en
la base lastrada ni en el fuste durante su montaje o utilización.
PRECAUCIÓN: Si se daña el cable flexible externo de la luminaria, sólo
debe sustituirlo una persona capacitada a fin de evitar riesgos.
EN CASO DE DUDA, CONSULTE CON UN ELECTRICISTA
CUALIFICADO
ENGLISH (USA)
Mount
Thank you for purchasing this Daylight product. To register your
purchase and read more information about your guarantee,
please go to www.daylightcompany.com
CLEANING
To ensure correct and safe operation please read the following
and retain for future reference
GENERAL INFORMATION
The Ultimate Floorstanding Lamp provides light, magnification,
chart/pattern holding facility and a storage tray. The accessories may
be removed when not required converting the lamp into an attractive
sitting room lamp. It is supplied in self assembly form – Please follow
the instructions below for quick and easy assembly.
SETTING UP YOUR LAMP
• Carefully unpack the lamp. You should have the following parts:
Weighted Base.
. Re-assemble in the reverse order.
CAUTION: BEFORE CLEANING UNPLUG THE LAMP FROM THE
ELECTRICAL SUPPLY.
• If the lamp requires cleaning simply dust it to keep it clean.
• If the shade becomes dirty remove the bulb and the shade. Clean the
shade with a soft cloth or in warm soapy water. Thoroughly dry the
shade before re-fitting.
• Take particular care when cleaning the high quality acrylic lens. To
avoid scratches use only a soft cloth dampened with warm soapy
water. NEVER USE AN ABRASIVE CLEANER. Take care not to touch
the lens with sharp objects.
• The tray may be cleaned with a soft cloth or in warm soapy water.
Thoroughly dry before re-fitting to the lamp.
• Do not use metal polish or spray cleaners on your lamp as they will
damage the surface.
REPLACING THE DAYLIGHT BULB
Base Pole.
Main Assembly C1 with a detached short pole
An electrical cable fitted with a foot switch and plug
passes through C1 and C2 .
C2
.
Lamp Shade.
Shade Securing Ring.
20w ES(E26) Energy Saving Bulb
• Always switch off and remove the plug from the mains supply and
allow the lamp to cool before changing the bulb. NEVER touch the
bulb while the lamp is switched on.
• The lamp is supplied with a 20w watt (equivalent to a 100w Tungsten
Bulb), E26 screw fitting Low Heat Daylight Simulation Bulb. (This type of
bulb is more suitable for detailed work rather than a hot tungsten bulb)
THE MAXIMUM WATTAGE BULB THE LAMP CAN ACCEPT IS A 60W
TUNGSTEN BULB - DO NOT USE BULBS OF A HIGHER WATTAGE,
THIS WILL DAMAGE YOUR LAMP AND INVALIDATE YOUR
GUARANTEE.
Flexible Arm with 1.75X magnification lens.
• Replacement Daylight Simulation Bulbs can be obtained
Flexible Arm with chart/pattern holder clip.
direct from your local stockist. Code No: U15200.
Storage Tray with transparent lid.
• Assemble the lamp as follows:
- Screw the Base Pole
on to the thread on the Base
taking care not to cross the threads. Ensure that the pole is
tight.
- Screw the short pole
C2
on to the Main Assembly
C1
C1
C2
- Screw the Main Assembly (
&
) on to the
Base Pole . Ensure the assembly is screwed tight. Also
take care not to tangle the cable. If it does get tangled
make sure it is untangled before the lamp is used.
- Unscrew the Shade Securing Ring
from the lampholder
at the end of the curved pole
and place the shade
into position. Replace and tighten the Shade Securing
Ring .
GRIP THE BULB
BY THE PLASTIC BASE NOT THE GLASS PART. DO NOT
OVERTIGHTEN.
- Screw in the 20w Energy Saving Bulb
- If required, insert the flexible arms with lens
and clip
attachments into the holes on the Accessory Supports P
either side Lower Mount .
- If required, fit the Tray
to the pole as shown in Fig. 2 .
The tray should be offered up to the pole at 45°, hooked
on to the pole, rotated to a horizontal position and locked
in place with the latch. It should be fitted to the Fixed Pole
and the
L at any height between the Lower Mount
Upper Mount K .
- Your lamp is now ready for use.
OPERATION
Plug the lamp into a convenient electrical socket and switch on using
the footswitch. The height may be adjusted by pressing in the button
M and moving the pole up or down as required.
REMOVING ACCESSORY SUPPORTS
To enhance the look of the lamp the Accessory Supports P used to
hold the magnifier and clip may be removed. Pull the flexible arms
&
out of the supports. Pull the End Caps N off the supports then
unscrew and remove them. Re-fit the End Caps M to the Lower
• Simply unscrew the old bulb and screw in the new bulb. GRIP
THE BULB BY THE PLASTIC BASE NOT THE GLASS PART.
DO NOT OVERTIGHTEN.
• The old bulb should be re-cycled where local facilities are
available.
SAFETY
WARNING: DO NOT LEAVE THE LENS UNATTENDED IN DIRECT
SUNLIGHT AS THIS CONSTITUTES A FIRE HAZARD. ALWAYS
REMOVE THE LENS FLEXIBLE ARM WHEN NOT IN USE.
CAUTION: Never touch the bulb when the lamp is switched on, or
position it so it may come into contact with curtains or drapes.
CAUTION: Take care not to raise the pole too high. The lower pole
C2
should not come out of the Lower Mount
as the lamp may
become unstable if this occurs.
THE MAXIMUM WATTAGE BULB WHICH CAN BE USED IN THE LAMP
IS A 60W TYPE - A BULB OR SMALLER - DO NOT USE BULBS OF A
HIGHER WATTAGE , THIS WILL DAMAGE YOUR LAMP AND
INVALIDATE YOUR WARRANTY
CAUTION: The shade fitted to this lamp is specially designed to suit its
maximum wattage, changing the shade could affect your lamp's
electrical safety.
CAUTION: Take care not get the flexible cord tangled around the
weighted base or pole during assembly and during use.
CAUTION: This portable lamp has a polarized plug (ONE BLADE IS
WIDER THAN THE OTHER) as a feature to reduce the risk of electric
shock. This plug will fit in a polarized outlet only one way. If the plug
does not fit fully in the outlet, reverse the plug and try the other way. If it
still does not fit contact a qualified electrician.
NEVER USE WITH AN EXTENSION CORD UNLESS THE PLUG CAN BE
FULLY INSERTED.
DO NOT TAMPER OR ALTER THE PLUG.
DO NOT ATTEMPT TO USE THE LAMP ON A DIMMING CIRCUIT
IN CASE OF DOUBT CONSULT A QUALIFIED ELECTRICIAN
NEDERLANDS
ACCESSOIRESDRAGERS VERWIJDEREN
Hartelijk dank voor de aankoop van dit Daylight-product. Om uw
aankoop te registreren en voor meer informatie over uw waarborg,
gaat u naar www.daylightcompany.com
Om de look van de lamp te verbeteren, kunnen de accessoirehouders
P voor het vergrootglas en de klem worden verwijderd. Trek de flexibele
armen
&
uit de houders. Trek de eindkapjes N van de houders,
schroef ze los en verwijder ze. Plaats de eindkapjes M terug op de
onderste assemblage . Monteer opnieuw in omgekeerde volgorde.
In het belang van een correct en veilig gebruik moet u de volgende
richtlijnen lezen en bewaren zodat u ze later kunt herlezen.
SCHOONMAKEN
ALGEMENE INFORMATIE
De Ultimate Floorstanding Lamp zorgt voor licht, vergroting, kan een
kaart of een patroon vasthouden en beschikt over een opbergbakje.
De accessoires kunnen worden verwijderd wanneer ze niet worden
gebruikt waardoor de lamp verandert in een aantrekkelijke
zitkamerlamp. De lamp wordt als zelfbouwpakket geleverd – volg de
richtlijnen voor een snelle en eenvoudige montage.
VOORZICHTIG: VOOR HET SCHOONMAKEN MOET U DE STEKKER
VAN DE LAMP UIT HET STOPCONTACT HALEN.
Lampenkap
• Om de lamp schoon te maken, volstaat eenvoudig afstoffen.
• Wanneer de kap vuil is, moet u de lamp en de kap verwijderen.
Maak de kap schoon met een zachte doek of in warm zeepwater.
Droog de kap grondig af voor u ze terugplaatst.
• U moet bijzonder zorgvuldig te werk gaan wanneer u de acryl lens
schoonmaakt. Deze is van hoge kwaliteit. Om krassen te vermijden,
mag u uitsluitend een zachte doek gebruiken die is bevochtigd met
warm zeepwater. GEBRUIK GEEN SCHUURMIDDELEN. Zorg
ervoor dat u de lens niet aanraakt met scherpe voorwerpen.
• Het bakje kan worden schoongemaakt met een zachte doek of in
warm zeepwater. Droog het grondig af voor u het weer aan de lamp
vastmaakt.
• Gebruik geen metaalpoets of sprays op uw lamp. Deze zullen de
oppervlakte beschadigen.
Bevestigingsring voor de lampenkap
DAYLIGHTLAMP VERVANGEN
LAMP INSTALLEREN
• Pak de lamp zorgvuldig uit. Dit zult u aantreffen:
Zware voet
Basisstaaf
Hoofdassemblage C1 met losse korte staaf C2 . Een
elektriciteitskabel met voetschakelaar en stekker loopt door
C1
en C2
Energiebesparende lamp 20w ES(E27)
• De lamp altijd uitschakelen en de stekker uit het stopcontact halen.
Laat de lamp afkoelen alvorens de gloeilamp te verwisselen. Raak
de gloeilamp NOOIT aan als de lamp aan is.
Flexibele arm met 1,75X vergrootglas.
Flexibele arm met klem voor kaarten of patronen
Opbergbakje met transparant deksel.
• Monteer de lamp als volgt:
- Schroef basisstaaf (B) vast op de schroefdraad van voet
terwijl u er zorg voor draagt de schroefdraad niet te
beschadigen door verkeerd te schroeven. Zorg ervoor dat de
staaf stevig vastzit.
- Schroef de korte staaf
C2
op de hoofdassemblage
C1
- Schroef de hoofdassemblage C1 & C2 op de
basisstaaf . Zorg ervoor dat de assemblage stevig
vastgeschroefd is. U moet er ook voor zorgen dat het snoer niet
in de knoop zit. Als het verstrengeld is, dan moet u het uit de
knoop halen voor u de lamp gebruikt.
- Schroef de bevestigingsring voor de lampenkap
van de
fitting aan het einde van de gebogen staaf
los, haal de ring
er af, en steek lampenkap
op haar plaats. Plaats de
bevestigingsring voor de lampenkap
terug en draai stevig
vast.
- Schroef de 20 watt spaarlamp
vast DE LAMP VASTGRIJPEN
BIJ DE PLASTIC VOET, NIET BIJ HET GLAZEN DEEL. NIET TE
HARD AANSPANNEN..
- Indien nodig, steekt de flexibele armen met lens
en klem
in de gaten van de accessoiredragers P aan beide kanten van
de onderste assemblage
- Indien nodig maakt u het opbergvakje
vast aan de staaf,
zoals u ziet in Fig. 2
U moet het bakje in een hoek van 45 graden houden ten
opzichte van de staaf en dan horizontaal draaien en vastzetten
met de grendel. Het moet worden vastgemaakt aan de vaste
staaf L op gelijk welke hoogte tussen de onderste assemblage
en de bovenste assemblage K
- De lamp is nu gebruiksklaar.
BEDIENING
Steek de lamp in een makkelijk bereikbaar stopcontact en schakel ze
in met behulp van de voetschakelaar. De hoogte kan worden
aangepast door op knop M te drukken en de staaf naar boven of
beneden te schuiven, naargelang dat nodig is.
• De lamp wordt geleverd met een koele Daylight-gloeilamp E27 van
20 watt met schroeffitting (gelijk aan een wolfraamgloeilamp van
100 watt). Dit type gloeilamp is veel geschikter voor gedetailleerd
werk dan een hete wolfraamgloeilamp.
DE LAMP KAN UITSLUITEND WORDEN GEBRUIKT MET
WOLFRAAMGLOEILAMPEN VAN TEN HOOGSTE 60 WATT GEBRUIK GEEN HOGER WATTAGE. HIERDOOR ZAL DE LAMP
BESCHADIGEN EN VERVALT UW GARANTIE.
• Daglichtsimulerende lampen ter vervanging van oude of versleten
lampen zijn verkrijgbaar bij uw lokale handelaar. Codenr.: D15200.
• Gewoon de oude lamp losdraaien en de nieuwe lamp indraaien.
DE LAMP VASTGRIJPEN BIJ DE PLASTIC VOET, NIET BIJ HET
GLAZEN DEEL. NIET TE HARD AANSPANNEN.
• De oude lamp moet gerecycleerd worden als dat mogelijk is in uw
streek.
VEILIGHEID
WAARSCHUWING: U MAG DE LENS NOOIT IN DIRECT ZONLICHT
LATEN LIGGEN OMDAT HIERDOOR BRAND ZOU KUNNEN
ONTSTAAN. ALTIJD DE FLEXIBELE ARM VOOR DE LENS
VERWIJDEREN WANNEER HIJ NIET WORDT GEBRUIKT.
VOORZICHTIG: raak de lamp nooit aan wanneer hij is ingeschakeld,
en zorg ervoor dat hij niet in contact komt met gordijnen.
VOORZICHTIG: zorg ervoor dat u de staaf niet te hoog uittrekt. De
onderste staaf C2 mag niet uit de onderste assemblage
komen
omdat de lamp onstabiel kan worden wanneer dit gebeurt.
VOORZICHTIG: de kap die bij deze lamp hoort, is speciaal ontworpen
voor het maximaal wattage. Als u de kap vervangt door een andere,
dan kan dit de elektrische veiligheid van uw lamp in gevaar brengen.
VOORZICHTIG: let er op dat het soepele elektrische snoer niet rond de
zware voet of de staaf wordt gewikkeld tijdens het monteren en tijdens
het gebruik.
VOORZICHTIG: als de externe flexibele kabel van de lamp beschadigd
raakt, dient hij ter voorkoming van ongevallen uitsluitend te worden
vervangen door een hiertoe gekwalificeerd persoon.
IN GEVAL VAN TWIJFEL DIENT U EEN BEVOEGD ELEKTRICIEN TE
RAADPLEGEN.
ITALIANO
Grazie per avere acquistato questo prodotto Daylight. Per registrare
l’acquisto e leggere ulteriori informazioni sulla garanzia, è possibile
visitare www.daylightcompany.com
Per assicurare il funzionamento corretto e sicuro, leggere e conservare
quanto segue a scopo di riferimento futuro.
INFORMAZIONI GENERALI
Oltre a fornire illuminazione e ingrandimento, la lampada da terra
Ultimate è dotata di struttura di supporto per disegni/modelli e vano
portaoggetti. Gli accessori possono essere rimossi per trasformarla in
una splendida lampada da salotto. È disponibile in versione montaggio
fai-da-te. Seguire le istruzioni riportate di seguito per un montaggio
rapido e semplice.
PREPARAZIONE DELLA LAMPADA PER L'USO
• Estrarre con cura la lampada dall’imballaggio, controllando che vi
siano tutti questi elementi:
Base pesante
Asta base
Gruppo principale C1 con astina separata C2 .
Il cavo elettrico dotato di interruttore a pedale e spina passa
attraverso C1 e C2 .
Paralume
Anello di fissaggio paralume
Lampadina a risparmio energetico da 20w ES (E27)
Braccio flessibile con lente d'ingrandimento da 1,75X
Braccio flessibile con clip di supporto per disegni/modelli
Vano portaoggetti con coperchio trasparente Sei ruote
• Montare la lampada secondo le seguenti istruzioni:
IL MONTAGGIO DELLE RUOTE È FACOLTATIVO. MA, UNA VOLTA
EFFETTUATO, NON NE CONSENTE LA RIMOZIONE. Capovolgere
e appoggiare la base
su un tappeto o su un panno. Inserire le sei
ruote nei fori ROSSI vicino al bordo esterno della base e spingere
manualmente fino allo scatto di posizionamento. Girare la base
appoggiandola sulle ruote.
- Avvitare l’asta base
sulla filettatura della base
prestando
attenzione a non incrociare i filetti. Verificare che l’asta sia ben fissata.
C2
C1
- Avvitare l’astina
sul gruppo principale
C1
- Avvitare il gruppo principale
e C2 sull’asta base
Verificare che il gruppo sia ben avvitato. Prestare attenzione anche a
non attorcigliare il cavo. Se necessario, sbrogliare il cavo prima di
utilizzare la lampada.
- Svitare l'anello di fissaggio paralume
dal porta-lampada
all’estremità dell’asta ricurva e montare il paralume
.
Riposizionare e fissare l'anello di fissaggio paralume .
- Avvitare la lampadina a risparmio energetico da 20w. AFFERRARE
LA BASE DI PLASTICA DELLA LAMPADINA, NON LA PARTE DI
VETRO. NON SERRARE ECCESSIVAMENTE.
- Inserire eventualmente i bracci flessibili con gli attacchi per lente
e clip
nei fori sui supporti per accessori P su ambo i lati del
supporto inferiore .
- Se necessario, installare il portaoggetti sull’asta come mostrato in
Fig. 2 . Inclinare il portaoggetti di 45° rispetto all’asta e agganciarlo
alla stessa, ruotarlo in posizione orizzontale e fissarlo con il blocco.
Il portaoggetti può essere montato sull’asta fissa L a qualsiasi
altezza tra supporto inferiore
e superiore K .
- La lampada è pronta per l'uso.
FUNZIONAMENTO
Inserire la lampada in una presa elettrica e accendere con l'interruttore
a pedale. Per regolare l’altezza, premere il pulsante M e alzare o
abbassare l'asta come desiderato.
N.B.: ALLA PRIMA ACCENSIONE, LA LAMPADA PUÒ EMANARE UN
LEGGERO ODORE, CHE CESSERÀ DOPO ALCUNE ORE DI UTILIZZO.
RIMOZIONE DEI SUPPORTI PER ACCESSORI
Per migliorare l’estetica della lampada, è possibile rimuovere i supporti
per accessori P utilizzati per fissare la lente d’ingrandimento e la
clip.Estrarre i bracci flessibili
e
dai supporti. Sfilare i cappucci alle
estremità N dai supporti, quindi svitarli e rimuoverli.Riposizionare i
cappucci alle estremità M sul supporto inferiore
Rimontare in
ordine inverso.
PULIZIA
ATTENZIONE: PRIMA DI PULIRE LA LAMPADA STACCARE LA SPINA
DALLA PRESA ELETTRICA.
• Per pulire la lampada, è sufficiente spolverarla.
• Se fosse necessario procedere a una pulizia più accurata del
paralume, smontare prima la lampadina e poi il paralume. Pulire il
paralume con un panno morbido eventualmente inumidito con
acqua calda insaponata. Asciugare bene il paralume prima di
rimontarlo.
• Prestare particolare attenzione durante la pulizia della lente acrilica
di alta qualità. Per evitare graffi della superficie, utilizzare solo un
panno morbido inumidito con acqua calda insaponata. NON USARE
MAI UN DETERGENTE ABRASIVO. Fare attenzione a non toccare
mai la lente con oggetti acuminati o taglienti.
• Pulire il vano portaoggetti con un panno morbido eventualmente
inumidito con acqua calda insaponata e asciugarlo bene prima di
rimontarlo sulla lampada.
• Non utilizzare prodotti per lucidare il metallo o detergenti spray in
quanto danneggerebbero la superficie della lampada.
SOSTITUZIONE DELLA LAMPADINA DAYLIGHT
Prima di sostituire la lampadina è assolutamente necessario spegnere
la lampada, estrarre la spina dalla presa di corrente e aspettare che la
lampada si sia raffreddata. NON toccare mai la lampadina mentre la
lampada è accesa.
• La lampada è fornita con una lampadina Daylight Simulation a
bassa emissione di calore con attacco a vite E27 da 20w
(equivalente a una lampadina al tungsteno da 100w) (questo tipo di
lampadina è più adatto per lavori di precisione rispetto a una
lampadina al tungsteno calda).
UNA LAMPADINA AL TUNGSTENO DA 60 WATT FORNISCE IL
WATTAGGIO MASSIMO CONSENTITO PER LA LAMPADA - NON
USARE LAMPADINE CON WATTAGGIO SUPERIORE, PERCHÉ
DANNEGGEREBBERO LA LAMPADA E RENDEREBBERO NULLA LA
GARANZIA.
• Le lampadine Daylight Simulation di ricambio si possono acquistare
direttamente presso i rivenditori locali. Codice n. D15200.
• Svitare semplicemente la lampadina usata e avvitare quella nuova.
AFFERRARE LA BASE DI PLASTICA DELLA LAMPADINA, NON LA
PARTE DI VETRO. NON SERRARE ECCESSIVAMENTE.
• Le lampadine usate dovranno essere riciclate presso le apposite
strutture locali
SICUREZZA
AVVERTENZA: NON LASCIARE LA LENTE INCUSTODITA ALLA LUCE
DIRETTA DEL SOLE, PERCHÉ CIÒ POTREBBE CREARE UN RISCHIO
DI INCENDIO. RIMUOVERE SEMPRE IL BRACCIO FLESSIBILE DELLA
LENTE QUANDO NON È UTILIZZATA.
ATTENZIONE: Non toccare mai la lampadina quando la lampada è
accesa e non posizionarla a contatto con tende o tessuti.
ATTENZIONE: Prestare attenzione a non alzare eccessivamente l’asta.
C2
L’asta inferiore
non deve fuoriuscire dal supporto inferiore
)
in quanto la lampada potrebbe perdere stabilità.
ATTENZIONE: Il paralume montato su questa lampada è
appositamente ideato per il wattaggio massimo consentito; cambiare il
paralume potrebbe compromettere la sicurezza elettrica della lampada.
ATTENZIONE: Prestare attenzione a non attorcigliare il cavo elettrico
flessibile intorno alla base pesante o all’asta durante il montaggio o
l’utilizzo.
ATTENZIONE: In caso di danneggiamento del cavo flessibile esterno di
questa lampada, farlo sostituire unicamente da una persona qualificata
per prevenire qualsiasi rischio.
IN CASO DI DUBBIO, CONSULTARE UN ELETTRICISTA
QUALIFICATO.
ESPAÑOL
Gracias por adquirir este producto Daylight. Para registrar su compra
y saber más sobre la garantía de su producto, visite
www.daylightcompany.com
LIMPIEZA
PRECAUCIÓN: ANTES DE LIMPIARLA, DESENCHUFE LA LÁMPARA
DE LA RED ELÉCTRICA.
Para un funcionamiento correcto y seguro, lea las siguientes
instrucciones y consérvelas para futuras consultas.
• Si hubiera que limpiar la lámpara, basta con quitarle el polvo para
mantenerla limpia.
INFORMACIÓN GENERAL
• Si la pantalla se ensucia, quite la bombilla y la pantalla. Limpie la
pantalla con un paño suave o en agua jabonosa templada. Seque a
fondo la pantalla antes de volver a colocarla.
La lámpara de pie Ultimate proporciona iluminación, aumento, y la
capacidad de sujetar muestras/patrones y poner cosas en su
bandeja de depósito. Los accesorios pueden desmontarse cuando
no hagan falta, convirtiéndose el producto en una atractiva lámpara
de salón. El usuario deberá montar la lámpara. Siga estas
instrucciones para montarla fácil y rápidamente.
• Tenga especial cuidado al limpiar la lente acrílica de gran calidad.
Para evitar arañazos, use un paño suave humedecido con agua
jabonosa templada. NUNCA UTILICE LIMPIADORES ABRASIVOS.
Tenga cuidado de no tocar la lente con objetos afilados.
• La bandeja puede limpiarse con un paño suave o en agua jabonosa
templada. Séquela a fondo antes de volver a colocarla en la
lámpara.
MONTAJE DE LA LÁMPARA
• Desembale la lámpara con cuidado. Debería tener las siguientes
piezas:
Base lastrada.
• No use en la lámpara productos de limpieza en aerosol ni para
pulido de metales ya que podrían dañar la superficie.
Fuste de base
SUSTITUCIÓN DE LA BOMBILLA DAYLIGHT
Conjunto principal C1 con fuste corto separado C2 .
Un cable eléctrico provisto de interruptor de pie y enchufe que
pasa por C1 y C2 .
• Apague siempre la lámpara, desconecte el enchufe de la corriente
eléctrica y deje que la lámpara se enfríe antes de proceder a
cambiar la bombilla. No toque NUNCA la bombilla cuando la
lámpara esté encendida.
Pantalla de lámpara.
• La lámpara lleva una bombilla de simulación Daylight enroscable de
bajo calentamiento de 20 vatios (equivalente una bombilla de
tungsteno de 100 W) E27 (este tipo de bombillas es más adecuado
para trabajos minuciosos que la bombilla de tungsteno).
Aro de fijación de pantalla.
Bombilla de bajo consumo ES(E27) de 20 W.
Brazo flexible con lente de aumento x1,75.
Brazo flexible con pinza para sujeción de muestras/patrones.
LA BOMBILLA DE MÁS POTENCIA QUE PUEDE ADMITIR LA
LÁMPARA ES UNA BOMBILLA DE TUNGSTENO DE 60 W. NO
UTILICE BOMBILLAS DE MAYOR POTENCIA, YA QUE DAÑARÁ LA
LÁMPARA Y LA GARANTÍA QUEDARÁ INVALIDADA.
Bandeja de depósito con tapa transparente.
• Arme la lámpara de la siguiente forma:
- Enrosque el fuste
en la rosca de la base
con cuidado de
que no se trasrosque. Cerciórese de que el fuste esté apretado.
- Enrosque el fuste corto
C2
en el conjunto principal
C1
.
- Enrosque el conjunto principal ( C1 y C2 ) en el fuste de
la base
. Asegúrese de que el conjunto quede bien apretado.
Tenga también cuidado de no enredar el cable. Si se enredase,
asegúrese de desenredarlo antes de usar la lámpara.
• Las bombillas de simulación de luz diurna pueden adquirirse
directamente en los comercios locales. Núm. código: D15200.
• Sólo tiene que desenroscar la bombilla vieja y sustituirla por la nueva.
AGARRE LA BOMBILLA POR LA BASE DE PLÁSTICO, NO POR LA
PARTE DE CRISTAL. NO LO APRIETE EN EXCESO.
• Las bombillas antiguas deben reciclarse en las instalaciones locales
que estén disponibles.
- Desenrosque el aro de fijación de la pantalla
del
portalámparas en el extremo del fuste curvo
y coloque la
pantalla
en posición. Vuelva a colocar y apretar el aro de
fijación de la pantalla .
SEGURIDAD
- Enrosque la bombilla de bajo consumo de 20 W
AGARRE
LA BOMBILLA POR LA BASE DE PLÁSTICO, NO POR LA PARTE
DE CRISTAL. NO LO APRIETE EN EXCESO..
PRECAUCIÓN: No toque nunca la bombilla cuando la lámpara esté
encendida, ni la ponga donde pueda entrar en contacto con cortinas o
visillos.
- Si hace falta, introduzca los brazos flexibles con la lente
y la
pinza
en los orificios de los soportes de accesorios P de
cualquier lado de la fijación inferior .
PRECAUCIÓN: Tenga cuidado de no subir el fuste demasiado. El fuste
inferior C2 no debe salirse de la fijación inferior
ya que la
lámpara podría desestabilizarse si eso sucediera.
- Si hace falta, coloque la bandeja en el fuste como muestra la
Fig. 2 . La bandeja debería acercarse al fuste en un ángulo de
45°, engancharse en éste, girarse a una posición horizontal y
bloquearse en su sitio con el enganche. Debe colocarse en el
fuste fijo L a cualquier altura entre la fijación inferior
y la
fijación superior K .
LA BOMBILLA DE MÁS POTENCIA QUE SE PUEDE UTILIZAR EN LA
LÁMPARA ES UNA BOMBILLA DE TIPO A DE 60 W O MENOR
POTENCIA. NO UTILICE BOMBILLAS DE MAYOR POTENCIA, YA QUE
DAÑARÁ LA LÁMPARA Y LA GARANTÍA QUEDARÁ INVALIDADA.
- La lámpara ya está lista para utilizarse.
UTILIZACIÓN
Enchufe la lámpara en una toma de corriente eléctrica adecuada y
enciéndala con el interruptor de pie. La altura puede ajustarse
pulsando el botón M y subiendo o bajando el fuste lo necesario.
DESMONTAJE DE SOPORTES DE ACCESORIOS
Para mejorar el aspecto de la lámpara, pueden desmontarse los
soportes de accesorios P empleados para sujetar la lupa y la pinza.
Saque los brazos flexibles
y
de los soportes. Extraiga las
cofias (N) de los soportes, desenrósquelos y desmóntelos. Vuelva a
poner las cofias N en la fijación inferior . Para volver a montar,
siga el orden inverso.
ADVERTENCIA: NO DEJE NUNCA LA LENTE SIN VIGILANCIA BAJO
LA LUZ SOLAR YA QUE PODRÍA PROVOCAR UN INCENDIO. RETIRE
EL BRAZO FLEXIBLE DE LA LENTE SIEMPRE QUE NO LO UTILICE.
PRECAUCIÓN: La pantalla que lleva esta lámpara está especialmente
diseñada para la máxima potencia admitida, si se cambia la pantalla, la
seguridad eléctrica de la lámpara podría verse afectada.
PRECAUCIÓN: Tenga cuidado de que no se enrede el cable flexible en
la base lastrada ni en el fuste durante su montaje o utilización.
PRECAUCIÓN: Si se daña el cable flexible externo de la luminaria, sólo
debe sustituirlo una persona capacitada a fin de evitar riesgos.
EN CASO DE DUDA, CONSULTE CON UN ELECTRICISTA
CUALIFICADO