1
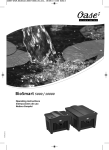
GAW_SwimSkim_USA_A5_end:. 20.02.12 09:38 Seite 2
02 H
SwimSkim
2
-
English
-
Information about these operating instructions
Welcome to OASE Living Water. You made a good choice with the purchase of this product SwimSkim.
Prior to commissioning the unit, please read the instructions of use carefully and fully familiarise yourself with the unit.
Ensure that all work on and with this unit is only carried out in accordance with these instructions.
Please strictly follow the enclosed instructions to ensure safe and correct handling of the product.
Keep these instructions in a safe place! Please also hand over the instructions when passing the unit on to a new
owner.
Symbols used in these instructions
The symbols used in this operating manual have the following meanings:
Risk of injury to persons due to dangerous electrical voltage
This symbol indicates an imminent danger, which can lead to death or severe injuries if the appropriate measures are not taken.
Risk of personal injury caused by a general source of danger
This symbol indicates an imminent danger, which can lead to death or severe injuries if the appropriate measures are not taken.
Important information for trouble-free operation.
Intended use
SwimSkim, in the following termed "unit", and all other parts from the delivery scope may be used exclusively as
follows:
− For cleaning garden pond surfaces.
− For aeration and supplying oxygen to garden ponds.
− Operation under observance of the technical data.
The following restrictions apply to the unit:
− Never use the unit to convey fluids other than water.
− Do not use for commercial or industrial purposes.
− Do not use in conjunction with chemicals, foodstuff, easily flammable or explosive substances.
Important! The unit is equipped with a permanent magnet. The magnetic field may affect the function
of pacemakers.
Use other than that intended
This unit can be dangerous and cause harm to persons if not used in accordance with these instructions. Any use not
in accordance with these instructions or modification(s) to the unit will void the limited warranty.
3
-
English
-
Assembly and installation (A, B)
Press the two floating bodies (1) into the channels in the container (2) provided for this purpose until they audibly
engage. Align the air distributor (4) as shown in figure B.
Place the unit in the pond. Submerge the unit until the pump chamber (3) and the container (2) are completely flooded.
Ensure that the skimmer flap (5) is in its correct position.
If necessary, anchor the unit to limit its movement radius. For this purpose, fasten a cord at the lug of the pump chamber (3) and anchor the other end of the cord at the edge or at the bottom of the pond.
Switching on / Switching off (C)
Attention! Dangerous electrical voltage.
Possible consequences: Death or severe injury.
Protective measures: Disconnect the power plug (13) prior to reaching into the water and commencing
work.
The unit switches on automatically when power connection is established.
Switching on: Plug the power plug (13) into the socket.
Switching off: Disconnect the power plug (13).
Maintenance and cleaning (D-I)
Attention! Dangerous electrical voltage.
Possible consequences: Death or severe injury.
Protective measures: Disconnect the power plug (C, 6) prior to reaching into the water and commencing
work.
Regular cleaning (D, E): Remove the filter basket (6) and the foam filter (7) from the unit, rinse with clean water and
reinstall.
Complete cleaning (F-H): Take the unit out of the water. Remove the air distributor (4) located beneath the pump
chamber (3). Press in the engagement lugs on three sides of the pump chamber (3) and remove the container (2).
Ensure that the air hose (9) does not slip off the injector (10). Remove the pump (10) and undo the union nut of the
injector (8). Clean all components using clean water and a brush.
Cleaning the pump (I): Open the pump cover (11) with the bayonet closure and remove the impeller (12). Clean all
components using clean water and a brush.
Reassembly: After cleaning the pump and the unit, reassemble in the reverse order.
Important: Route connection cable such that it cannot be pinched. Ensure that the air hose (G, 9) is routed without
kinks. The engagement lugs must audibly click when reassembling the pump chamber (3) and the container (2). Align
the air distributor (4) as shown in figure B.
Malfunctions
Malfunction
Cause
Remedy
The unit is not operating
No mains voltage
Check mains voltage
Insufficient delivery rate
Impeller blocked
Clean
Filter basket / foam filter soiled
Clean
Injector blocked
Clean
No aeration
The aerating hose between the floating body
and the injector is kinked or disconnected
Ensure secure fastening and avoid kinks in the
aerating hose
Unit switches off after a short running period
Water temperature too high
Note maximum water temperature of 95°F
(+ 35°C)
4
-
English
-
Storage/Over-wintering
Remove the unit at temperatures below zero degrees centigrade. Thoroughly clean and check the unit for damage.
Store the unit immersed in water or filled with water in a frost-free place. Do not flood the power plug!
Wear parts
Foam filters and impeller vanes are wearing parts; for this reason they are excluded from our warranty.
Disposal
Do not dispose of this unit with domestic waste! For disposal purposes, please use the return system provided.
Disable the unit beforehand by cutting off the cables.
5
-
Español
Español
-
-
Indicaciones sobre estas instrucciones de uso
Bienvenido a OASE Living Water. La compra del producto SwimSkim es una buena decisión.
Lea minuciosamente las instrucciones y familiarícese con el equipo antes de usar el mismo por primera vez. Todos los
trabajos en y con este equipo sólo se deben ejecutar conforme a estas instrucciones.
Por favor siga estrictamente las instrucciones adjuntas para asegurar el correcto uso y seguridad del producto.
Guarde cuidadosamente estas instrucciones. Entregue estas instrucciones al nuevo propietario en caso de cambio de
propietario.
Símbolos en estas instrucciones
Los símbolos que se emplean en estas instrucciones de uso tienen el siguiente significado:
Peligro de daños a personas por tensión eléctrica peligrosa
El símbolo indica un peligro inminente que puede provocar la muerte o graves lesiones si no se toman las
medidas correspondientes.
Peligro de daños de personas por una fuente de peligro general
El símbolo indica un peligro inminente que puede provocar la muerte o graves lesiones si no se toman las
medidas correspondientes.
Indicación importante para un funcionamiento sin fallos.
Uso conforme a lo prescrito
SwimSkim, denominado a continuación "equipo" y todas las otras piezas incluidas en el suministro se deben emplear
exclusivamente como sigue:
− Para la limpieza de superficie de los estanques de jardín.
− Para airear y abastecer los estanques de jardín con oxígeno.
− Operación observando los datos técnicos.
Para el equipo son válidas las siguientes limitaciones:
− No transporte nunca otros líquidos que no sea el agua.
− No emplee el equipo para fines industriales.
− No emplee el equipo en combinación con productos químicos, alimentos y sustancias fácilmente inflamables o
explosivas.
¡Importante! El equipo está equipado con un imán permanente. El campo magnético puede influir en
el marcapasos.
Uso no conforme a lo prescrito
Si no se cumplen las indicaciones contenidas en estas instrucciones de uso expira todo tipo de garantía y
responsabilidad y se pueden producir peligros para las personas.
6
-
Español
-
Montaje y emplazamiento (A, B)
Presione los dos cuerpos flotantes (1) en los pozos previstos del recipiente (2) hasta que enclaven perceptiblemente.
Alinee el distribuidor de aire (4) como está representado en la ilustración B.
Coloque el equipo en el estanque. Sumerja el equipo en el agua hasta que la cámara de bomba (3) y el recipiente (2)
estén completamente inundados. Tenga en cuenta la posición correcta de la tapa del absorbedor (5).
Fije si fuera necesario el equipo para limitar su radio de movimiento. Fije para esto un cordel en la osa de la cámara
de bomba (3) y fije el otro extremo del cordel en el borde o el fondo del estanque.
Conexión / desconexión (C)
¡Atención! Tensión eléctrica peligrosa.
Posibles consecuencias: La muerte o lesiones graves.
Medidas de protección: Antes de tocar el agua y realizar trabajos en el equipo saque la clavija de la red
(13).
El equipo se conecta automáticamente cuando se haya realizado la conexión eléctrica.
Conexión: Enchufe la clavija de red (13) en el tomacorriente.
Desconexión: Saque la clavija de la red (13).
Limpieza y mantenimiento (D-I)
¡Atención! Tensión eléctrica peligrosa.
Posibles consecuencias: La muerte o lesiones graves.
Medidas de protección: Antes de tocar el agua y realizar trabajos en el equipo saque la clavija de la red
(C, 6).
Limpieza regular (D, E): Saque el cesto de filtro (6) y el elemento de espuma filtrante (7) del equipo, enjuáguelos con
agua clara y colóquelos de nuevo en el equipo.
Limpieza completa (F-H): Saque el equipo del agua. Extraiga debajo de la cámara de bomba (3) el distribuidor de aire
(4). Presione los enclavamientos por los tres lados de la cámara de bomba (3) y saque el recipiente (2). Observe que
el tubo flexible de aire (9) no se desbale del inyector (10). Saque la bomba (10) y suelte la tuerca racor del inyector (8).
Limpie todas las piezas con agua limpia y un cepillo.
Limpieza de la bomba (I): Abra la tapa de la bomba (11) con el cierre de bayoneta y saque el rotor (12). Limpie todas
las piezas con agua limpia y un cepillo.
Montaje: Monte la bomba y el equipo en secuencia contraria después de la limpieza.
Importante: Coloque la línea de conexión de forma que no se aplaste. Tienda el tubo flexible de aire (G, 9) de forma
que no se doble. Al montar la cámara de bomba (3) y el recipiente (2) tienen que enclavar perceptiblemente los
enclavamientos. Alinee el distribuidor de aire (4) como está representado en la ilustración B.
Fallos
Fallo
Causa
Ayuda
El equipo no funciona
No hay tensión de alimentación
Compruebe la tensión de alimentación
Capacidad de elevación insuficiente
Rueda de rodadura bloqueada
Realice una limpieza
Cesto de filtro / elemento de espuma filtrante
sucio
Realice una limpieza
Inyector obstruido
Realice una limpieza
La aireación no funciona
Tubo flexible de aire entre el cuerpo flotante y
el inyector doblado o sacado.
Tenga en cuenta una fijación segura y no doble
el tubo flexible de aireación.
El equipo se desconecta después de un corto
tiempo de funcionamiento
Temperatura del agua muy alta
Mantenga la temperatura máxima del agua de
95°F (+ 35°C)
7
-
Español
-
Almacenamiento / Conservación durante el invierno
Desinstale el equipo en caso de heladas. Limpie minuciosamente el equipo y compruebe si está dañado.
Guarde el equipo sumergido en el agua o llenado con agua y protéjalo contra las heladas. ¡No sumerja el
enchufe en el agua!
Piezas de desgaste
El rotor y el elemento de espuma filtrante son piezas de desgaste y no entran en la prestación de garantía.
Desecho
¡Este equipo no se debe desechar en la basura doméstica! Deseche el equipo sólo a través de un sistema de
recogida previsto. Corte el cable para inutilizar el equipo.
8
Technical Data
GB
Dimensions
Weight
Rated voltage
Power consumption
Water flow
Cable
length
Water
temperature
pond
surface
ES
Dimensiones
Peso
Tensión asignada
Consumo de potencia
Caudal de agua
Longitud
del cable
Temperatura
del agua
Superficie
del estanque
13 x 17 x 10.7 in
332 × 297 × 250 mm
5.8 lbs
2.7 kg
~ AC 110-120 V
60 Hz
40 W
580 glh
2200 l/h
15 ft
4.5 m
39 … 95 °F
+4 … +35 °C
270 sq.ft.
25 m²
GB
Dust tight. Submersible to 6.6 ft
2 m depth.
ES
A prueba de polvo.
Impermeable al agua hasta
6.6 ft 2 m de profundidad
Remove the unit at
temperatures below zero
(centigrade).
Desinstale el equipo en
caso de heladas
Possible hazard for persons wearing pace
makers!
Posibles peligros para las personas con
marcapasos.
Attention!
Read the operating instructions
¡Atención!
Lea las instrucciones de uso
9
10
19722/02H
OASE North America Inc. · www.oase-livingwater.com