Transcript
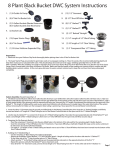
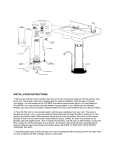
Black Bucket DWC Bubbler System Instructions
1. (1) Air pump
6. (1) 4” Air Stone
2. (2) Liters ViaStone Expanded Clay
8. (1) 1/2“ Grommet
3. (1) 5 Gallon Bucket (reservoir)
9. (1) 1/2” Barbed “L”
4. (1) 6” Net Pot Bucket Lid
10. (1) 18” Transparent Blue 1/2“ Tubing
11. (1) 10‘ Length of 1/4“ Clear Tubing
Preparation:
1. Wash and rinse your ViaStone Clay Rocks thoroughly before placing them in the 5 Gallon Nursery Pot
Insert.
System Assembly:
1. The 5 Gallon Bucket will have one pre-drilled hole in the bottom of the side wall. Insert the ½” Grommet
into the pre-drilled hole, then insert one side of the Barbed “L” until it is firmly seated inside of the grommet
with the exposed end facing up. Now push the 18“ length of transparent blue tubing over the open end of
the Barbed “L”. This length of tubing will be used as your water level indicator and will allow you to visually
inspect the water level inside of the system without removing the lid. Make sure the transparent blue
tubing is pointed up.
2. Fill the Net Pot Bucket Lid insert with the included ViaStone Clay Rocks.
3. Attach one end of the 1/4“ Clear Tubing to the 4” Air Stone by gently pushing the tubing over blue plastic
barb on Air Stone nipple. Now, attach the open end of the 1/4“ Clear Tubing to the Air Pump nipple. The Air
Pump should be elevated above the height of the system at all times. This will prevent water from entering
the Air Pump and damaging it. Now place the 4” Air Stone at the bottom of the 5 Gallon Bucket.
4. Fill the 5 Gallon Bucket (reservoir) with a water-nutrient solution
so that the lower ½” of the 6” Net Pot Bucket Lid will
be submerged in water. As the roots grow, decrease the
water-nutrient solution level to keep the root mass from
being submerged completely.
5. Place the Net Pot Bucket Lid on the top of the 5 Gallon Bucket
and snap it on securely.
6. Plug in the Air Pump and you are ready to grow! The
system will recirculate the water-nutrient solution until
it runs low. Refill the 5 Gallon Bucket (reservoir) as needed.