1
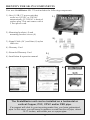
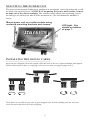
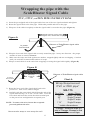
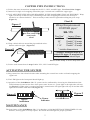
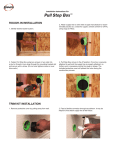
The eco-friendly solution to hard water
SB-175
Installation & Operation Manual
Residential Unit • Indoor/Outdoor Installation
IDENTIFY THE SB-175 COMPONENTS
Your new ScaleBlaster SB-175 unit includes the following components:
1.) One (1) SB-175 power unit that
works on 115VAC or 230VAC
automatically. If 230VAC is desired,
replace plug. This unit comes with a
5 foot power cord.
1.)
2.) Mounting brackets (4) and
mounting bracket screws (4)
2.)
3.) Signal Cable (56’) and four (4) nylon
cable ties
4.) Warranty Card
5.) Extended Warranty Card
3.)
6.) Installation & operation manual
4.)
5.)
6.)
The ScaleBlaster unit can be installed on a horizontal or
vertical Copper, PVC, CPVC and/or PEX pipe.
If a magnet will stick to your incoming water line, you have galvanized
pipe. In this case, you will need to replace a small section of pipe, about
10-11 inches, with either pvc or copper pipe.
2
Before You Start Installing
Finding The Main Cold Water Pipe
The water shutoff valve is on the main cold water pipe. Install the ScaleBlaster unit on this
pipe as close to where it comes into the house as possible. This will ensure that the outside
spigots and kitchen are being treated.
If you cannot access the cold water pipe before it splits
Follow the main cold water pipe back as far as possible from the water heater and install the
ScaleBlaster there. By doing this, all of the home's water may not be treated, and in some
cases only the hot water may be treated. However, the hot water line is the most important to
treat and is the main cause of lime scale formation.
Well Water Installation
For customers that are on a private well, the best place to install the ScaleBlaster unit is after
the well’s pressure tank. If that is not possible, the ScaleBlaster unit can be installed prior to
the pressure tank.
Softener Loop
The ScaleBlaster unit can be installed on a softener loop. Installing on a softener loop gives
treatment to all of the water that a softener would treat. Water to the kitchen faucet and outside
spigots may not be treated when the ScaleBlaster unit is installed this way.
Find The Pipe Size
If you do not know the actual pipe size, place a ruler in front of the pipe and measure the
outside diameter. Use Table 1 to determine the size of the pipe. The actual pipe size is always
rated by the inside dimensions of the pipe.
Table 1
A Tight Wrap Is Very Important
It is extremely important to the effectiveness of your ScaleBlaster unit that the signal cable
wire be wrapped correctly. If there are any gaps between the wraps, your ScaleBlaster unit
will not work to its full capacity.
Nylon cable ties
Example of a properly wrapped pipe. No gaps or loose wire wrappings allowed!
See chart on pages 6 & 7 to wrap the coil and to determine the proper number of wraps.
3
LOCATION OF THE SB-175 UNIT
1.) The most desirable place to install the unit is on the main water line that enters the house.
2.) The power unit should be mounted on a wall or other solid surface within five feet from an electrical
outlet and within ten feet from where the pipe will be wrapped.
3.) Once the main water inlet pipe to the house is located, identify a section of pipe that is at least 12
inches straight and at least two feet away from any major electrical interference, example - an
electric motor.
Installs on the incoming water supply line
At least 12 inches of straight pipe
main water
shutoff valve
Keep signal cable at
least two feet away
from any major
electrical interference.
No more than ten feet
of wire is allowed
between the power box
terminals and the
signal cable location
wrapped on the pipe.
Keep wires from
touching each other going from the
terminals to the signal
cable location on the
pipe.
SB-175 comes with a
5 foot power cord.
Install the signal cable
on the incoming cold
water supply line
entering the home as
close to where it comes
into the house as
possible.
water going to house
Z
Important! For best results, wrap signal cable on a
straight section of pipe of 12” or more. Keep the
signal cable as far away as possible from tees,
elbows, couplings, valves and any curved pipe.
4
MOUNTING THE POWER UNIT
The unit can be mounted indoors or outdoors in an upright vertical position on a wall
or other non-enclosed area. NOTICE: If mounting the power unit outside, it must
be kept out of the direct sunlight. The installer must supply the mounting screws
for the type of surface the unit will be mounted on. (We recommend a number 8
screw)
Mount power unit on a solid surface using
enclosed mounting brackets and screws.
LED light. See
details on bottom
of page 7.
INSTALLING THE SIGNAL CABLE
Insert the pre-stripped end of the signal cable into one of the two signal terminals and tighten.
Follow instruction on how to wrap pipe with wire on next two pages (pages 6 &7).
Twist down to see hole to put wire in, put stripped wire in hole (making sure the two bare
wires do not touch) then twist up to tighten.
5
Wrapping the pipe with the
ScaleBlaster Signal Cable
PVC, CPVC, or PEX PIPE INSTRUCTIONS
1.) Insert the pre-stripped end of the signal cable into one of the two signal terminals and tighten.
2.) Route the signal cable to the inlet pipe. Hold cable parallel and next to the pipe.
3.) Wrap one of the cable ties tightly so that the signal cable is secured to the pipe. (Figure A)
Straight section of pipe away
from angles, tees, valves and couplings
Figure A
Balance of ScaleBlaster signal cable
to power
box terminal
Cable Tie
4.) Wrap the loose end of the signal cable securely around the pipe - in any one direction – the proper
number of turns as noted in Chart A.
5.) Make sure the wraps are flush against one another, wrapped tightly and not overlapping. Continue
until you reach the recommended number of wraps.
6.) Wrap a second cable tie at the end of the wrappings securing the signal cable tightly. (Figure B)
Figure B
to power
box terminal
Cable Tie
See wrap
maximum
chart
Balance of ScaleBlaster signal cable
Cable Tie
Chart A
Wrap Requirement
PVC or PEX pipe*
7.) Route the loose end of the signal cable back to the
power box. Trim excess cable to length.
8.) Carefully strip the outer plastic shield from the end of the
signal cable leaving 1/2” to 5/8” of bare cable. Twist the
bare cable and insert the end in the other terminal post
on the power box and tighten the receptacle post.
NOTE - To remove the wire, loosen the receptacle
post and pull out the wire.
SB-175
Pipe Size*
1/2”
3/4”
1”
1 1/4”
Layers / Wraps
Double** 38 wraps
Single 70 wraps
Single 57 wraps
Single 50 wraps
* inside dimensions
**Example - Double/38 wraps is a
total of 76 wraps. 38 wraps on first
layer and 38 on second layer
Never under wrap or over wrap the coil.
6
COPPER PIPE INSTRUCTIONS
1.) Follow the same instructions in steps 1-6 for PVC, CPVC and PEX pipe. Use Chart B for Copper
2.) Instead of a single coil wrapping around the pipe, a second one is added for copper pipe.
3.) YOU MUST KEEP THE SECOND WRAPPING IN THE SAME DIRECTION AS THE FIRST! Wrap
right over the top of the first layer continuing in the same wrapping direction as the first layer –
clockwise or counterclockwise. This second layer must also be tight and touching the prior wrap.
(Figure C)
Chart B
Figure C
Wrap Requirement
COPPER pipe*
SB-175
See wrap
maximum
chart
4.) Wrap a third cable tie around the pipe and both wires.
Pull the cable tie tight. (Figure D)
Figure D
Pipe Size*
1/2”
3/4”
1”
1 1/4”
Layers / Wraps
Double** 50 wraps
Double** 50 wraps
Double** 45 wraps
Double** 40 wraps
* inside dimensions
**Example - Double/50 wraps is a
total of 100 wraps. 50 wraps on first
layer and 50 on second layer
Never under wrap or over wrap the coil.
5.) Follow same instructions in steps 7-8 for PVC, CPVC and PEX pipe.
ACTIVATING THE SYSTEM
1.) Plug control box into electrical outlet after mounting the control box on the wall and wrapping the
signal coil.
2.) The LED light on the front panel should light up.
3.) Operation of the ScaleBlaster SB-175 system can be confirmed by observing the illumination of the
LED indicator located on the face of the power unit. Power on - green light on far right side will stay
lit (Figure E). When pipe is wrapped and unit is turned on the far right light will stay lit and the other
lights will oscillate back and forth (Figure F).
Figure F
Figure E
Signal
Indicators
Power
Indicator
MAINTENANCE
The best feature of the ScaleBlaster SB-175 is that there is NO MAINTENANCE REQUIRED. No salt,
batteries, moving parts or costly repairs. Just check the LED light for proper operation.
7
WARRANTY & EXTENDED WARRANTY
This unit comes with a 5 year warranty to be free from defects in material and workmanship under normal
use from the date of purchase. A 5 year extended warranty is available on this unit at a very minimal cost.
90-DAY MONEY-BACK GUARANTEE
We are so sure you will be satisfied with ScaleBlaster, we are offering a 90-day money back guarantee
from the date of purchase if you are not 100% satisfied with the product.
ENJOYING THE SCALEBLASTER SYSTEM
There is no maintenance with the ScaleBlaster unit itself! No bags of salt to haul
around, wasted water or batteries to change. Best of all, you are protecting the
environment!
Allow up to 90 days to realize the full effects. Initial descaling may make things worse
for awhile, especially in the dishwasher and aerators. This is normal! Simply clean out
the screens or aerators. With dishwashers, we recommend cutting back on soap usage
(unless you have been using a water softener). In July of 2010, manufacturers of
dishwasher soap detergents cut back on phosphates - resulting in an increase in spotting
and cloudiness. We recommend using Cascade Action Pacs with Dawn or Cascade Allin-one Action Pacs for best cleaning results. Another product that works best is Lemi
Shine. You may also add white vinegar in the rinse cycle.
After the first 90 days, we strongly recommend you drain out your water heater. You will
be amazed at what ScaleBlaster has cleaned out of your pipes!
The eco-friendly solution to hard water
Commercial & industrial models available for pipes up to 40”
Manufactured by
File No. E232081
2SF0
10/13
Established 1989
Phone: 800-756-7946 or 727-562-5186 • Fax: 727-562-5187
ScaleBlaster.com