1
GARAGE DOOR OPENER MODELS
PowerMax® 1200/1500, SC 1200/1500, TriloGTM 1200/1500, PowerLift® 900, GPowerTM 900,
SilentMax® 1000/1200, CB 1000/1200, IntelliG® 1000/1200
SCREW/BELT/CHAIN DRIVES
OPERATION & MAINTENANCE MANUAL
Includes INTELLICODE® 2 Remote Control. Safe-T-Beam® System must be installed to close door.
For use only with residential sectional or one piece overhead garage doors.
Homelink®and Car2U® compatible.
Need help or have questions? DO NOT RETURN to the store. Call us: 800-354-3643
For Answers and Assistance:
1.800.354.3643
or visit www.geniecompany.com
SAVE THIS MANUAL FOR FUTURE REFERENCE
INSTALLER: LEAVE THIS MANUAL WITH HOMEOWNER
WARN I N G
To reduce the risk of injury to persons or damage to property – Use this opener only with a one-piece or sectional door.
Genie, Genie logo, Intellicode, Safe-T-Beam, IntelliG, PowerMax, PowerLift, ChainMax and SilentMax are registered trademarks TriloG and GPower are trademarks of GMI Holdings, Inc., dba The Genie Company
Homelink is a registered trademark of Johnson Controls Technology Company. Car2U is a registered trademark of Lear Corporation. ©The Genie Company 2012 PN#38209501582, 5/2012
38209501582
Table of Contents
TRANSMITTER COMPLIANCE STATEMENT
Transmitters comply with all United States and Canadian legal
requirements as of the date of manufacture. No warranty is made that
they comply with all legal requirements of any other jurisdiction. If
transmitters are to be used in another country, the importer must
determine compliance with any local laws and regulations which may
differ from United States and Canadian requirements prior to use.
1
Los transmisores cumplen con todas las reglamentaciones legales de los
Estados Unidos y del Canadá, en la fecha de fabricación. Ninguna garantía
se da que cumplan con todas las reglamentaciones legales de ninguna
otra jurisdicción. Si los transmisores se van a utilizar en otro país, el
importador debe determinar si cumplen con las reglamentaciones y leyes
locales que puedan ser diferentes a las reglamentaciones de los Estados
Unidos y del Canadá, antes de usar los mismos.
1
2
1
Safety
2 Information
3
4
5
6
7
8
Safety Notifications........................................... 3
Important Safety Instructions............................. 3
Infrared Protection Function.............................. 3
2
Features
3
4
5
6
7
8
9
Safety............................................................... 4
Opener.............................................................. 4
3
Required
4
5 Programming
6
7
8
9
Introduction....................................................... 5
Overview of Powerhead Controls....................... 5
Travel Limits
Closing Garage Door (DOWN Limits).............. 6
Opening Garage Door (UP Limits).................. 7
Wall Console Overview...................................... 8
Series III Wall Consoles with Black Buttons... 8
Series II Wall Consoles with White Buttons.... 8
Force and Speed Control............................... 9
Contact Reverse Test.................................... 9
Remotes/New Intellicode 2 Openers................ 10
Les émetteurs sont conformes à la réglementation américaine et
canadienne à compter de leur date de fabrication. Aucune garantie
n’est stipulée indiquant qu’ils sont conformes à toutes les prescriptions
juridiques d’autres autorités. Si les émetteurs sont utilisés dans d’autres
pays, il incombe à l’importateur d’en déterminer leur conformité aux lois
et règles locales pouvant différer de celles des États-Unis et du Canada
avant toute utilisation desdits émetteurs.
Sendegeräte entsprechen allen gesetzlichen Bestimmungen in den
USA und Kanada zum Zeitpunkt der Herstellung. Wir übernehmen keine
Gewährleistung für die Einhaltung aller gesetzlichen Bestimmungen in
anderen Ländern. Sollen Sendegeräte in anderen Ländern eingesetzt
werden, so muss der Importeur vor dem Gebrauch sicherstellen, dass die
Sendegeräte auch solchen lokalen Bestimmungen entsprechen, welche
von den Bestimmungen der USA und Kanadas abweichen.
1
1
1
2
1
2
3
4
Optional
5
6Programming
7
8
9
Keypad............................................................ 12
Clearing Memory for Remotes......................... 13
Intellicode 1 Remotes...................................... 14
1
2
3
4
5
One
6 Piece7Doors8
9
Attaching Door Bracket to Door....................... 15
Attaching Door Arm to Door Bracket................ 15
1
2
3
4
5
6
Maintenance
7
8 and
9 Adjustments
Maintenance Safety........................................
Regular Maintenance......................................
Corrective Maintenance...................................
Adjustment Guides..........................................
2
3
4
5
6
7
Wiring
Diagram.
.................................................. 20
8
9
8
Troubleshooting..................................................
21
9
9
Warranty............................................................. 23
Need help or have questions? Call us:
800-354-3643.
2
3
4 DO 5NOT RETURN
6
7
to the store.
3
4
5
6
7
8
SAVE THESE INSTRUCTIONS
READ AND FOLLOW ALL INSTRUCTIONS
2
16
16
17
18
9
1
Safety Information
Important Safety Instructions
OVERVIEW OF POTENTIAL HAZARDS
READ THIS SAFETY INFORMATION
CONVENTIONS USED IN THESE INSTRUCTIONS
Garage doors are large, heavy objects that move with the help of
springs under high tension and electric motors. Since moving objects,
springs under tension, and electric motors can cause injuries, your
safety and the safety of others depend on you reading the information
in this manual. If you have questions or do not understand the information presented, call your nearest trained door system technician or
visit our website at www.geniecompany.com
The following safety alert symbol and signal words are used
throughout this manual to call attention to and identify different levels
of hazard and special instructions.
This is the safety alert symbol. This symbol alerts you to
potential hazards that can kill or hurt you and others.
All safety messages will follow the safety alert symbol and the word
“DANGER”, “WARNING”, or “CAUTION”.
• DANGER indicates an imminently hazardous situation which, if
NOT avoided, will result in death or serious injury.
• WARNING indicates a potentially hazardous situation which, if
NOT avoided, could result in death or serious injury.
• CAUTION indicates a potentially hazardous situation which, if
NOT avoided, may result in injury or property damage.
• The word NOTE is used to indicate important steps to be followed or important considerations.
Potential Hazard
Effect Prevention
WARNING
Keep people clear of opening
Could result while door is moving.
in Death
or Serious Do NOT allow children to play
Injury
with the door opener.
Do NOT operate a door that jams or one that has a broken spring.
WARNINGTurn OFF power before
Could result
removing opener cover.
in Death
or Serious When replacing cover, make
Injury
sure wires are NOT pinched or
near moving parts.
WARNING
Could result
in Death
or Serious
Injury
Opener must be fully
grounded.
Do NOT try to remove, install,
repair or adjust springs or
anything to which door spring
parts are fastened, such as,
wood blocks, steel brackets,
cables or other like items.
Installations, repairs and
adjustments must be done
by a trained door system
technician, using proper tools and instructions.
WA R N I N G
TO REDUCE THE RISK OF SEVERE INJURY OR DEATH
READ AND FOLLOW ALL SAFETY, INSTALLATION AND OPERATION INSTRUCTIONS. If you have
any questions or do not understand an instruction, call The Genie® Company or your local
Genie® Factory Authorized Dealer.
• DO NOT install operator on an improperly balanced door. An improperly balanced door
could cause severe injury. Repairs and adjustments to cables, spring assembly, and other
hardware must be made by a trained service person using proper tools and instructions.
• Remove all ropes, and disable all locks connected to the door before installing operator.
• Install door operator 7 feet or more above the floor. Mount the emergency release knob
6 feet above the floor.
• DO NOT connect the operator to the source of power until instructed to do so.
• Locate the wall console button: A) Within sight of door. B) At a minimum height of 5 feet
so small children cannot reach it. C) Away from all moving parts of the door.
• Install the entrapment WARNING label next to the wall button or console. Install the
emergency release tag on, or next to, the emergency release handle.
• The operator must reverse when the door contacts a 1-1/2 inch high object on the floor
at the center of the doorway. This is about the size of a 2" x 4" board laid flat.
3
2
Features
Begin here only after completing assembly and installation of the opener. Review the Assembly and Installation poster to ensure all steps have
been performed.
Contact your Genie® Professional Dealer for an installation poster, if needed, or call 1-800-35GENIE. You may also visit www.geniecompany.com
to download a PDF file.
SAFETY FEATURES
opener features
Safe-T-Beam (STB) Non-Contact
Reversing System
Puts an invisible beam across the door opening.
The door stops and reverses to the full open
position if anything passes through the beam.
LED indicator lights on the powerhead and on
the STBs provide a self-diagnostic code if an
operational problem exists.
INTELLICODE® 2 Access Security System
A new generation superior encryption system
that enhances the security of the door opener
by continuously changing the access code each
time the remote is used. The door opener responds to each new code only once. An access
code copied from a working system and tried
again, will not control the door opener.
Safe-T-Reverse® Contact Reversing System
Automatically stops and reverses a closing door
within two seconds of contact with an object.
Wall Console
Operates door opener from inside garage.
The wall console has an indicator light with:
Open/Close, Sure-Lock™, and independent
light control buttons.
®
Automatic ForceGuard™ Control
Automatically sets the force required to fully
open and close the door for maximum safety.
Watch Dog Monitoring System
Monitors the Safe-T-Beam® system to ensure
proper functionality and will automatically stop
and reverse a closing door if a problem
is detected.
™
Manual Emergency Release
Manually releases door from door opener. Used
during a power failure or other emergency to
allow manual opening and closing of door.
SmartSet™ Electronic Programming
Easily adjust the programming to reduce
opening speed to a desired rate, vary limits
and force, and program new remotes.
Automatic Lighting System
Two bulb lighting system supplies light for safer
evening exits and entries. Turns ON when door is
activated and automatically turns OFF 4 minutes
later.
4
Integrated Motion Detection (Not available on
all models)
Some units have motion detection built into the
powerhead. Lights automatically turn ON when
motion is detected for much safer movement
through the garage. Lights will turn OFF after
4 minutes of no motion.
Home Link and Car2U® compatible. Refer to the
programming instructions on page 11.
NOTE: Use this manual ONLY after completing assembly
and installation of opener. Review Assembly/Installation
Instructions poster. Check that all steps have been
completed.
Contact your Genie® Professional Dealer for an
Assembly/Installation Instructions poster, if needed,
or call 1-800-35GENIE. You can also go to
www.geniecompany.com to download a printable file.
INFRARED PROTECTION FUNCTION
1. The Safe-T-Beam® has no effect on the door during an opening cycle.
2. If the Safe-T-Beam® detects an obstruction when trying to close the
door, it will not allow the door to close.
3.When the garage door is closing, if Safe-T-Beam® is interrupted by
a person or obstacle, the garage door will stop its downward travel
and reverse automatically to its fully opened position.
4. If the Safe-T-Beam® System fails, loses power, or is installed
improperly, press and hold the wall console “open/close” button
until the door reaches its fully closed position. If you release the
“open/close” button on the wall console during the closing
movement, the door will reverse automatically to its fully-opened
position.
3
Required Programming
NOTE: Before you begin programming, check to make sure there are
no objects in the garage door opening.
INTRODUCTION
Now that your Genie garage door opener is installed, you will want to
program the opener so that the door opens and closes properly and
all remote devices operate correctly. The following steps guide you
through setting your opener so it functions properly for you.
The following information will take you through programming your
opener’s functional settings for use.
There are only 2 “required” programming processes you will need to
follow to set up your garage door opener for operation:
1. “TRAVEL LIMITS”
2. “REMOTE PROGRAMMING”
There are 4 programs (The 2 “Factory Set” programs are unlikely to
need changes.)
1. Door Travel Limits Program
–This program is used to set how far your door travels up
and down.
2. Remote Programs (Default menu)
–These show you how to program your remotes to synch with
additional remote control devices, wall consoles, keypads, and
the powerhead.
3. Door Force Program (Factory Set)
–This program is only used for minor adjustments under certain
circumstances.
4. Door Speed Program (Factory Set)
– This program does not require manually initiated changes.
NOTE: The 3 programming buttons are for programming ONLY. These
buttons should NOT be used to operate the opener once the Required
Programming section has been successfully completed.
Term Definitions:
Travel Limits programming allows you to set how far your door
travels up or down in opening and closing your garage door.
Remote Programming synchronizes your remote control devices
(remotes, wall console, and keypad) with the powerhead.
Force Control refers to how much power is needed to move (open/
close) your particular door and does NOT require programming.
Speed Control refers to how fast or slow your opener opens and
closes your particular door and is preset at the factory. This
function does NOT require programming.
Overview of Powerhead Controls
ROUND LED
Indicator
This section describes the programming functions on the powerhead
of the opener. Use the following information to familiarize yourself with
the buttons, LED indicators and products used to program functions.
Close Travel
Open Travel
Button
–
+
PROGRAM
Powerhead: There are 3 programming buttons and 2 LED lights on
the powerhead. Each of the buttons is used to enter and complete
the setup programming. The LED lights indicate status or a function
change by illuminating ON, OFF, or ON FLASHING in one of three
different colors: blue, red or purple.
SET
LONG LED
Indicator
Located on bottom of Powerhead.
PROGRAM
Enters into and selects programming menus.
SET
–
+
Multi-function; move door during programming
and advance through menus
5
3
Required Programming
TRAVEL LIMITS
WA R N I N G
3
• Make sure doorway is in view and clear of obstacles and
people to avoid injury or damage to property.
• DO NOT operate this unit from wall console before LIMITS
are set. Severe damage to the opener can occur.
• The shuttle MUST be engaged to carriage BEFORE setting limits.
See Installation Poster (if provided) or call Customer Service at
1-800-35GENIE or visit www.geniecompany.com
NOTE: If shuttle/bullet has NOT been engaged to carriage, do so now.
See page 17.
NOTE: Before setting limits confirm wall console red indicator light
(or backlight) is ON. If not illuminated, check for correct wiring or the
Sure-Lock switch may be activated.
Release down arrow button (-) and the long LED
will begin flashing.
PROGRAM
SET
4
–
+
Press and hold the down arrow button (-) until
garage door is fully closed on floor, then release.
PROGRAM
Closing Garage Door (Down Limits)
1
SET
Lift the door open by hand until the shuttle/bullet
engages the carriage on the rail.
–
+
HOLD
1
2
1
PROGRAM
2
Press and hold the down arrow button (-) for
2 seconds until the long LED comes on blue
(round LED remains off).
–
HOLD
2 seconds
6
–
+
PROGRAM
PROGRAM
SET
SET
+
SET
NOTE: You have 30 seconds to execute each step. If you see two
solid red or flashing LEDs on the Powerhead, you have run out of
time and must go back to the beginning of the step and start over. You
can restart as many times as necessary to complete each step.
(continued next page)
3
5
Required Programming
8
Press and release the Program Set button (both
LEDs flash blue and go off).
PROGRAM
PROGRAM
Press and hold the up arrow button (+) until door
is fully open, then release. Watch carriage as
it approaches the power head to avoid contact
with powerhead.
PROGRAM
SET
–
+
SET
SET
–
+
HOLD
The DOWN (closed) limit is programmed.
Opening Garage Door (Up Limits)
NOTE: Beginning with garage door closed is recommended but not
necessary.
6
Press and hold the up arrow button (+) for
2 seconds until the long LED light comes on blue
(round LED remains off).
PROGRAM
PROGRAM
SET
–
PROGRAM
+
SET
HOLD
2 seconds
7
SET
Release up arrow button (+) and the round LED
will begin flashing.
PROGRAM
9
–
Press and release the Program Set button (both
LEDs flash blue and go off).
PROGRAM
PROGRAM
SET
–
+
+
SET
–
+
SET
The UP (open) limit is programmed.
BOTH DOOR LIMITS ARE NOW PROGRAMMED.
7
3
Required Programming
Wall Console / Overview
This opener has a serial
number sticker in which
the serial numbers begin
with 10 or higher.
MODEL AC SR3
FCC ID: B8Q AC SR3
IC: 2133A-CSD1D
Series III Wall Consoles with Black Buttons
THE GENIE COMPANY
Residential Door Operator
120V. 60HZ. 5A
S/N:10XXXX XXXXXXX
Indicator Light
Indicator light will display Red when wall console is properly wired and
Sure-Lock™ is OFF. When Sure-Lock™ is ON, indicator light flashes.
Wall consoles from other manufacturers may not work with openers
of these serial number groups. Use only the wall console provided with
this unit. Each wall console has three buttons.
Open/Close Button
Use this button to open or close garage door. When Sure-Lock™ is
ON, the Open/Close button will CLOSE the door only.
In your carton you will find one of the following
wall consoles:
Note: Constant button pressure in the CLOSE mode will override STB
fault in the powerhead and close door.
Series II Wall Consoles with White Buttons
Independent Light Control Button
Use this button to turn powerhead lights ON. Powerhead lighting will
remain ON until this button is pressed again or a door action has been
completed.
Indicator Light
Large white button will display Red when wall console is properly
wired and Sure-Lock™ is OFF. When Sure-Lock™ is ON, this light is off
Open/Close Button
Use this button to open or close garage door. When Sure-Lock™ is
ON, the Open/Close button will CLOSE the door only.
Note: Constant button pressure in the CLOSE mode will override
STB fault in the powerhead and close door.
Independent Light Control Button
Use this button to turn powerhead lights ON. Powerhead lighting will
remain ON until this button is pressed again or a door action has been
completed.
Note: If opener has a Motion Detector sensor, it will keep powerhead
lights ON as long as motion is detected.
Sure-Lock™ Button
When Sure-Lock™ is ON, the powerhead cannot be activated by the
wall console or a remote.
• Press and release (or until red light goes off) to activate Sure-Lock™.
• Press and release to turn Sure-Lock™ OFF.
Sure-Lock™ Button
– LOCK disables controls after
door is completely closed.
– UNLOCK allows controls to
work normally.
Independent Light Control Button
Controls door opener lights from inside garage.
8
Sure-Lock™ Button
When Sure-Lock™ is ON, the powerhead cannot be activated by the
wall console or a remote.
• Press and hold for 5 seconds (or until Indicator Light flashes) to activate Sure-Lock™.
• Press and release to turn Sure-Lock™ OFF.
Open/Close Button
Opens and closes door from inside garage.
Indicator Light
–Red indicator light is
always ON.
–When Sure-Lock™ is ON,
the indicator light flashes.
To powerhead
Sure-Lock™ Button
– LOCK disables controls
after door is completely
closed.
– UNLOCK allows controls to
work normally.
B/W
Independent Light Control Button
Controls door opener lights from inside garage.
Open/Close Button
Opens and closes door from inside garage.
Indicator Light
–Red indicator backlight is ON.
–When Sure-Lock™ is
ON, the indicator light is OFF
Note: If opener has a Motion Detector sensor, it will keep powerhead
lights ON as long as motion is detected.
To powerhead
TIP
FROM STBs
FROM STBs
OM STB
B/W
FROM WALL
CONSOLE
FROM WALL
ROM
OM W
WA
CONSOLE
W
NOT
USED
STB
BWC
IWC
STB
BWC
NOT
USED
IWC
W
3
Required Programming
Force and Speed Control
12
These controls are factory programmed and automatically set
themselves when you use the Wall Console to open and close the
garage door for the first time. The door MUST complete a full cycle
from open to close and close to open before it is fully set.
Lay a 2” x 4” board flat under the center of the
door opening.
Note: Force or Speed controls DO NOT require programming. Force
and Speed Limits are factory set and rarely require adjustments.
Making adjustments to these settings is covered in Troubleshooting
Section of this manual (pages 21-22).
10
Open and close your garage door using the Wall
Console Open/Close button.
13
Close the garage door using the Open/Close
button on the Wall Console.
NOTE: Using these functions for the first time automatically sets the
Force needed to open and close your garage door.
FORCE AND SPEED CONTROL ARE NOW SET.
Contact Reverse Test
NOTE: The Limit and Force settings MUST BE COMPLETED before
performing the Contact Reverse Test.
11
Open the garage door using the Open/Close button
on the Wall Console.
When the door contacts the board, it should stop and reverse direction within 2 seconds to the fully OPEN position. Red LED lights on the
powerhead will begin to flash with the reversal of the door. The next
cycle will clear the lights.
Contact Reverse Adjustment
If the door stops before contacting the board or if it does not reverse
direction to fully open after contact with the board, it may be due to
improperly set DOWN limits.
Repeat the Setting the Down Limit steps 1-5 to make certain the door
is closing tight to the floor.
Repeat step 10 to set force limits.
Then repeat the WALL CONSOLE/Contact Reverse Test, steps 11-13.
Repeat this process as needed until door passes the Contact Reverse
Test. For further help, refer to MAINTENANCE and ADJUSTMENTS,
Regular Maintenance, pages 16-19.
9
3
Required Programming
REMOTES / New Intellicode 2 Openers
16
Remove protective film for battery from remote.
PULL
NOTE: The following instructions are for the remote control
transmitters (“Remotes”) provided with this opener. This Remote is
preset for use with the Intellicode 2 Access Security System. Refer to
page 14 for additional information on Intellicode 1 and 2 Remotes and
how to switch from Intellicode 2 to Intellicode 1. See page 14
for programming instructions using Intellicode 1 Remotes.
NOTE: You have 30 seconds to execute each step. If you see two
flashing red LEDs on the Powerhead, you have run out of time and
must go back to the beginning of the step and start over. You can
restart as many times as necessary to complete each step.
NOTE: Each button on each Remote must be programmed separately,
following these steps.
14
Press and hold the Program Set button (the round
LED turns blue).
PROGRAM
SET
–
+
HOLD
2 seconds
15
17
Press and release the button you have choosen
on the Remote (long LED comes on purple).
Release the Program Set button (the long LED
begins flashing purple).
PROGRAM
SET
–
+
PROGRAM
SET
–
+
NOTE: Do NOT hold Remote too close to the Powerhead when
programming Remote buttons.
10
(continued next page)
3
18
Required Programming
The Remote button is now programmed.
Press and release the same button on the remote
(both LED’s flash blue and then turn off).
Repeat as necessary for additional Remotes.
To program the same Remote for other garage door openers, repeat
the steps above using one of the other two Remote buttons.
Each Remote can be programmed for three door openers.
BASIC PROGRAMMING IS COMPLETE AND YOUR GARAGE DOOR IS
READY TO USE!
NOTE: For Car2U and HomeLink, park the car outside the garage
with the ignition key in the “Accessory” position. Follow the Car2U or
HomeLink instruction to set the button in the car to Genie mode.
PROGRAM
SET
19
PROGRAM
–
SET
–
IMPORTANT: Your HomeLink® device will
ONLY respond to pressing THIS button
on your Intellicode remote when it's searching
to connect to your remote in "Learn Mode" as
described in the HomeLink® instruction manual.
Press and release the same button on the remote
(the door should open or close).
11
?
4
Optional Programming
If Safety Reverse does not work properly:
A Moving Door can cause serious injury or death.
1 Close Door and disconnect the opener using Emergency Release Cord.
1 Keep people clear of opening while Door is moving.
2 Do not use Door Opener, Remote, or Wireless Keypad.
2 Do Not allow children to play with Wireless Keypad.
3 Refer to Door and Door Opener Owner’s Manuals before attempting any repairs.
3 Wall Control should be mounted within sight of door, at least 5 feet above floor and clear of moving parts.
4 During programming, the Door Opener could begin to run, so stay away from the
moving Door and its parts. To keep the Door from moving, close the Door and disconnect it from the
Opener by pulling the Emergency Release Cord.
KEYPAD
For convenience— it’s easier to perform programming before mounting the Keypad
A. ESTABLISH
A PIN
ON THE WIRELESS KEYPAD:
1. Press, in order, 3-5-7. (This is the default PIN)
2. Press PROGRAM .
3. Enter your new PIN (3 to 8 characters).
4. Press PROGRAM .
B. PROGRAM
DOOR(S: )
ON THE OPENER’S POWERHEAD
(Fig. 1)
D. MOUNTING KEYPAD
THE KEYPAD MUST BE MOUNTED (1) WITHIN SIGHT OF THE
GARAGE DOOR(S), (2) AT LEAST 5 FT. ABOVE THE FLOOR
AND (3) CLEAR OF ANY MOVING DOOR PARTS.
1. Remove the battery cover and batteries (Fig. 3).
2. Drill a 1/16" pilot hole for the top mounting screw (included).
3. Install a screw into the pilot hole, leaving a 1.8" gap between
the screw head and the wall (Fig. 2).
4. Hook the keypad over the screw
1"
Polarity
screw
head (slot on back of keypad).
8
markings
head
Wall
5. Mark and drill a pilot hole for the gap
bottom screw and install screw
Press here
to open
(do not overtighten).
Battery
Figure 3
Figure 2
Cover
6. Install batteries and cover.
+
+
PROGRAM
ROUND LED
Figure 1
SET
LONG LED
Close
Travel
Button
Open
Travel
Button
PROGRAM
1. Press and hold
on the Powerhead for 2 seconds
SET
(the round LED turns BLUE and the OFF,
the long LED will begin flashing PURPLE).
ON THE KEYPAD:
2. Enter your PIN.
. LEDs will stay on steady.
3. Press
4. Press
again. LEDs will turn off.
5. Press
again. Door opener will run.
If you have forgotten your PIN or you fear it may have fallen
into unauthorized hands, you must erase the old programming.
1. Erase old PIN,
• Press & hold PROGRAM with the
for 5 seconds or
until the lights turn off.
2. Create New PIN.
• return to Steps A & B and follow instructions as before.
CHANGING YOUR PIN:
1. Enter your Current PIN and press PROGRAM .
2. Enter your New PIN and press PROGRAM . The opener will
now work with the New PIN.
USING A TEMPORARY PIN:
C. OPERATING
A DOOR
ON THE WIRELESS KEYPAD:
1. Enter you current PIN and press
2. Enter a temporary PIN and press
NOTE: For multiple door operation—
See Wireless Keypad Instruction Sheet
NOTE: Rapid blinking of the red LED indicates an error.
After a few seconds the LED will turn off. Start over.
FOR HELP—CALL 800-35-GENIE, OR VISIT WWW.GENIECOMPANY.COM.
-
-
E. FORGOTTEN
AUXILIARY
ACTIONS
YOUR PIN?
NOTE: Pressing any key will stop and start the opener during the next 30
seconds. (It will automatically stop at the fully closed or fully open position.)
1. Enter your PIN.
.
2. Press
AAA
AAA
Atemporary PIN allows temporary access to your home by
repair persons, meter readers, etc. while you are out, if you so desire.
PROGRAM
PROGRAM
3 times.
.
NOTE: NO NEED TO REPROGRAM YOUR KEYPAD. The temporary PIN is
cancelled the next time your normal PIN is entered.
CHANGING BATTERIES:
If the Keypad backlight does not come on, this indicates the
need to replace the batteries. No programming is lost when
replacing the batteries.
1. Remove battery cover and batteries (FIG. 3).
1. Replace with same type battery. Check proper direction.
FCC and IC CERTIFIED
This device complies with FCC Part 15 and RSS 210 of Industry Canada. This equipment has been tested and found to comply with the limits for a
Class B digital device, pursuant to Part 15 of the FCC Rules. These limits are designed to provide reasonable protection against harmful interference
in a residential installation. This equipment generates, uses and can radiate radio frequency energy and, if not installed and used in accordance
with the instructions, may cause harmful interference to radio communications. However, there is no guarantee that interference will not occur in
a particular installation. If this equipment does cause harmful interference to radio or television reception, which may be determined by turning the
equipment OFF and ON, the user is encouraged to try to correct the interference by one or more of the following measures: (1) Re-orient or relocate
the receiver antenna, (2) Increase the separation between the opener and receiver, (3) Connect the opener into an outlet on a circuit different from
that to which the receiver is connected, (4) Consult your local dealer.
12
THE KEYPAD IS PROGRAMMED.
Additional Genie® products can be ordered through your local GENIE® Professional Dealer. To
locate a dealer near you—call 800-OK-GENIE.
Covers available in: Tan-P/N 37226T, Almond-P/N 37226U, Gray- P/N 37226S and White-P/N 37226R.
?
4
Optional Programming
Clearing Memory FOR Remotes
1
4
Press the Program Set button on the Powerhead
and hold 2 seconds, round LED comes ON.
PROGRAM
SET
To verify that the memory is cleared, press
a remote button that was previously
programmed to the Powerhead.
PROGRAM
–
+
SET
HOLD
2 seconds
2
Release the Program Set button, round LED goes
off and the long LED flashes purple.
PROGRAM
SET
–
If the memory has been cleared, the Remote will not activate the door
opener.
+
NOTE: The garage door opener will operate normally using the Wall
Console.
3
Press up arrow button (+) and down arrow
button (-) simultaneously on the Powerhead and
hold until both LEDs flash blue and then go OFF.
PROGRAM
SET
–
+
HOLD
HOLD
NOTE: When the remote is pressed the round LED will flash blue but
will not activate the door opener.
PROGRAM
NOTE: Clearing Remotes from the Powerhead memory will clear ALL
programmed Remotes and wireless Keypads. Your opener will no
longer recognize any signal received from a missing Remote.
SET
All remaining (or recovered) Remotes and wireless Keypads MUST BE
reprogrammed as shown on pages 9 and 12.
(continued next page)
13
4
Optional Programming
Intellicode 1 REMOTES
6
Remotes provided with this unit can operate other (Intellicode 1)
models of Genie garage door openers. The default Intellicode 2 setting
must be changed to Intellicode 1. (Follow these same steps to change
Intellicode 1 back to Intellicode 2.)
NOTE: The button directly above the logo on the transmitter is preset
to Intellicode 1.
The LED color displayed on the Remote indicates the Intellicode mode:
Red = Intellicode 1
1
2
Green = Intellicode 2
Select a Remote button NOT already programmed to
the Powerhead. Press and hold the button for 10 seconds
(both the RED and GREEN LEDs on the Remote turn ON).
Press and release the Remote button 3 times.
***Repeat Step 2 to turn the RED LED on the Remote back to GREEN
for operation with Intellicode 2 openers.
Once the LED on the Remote turns RED when the button is pressed,
that button is programmed to the Intellicode 1.
3
Find the Learn Code Button and Learn Code Indicator LED
on your older Genie door opener.
If your door opener has a black antenna wire and the serial number
does not start with 10 or higher, the Learn Code Button and
Indicator LED are located near the antenna. The light lens may need to
be opened. If you use an external receiver, it may need to be opened
to access the Learn Code Button and Indicator LED.
4
5
14
Press the Learn Code Button (the LED on the Opener
flashes RED).
Press the Remote button 2 times (the LED on the Opener
turns OFF).
Press the Remote button again. If the door moves, the
Remote button is programmed to your opener.
If you have questions, see your Genie instructions for this Intellicode I
model of opener.
NOTE: Choose the Genie Remote using Intellicode 1 button for this
activity. All new Remotes have the button directly above the logo
preset to Intellicode I.
This button is set to Intellicode 1.
5
One-Piece Doors
Attaching door bracket to door
1
Using bracket, mark holes on door or frame and drill
5/32" hole completely through door frame.
Attaching door arm to door bracket
1a
Screw drive models:
One-Piece Doors will only accept a straight door arm.
Curved door arm
3/8"-16 x 7/8"
Bolt
Door centerline
3/8" Lock nut
Straight door arm (not included)
NOTE: Center bracket on door as high as possible, preferably top edge.
1b
2
Secure bracket with 5/16" x 2" or 5/16" x 4-1/2" carriage
bolts and nuts or drill 1/8" pilot holes and secure with 1-1/2"
to 2" lag bolts. (Bolts, nuts, and screws not furnished.)
Chain/belt drive models:
One-Piece Doors will only accept a straight door arm.
Straight door arm
3/8"-16 x 7/8"
Bolt
3/8" Lock nut
Straight door arm (not included)
2
Secure door arm to the door bracket and with clevis pin
and cotter pin.
Cotter pin
Door bracket
Straight door arm
Clevis pin
15
6
Maintenance and Adjustments
If you have any questions, please do not hesitate to contact customer
service at: 1-800-35-GENIE or visit www.geniecompany.com
A. Contact Reverse Test
See page 9.
IMPORTANT SAFETY INSTRUCTIONS
WA R N I N G
TO REDUCE THE RISK OF SEVERE injury or death, READ
AND FOLLOW ALL INSTRUCTIONS.
1. NEVER let children operate or play with the door controls. 2.Keep remote away from children.
3. ALWAYS keep the moving door in sight and away from people
and objects until door is completely closed. NO ONE SHOULD
CROSS THE PATH OF THE MOVING DOOR.
4. NEVER GO UNDER A STOPPED, PARTIALLY OPEN DOOR.
5. Test opener monthly. The door MUST reverse on contact with a
1-1/2" high object (or a 2" x 4" board laid flat) at the center of
doorway on the floor. After adjusting either the force or limit of
travel, retest door opener. Failure to adjust the opener properly
may cause severe injury or death.
6. When possible, use emergency release only when door is closed. Use caution when using this release with the door open.
Weak or broken springs are capable of increasing the rate of
door closure and increasing the risk of severe injury or death.
7. KEEP DOORS PROPERLY BALANCED. See your garage door
Owner’s Manual. An improperly balanced door increases the
risk of severe injury or death. Have a trained door system
technician make repairs to cables, spring assemblies, and
other hardware.
SAVE THESE INSTRUCTIONS
WA R N I N G
• Garage door hardware (springs, cables, brackets, pulleys, etc.)
are under extreme pressure and tension.
• DO NOT attempt to repair or adjust door springs or any hardware, and DO NOT OPERATE garage door automatically or manually if door is improperly balance or springs are broken.
• CONTACT A TRAINED DOOR SYSTEM TECHNICIAN.
WARN I N G
Use of any other wall control can cause unexpected operation of
the door and loss of lighting feature. Locate wall console within
sight of door and far enough from door to prevent contacting it
while operating the console. Control must be at least 5 feet above
floor to prevent small children from operating it.
B. Safe-T-Beam® (STB) System Check
Check that both the RED and GREEN LEDs are ON steady. This
indicates the system is working properly. If both LEDs are not ON
steady, check the appropriate items below:
• STB red LED flashes.
– Check for obstruction.
– Check alignment.
–Verify wire routing from STBs to STB connection in powerhead
–Check for signal interference from another Safe-T-Beam® unit (for multiple door installations).
•No STB red or green LED displayed.
–Check wiring and wire connections.
If the system appears to be working properly, perform the check as
follows:
1. Start the door closing.
2. Pass an object through the beam. The door should stop and reverse to the fully open position.
C. Door Balance (Spring Tension)
Perform the check as follows:
• With the door closed, pull manual emergency release handle DOWN and let go to release door carriage assembly from drive system.
•Raise and lower the door manually—it should move freely and smoothly.
•Raise door manually about 3' to 4' feet and let go.
REGULAR MAINTENANCE
Basic monthly maintenance tasks include:
• Contact Reverse
• Safe-T-Beam® System Check
•Door balance
•Lubricate door hardware
16
3' - 4'
Sectional Door
3' - 4'
One-Piece Door
– Door should remain stationary or move very slowly.
– If door moves quickly, CONTACT A TRAINED DOOR SYSTEM TECHNICIAN to have your door springs serviced.
• Close the door.
(continued next page)
6
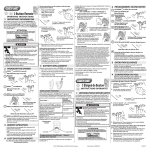
Maintenance and Adjustments
REGULAR MAINTENANCE (continued)
• S crew drive models: Verify shuttle release lever is in ENGAGED
(UP) position (pull release handle toward opener and let go)
• Chain/belt drive models: Verify bullet is engaged to carriage.
Pull/release cord down and back towards opener and let go.
Screw Drive
Belt/Chain Drive
Opener
Opener
Reset Open/Close Travel Limit
Performing all eleven (11) Limits/Force setting steps (see pages 6-8)
erases previous Limits/Force settings.
Note: The opener will not close the door automatically unless the
Safe-T-Beam® System is installed and Limits are programmed.
Disengaging and Engaging Carriage/Bullet
Screw Drive
Belt/Chain Drive
Opener
Opener
Engaged
Disengaged
Disengaged
Engaged
Engaged
Disengaged
Disengaged
Engaged
To engage bullet to carriage,
pull the release handle down and
toward the opener.
–Operate door using a remote or wall console.
–Door will re-attach itself to carriage assembly.
CORRECTIVE MAINTENANCE
To engage shuttle to carriage,
pull down and toward the opener.
To disengage shuttle from carriage,
pull down on relaese hanfle.
To disengage bullet from carriage,
pull relaese handle down and
toward the door.
Changing Light Bulbs
WA R N I N G
Remote Battery Replacement
Replace remote battery with a CR 2032 coin cell battery.
1. Open remote case using a washer or coin that fits into the slot at top of remote.
2. Replace battery.
3. Align components and snap case
closed.
• Use extreme caution when working from a ladder or step stool.
• When replacing light cover, make sure wires are not pinched or near moving parts.
1. Disconnect power to door opener.
• Open powerhead light cover.
• Remove light bulb(s).
• Replace light bulb(s).
–DO NOT use light bulbs with greater than 100 Watt rating,
PowerLift® 900, GPower™ 900 require light bulbs of no more
than 60 watts. Compact CFL's may also be used.
– Close powerhead light cover.
2. Reconnect power to door opener.
• Test light operation.
(continued next page)
17
6
Maintenance and Adjustments
Adjustment Guides
Force Level 1
Purple
Red
Blue
Powerhead LEDs
ROUND LED
LONG LED
BLUE
Off
Force Level 2
BLUE
Off
Force Level 3
BLUE
BLUE
Force Level 4
Off
PURPLE
Force Level 5
PURPLE
Off
Force Level 6
PURPLE
PURPLE
Force Level 7
Off
RED
Force Level 7
RED
Off
Force Level 9
RED
RED
LED indicator colors:
CAUTION
Force Level
Door closing force is FACTORY set and requires no adjustment
for normal operation.
• NEVER adjust the force settings to compensate for damage, including an unbalanced door, binding door track, or broken spring.
• Perform monthly a CONTACT REVERSE TEST. See page 8.
Force Settings
Force settings are pre programmed at the factory and “learned”
during the Open/Close Limit settings steps (see pages 6-7). For normal
use, these settings should not need adjustment with this unit.
OFF
However, conditions possibly requiring adjustment are:
1. Doors with very stiff weather seals.
2. Doors that start down, STOP, and reverse before closing.
3. Doors that start up, but STOP before they completely open.
Force Adjustment
Action
1
LED Indication/Result
Press and hold
both up and
down buttons
2 seconds or until round
LED turns RED.
2 Press either
until you reach
desired setting.
3 Press and
PROGRAM
SET
5
Press either
until you
reach the
desired setting.
Press and
release.
RED
BLUE
OFF Flashes 3 Times
The Current UP FORCE SETTING
will display. SEE CHART IN NEXT
COLUMN.
USE CHART IN NEXT COLUMN
release.
4
OFF
LOCKS IN SETTING.
Then the New
DOWN FORCE
SETTING will display.
USE CHART IN
NEXT COLUMN
PROGRAM
SET
BLUE
Flashing
BLUE
LOCKS IN SETTING.
Both LEDs turn
BLUE
BLUE then OFF
BLUE
confirms both
FORCE Settings are reset.
OFF
BLUE
OFF
OFF
FORCE SETTINGS DONE
18
(continued next page)
6
Maintenance and Adjustments
Adjustment Guides (continued)
LED indicator colors:
Speed Settings (DC motors only)
Speed settings are pre-programmed at the factory for the maximum
speed. Speed settings should not need adjustment with this unit.
However, travel speed for the opener can be adjusted to a slower
speed in both the Open and Close directions, to minimize wear on
heavier sectional doors.
Purple
Red
Blue
Powerhead LEDs
ROUND LED
LONG LED
RED
RED
OFF
Speed Level
High
Medium
PURPLE
PURPLE
BLUE
BLUE
Low
Note: One-piece doors are automatically set to the slowest speed
during Limits programming and cannot be adjusted.
Note: PowerLift® 900, GPower™ 900 openers DO NOT have speed
adjustments.
There are 3-speed settings available for sectional doors. Please note
that speed may be affected by door weight and balance, along with
condition of door components and tracks.
Locating Safe-T-Beam Pairs:
Source (Red LED) and Sensor (Green LED)
Sun
Speed Adjustment
Action
1 Press and hold for
about 10 seconds
or until both LEDs
turn BLUE.
Then release.
2
LED Indication/Result
PROGRAM
SET
BLUE
Press twice.
BLUE
3
Press and
release.
PROGRAM
OFF
SET
4
5
BLUE
PROGRAM
SET
One Door
Garage
Green
LED
Green
LED
Red
LED
Red
LED
Green
LED
Green
LED
Green
LED
Two Door
Garage
Red
LED
Red
LED
Red
LED
Flashes BLUE 3 Times
Then the Current Speed setting
for OPENING travel will display.
SEE CHART IN NEXT COLUMN.
LOCKS IN OPENING SETTING.
Flashes BLUE
3 Times
OFF
Then the Current Speed setting
for CLOSING travel will display.
SEE CHART IN NEXT COLUMN.
6 Press either until
you reach the
desired setting.
7
PROGRAM
Press and
release.
SET
Both LEDs FLASH
BLUE to confirm setting.
Green
LED
Three Door
Garage
NOTE: Depending on the criteria
mentioned above, you may not
have the option to increase speed.
Press either until
you reach the
desired setting.
Press and
release.
BLUE
Red
LED
Single Garage Door
• Determine which side of the garage receives direct sunlight.
• Position the Source (Red LED) on the direct sunlight side
Multiple Garage Doors
• NEVER position Safe-T-Beam modules where signals will cross.
• Place the Source (Red LED) Safe-T-Beams on adjacent doors facing
in opposite directions.
NOTE: Direct sunlight creates interference with Safe-T-Beam Sensor
(Green LED). Sensor modules CAN be positioned further away from
door opening if necessary to avoid sunlight but no further off the wall to
maintain alignment with paired Source module.
NOTE: Depending on the criteria
mentioned above, you may not
have the option to increase speed.
Sun
LOCKS IN CLOSING SETTING.
FLASH BLUE
Red
LED
Green
LED
FLASH BLUE
SPEED SETTINGS DONE
One Door
Garage
19
7
Wiring Diagram
Opener circuit wiring diagram. This wiring diagram is for reference only.
WA R N I N G
OPENING COVER MAY CAUSE ELECTRIC SHOCK.
Disconnect power from opener prior to removing cover.
POWER CORD
SCREW DRIVE MOTOR
CHAIN MOTOR
PRINTED CIRCUIT BOARD
CONNECTOR
BLACK
WHITE
RED
RED
BLACK
BLACK
1
2
3
4
GREEN
STB
1
BWC
2
3
(IWC or AWC)
4
5
6
CHOKE
STRIPED WHITE
STRIPED WHITE
WHITE
SAFE-T-BEAM®
BLACK
WHITE
STRIPED WHITE
(Purchased Separately)
INTELLIGENT WALL CONSOLE
BLACK
7
6
5
4
3
2
WALL CONSOLE
1
WAR N I N G
ELECTRICAL SHOCK.
MOTION DETECTOR*
1
RED
2
OPTICAL SENSOR*
3
1
BLACK
2
3
4
RED
YELLOW
*SOME MODELS DO NOT COME WITH THIS FEATURE
20
GREEN
8
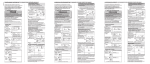
Troubleshooting
OPERATION
PROBLEM
Opener does NOT run
from wall console.
Opener runs, but door
does not move.
Opener works from
wall console, but NOT
from remote.
Remote has less than
25 feet operating
range or no operation.
Door starts down,
then STOPS and goes
back up.
OR
Safe-T-Beam® System
malfunction.
Need help or have questions? DO NOT RETURN to the store. Call us: 800-354-3643
WHAT TO DO
• Check power source.
– Plug a lamp into outlet used for powerhead. If lamp works, power source is OK.
– If not, check fuse or circuit breaker.
• If power is OK,
– Check connections at powerhead terminals and at wall console.
– Limits must be set with door arm connected to door.
• Check if wall console Sure-Lock™ is ON. Turn Sure-Lock™ OFF and check operation.
• Check for reversed, broken or cut wires. Staples can cut insulation and short wires. Repair or replace.
• Make certain carriage is engaged into chain/belt bullet or screw drive shuttle. See page 6. Refer to Installation
poster or download poster from www.geniecompany.com
• Check to make sure chain/belt is not broken or OFF its pulley.
• Check all remotes.
• Replace remote battery with good one. See page 17.
• Program remote to powerhead. See pages 10-11.
• Relocate remote inside car and/or point remote at garage door.
• Replace battery. See page 17.
• Reposition door opener antenna.
• Remote LED does not come ON with button push – replace battery. See page 17.
• Eliminate possible competing signals (satellite radio, FiOS® TV).
• If a NEW installation, check Door Arm position. Refer to Installation poster or download poster from
www.geniecompany.com
• Check if limits are properly set. See pages 6-7.
• Check if Safe-T-Beam® Red LED is flashing.
• Check Safe-T-Beam® system for beam obstruction or misalignment of lenses.
• Check garage door for binding.
• If an operational problem exists, and opener will not close, the opener can be forced to close as follows: Press
and hold the wall console button until door is completely closed.
• Check for interference from adjacent Safe-T-Beam® units.
• Contact The Genie Company at 1-800-35GENIE.
Door starts down,
then STOPS before it
is closed.
OR Door will only open.
• Check Safe-T-Beam® wire connections at powerhead and at STBs. See page 8, STB instruction, poster or website.
• Check if limits are properly set. See pages 6-7.
• Check CONTACT REVERSE. See pages 8-9.
• Check garage door for binding.
• Check closing “FORCE” adjustment. See page 8.
Door starts up, but
STOPS before it is
completely open.
• Check if limits are properly set. See pages 6-7.
• Be sure door, opener, and springs are in good repair, properly lubricated and balanced.
• Check closing “FORCE” adjustment. See page 8.
• WARNING: If you suspect a problem with the garage door hardware or springs, contact
The Genie Company at 1-800-35GENIE.
Door will only run
closed.
• Check if limits are properly set. See pages 6-7.
• Check Sure-Lock™. Sure-Lock™ should be OFF for normal operation. See page 8.
• Check door balance, condition, and door spring.
• Check opening “FORCE” adjustment. See page 8.
• WARNING: If you suspect a problem with the garage door hardware or springs, contact
The Genie Company at 1-800-35GENIE.
Door opener starts for
no reason.
• Button stuck on wall console or remote.
• Was a remote lost or stolen? Erase all remotes from powerhead memory and program new remotes. See page 13.
21
8
Troubleshooting
OPERATION (continued)
PROBLEM
Noisy operation.
Door opener runs
slow.
WHAT TO DO
• Be sure all door fasteners are tight.
• Be sure garage door is in good repair, properly lubricated and balanced.
• Be sure opener is in good repair.
• Check operating condition of door. Door may need professional repair/adjustment.
• Is this opener installed on a one-piece door? Normal speed for one-piece door is lowest speed setting.
• If carriage travel is less than 6-feet, opener configures programming for a one-piece door.
• Contact The Genie Company at 1-800-35GENIE concerning door speed.
POWERHEAD LEDS
Powerhead LED
Round LED
Long LED
22
Possible Problem
Solution
Normal operation.
None required.
No response from unit.
Check power supply.
Contact a trained door system technician.
OFF
OFF
ON/RED/
STEADY
ON/RED/
STEADY
Limits NOT set properly.
Re-program limits, see page s 6-7.
ON/RED/
FLASHING
ON/RED/
FLASHING
Program error.
Unplug unit, wait 5 seconds, plug in.
Component failure.
Contact a trained door system technician.
ON/BLUE/
FLASHING
OFF
Remote NOT programmed.
Program remote, see pages 10-11.
ON/PURPLE/
FLASHING
OFF
Intellicode® 1 remote NOT
programmed.
Program remote using Intellicode® 2 remote,
see page 10. Then program Intellicode® 1
remote using instructions on page 14.
Safe-T-Beam® physical obstruction.
Remove obstruction, recheck unit.
Safe-T-Beam® signal interference.
Check alignment of Safe-T-Beam® pair and
nearest other Safe-T-Beam® pair, see page 19.
Door contact in UP or DOWN travel.
Remove obstruction.
Door component failure detected.
Check door spring, track, rollers, hinges and
fixtures.
Thermal cutout
DO NOT unplug unit.
Wait until LED clears before operating.
ON/RED/
FLASHING
OFF
OFF
ON/RED/
FLASHING
OFF
ON/RED/
STEADY
9
Warranty
PowerMax® 1200/1500, SC 1200/1500, TriloG™ 1200/1500, PowerLift® 900,
GPower™ 900, SilentMax® 1000/1200, CB 1000/1200, IntelliG® 1000/1200
LIMITED WARRANTY
GMI Holdings, Inc. d/b/a The Genie Company ("Seller") warrants to the original purchaser of the below identified, SilentMax® 1000/1200, CB 1000/1200, IntelliG®
1000/1200, PowerMax® 1200/1500, SC 1200/1500, TriloG™ 1200/1500, PowerLift® 900, or GPower™ 900 garage door openers, (“Product”), subject to all of the terms and
conditions hereof, that the Product and all components thereof will be free from defects in materials and workmanship for the following period(s) of time, measured from the date
of purchase:
SilentMax® 1000/1200, CB 1000/1200, IntelliG® 1000/1200,
MOTOR/GEARBOX- Seller warrants the motor/gearbox for the LIFETIME* of the product.
BELT- Seller warrants the belt for a period of FIFTEEN (15) YEARS.
CHAIN- Seller warrants the chain for a period of FIVE (5) YEARS.
PowerMax® 1200/1500, SC 1200/1500, TriloG™ 1200/1500
MOTOR – Seller warrants the motor for the LIFETIME* of the Product.
DRIVE SCREW– Seller warrants the drive screw for the LIFETIME* of the Product
PowerLift®, 900 , GPower™ 900
MOTOR – Seller warrants the motor for a period of FIFTEEN (15) YEARS
DRIVE SCREW – Seller warrants the drive screw for a period of FIVE (5) YEARS.
CORE UNIT PARTS** - Seller warrants all other parts and components of the Core Unit for a period of FIVE (5) YEARS.
ACCESSORIES - Seller warrants all accessories included with product for a period of ONE (1) YEAR.
*Lifetime shall mean for as long as the original purchaser owns the home in which the product is originally installed.
** The Core Unit consists of the powerhead, wired wall control, Safe-T-Beam® system, J-Arm and rail.
Seller’s obligation under this warranty is specifically limited to repairing or replacing, at its option, the Product or any part thereof which is determined by Seller to be defective
during the applicable warranty period. Any labor charges are excluded and will be the responsibility of the purchaser.
This warranty gives you specific legal rights, and you may also have other rights which vary from state to state. This warranty is made to the original purchaser of the Product
only, and is not transferable or assignable. This warranty applies only to Product installed in a residential or other non-commercial application. It does not cover any Product
installed in commercial or industrial building applications. This warranty does not apply to any unauthorized or improper installation, alteration or repair of the Product, or to any
Product or component which has been damaged or deteriorated due to misuse, abuse, neglect, accident, failure to provide necessary maintenance, normal wear and tear, or acts of
God or any other cause beyond the reasonable control of Seller, and does not cover batteries, missing or damaged parts from clearance or open box sales, or repairs or
maintenance to door components.
ALL EXPRESS AND IMPLIED WARRANTIES FOR THE PRODUCT, INCLUDING BUT NOT LIMITED TO ANY IMPLIED WARRANTIES OF MERCHANTABILITY
AND FITNESS FOR A PARTICULAR PURPOSE, ARE LIMITED IN TIME TO THE APPLICABLE WARRANTY PERIOD REFLECTED ABOVE. NO WARRANTIES,
WHETHER EXPRESS OR IMPLIED, WILL APPLY
AFTER THE LIMITED WARRANTY PERIOD HAS EXPIRED. Some states do not allow limitations on how long an implied warranty lasts, so the above limitation may not
apply to you.
IN NO EVENT SHALL GMI HOLDINGS, INC. OR ITS PARENT OR AFFILIATES BE RESPONSIBLE FOR, OR LIABLE TO ANYONE FOR, SPECIAL, INDIRECT,
COLLATERAL, PUNITIVE, INCIDENTAL OR CONSEQUENTIAL DAMAGES, even if Seller has been advised of the possibility of such damages. Such excluded damages
include, but are not limited to, loss of use, cost of any substitute product, or other similar indirect financial loss. Some states do not allow the exclusion or limitation of incidental
or consequential damages, so the above limitation or exclusion may not apply to you.
Claims under this warranty must be made promptly after discovery and within the applicable warranty period. To obtain warranty service, you must contact Genie® customer
service and provide proof of the date and location of purchase and identification as the original purchaser. Call Genie® Customer Service toll free at 1-800-354-3643 to speak
with a trained representative. Purchaser must allow Seller a reasonable opportunity to inspect Product claimed to be defective prior to removal or alteration of its condition.
Upon determination by Seller that the Product or any part thereof is defective during the applicable warranty period (which may require purchaser to return the Product to Seller
at purchaser’s expense), Seller will supply the purchaser with replacement parts or, at its option, a replacement Product (shipping and handling of any replacement part(s) or
replacement Product also at purchaser’s expense). Seller may use new or reconditioned parts, or a new or reconditioned Product of the same or similar design.
There are no established informal dispute resolution procedures of the type described in the Magnuson-Moss Warranty Act.
PURCHASER: ___________________________________________________________________________________________________________________
INSTALLATION ADDRESS: _______________________________________________________________________________________________________
DATE PURCHASED: ________________ SERIAL NUMBER:___________________________________________________________________________
OPENER MODEL:________________________________________________________________________________________________________________
REMOTE CONTROL MODEL: _____________________________________________________________________________________________________
DEALER NAME: _________________________________________________________________________________________________________________
DEALER ADDRESS:______________________________________________________________________________________________________________
23
Garage Door Opener Accessories
Looking for Leading-Edge Technology or the Perfect Update/Replacement?
Genie Has the Answer!
Did your garage door close?
GenieNet technology “tells” you!
Closed Confirm Wireless Remote
Leading-Edge
Technology
(Works with Revolution Series 1500, 1200 and 1000 Models)
• Sleek and compact design
37337R
GLRN-R
• Beeps and flashes green when garage
door closes. Gives warning tone and
flashes red when garage door does not
close properly
Intelligence at your finger tips
3-Button Remote
• Features Intellicode®
Access Security System
“Super Sub”
Replacement
• Operates up to 3 openers
• Provides low-battery warning
37330R
G3T-R
Convenience, Security All in One
Wireless Keypad
• Wireless; can open door without remote
• Lighted keypad with flip-up cover
Upgrade
with style
• Controls up to three openers
White Gray Tan Almond
37332R
GK-R
Color-Match These Covers to Your Home – 4 Color Options by Special Order
Perfect Stop
Parking System
• Garage parking guide for extra safety
Universal Wall Push Button
• Easy to mount inside garage
• Ball and string system attaches to door
– enables safe parking in garage
• Used in addition to other remotes or wall buttons
Check out NEW ACCESSORIES and PRODUCTS; visit www.GenieCompany.com or call 1-800-35-GENIE.
Also available at Home Improvement outlets and other retail/commercial locations nationwide.