Transcript
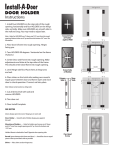
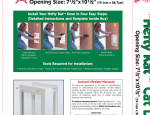
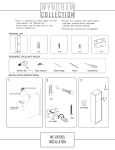
Ruff Weather™
Premium All-Weather Pet Door
INSTALLATION INSTRUCTIONS
Tools Required for Installation
Hammer and Awl (or Nail) • Drill and 3/8” (1cm) Drill Bit • Sabre Saw • Phillips Screwdriver
1. Determine template placement - The die-cut template is located in the center of pet door. Remove screws holding the
frame together; lift out template. Center template (width) in middle of door; tape in place. Position the top of the template
2” (5.1cm) taller than your pet’s shoulder.
Important: Under no circumstances should the bottom edge of the rough opening be less than 3” (7.6cm) from
the bottom edge of the wood door.
2. Outline pet door opening - With template taped in place, use a pencil to draw around the inside edge of template onto
door. Use a nail or awl to mark outer screw holes.
3. Drilling holes - Next: Drill the four (4) 3/8” (1cm) diameter outer screw holes.
4. Cutting the opening - Mark the inside (4) corners of template and drill four (4) 3/8” (1cm) diameter saw-out starter holes.
Beginning with one of the inside 3/8” (1cm) saw-out starter holes, use a sabre saw to cut along inside edge pencil line.
5. Assembly and Adjustments
(see diagram) - Insert outer frame (A) into opening
from exterior side (frame must be flush with door
surface). Place inner frame (B) into opening from
inside door and hold in place. Install screws (C)
and tighten until snug. Do not over-tighten.
(A)
(D)
6. Locking your pet door - Slide cover into guide
channels located on both sides of pet door opening.
Lock inside slide (D) with the red tab located on
door’s upper left side.
Cut-Out
Opening
The “RUFF WEATHER™” Wall Installation Kit
The RUFF WEATHER™ Pet Door can also be installed
in walls 4 3/4” - 7 1/4” (12.1cm -18.4cm) using the
optional Wall Installation Kit available from your retailer.
Outer Screw Hole
(C)
Installation Diagram