1
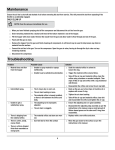
Maintenance
Ensure the air line is shut-off and drained of air before removing this tool for service. This will prevent the tool from operating if the throttle
is accidentally engaged.
DAILY CLEAN UP
NOTE: Clean the spray gun immediately after use.
□□ Paint and other materials dry quickly in the small passages rendering
the gun useless due to the difficulty of removing hardened paint from the
passages inside the gun. An in-line filter-regulator-lubricator is recommended
as it increases tool life and keeps the tool in sustained operation. Remove and
empty the canister. Rinse with a solvent recommended for the paint or
other material used. Refill the canister with clean solvent and attach to the gun.
Spray the solvent through the gun while shaking the gun vigorously.
Wipe the gun exterior with a solvent soaked rag. Repeat until the gun is clean.
□□ Remove the air cap and soak in solvent until clean. Use a small brush for
stubborn stains if necessary. Toothpicks or small brushes may be used to
clean air passages. NEVER USE METAL OBJECTS TO CLEAN PRECISELY
DRILLED PASSAGES. DAMAGED PASSAGES WILL CAUSE IMPROPER SPRAYING.
□□ Clean the gaskets with a solvent soaked rag. To prevent equipment damage,
DO NOT IMMERSE THE GASKET OR SPRAY GUN BODY IN SOLVENTS.
□□ After using water to clean out water based paints or materials, spray mineral
spirits through the gun to prevent corrosion.
□□ Use a non-silicone oil on all moving parts when reassembling. Use Vaseline®
or light grease on all threaded connections prior to storage.
8
Troubleshooting
Problem
Possible Cause
Solution
Heavy spray pattern to the left
or right of the paint surface.
□□ Holes in the left or right side of the air cap
are plugged.
□□ Use only non-metalic paint.
□□ Dirt on the left or right side of the fluid tip.
□□ Clean the fluid tip.
Heavy spray pattern to the top
or bottom of the paint surface.
□□ Dried material at the top or bottom of the
fluid tip.
□□ Use only non-metalic paint.
□□ The air cap is loose or the seat is dirty.
□□ Clean and tighten the air cap.
□□ The air cap is plugged.
Spray gun emits split spray
pattern.
The spray gun emits sputtering
spray pattern.
Air is leaking from the air cap
without pulling the trigger.
Fluid leaking from fluid tip of
spray gun.
The spray gun emits excessive
overspray.
The spray gun will not spray.
□□ Clean the fluid tip.
□□ The fan pattern is open too far.
□□ Partially close the pattern adjustment.
□□ The fluid control is turned too far.
□□ Increase fluid using the fluid control
knob.
□□ The atomization air adjustment is too high.
The spray gun emits split spray
pattern.
□□ Clean the air cap.
□□ Reduce the atomization air pressure.
□□ The fan adjustment is partially closed.
□□ Open the fan pattern adjustment.
□□ The paint material is too thick.
□□ Thin paint material to proper viscosity.
□□ Atomization pressure is too low.
□□ Increase the atomization pressure.
□□ The material level is too low.
□□ Refill the paint cup.
□□ The container is tipped too far.
□□ Hold the spray gun upright.
□□ Loose fluid inlet connection.
□□ Tighten the fluid cap.
□□ Loose or damaged fluid tip / seat.
□□ Adjust or replace the fluid tip or seat.
□□ Dry or loose fluid needle packing nut.
□□ Lubricate and tighten the fluid needle
and packing nut.
□□ The air vent is clogged.
□□ Clear the vent hole.
□□ The air valve stem is sticking.
□□ Lubricate the valve stem.
□□ There is contaminate on the valve or seat.
□□ Clean air valve or seat.
□□ The air valve or seat is worn or damaged.
□□ Replace air valve or stem.
□□ The air valve spring is broken.
□□ Replace air valve spring.
□□ Valve stem is bent.
□□ Replace valve stem.
□□ The packing nut is too tight.
□□ Adjust the packing nut.
□□ The fluid tip is worn or damaged.
□□ Replace the tip and / or needle.
□□ There is foreign matter on the tip.
□□ Clean the fluid tip.
□□ The fluid needle spring is broken.
□□ Replace fluid needle spring.
□□ The atomization pressure is set too high.
□□ Reduce the atomization pressure.
□□ The spray gun is held too far away from the
work surface.
□□ Adjust to the proper distance.
□□ Improper stroking (arcing, gun motion too
fast).
□□ Move the spray gun at a moderate
pace, parallel to the surface.
□□ There is no air pressure at the gun.
□□ Check the air lines.
□□ The fluid control is not open enough.
□□ Open fluid control.
□□ The material is too heavy.
□□ Thin the material or change over to a
pressure feed system.
9HUSKYTOOLS.COM
Please contact 1-888-43-HUSKY for further assistance.
Service Parts
10
Service Parts (continued)
Reference Part Number
Number
1
9F501
Description
Reference Part Number
Number
Air Cap Ring
16
9F5083
Description
O-Ring
1a
9F501G
Telfon Gasket
17
9F510
Fluid Adj. Needle Spring
2
9F5021
Air Cap 1.8 mm
18
9F515
Fluid Adj. Spring
2a
9F5021C
Air Cap 2.2 mm
19
9F512
Fluid Adj. Knob
3
9F5031
Nozzle 1.8 mm
20
9W8818
Trigger Pin
3a
9F5031C
Nozzle 2.2 mm
21
9F5305
Paint Canister Lid
4
9F505
Gun Body
22
9F5302
Suction Tube
5
9W7120
Retainer Ring
23
9F5304
Rubber Gasket
6
9F5281
Pattern Control Needle
24
9F5301
Paint Canister
7
9F5283
Spring
25
9F519
Trigger Lever
8
9W71282
Washer
26
9F517
Air Inlet
9
9W71062
O-Ring
27
9F5042
Fluid Needle Bushing
10
9F5286
Pattern Control Nut
28
9F5041
Fluid Needle Seat
11
9W71287
Pattern Control Knob
29
9F5304-1
O-Ring
12
9F5081
Fluid Adj. Plug
30
9W9726
Wrench
13
9F509
Fluid Adj. Needle 1.8 mm
31
9W7127
Soft Brush
13a
9F509C
Fluid Adj. Needle 2.2 mm
32
9D41A4105
Needle
14
9F5082
O-Ring (2)
33
9D41A4103
Cleaning Brush
15
9F508
Fluid Adj. Bushing
11
HUSKYTOOLS.COM
Please contact 1-888-43-HUSKY for further assistance.