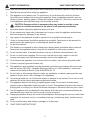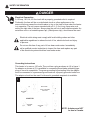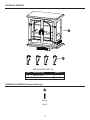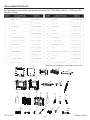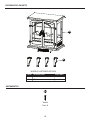
1
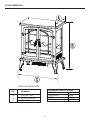
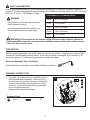
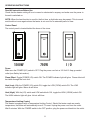
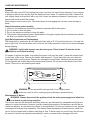
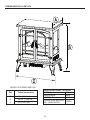
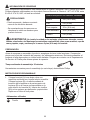
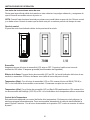
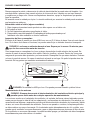
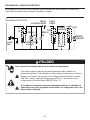
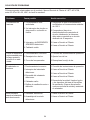
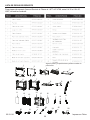
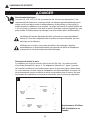
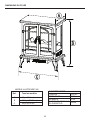
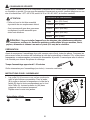
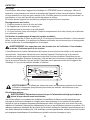
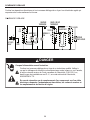
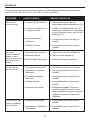
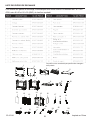
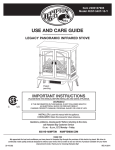
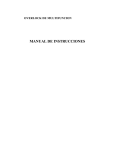
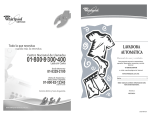
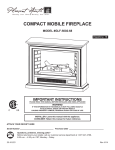
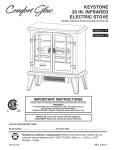
W a r m i n g Y o u r H o m e. 25 IN. PANORAMIC ELECTRIC STOVE W a r m i n g Y o u r H e a r t. MODEL SERIES #EST-330, EST-340, SES-81, SES-82, SES-91, SES-92 Español p. 14 Francais p. 27 MODEL SHOWN #EST-340 Patent pending IMPORTANT INSTRUCTIONS PLEASE READ THIS MANUAL BEFORE INSTALLING AND USING APPLIANCE WARNING! C US IF THE INFORMATION IN THIS MANUAL IS NOT FOLLOWED EXACTLY, AN ELECTRICAL SHOCK OR FIRE MAY RESULT CAUSING PROPERTY DAMAGE, PERSONAL INJURY OR LOSS OF LIFE. INSTALLER: Leave this manual with the appliance. CONSUMER: Retain this manual for future reference. ATTACH YOUR RECEIPT HERE Serial Number ________________________________ Purchase Date _________________________________ Questions, problems, missing parts? Before returning to your retailer, call our customer service department at 1-877-447-4768, 8:30 a.m. –4:30 p.m. CST, Monday – Friday. 20-10-141 1 REV. 05/01/2012 TABLE OF CONTENTS Safety Information............................................................................................................................. 3 Package Contents............................................................................................................................. 5 Hardware Contents .......................................................................................................................... 5 Stove Dimensions ............................................................................................................................ 6 Safety Information ............................................................................................................................ 7 Preparation ....................................................................................................................................... 7 Assembly Instructions ...................................................................................................................... 7 Operating Instructions....................................................................................................................... 8 Care and Maintenance...................................................................................................................... 9 Electric Wiring Diagram................................................................................................................... 10 Troubleshooting............................................................................................................................... 11 Warranty.......................................................................................................................................... 12 Replacement Parts List................................................................................................................... 13 IMPORTANT: Read all instructions and warnings carefully before starting installation. Failure to follow these instructions may result in a possible electric shock, injury to persons, fire hazard and will void the warranty. Please read the Installation & Operating Instructions before using this appliance. CAUTION PRODUCT DAMAGE MAY OCCUR. Never attempt to disassemble or alter the product in any way not instructed by this manual. 2 SAFETY INFORMATION SAVE THESE INSTRUCTIONS Please read and understand this entire manual before attempting to assemble, operate or install the product. 1. 2. Read all instructions before using this appliance. This appliance is hot when in use. To avoid burns, do not let bare skin touch hot surfaces. If provided, use handles when moving this appliance. Keep combustible materials, such as furniture, pillows, bedding, papers, clothes and curtains at least 3 ft. (914 mm) from the front of this appliance and keep them away from the sides and rear. 3. CAUTION: Extreme caution is necessary when any heater is used by or near children or invalids and whenever the heater is left operating unattended. 4. If possible always unplug this appliance when not in use. 6. Any repairs to this appliance should be carried out by a qualified service person. 5. 7. 8. 9. Do not operate any heater with a damaged cord or plug or after the appliance malfunctions, has been dropped or damaged in any manner. Under no circumstances should this appliance be modified. Parts having to be removed for servicing must be replaced prior to operating this appliance again. Do not use outdoors. This heater is not intended for use in bathrooms, laundry areas and similar indoor locations. Never place this appliance where it may fall into a bathtub or other water container. 10. Do not use this heater in elevated locations, such as on shelves, raised platforms, etc. 11. Do not run cord under carpeting. Do not cover cord with throw rugs, runners or the like. Arrange cord away from traffic areas and where it will not be tripped over. 12. To disconnect this appliance, turn controls to the off position, then remove plug from outlet. 13. Connect to properly grounded outlets only. 14. This appliance, when installed, must be electrically grounded in accordance with local codes, with the current CSA C22.1 Canadian Electrical codes or for USA installations, follow local codes and the National Electric Code, ANSI/NFPA No. 70. 15. Do not insert or allow foreign objects to enter any ventilation or exhaust opening as this may cause an electric shock, fire or damage to the appliance. 16. To prevent possible fire, do not block air intakes or exhaust in any manner. Do not use on soft surfaces, like a bed, where openings may become blocked. 17. This appliance has hot and arcing or sparking parts inside. Do not use it in areas where gasoline, paint or flammable liquids are used or stored. This appliance should not be used as a drying rack for clothing, nor should Christmas stockings or decorations be hung on or near it. 18. Use this appliance only as described in this manual. Any other use not recommended by the manufacturer may cause fire, electric shock or injury to persons. 19. Always plug heaters directly into a wall outlet/receptacle. Always plug the unit into a wall outlet/ receptacle. An extension cord or re-locatable power tap, (outlet/power strip), should never be used. 20. Do not use this heater with missing, damaged, or broken legs. 21. "SAVE THESE INSTRUCTIONS" 3 SAFETY INFORMATION DANGER Electrical Connection A 15 Amp, 120 Volt, 60 Hz circuit with a properly grounded outlet is required. Preferably, the item will be on a dedicated circuit as other appliances on the same circuit may cause the circuit breaker to trip or the fuse to blow when the heater is in operation. The unit comes standard with a 6 ft. (1.8 m) long, three-wire cord, exiting the right side of the item. Always plug the unit into a wall outlet/receptacle. An extension cord or re-locatable power tap, (outlet/power strip), should never be used. Electrical outlet wiring must comply with local building codes and other applicable regulations to reduce the risk of fire, electrical shock and injury to persons. Do not use this item if any part of it has been under water. Immediately call a qualified service technician to inspect the item and replace any part of the electrical system which has been under water. Grounding Instructions This heater is for use on 120 volts. The cord has a plug as shown at (A) in figure 1. An adaptor as shown at (C) is available for connecting three-blade grounding-type plugs to two-slot receptacles. The green grounding lug extending from the adaptor must be connected to a permanent ground such as a properly grounded outlet box. The adaptor should not be used if a three-slot grounded receptacle is available. 1 (A) METAL SCREW COVER OF GROUNDED OUTLET BOX GROUNDING PIN (B) Adaptor ADAPTER (C) GROUNDING MEANS GROUNDING PIN (D) 4 NOTE: Adaptors are NOT for use in Canada. PACKAGE CONTENTS A B MODEL SHOWN #EST-340 PART A B DESCRIPTION Electric Stove Leg HARDWARE CONTENTS (shown actual size) AA Screw Qty. 8 5 QUANTITY 1 4 Stove Dimensions MODEL SHOWN #EST-340 Ref. All models 15 in. (38.1 cm) A B C TECHNICAL SPECIFICATIONS Voltage120V AC Frequency 60Hz Amps12.5A Rating1500W 28.5 in. (72.39 cm) 25 in. (63.5 cm) 6 SAFETY INFORMATION Please read and understand this entire manual before attempting to assemble, operate or install the product. If you have any questions regarding the product, please call customer service at 1-877-447-4768, 8:30 a.m. - 4:30 p.m., CST, Monday - Friday. Clearance to Combustibles WARNING • Stove is heavy and should be assembled near its desired location. • It is recommended that two people move the assembled stove to prevent injury. Sides 4 in. (101.6 mm) Floor 0 in. (0 mm) Top 36 in. (914 mm) Front 36 in. (914 mm) Rear 0 in. (0 mm) Warning: Do not install unit on shelves, raised platforms, beds, blankets, pillows etc. Keep combustible materials such as furniture, bedding, papers, clothes and curtains at least 3 feet (914 mm) from the stove. PREPARATION Before beginning assembly of product, make sure all parts are present. Compare parts with package contents list and hardware contents above. If any part is missing or damaged, do not attempt to assemble the product. Contact customer service for replacement parts. Estimated Assembly Time: 20 minutes Tools Required for Assembly (not included): Phillips screwdriver ASSEMBLY INSTRUCTIONS 1. Lay stove (A) upside down on a padded surface with the underside accessible. Attach leg (B) to stove by inserting the tab on the top of the leg (B) into the corresponding slot on the bottom of the stove (A). Insert two screws (AA) into predrilled holes and tighten securely. Repeat with remaining three legs. Hardware Used AA Screw x8 7 1 B AA AA B A OPERATING INSTRUCTIONS Read All Instructions Before Use Check that the heater outlet grill is not covered or obstructed in anyway, and make sure the power to the unit is switched on. NOTE: When the heat function is used for the first time, a slight odor may be present. This is normal and should not occur again unless the heater is not used for an extended period of time. Control Panel The control panel is located behind the doors of the stove. 1500W 750W I/O Power Make sure the POWER (I/O) switch is OFF. Plug the power cord into a 120 Volt 15 Amp grounded outlet (see Safety Information). Flame Effect: Toggle POWER (I/O) switch ON. The POWER indicator light will glow. Flame effect will be visible through the front door. Heat (Low): With the POWER (I/O) switch ON, toggle the LOW (750W) switch ON. The LOW indicator light will glow. Warm air will blow. Heat (High): With the (I/O) switch and LOW switch both ON, toggle the HIGH (1500W) switch ON. The HIGH indicator light will glow. Hot air will blow. Temperature Limiting Control This heater is equipped with a Temperature Limiting Control. Should the heater reach an unsafe temperature, the heater will automatically turn off. To reset: Unplug the power cord from the outlet. Wait 5 minutes. With the POWER switch in the OFF position, plug the power cord back into the outlet. 8 CARE AND MAINTENANCE Cleaning Always turn the stove OFF and unplug the power cord from the outlet before cleaning. Use a vacuum or duster to remove dust and dirt from the heater and vent areas. To maintain the finish, clean with a soft, slightly damp cloth and buff with a dry cloth. Never use abrasive cleansers, liquid sprays, or any cleaner that could scratch the surface. Never drag the unit across a floor. The added stress from dragging the unit may cause the legs to break. Glass Information (select models) 1. Under no circumstances should this product be operated with broken glass. 2. Do not strike or slam the glass. 3. Do not use abrasive cleaners to clean the glass. 4. This product uses tempered glass. Replacement of the glass supplied by the manufacturer should be done by a qualified service person. Light Bulb Inspection and Replacement The flame effect is created by two 40-Watt light bulbs with an E-12 (small) socket base. Use only this type of light bulb. If the flame effect does not work, the bulbs may have come loose or been damaged during shipping. WARNING: Light bulbs become very hot during use. Allow at least 10 minutes for the bulbs to cool before touching. To inspect or replace the bulbs, first unplug the power cord from the outlet. Locate the access panel on the back of the stove. Remove the screws and the panel. Check the bulbs to be sure they are finger tight and in working order. Replace any damaged or faulty bulbs. Reattach the access panel. Do not operate this heater without the access panel in place. Do not remove the back cover of this heater. There are no serviceable parts inside. WARNING: Do not exceed 40 watts per bulb. Use of higher rated bulbs may result in a fire, causing property damage or personal injury. Maintenance of Motors WARNING: Always disconnect the appliance from the main power supply and allow it to cool before any servicing operation. The motors used on the fan heater and flame effect are pre-lubricated for extended bearing life and require no further lubrication. However, periodic cleaning/vacuuming of the appliance around the air intake and exhaust, as well as the fan heater is recommended. For heavy or continuous use, periodic cleaning must be done more frequently. If the heater blows alternating cold and warm air, check the fan for free movement and for debris restricting air flow. If the fan does not move freely, the unit must be turned off and the fan replaced immediately in order to prevent further damage to the unit. 9 BOTTOM PANEL ELECTRIC WIRING DIAGRAM Any electrical repairs or rewiring of this unit should be carried out by a licensed electrician in accordance with national and local codes. CIRCUIT DIAGRAM S1 I/O L AC120V / 60HZ N GND THERMAL CUTOFF BULB 1 40W BULB 2 40W THERMAL FUSE 750W HEATER ELEMENT S2 S3 1500W FAN MOTOR AC120V 60HZ FLAME EFFECT MOTOR <4W WARNING: DISCONNECT POWER BEFORE SERVICING. 20110715 DANGER Disconnect power before servicing. Any electrical re-wiring of this appliance must be done by a qualified electrician. This wiring must be done in accordance with local codes and/or in Canada with the current CSA C22.1 Canadian Electrical Code, and for US installations, the National Electrical Code ANSI/NFPA No. 70. If repairing or replacing any electrical component or wiring, the original wire routing, color coding and securing locations must be followed. 10 TROUBLESHOOTING If you have any questions regarding the product, please call customer service at 1-877-447-4768, 8:30 a.m. –4:30 p.m. CST, Monday – Friday. Problem Possible Cause Corrective Action Stove does not operate. 1. The stove is not plugged in. 1. Make sure the stove is plugged in to a standard 120V outlet. 2. A circuit breaker is tripped or a fuse blown. 2. Check additional appliances on the circuit; ideally the stove should be on a dedicated 15 Amp circuit. 3. Defective ON/OFF switch. 3. Call customer service. 4. Loose wiring. 4. Call customer service. Power light is ON but the flame effect is not visible. 1. Incorrect operation. 1. Refer to operating instructions. 2. Loose light bulb(s). 2. Tighten light bulb(s). 3. Burnt out light bulb(s). 3. Replace light bulb(s). Heater is not operating. 1. Incorrect operation. 1. Refer to operating instructions. 2. Defective heater switch. 2. Call customer service. 3. Defective heater assembly. 3. Call customer service. 4. Loose wiring. 4. Call customer service. 5. Dirty or clogged vents. 5. Unplug the unit. Clear vent area of dust and debris. Wait ten minutes, plug the unit in again and turn on the heater. 1. Defective fan. 1. Call customer service. 2. Defective heater assembly. 2. Call customer service. Excessive noise when the heater is operating. 11 WARRANTY The manufacturer warrants that your new electric stove is free from manufacturing and material defects for a period of one year from date of purchase, subject to the following conditions and limitations. 1. This electric stove must be installed and operated at all times in accordance with the instructions furnished with the product. Any alteration, willful abuse, accident, or misuse of the product shall nullify this warranty. 2. This warranty is non-transferrable, and is made to the original owner, provided that the purchase was made through an authorized supplier of the manufacturer. 3. This warranty is limited to the repair or replacement of part(s) found to be defective in material or workmanship, provided that such part(s) have been subjected to normal conditions of use and service, after said defect is confirmed by the manufacturer’s inspection. 4. The manufacturer may, at its discretion, fully discharge all obligations with respect to this warranty by refunding the wholesale price of the defective part(s). 5. Any installation, labor, construction, transportation, or other related costs/expenses arising from defective part(s), repair, replacement, or otherwise of same, will not be covered by this warranty, nor shall the manufacturer assume responsibility for same. Further, the manufacturer will not be responsible for any incidental, indirect, or consequential damages, except as provided by law. 6. All other warranties - expressed or implied - with respect to the product, its components and accessories, or any obligations/liabilities on the part of the manufacturer are hereby expressly excluded. 7. The manufacturer neither assumes, nor authorizes any third party to assume, on its behalf, any other liabilities with respect to the sale of this product. 8. The warranties as outlined within this document do not apply to non-manufacturer accessories used in conjunction with the installation of this product. 9. This warranty does not cover the lightbulb(s) included with the fireplace. This warranty is void if: a) The stove has been operated in atmospheres contaminated by chlorine, fluorine or other damaging chemicals. b) The stove is subjected to prolonged periods of dampness or condensation. c) Any alteration, willful abuse, accident, or misuse of the product. IF WARRANTY SERVICE IS NEEDED . . . 1) Contact customer service at 1-877-447-4768, 8:30 a.m. –4:30 pm CST, Monday – Friday. Make sure you have your warranty, your sales receipt, and the model/serial number of your product. 2) DO NOT ATTEMPT TO DO ANY SERVICE WORK YOURSELF. GHP Group, Inc. 8280 Austin Avenue • Morton Grove, IL. • 60053-3207 12 REPLACEMENT PARTS LIST For replacement parts, please call customer service at 1-877-447-4768, 8:30 a.m. –4:30 p.m. CST, Monday – Friday. 1 Some parts and specifications may change without notice. 2 6 4 3 7 8 11 12 20 20-10-141 5 13 21 14 22 15 9 16 23 13 17 24 18 25 10 19 26 Printed in China W a r m i n g Y o u r H o m e. W a r m i n g Y o u r H e a r t. ESTUFA eléctrica Panorámica DE 25 PULG. MODELO DE LA SERIE #EST-330, EST-340, SES-81, SES-82, SES-91, SES-92 MODELO ILUSTRADO #EST-340 Patent pending INSTRUCCIONES IMPORTANTES LEA ESTE MANUAL ANTES DE INSTALAR Y USAR EL ELECTRODOMÉSTICO ¡ADVERTENCIA! C US SI NO SE SIGUE CON PRECISIÓN LA INFORMACIÓN DE ESTE MANUAL, SE PUEDE PRODUCIR UNA DESCARGA ELÉCTRICA O UN INCENDIO QUE PRODUZCA DAÑOS A LA PROPIEDAD, LESIONES PERSONALES O MUERTE. INSTALADOR: Deje este manual con el electrodoméstico. CONSUMIDOR: Conserve este manual para referencia futura. ADJUNTE SU RECIBO AQUÍ Número de serie _____________________________ Fecha de compra _____________________________ ¿Preguntas, problemas, piezas faltantes? Antes de volver a la tienda, comuníquese con nuestro departamento de Servicio al Cliente llamando al 877-447-4768, de 8:30 a.m. a 4:30 p.m. hora central estándar, de lunes a viernes. 20-10-141REV. 05/01/2012 14 Índice Información de seguridad................................................................................................................ 16 Contenido del paquete ................................................................................................................... 18 Aditamentos del paquete................................................................................................................. 18 Dimensiones de la estufaa.............................................................................................................. 19 Información de seguridad................................................................................................................ 20 Preparación..................................................................................................................................... 20 Instrucciones de ensamblaje........................................................................................................... 20 Instrucciones de operación............................................................................................................. 21 Cuidado y mantenimiento................................................................................................................ 22 Diagrama del cableado eléctrico..................................................................................................... 23 Solución de problemas.................................................................................................................... 24 Garantía.......................................................................................................................................... 25 Lista de piezas de repuesto............................................................................................................ 26 IMPORTANTE: lea con atención todas las instrucciones y advertencias antes de comenzar la instalación. Si no se siguen las instrucciones, se puede provocar una descarga eléctrica, lesiones a personas, riesgo de incendio, lo que anulará la garantía. Lea estas instrucciones de instalación y funcionamiento antes de utilizar el electrodoméstico. PRECAUCIÓN EL DAÑO DEL PRODUCTO PUEDE OCURRIR. Nunca trate de desarmar o alterar este producto sin seguir las instrucciones de este manual. 15 Información de seguridad Guarde estas instrucciones Lea y comprenda completamente este manual antes de intentar ensamblar, usar o instalar el producto. 1. 2. Lea todas las instrucciones antes de usar este electrodoméstico. Este electrodoméstico se calienta cuando está en funcionamiento. Para evitar quemaduras, no toque superficies calientes con la piel desnuda. Si se incluyen, utilice las manijas para trasladar el electrodoméstico. Mantenga materiales inflamables, como muebles, almohadas, ropa de cama, papeles, ropa y cortinas al menos a 914,4 mm (3 pies) de la parte delantera de este electrodoméstico y mantenerlos alejados de los costados y parte trasera.. 3. PRECAUCIÓN: Se debe tener extrema precaución cuando niños o personas discapacitadas usen un calentador o cuando se use cerca de ellos, y siempre que el calentador se deje funcionando sin vigilancia. 4. Si es posible, siempre desenchufe este electrodoméstico cuando no lo use. 5. No opere ningún calentador con un cable o enchufe dañados, o después de fallas del mismo, de que se haya dejado caer o dañado de cualquier forma. 6. Toda reparación de este electrodoméstico debe realizarla un técnico calificado. 7. Bajo ninguna circunstancia se debe modificar este electrodoméstico. Las piezas que se deben retirar para reparación se deben reemplazar antes de volver a hacer funcionar este electrodoméstico. 8. No lo use en exteriores. 9. Este calentador no se debe usar en el baño, lavadero y en espacios húmedos similares interiores. Nunca coloque este calentador donde se pueda caer dentro de una bañera u otro contenedor de agua. 10. No utilice este calentador en lugares elevados como por ejemplo sobre repisas, plataformas elevadas, etc. 11. No coloque el cable debajo de una alfombra. No cubra el cable con alfombras, tapetes o similares. Coloque el cable lejos de zonas de tránsito en donde nadie se pueda tropezar y caer. 12. Para desconectar este electrodoméstico, gire los controles a la posición de apagado y luego retire el enchufe del tomacorriente. 13. Conecte únicamente a un tomacorriente con la debida puesta a tierra. 14. Cuando está instalado, este electrodoméstico se debe poner a tierra según los códigos locales, según los Códigos de Electricidad de Canadá CSA C22.1 o, para instalaciones en EE.UU., siga los códigos locales y el código nacional de electricidad, ANSI/NFPA No. 70. 15. No introduzca objetos extraños ni permita que entren en las aberturas de escape o ventilación, ya que pueden provocar descargas eléctricas, incendios o daños en el electrodoméstico. 16. Para evitar incendios, no bloquee las entradas ni salidas de aire de ninguna manera. No use sobre superficies blandas, como una cama, donde las aberturas se puedan bloquear. 17. Este electrodoméstico tiene en su interior piezas calientes y piezas que forman arcos eléctricos o que echan chispas. No lo use en áreas donde se use o almacene gasolina, pintura o líquidos inflamables. Este electrodoméstico no se debe usar como una rejilla para secar ropa, ni tampoco se deben colgar calcetas navideñas o decoraciones en el electrodoméstico o cerca de éste. 18. Utilice este electrodoméstico sólo como se describe en este manual. Cualquier otro uso no recomendado por el fabricante puede causar incendios, descargas eléctricas o lesiones personales. 19. Siempre conecte las estufas directamente al enchufe/toma de electricidad de la pared. Siempre enchufe la unidad en untomacorriente/receptáculo de la pared. Nunca deben usarse una extensión eléctrica ni un tomacorriente de alimentación reubicable (tomacorriente/enchufe múltiple). 20. No utilice este calentador cuando le falten patas o estén dañadas o rotas. 21. GUARDE ESTAS INSTRUCCIONES. 16 Información de seguridad PELIGRO Conexión eléctrica Se requiere un circuito de 15 amperios, 120 voltios, 60 Hz con un tomacorriente correctamente puesto a tierra. De preferencia, la artículo debe estar en un circuito dedicado, ya que la conexión de otros electrodomésticos al mismo circuito puede provocar que el interruptor de circuito se desconecte o que el fusible se funda cuando el calentador esté en funcionamiento. Se incluye como estándar con la unidad un cable de tres conductores de 1,83 m (6 pies) de largo, que sale del lado derecho de la artículo. Siempre enchufe la unidad en untomacorriente/receptáculo de la pared. Nunca deben usarse una extensión eléctrica ni un tomacorriente de alimentación reubicable (tomacorriente/enchufe múltiple). El cableado del tomacorriente debe cumplir con los códigos de construcción locales y con otras normas que correspondan para reducir el riesgo de incendio, descarga eléctrica y lesiones a personas. No utilice esta artículo si alguna de sus piezas estuvo sumergida en agua. Llame de inmediato a un técnico en mantenimiento calificado a fin de que inspeccione la artículo y reemplace cualquier pieza del sistema eléctrico que haya estado bajo agua. Instrucciones de puesta a tierra Este calentador fue diseñado para su uso en 120 voltios. El cable tiene un enchufe, como se muestra en A de la figura 1. Hay disponible un adaptador, como se muestra en C, para conectar enchufes con puesta a tierra de tres clavijas a receptáculos de dos ranuras. La orejeta verde de puesta a tierra que sale del adaptador se debe conectar permanentemente a tierra, como a través de una caja de un tomacorriente correctamente puesto a tierra. El adaptador no se debe usar si hay disponible un receptáculo de tres ranuras puesto a tierra. 1 Figura 1 TORNILLO DE METAL TAPA DE LA CAJA DEL TOMACORRIENTE PUESTO A TIERRA CLAVIJA CON PUESTA A TIERRA (A) ADAPTADOR (C) PUESTA A TIERRA CLAVIJA CON PUESTA A TIERRA (D) 17 NOTA: Los adaptadores NO son para ser utilizados en Canadá CONTENIDO DEL PAQUETE A B MODELO ILUSTRADO #EST-340 PIEZA DESCRIPCIÓN A Estufa eléctrica B Pata ADITAMENTOS AA Tornillo Cant. 8 18 CANTIDAD 1 4 Dimensiones de la ESTUFa MODELO ILUSTRADO #EST-340 Ref. Todos los modelos 15 in. (38.1 cm) A B C 28.5 in. (72.39 cm) 25 in. (63.5 cm) Especificaciones técnicas Voltaje 120V AC Frecuencia 60Hz Amperaje 12.5A Potencia de Servicio 1500W del Calentador 19 INFORMACIÓN DE SEGURIDAD Lea y comprenda completamente este manual antes de intentar ensamblar, usar o instalar el producto. Si tiene preguntas relacionadas con el producto, llame al Servicio al Cliente al 1-877-447-4768, entre 8 h 30 et 16 h 30, HNC, du lundi au vendredi. Distancia de separacion con elementós inflamables PRECAUCIONES • Estufa es pesado y debe ser montado cerca de su ubicación deseada. • Se recomienda que dos personas se desplazan la estufa se reunieron para prevenir lesiones. Lateral 4 in. (101.6 mm) Piso 0 in. (0 mm) Parte superior 36 in. (914 mm) Parte delantera 36 in. (914 mm) Trasero 0 in. (0 mm) ADVERTENCIA: No instale la unidad en los estantes, plataformas elevadas, camas, mantas, almohadas, etc Mantenga los materiales combustibles, tales como muebles, ropa de cama, papeles, ropa y cortinas por lo menos 3 pies (914 mm) de la estufa. PREPARACIÓN Antes de comenzar a ensamblar el producto, asegúrese de tener todas las piezas. Compare las piezas con la lista del contenido del paquete y los aditamentos anteriores. No intente ensamblar el producto si falta alguna pieza o si éstas están dañadas. Póngase en contacto con el Departamento de Servicio al Cliente para obtener piezas de repuesto. Tiempo estimado de ensamblaje: 20 minutos Herramientas necesarias para el ensamblaje (no se incluye): destornillador Phillips INSTRUCCIONES DE ENSAMBLAJE 1. Coloque la estufa (A) boca abajo sobre una superficie acolchada con la parte inferior accesible. Coloque la pierna (B) a la estufa mediante la inserción de la lengüeta en la parte superior de la pierna (B) en la ranura correspondiente en la parte inferior de la estufa (A). Inserte dos tornillos (AA) en los agujeros pre-perforados y apriete bien. Repita con el resto de tres patas. Aditamentos utilizados AA Tornillo x8 20 1 B AA AA B A Instrucciones de operación Lea todas las instrucciones antes de usar Revise que la parrilla de salida de la estufa no este cubierta o haya algun obstaculo, y asegurese de que el boton de encendido este en el punto on. NOTA: Cuando haga funcionar la estufa por primera vez, puede haber un poco de olor. Esto es normal y no debe volver a ocurrir al menos que la estufa este por un extenso periodo de tiempo sin usar. Panel de control El panel de control está situado detrás de las puertas de la estufa. 1500W 750W I/O Encendido Asegurese de que el boton de encendido (I/O) este en OFF. Conecte el cable a una toma de corriente de 120 voltios 15 amperes grounded (vea Information de Seguridad). Effecto de la llama: Ponga el boton de encendido (I/O) en ON. La luz del indicador del boton de encendido se encendera. El efecto de llamas sera visible a traves del puerto frontal. Temperatura (Baja): Con el boton de encendido (I/O) en ON, mueva el boton de BAJA (750 W) a ON. La luz indicadora de encendido se encendera. Comenzara a soplar aire con calor. Temperature (Alta): Con el boton de encendido (I/O) en Bajo/LOW cambia ambos ON, mueva el boton de encendido de Alta/High (1500 W) a ON. La luz indicadora de la temperatura alta se encendera. Control de la Temperatura Esta estufa esta equipada con control del limite de la temperatura. Si alcanza un nivel peligroso, la estufa se apagara automaticamente. Para re encenderla: desenchufe el cable de electricidad de la pared. Espere 5 minutos. Con el boton de encendido en la posicion OFF, vuelva a conectar el cable a la pared. 21 CUIDADO Y MANTENIMIENTO Limpieza Siempre apague la estufa y desconecte el cable de electricidad de la pared antes de limpiarla. Use una aspiradora o plumero para sacarle el polvo de la toma de aire. Limpiela con un trapo humedo y sequela con un trapo seco. Nunca use limpiadores abrasivos, sprays or limpiadores que puedan rayar la superficie. No arrastre nunca la unidad por el piso. La tensión adicional por arrastrar la unidad puede ocasionar que las patas se quiebren. Información sobre el vidrio (algunos modelos) 1. Bajo ninguna circunstanc