1
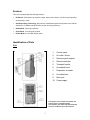
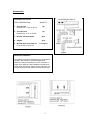
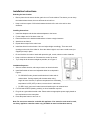
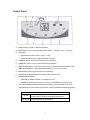
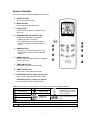
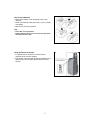
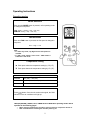
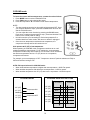
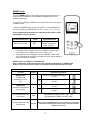
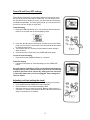
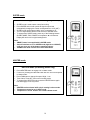
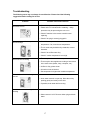
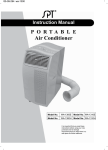
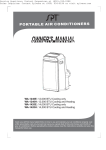
DUAL-HOSE PORTABLE AIR CONDITIONER
USE AND CARE MANUAL
MODELS:
WA-9040DE · WA-9040DH · WA-1140DE
WA-1340DE · WA-1340DH
Thank you for purchasing SPT Air Conditioner, please read the Use and Care
Manual carefully before installing and using this appliance. Keep this manual for
future reference.
CONTENTS
Table of Contents
1
Introduction
2
Features
3
Identification of Parts
Unit
3
Accessories and Window Kit
4
Installation Instructions
5
Control Panel
6
Remote control
7, 8
Operating Instructions
9
Operating modes
Cooling
10
Dry
11
Smart mode
12
Timer settings
13
Setting the clock
13
Super and Heater
14
Protection Features
15
Maintenance
16
Troubleshooting
17
Specifications
18
Warranty Info
19
Notes
20
1
Introduction
Thank you for choosing this portable air conditioner. It will provide you and your family with all of
the “Home Comfort” requirements for your home, cottage or office. This appliance can be moved
from room to room within your home and set-up in just minutes.
Electrical Specifications
1. All wiring must comply with local and national electrical codes and be installed by a qualified
electrician. Contact a qualified electrician with questions regarding the following instructions.
2. Check available power supply and resolve any wiring problems before installation and
operation of this unit.
3. For your safety and protection, this unit is grounded through the power cord plug when
plugged into a matching wall outlet. If you are not sure whether the wall outlets in your home
are properly grounded, please consult an electrician. Do not use plug adapters or extension
cords with this unit. If it is necessary to use an extension cord, use with heavy appliance
extension cord only (available at most local hardware stores).
Energy Saving Tips
•
•
•
•
•
•
•
•
Please use the unit in the recommended room size. (Refer to www.spt-usa.com).
Do not locate the air conditioner where furniture or other objects can obstruct the airflow.
Keep blinds/curtains closed during the sunniest part of the day.
Close the fireplace damper and floor or wall grills so that cool air does not escape through
the chimney or ductwork.
Keep the exhaust hose as short and straight as possible.
If unit is to be operated throughout the day, turn on the unit early, before the noon heat hits.
It is highly recommended to turn on the air conditioner when the room temperature is
around 75°F. Do not wait until the room gets excess ively hot.
Keep the filters clean.
Single Hose vs. Dual Hose
Single Hose: draws indoor air for both front cold air output and exhaust air (to cool compressor).
PROS:
CONS:
• Fresh air is exchanged
• Fresh air will delay the speed of ambient temperature drop
Dual Hose: draws indoor air for front cold air output and outdoor air for exhaust air.
PROS:
CONS:
• If outside temperature is lower than ambient, compressor cools down faster
and produces colder air output
• Ambient temperature drops quickly
• Same air circulating within the room, resulting in decreased oxygen level
and increased carbon dioxide
• If outside temperature is too high, compressor cannot be cooled – resulting
in increased temperature of front air output.
NOTE: It is suggested to remove the air intake hose and use as single hose system when
outside temperature is over 95°F.
2
Features
This unit is equipped with the following features:
•
Re-Start IC: Should there be a power outage, when power returns, unit will resume operating
at last setting / mode.
•
Self-Evaporating Technology: Recycles the condensed water and evaporates it out with the
exhaust air, for added cooling efficiency as well as energy efficiency.
•
Smart Mode: fuzzy logic operation
•
Super Mode: for cooling only models
•
Heater Mode: for units with heater option
Identification of Parts
Unit
1.
Control panel
2.
Air outlet / louver
3.
Remote signal receptor
4.
Remote controller
5.
Transport handle
6.
Air exhaust hose
7.
Evaporator air intake
8.
Air intake hose
9.
Drain port
10. Power supply
The images in this manual are based on the
external view of a standard model.
Consequently, the shape may differ from that
of the air conditioner you have selected.
3
Accessories
Installation Accessories
PART & DESCRIPTION
QUANTITY
1. Air inlet hose
Extends from 17 3/4” to 70 5/8”
1pc
2. Air outlet hose
Extends from 17 ¾” to 70 5/8”
1pc
3. Window exhaust adapter
2pcs
4. Adapter
2pcs
5. Window/patio door slider kit
From 28 3/8” up to 55 5/8”
1 set (3pcs)
Window Kit Installation
The window kit has been designed to fit most standard
windows, with vertical or horizontal applications.
However, it may be necessary for you to improvise or
modify some aspects of the installation procedures for
certain types of windows. Please refer to Figures 1 and
2 below for minimum and maximum window openings.
4
Installation Instructions
Selecting the best location
•
Best to place the unit near a window, patio door or French window. The shorter you can keep
the intake/exhaust hoses, the more efficient the unit will run.
•
Keep a minimum space of 20 inches between the back of the unit to the wall or other
obstacles.
Installing instructions
1. Install the adapters and window exhaust adapters to the hoses.
2. Fix the adapter end of the hose to the unit.
3. Extend the hose to the destined window/door to insure enough clearance.
4. Attach hose to slider kit
5. Repeat above steps for the other hose.
6. Install the slider kit to the window / door and adjust height accordingly. There are small
openings on the side of the slider kit. Once the desire height is set, insert a small screw (not
supplied) to keep in place.
•
Do not block the air outlet or intake with protective grid, curtain, shutter or other obstacles.
•
Keep a minimum clearance of 8” between the ends of air hoses.
•
Try to keep the air hoses as straight as possible, as in Figure 3.
Installation Sequence
1. Select a suitable location, with easy access to an electrical outlet.
2. Install the flexible air hoses and adjustable slider kit as depicted in
Figure 3.
•
For COOLING mode, please install both the air intake and air
exhaust hose. Cooling capacity will decrease when using
single air hose. However, to prevent compressor from overheating, when outdoor
temperature is 35°C (95°F) or above, remove the air intake hose.
•
For DRY mode, remove air intake hose and install only the air exhaust hose.
2. For FAN and HEATER (Heating models), no hose installation required.
3. Plug unit to a grounded electrical outlet. Please select an appropriate power supply based on
the requirements on the nameplate.
4. Press the power button to turn unit on.
Note: Do not use an extension cord with this appliance. If an extension cord must be used,
use heavy appliance extension cords only. (Available at most local hardware stores)
5
Control Panel
SUPER
A. ON/OFF button: to start or stop the appliance.
B. MODE button: to select the operating mode. (Smart → Cooling → Dry → Fan only)
C. FAN button:
•
Selects the fan speed. (Auto → High → Low)
•
Press and hold to start or stop auto-swing of louvers.
D. TIMER-ON button: to set or cancel the timer-on operation.
E. TIMER-OFF button: to set or cancel the timer-off operation.
F. TEMP/TIMER buttons: to set clock, to set timer or to adjust temperature setting. Press
▲▼ buttons together to switch temperature display, °C to °F or vice versa.
G. RUN indicator: lights up green when unit is operating.
H. WATER FULL indicator: lights up red when water reservoir is full.
I.
J.
HEATER/SUPER button:
•
HEATER (on Heater models) = turn heater on or off.
•
SUPER (on Cooling only models) = to enter or exit SUPER (fast cooling) mode.
LCD display: displays temperature and mode settings. The LCD display on the unit
corresponds to the LCD display on the remote, except for ambient temperature display.
Temperature Display
On unit
On remote
• When flashing, displays the set temperature
• When steady, displays the ambient temperature
Only displays the set temperature
6
Remote Controller
The remote controller transmits signals to the main unit.
1. ON/OFF BUTTON
To turn the unit ON or OFF
2. MODE BUTTON
Used to select the operating mode
3. FAN BUTTON
Used to select fan speed, in sequence: Auto,
High, Low
4. TEMPERATURE SETTING BUTTONS
• Used to set the desired temperature
• Used to set clock or set timer
• If the ▲▼ buttons are pressed together,
temperature display will switch between °C
and °F
5. SWING BUTTON
• Press once for vertical swing of the louver
• Press again to set the louver at a desired
position
6. SMART BUTTON
Press to enter fuzzy logic operation, regardless
if unit is ON or OFF
7. TIMER-ON BUTTON
Used to set or cancel timer-on function
8. TIMER-OFF BUTTON
Used to set or cancel timer-off function
9. HEATER BUTTON (for Heating models only)
Used to start or stop electrical heating mode
SUPER BUTTON (for Cooling only models)
Used to start or stop fast cooling function
KEY (all buttons exist and correspond to the control panel, except: SUPER, SMART & SWING.)
Signal transmit
Auto fan speed
Smart indicator
High fan speed
Cooling indicator
Low fan speed
Dry indicator
Displays set
temperature
Fan only indicator
Used to regulate
temperature in Smart or Dry
mode (see page 12 “Smart
Mode” for details)
Indicator of Timer-ON or
Timer-OFF and displays real
time
Heater indicator available for models with heater only
Note:
Each mode and relevant function will be further specified in following pages.
7
How to Insert Batteries
• Remove the battery cover according to the arrow
direction.
• Insert new batteries making sure the (+) and (-) match
accordingly.
• Slide the cover back in position.
Note:
• Use 2 AAA (1.5 volt) batteries.
• Replace batteries with new ones of the same type when
the display becomes dim.
Using the Remote Controller
• To operate the air conditioner, aim the remote
controller at the receiver window.
• The remote control will operate the air conditioner at a
distance up to 23 feet when pointed at the receiver
window.
8
Operating Instructions
Operating modes
MODE Selection
Each time the MODE button is pressed, unit’s operating mode
is changed in sequence:
UNIT: Smart → Cooling → Dry → Fan only
REMOTE: Cooling → Dry → Fan only
FAN Selection
Each time FAN button is pressed, the fan speed is changed in
sequence:
Auto → High → Low
Note:
• In “FAN” only mode, only High and Low fan speeds are
available.
• In “DRY” mode, airflow is set at “Low”. “FAN” button is
ineffective in this mode.
Temperature Setting
Each press raises the temperature setting by 1°C (2 °F).
Each press lowers the temperature setting by 1°C ( 2°F).
Temperature Range
COOLING
18°C (64°F) ~ 32°C (90°F)
DRY
Room temperature ± 2°C (4°F)
FAN ONLY
Unable to set
Power ON
Press
button. Once the unit receives the signal, the RUN
indicator on the air conditioner will light up.
HEATER (SUPER), SMART, DRY, TIMER ON and TIMER OFF operating modes will be
specified in the following pages.
•
•
When changing modes during operation, allow 3 minutes for compressor to kick on.
Wait 3 minutes before restarting the unit after powering off.
9
COOLING mode
To lower the room’s ambient temperature, operate the unit as follows:
1. Press MODE button to select COOLING mode.
2. Press FAN button to select desired fan speed.
3. Press the temperature ▲ or ▼ button to set desired temperature.
NOTE:
• The above settings can also be done while unit is powered OFF. Once
you complete the above steps, press the POWER button and unit will
start in COOLING mode.
• You can adjust the louver direction by pressing the SWING button.
Press once to swing and press again to stop. (Press and hold the FAN
button on the control panel for swing)
• Unit will memorize your last setting for Cool when powered off or
switched back from other modes. Will return to default if unplugged.
• Once the room temperature reaches the set temperature, the
compressor will stop and fan will continue to run.
Unit operates ± 1°C (2°F) of set temperature.
When operating in COOLING mode, compressor continues to run until
ambient temperature has reached 1°C (2°F) below the set temperature.
Compressor will then stop and unit will run in FAN mode. Once unit detects
the ambient temperature has rise 1°C (2°F) above se t temperature,
compressor will resume.
For example, your set temperature is 70°F. Compress or shuts off (and unit switches to FAN) at
68°F and resumes cooling at 72°F.
AUTO FAN speed selected in COOLING mode:
• When initial ambient temperature is higher than set temperature = HIGH Fan speed.
• When ambient temperature falls below the set temperature = LOW fan speed.
• When ambient temperature rise 3°C (6°F) above set t emperature = HIGH fan speed.
COOLING mode with AUTO Fan
COOLING mode
Ambient temp
decreasing
+4°C (8°F)
+2°C (4°F)
+1°C (2°F)
Compressor ON
-1°C (2°F)
-2°C (4°F)
Compressor OFF
HIGH
fan
+3°C (6°F)
+2°C (4°F)
Set temp
HIGH
fan
+1°C (2°F)
Set temp
-1°C (2°F)
-2°C (4°F)
10
Ambient temp
increasing
LOW
fan
LOW
fan
DRY mode
To use the unit as a dehumidifier (remove moisture), operate the unit as follows:
•
•
•
Press MODE button to select DRY mode.
You can also select DRY mode while unit is powered off. Once DRY is selected, press the
POWER button and unit will start in DRY mode.
Adjust the louver direction, by pressing SWING button, if desired.
When unit is first initiated in DRY mode, as the compressor kicks on, unit will run in COOL mode,
with settings at 18°C (64°F) for 3 minutes. This al lows the unit to determine the ambient
temperature. After 3 minutes, unit will automatically set the target temperature to be 1.5°C (3°F)
below ambient. You cannot change the set temperature and fan speed in DRY mode.
NOTE:
• DRY mode cannot be used to cool the room.
• Requires only air exhaust hose to be installed. (Do not install the air intake hose).
• In DRY mode, fan speed is pre-set at Low and cannot be changed. The FAN button is
invalid in this mode.
Delay Protection
If you select COOLING or DRY mode while unit is running in another mode, the compressor
will be delay-protected. Wait for 3 ~ 5 minute and unit will resume operation. Do not press any
button during the wait time or unit will re-count the delay-protection time.
11
SMART mode
Press the SMART button to enter smart mode (fuzzy logic operation). In
this mode, the temperature is automatically set based on the room’s
ambient temperature.
If unit is OFF, pressing the SMART button will turn the unit on and operate
in SMART mode.
* There is no SMART button on the control panel. To select SMART from
the control panel, press MODE button: Smart → Cooling → Dry → Fan only
Unit will automatically determine the operating mode (COOL or DRY)
when SMART mode is selected:
Ambient temperature
•
•
Operating
mode
26°C (79°F) or below
DRY
Over 26°C (79°F)
COOLING
Target temperature
1.5°C (3°F) lower than
ambient temperature,
after 3 minutes.
26°C (79°F)
FAN speed can be changed if unit runs in SMART & COOL mode.
Press FAN button to change in turn: Auto – High – Low.
FAN speed cannot be changed if unit runs in SMART & DRY mode.
The LCD displays as in image on the right, but in fact, the fan speed is
preset and cannot be changed.
SMART button is ineffective in SUPER mode.
Note: Temperature, airflow and direction are controlled automatically in SMART mode.
However, you can choose to increase or decrease the temperature by up to 2°C (4°F).
A increase or decrease up to 2°C (4°F) can be set i n SMART mode
You feel
Slightly warm
Decrease the
temperature up to 2°C
(4°F)
Press
Adjustment procedure
A
Press once to lower the set temp by
1°C (2°F)
B
Press twice to lower the set temp by
2°C (4°F)
A
Press once to raise the set temp by
1°C (2°F)
B
Press once to raise the set temp by
2°C (4°F)
▼
Slightly chill
Increase the temperature
up to 2°C (4°F)
▲
Uncomfortable due to air
flow volume
FAN
Changes the FAN speed: Auto – High – Low
(only applicable in SMART & COOL mode)
Press once to swing, press again for fixed airflow direction.
Uncomfortable due to air
flow direction
SWING
Note: There is no SWING button on the control panel. To activate
or deactivate swing from the control panel, press and hold FAN
button for 3 seconds
12
Timer-ON and Timer-OFF settings
Timer-ON and Timer-OFF are convenient features for those who would
like the unit to start and stop after a certain time. you can set the unit to
turn ON After 5-hours. When you return, your home will have achieved a
comfortable temperature. Or, before going to bed, you can set timer-OFF
to have the unit turn off after so much time.
Timer-ON setting
1. Press the TIMER-ON button once. You should see the ON indicator
flash for 0.5 seconds and the time displaying 12:00.
2. Press the ▲ or ▼ button to increase or decrease your set time. Each
press is an increment of 10 minutes. Press and hold down the buttons
to speed up the process.
3. The set time clock is in 24-hours format. Maximum timer setting is
within 24 hours.
4. Once the set time is achieved, press TIMER-ON button again.
To cancel Timer-On setting
• Press and hold the TIMER-ON button for 3 seconds.
Timer-OFF setting
• Follow the instructions as Timer-On setting, but use TIMER-OFF
button.
Once the time for Timer-ON or OFF is set, the unit will memorize the
set time (unless power is disconnected). If you wish to set Timer-ON
or OFF for the same time in a future day, simply press the Timer-ON
or Timer-OFF button twice. If unit is unplugged, Timer settings will
return to default.
Adjusting real time (setting the clock)
•
•
•
•
Real time can be adjusted while unit is off or running (in any mode).
Press TIMER-ON and TIMER-OFF buttons together.
Clock will flash for 0.5 seconds and display 12:00.
Adjust the real time by pressing the ▲ or ▼button. Each press is in
increment of 1 minute. Press and hold the ▲ or ▼ button and time will
adjust in increments of 10 minutes.
13
SUPER mode
SUPER mode (applicable for Cooling only models)
•
•
•
•
•
SUPER mode is used to start or stop fast cooling.
Press SUPER and unit will operate at high fan speed and
automatically changing the current set temperature to 18°C (64°F).
SUPER mode can be entered while unit is in operation or off.
You can adjust airflow direction and set timer in SUPER mode.
To escape from SUPER mode, press any of the following buttons:
SUPER, MODE, FAN, POWER or temperature ▲ or ▼ buttons.
Display will return to the original setting/mode.
Note:
• SMART button is not applicable in SUPER mode.
• Unit will continue to run in SUPER mode (high fan at 18°C/64°F)
until you press any of the buttons mentioned above.
• SUPER mode does not exist for models with Heater.
HEATER mode
HEATER mode (for heating model only)
•
•
•
•
•
Press HEATER button to engage unit in Heater mode.
If unit is off, pressing the HEATER button will turn unit on and operate
in Heater mode.
Press FAN button to change fan speed: High – Low.
Timer-ON or Timer-OFF can be set in heating mode.
To escape from HEATER mode, press the HEATER button again.
Unit will engage in fan only mode.
Note:
• HEATER can be selected while unit is running in other modes.
• Temperature cannot be set in HEAT mode.
• Temperature ▲ and ▼ buttons are invalid in Heater mode.
14
Protection Features
Operating Conditions and Protection Features
The protective device may trip and stop the unit in the following cases:
Mode
COOLING
DRY
Situation
When outdoor temperature
is over 43°C (109°F)
When ambient temperature
is below 18°C (64°F)
When ambient temperature
is below 18°C (64°F)
Reason
Compressor
overheat
Cooling coils
freezing
Cooling coils
freezing
Action
Remove air intake hose and
use unit as single hose
Compressor will not work
below 18°C (64°F)
Compressor will not work
below 18°C (64°F)
The protective device will also engage in the following cases:
• Restarting the unit immediately after operation stops or changing mode during operation.
Please wait 3 ~ 5 minutes.
• Turning on the unit immediately after connecting to power source. There may be a 20
seconds delay.
NOTE:
• If the air conditioner is running in COOLING or DRY mode with an open door or
window for a long period of time when relative humidity is above 80%, dew may
collect and drip from the outlet.
• Once unit is unplugged, all setting will return to default, including Timer-ON and
Timer-OFF settings.
Water Drainage
In COOLING and DRY operations, water is condensed as air passes through. This unit is
equipped with Self-Evaporating Technology, where most of the water is recycled and
evaporated through the exhaust hose. In humid conditions, however, when water condenses
faster than the unit can recycle, the excess water will collect within an inner water reservoir.
When the water reservoir becomes full, the Water Full indicator will flash (red light) and unit
will stop. At this time, you will need to drain the water reservoir before continuing operation:
1. Turn unit off and unplug from power source.
2. Move the appliance to a suitable place for water drainage. Push gently on the side to
prevent water spilling.
3. Pull out the rubber plug and allow water to drain out.
4. Re-inserted the rubber plug when done. Make sure the rubber plug is replaced, or water
will leak.
5. If the unit is placed in a position allowing water drainage, connect the drain hose to the
spout for water drainage.
15
Maintenance
Cleaning the AC unit
Cleaning the Air Filter
1. Turn off unit and remove power source.
It is necessary to clean the air filter after
approximately 100 hours of usage, or
whenever the filters appear dirty.
Turn appliance off before
disconnecting from power
supply.
1. Turn off unit. Remove the air filter by
pulling the frame upwards.
2. Wipe housing with a soft, dry cloth.
2. Clean the air filter
• Tap the filter lightly to remove
loose particles.
• Vacuum the filter.
• If extremely dirty, wash the filter in
lukewarm water and allow to dry
completely in a shaded place
before replacing.
3. Never use volatile substance such as
gasoline or polishing powder to clean the
appliance.
4. Never spray water directly onto the main unit.
3. Clean the air filter once every two
weeks if the unit is operating in an
extremely dusty environment.
Preparing the unit for storage
If the unit will not be used for a long period of time, follow the below instructions for unit storage:
1. Drain water from the reservoir and replace rubber plug.
2. Connect to power source and run unit in FAN only mode for 4 ~ 6 hours on a sunny day.
This will allow the unit’s interior to dry and prevent molding.
3. Turn unit off and remove power source. Remove batteries from the remote and store in a
safe place.
4. Clean the air filters and replace.
5. Remove the two air hoses and store them properly. Cover the hose openings on the unit.
6. Place unit back in original packaging (if available).
7. Store in a cool, dry place.
16
Troubleshooting
The following cases may not always be a malfunction. Please check the following
suggestions before asking for service.
Problem
Unit does not run
Possible cause and resolution
• Check if the protector trip or fuse is blown.
• Please wait 3~5 minutes before restarting – delayprotection may be preventing the unit to run.
• Check if batteries in the remote controller need
replacing.
• Check if the plug is securely plugged in.
Compressor runs for short period of
time and stops.
• Check if set temperature is too close to ambient
temperature. If so, lower the set temperature.
• The air outlet may be blocked by obstacles, remove
obstacles.
• Check if the air filters are dirty.
• Check if outdoor temperature is too high.
Unit runs but not cooling
• There may be doors or windows open.
• There may be other appliances creating a heat source
in the same room (heater, lamp, computer, etc.).
• Air filter is dirty, please clean.
• Air outlet or inlet is blocked.
• Set temperature is higher than ambient temperature.
Water leaks while unit is being
moved
• Inner water reservoir is open-top. Move the unit by
pushing gently and evenly on the side.
• If possible, drain water before moving.
Unit does not run and red light is
flashing
• Water reservoir is full. Remove rubber plug and drain
water.
17
Specifications
WA-9040DE
WA-9040DH
WA-1140DE
WA-1340DE
WA-1340DH
Cooling capacity (BTU/hr)
9,000
9,000
11,000
13,000
13,000
Heating capacity (BTU/hr)
-
4,100
-
-
4,100
115V / 60Hz
115V / 60Hz
115V / 60Hz
115V / 60Hz
115V / 60Hz
8.5 A
8.5 A
10.9 A
12 A
12 A
Cooling
977
977
1253
1380
1380
Heating
-
1246
-
-
1246
250 sq. ft.
250 sq. ft.
350 sq. ft.
420 sq. ft.
420 sq. ft.
Humidity removal capacity (pints/day)
47
47
51
55
55
Air flow volume (CFM)
176
176
176
235
235
Noise level (dB) High / Low
49 / 43
49 / 43
49 / 43
52 / 45
52 / 45
Compressor type
Rotary
Rotary
Rotary
Rotary
Rotary
R22 / 1.4 lb
R22 / 1.4 lb
R22 / 1.45 lb
R22 / 1.4 lb
R22 / 1.4 lb
Power supply
Amperage
Wattage
Recommended room size
Refrigerant type / Capacity
Fan speed
3 (Auto – High – Low)
Thermostat settings
64°F ~ 90°F
Operating temp.
64°F ~ 110°F
Timer-ON and Timer-OFF
Unit dimension (W x D x H)
Up to 24 hours
17.8 x 18.5 x 33.33 in.
17.8 x 19.7 x 32.3 in.
20.3 x 23 x 35.1 in.
20.3 x 26 x 35.1 in.
Net weight
82 lbs
86 lbs
Gross weight
88 lbs
93 lbs
Carton dimension (W x D x H)
* Data may vary for technical reasons, please refer to the rating label.
•
Please read this manual thoroughly before installing and using your new portable air
conditioner.
•
Un-insulated rooms such as sunrooms, garages or attics should be less than the suggested
sq. ft.
•
The following may effect the cooling efficiency of the unit in reaching your set temperature:
outside temperature, room size, ceiling height, room insulation, number of people in the
room, direct sunlight and sources of heat.
•
Measuring conditions for above is:
COOLING – RT 80.6°F, RH 60%
HEATING – RT 68°F, RH 60W
(without hose connection)
RT = room temperature
RH = room humidity
18
Portable Air Conditioner
Your Guarantee
If this product is found to be faulty as a result of faulty materials or workmanship within
one year from date of purchase, it will be repaired free of charge.
This guarantee is subject to the following terms:
•
Sunpentown must be notified of the fault.
•
Proof of purchase must be presented to Sunpentown’s nominated representative.
•
The warranty will be void if the product if modified, misused or repaired by an unauthorized
person.
•
The warranty after repair will not be extended beyond the original one-year period.
•
All replacement parts will be new or reconditioned.
•
Parts, which are replaced, become the property of Sunpentown.
•
The warranty applies for the use of the product in the USA only.
What is NOT COVERED:
•
Warranty does not include freight charges.
•
Incidental or consequential damage caused by possible defects with this product.
•
Damage to product caused by improper power supply voltage, accident, fire, floods or acts of
nature.
•
Failure of product resulting from unauthorized modifications to the product.
•
Improper installation or failure to perform the necessary maintenance.
This GUARANTEE is in addition to your Statutory Rights
SUNPENTOWN INTERNATIONAL INC.
14625 Clark Ave, City of Industry, CA 91745
Tel: 800-330-0388 · Fax: 626-336-7116
[email protected]
www.spt-usa.com
19