Transcript
6" Classic Hooded Exterior Vent
Installation Instructions
IMPORTANT - Observe all governing codes and ordinances.
-To be installed prior to siding- Metal screen must be removed when used over
exhaust duct for clothes dryer. See reverse side
for screen removal instructions.
CAUTION: Read all applicable installation instructions before installing
this product. Be sure to remove metal screen when applicable.
Step 1
recessed area
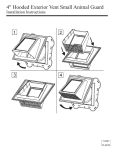
Snap tube into place by engaging the 4 tabs on the
aluminum tube with the 4 recessed areas on the vent. Be
sure the tube snaps into place firmly. See Figure 1 at
right.
tab
Figure 1
Step 2
Remove the trim ring from the 6" Hooded Vent assembly.
See Figure 2 at left.
Figure 2
Step 3
Place tape or sealant between the Hooded Vent and house.
Align the tube with the available opening (Suggested hole
size: 6 1/8" diameter.) See Figure 3 at right.
Figure 3
Step 4
Attach the Hooded Vent using an 8d nail or equivalent (to
include a #8 x 1" long or #8 x 1 1/2" long Zinc Coated
Screw) with a minimum of four attachments.
Step 5
Install the siding per the manufacturer's installation
instructions. See Figure 4 at right.
Figure 4
Step 6
Lock on the finishing trim ring. See Figure 5 at left.
Note: Be sure to clean screen periodically
Figure 5
I-0048
MIPC9135
06-23-00