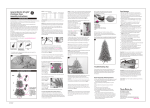
1
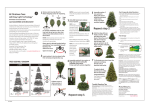
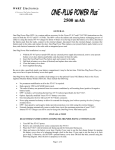
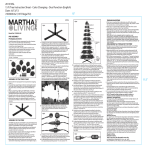
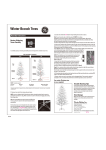
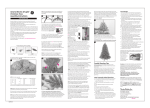
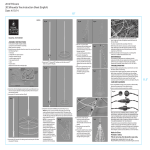
and unwrap all parts.
RED twist-tie to release
3 Untie
1 Remove
Retain shipping carton for repacking.
branch panels.
GE Christmas Trees
with Easy Light Technology
™
A
B
tree
top
Hint: if your
branches do not fall
into place, DO NOT
force down. Gently
lift up on the branch
panels to release
the branch from its
locked position.
Now, all
rows of branches should be in the open
position.
eliminates cord connections
Just assemble and decorate!
Nicolas Holiday Inc. thanks you for your purchase of this pre-lit
Christmas tree. With proper use and care, your Christmas tree
will provide years of use and memories.
Carefully follow the instructions below on how to assemble and
disassemble your pre-lit Christmas tree.
If you should have any problems with your tree, or if the tree
does not light after assembly, DO NOT return it to the place of
purchase. Please refer to the troubleshooting section of this
manual or call our toll free number: 1-877-398-7337 and a
customer support representative will assist you.
Our customer support center is open Monday through
Friday 10AM to 7PM EST with additional hours throughout
the holiday season:
November 14th to December 23rd:
Monday-Friday 8AM to 8PM EST,
Saturday-Sunday: 10AM to 7PM EST
You may also visit us on the web at www.geholidaylighting.com
Enjoy your holiday!
tree stand
For proper installation and use, the
tree must be set up in a clear area
without any obstructions and on a
flat surface.
TREE ASSEMBLY DIAGRAM
7.5 FT
NOTE: For a natural uniform look, position
some branches
outward and
some upward.
Repeat for each
branch panel
and each
tree section.
thumbscrew is loosened, so it does not
interfere with opening legs.
Place stand in desired location before
assembling. Your assembled tree will
be heavy and
difficult to move.
Open tree stand.
2 Insert section A
pull down the outer
layer of branches, and
fully insert tree top
into the top of the
pole on section B. (or C)
Align along the indicated
white marks.
Before adding the next section, follow the
shaping instructions listed below in NOTE.
NOTE: Before opening stand, be certain the
OPEN
tree top with one
5 Hold
hand as shown. Gently
4
Assemble section B into section A.
Align pole sections along the
indicated white marks.
Firmly seat both sections together.
into tree stand, after
first removing
red protective cap.
6 To illuminate your tree, insert the
extension cord plug
directly into an
electrical wall outlet.
If needed, adjust
branch tips to make
the tree look fuller.
Congratulations!
Your tree is complete
and ready to
decorate.
16.7"X11.2"
1.
Remove the tree’s main extension cord plug from
the wall outlet.
2.
Starting at the top, disconnect the top and section
B.
Step A: Gently fold the branches up toward the center.
Care Should be taken to avoid damage to the lights.
3.
Disconnect sections
B and A .
4.
Refer to the drawing
on how to repack
your tree.
A
B
TOP
Important: Store your carton neatly in a cool, dry location
protected from sunlight to prolong the tree life and to
better keep the light sets in working order. Do not place a
heavy load on the carton to avoid damage to or crushing
the carton and tree inside.
Disclaimer : DO NOT USE OR INSTALL ANY ADDITIONAL
CHRISTMAS LIGHTING OR ORNAMENTATION THAT IS
POWERED BY A LIGHT BULB SOCKET. DOING THIS MAY
RESULT IN DAMAGE TO YOUR CHRISTMAS TREE OR CAUSE
PERSONAL INJURY. DOING THIS, WILL RESULT IN A VOID OF
THE LIMITED WARRANTY OF THIS PRODUCT.
Spare Parts: Your tree includes a plastic bag containing
spare LEDs.
B
TREE
STAND
Q. May I add a lighted, decorative tree top to my tree?
A. Yes, There is an outlet on the back of the bladed
plug of the tree top.
Q. May I put blinking or flashing bulbs on my tree?
A. No
Q. May I add extra string sets to my pre-lit tree?
A. No
Q. May I put my pre-lit tree outside?
A. No. Pre-lit trees are for indoor use only.
Q. May I hang glass ornaments on a pre-lit tree?
A. Yes, however, do not hang directly on the wires
of the lights.
Q. May I remove a light string bulb and add a pig
tailed illuminated or animated ornament or motor?
A. No, removing the bulbs and inserting any additional
device into a lamp holder will cause the light set to
cease to operate and may revoke the limited
warranty of this product.
Tree Storage
TOP
A
Most Frequently Asked Questions
Trouble Shooting Tips
Tighten screw to
secure section A
in the tree stand.
NOTE: Remove twist tie around looped
wires with plug adapter, extend wire and
set aside.
1. If tree does not illuminate, try stepping on the On/Off FOOT
PEDAL. If the tree is plugged into a switch controlled wall outlet,
make sure the switch is turned ON.
2. If one section of your tree does not illuminate, check that
section for loose or missing LEDs, all factory connections are
properly made or that you properly made all the electrical
connections between each tree section.
Repeat step 3.
3. Also, check that connector on the main plug is fully secured.
4. All sections need to fully insert together and align along the
indicated white marks.
Distributed by Nicolas Holiday Inc.,
For indoor use only
©2015 Nicolas Holiday Inc.,
9 F., No. 37, Guangfu North Rd.
Taipei, Taiwan 10560
All rights reserved.
THIS IS NOT A TOY, FOR DECORATIVE USE ONLY.
Printed in China
HG15-LED-ONEPLUG
Árboles de navidad GE con
tecnología Easy Light Technology™
y desenvuelva todas las piezas.
el sujetador ROJO para
3 Desate
1 Retire
Guarde la caja para reempacarlo más
liberar los paneles de las ramas.
adelante.
A
B
para eliminar las conexiones de cables
copa del
árbol
¡Simplemente ensámblelo y decórelo!
Nicolas Holiday Inc. le agradece por su compra de este árbol de
navidad preiluminado. Con el uso y cuidado apropiados, su
árbol de navidad le brindará muchos años de uso y buenos
recuerdos.
Siga detenidamente las instrucciones que aparecen a
continuación para ensamblar y desarmar su árbol de navidad
preiluminado.
Si tuviera algún problema con su árbol, o si el árbol no enciende
después de ensamblarlo, NO lo devuelva al lugar de la compra.
Por favor, refiérase a la sección de detección de problemas de
este manual o llame a nuestro número gratuito: 1-877-398-7337
y un representante de servicio al cliente le ayudará.
base del árbol
Para garantizar el uso y la instalación
apropiados, el árbol se debe colocar en
un área despejada, sin obstrucciones y
en una superficie plana.
NOTA: Antes de abrir la base, asegúrese de
aflojar el tornillo de ajuste manual para que no
interfiera al tratar de abrir las patas.
Nuestro centro de servicio al cliente está abierto de lunes a viernes
de 10 a.m. a 7 p.m. (hora del este), con horas adicionales durante
la temporada festiva:
Del 14 de noviembre al 23 de diciembre:
De lunes a viernes de 8 a.m. a 8 p.m. (hora del este);
Sábado y domingo de 10 a.m. a 7 p.m. (hora del este)
Visítenos también por Internet en www.geholidaylighting.com
¡Disfrute sus fiestas!
DIAGRAMA DE ENSAMBLAJE
DEL ÁRBOL
7,5 PIES ( 2,29 M)
COPA
Coloque la base en el lugar deseado
para el árbol antes de empezar a
ensamblarlo. Una vez ensamblado,
el árbol es pesado y
difícil de mover.
Abra la base del
árbol.
ABRIR
2 Retire primero la
Consejo: Si las ramas no caen en su lugar
como debieran,
NO las fuerce.
Levante
suavemente los
paneles de ramas
para liberar las
ramas de su
posición asegurada. Ahora, todas las hileras
de ramas deben estar en la posición abierta.
NOTA: Para lograr una apariencia uniforme
natural, coloque
unas ramas hacia
arriba y otras hacia
abajo.
Repita este paso
para cada panel
de rama y cada sección del árbol.
la sección B sobre la
4 Coloque
sección A. Alinee las secciones del
poste a lo largo de las marcas
blancas que se indican. Acople
firmemente ambas secciones.
tapa protectora
roja y luego
inserte la sección
A en la base del
árbol.
ABRIR
alambres enrollados con el adaptador del
enchufe, extienda el alambre y déjelo a un lado.
P: ¿Puedo agregar adornos con luces para la copa del
árbol?
R. Sí, el enchufe con espigas de la copa del árbol tiene
un tomacorriente en la parte posterior.
P: ¿Puedo poner bombillas intermitentes o destellantes
en mi árbol?
R: No.
P: ¿Puedo agregar juegos de luces adicionales a mi
árbol preiluminado?
R: No.
P: ¿Puedo poner mi árbol preiluminado afuera?
R: No. Su árbol preiluminado es solo para uso decorativo
en interiores.
P: ¿Puedo colgar adornos de vidrio en un árbol preiluminado?
R: Sí. Sin embargo, no lo cuelgue directamente de los
alambres de las luces.
P: ¿Puedo quitar una bombilla del juego de luces y colocar
un adorno iluminado o animado con motor?
R: No. Si quita cualquier bombilla de LED para insertar
un aparato adicional en un portalámpara, esto
ocasionará que el juego de luces no funcione y puede
anular la garantía limitada de este producto.
6 Para encender su árbol, inserte el
1.
Retire el enchufe del cable de extensión principal
del árbol del tomacorriente.
enchufe del cable de extensión
directamente en un tomacorriente
de pared.
2.
Comience desde la copa. Desconecte la copa y la
sección B.
De ser necesario, ajuste
las puntas de las ramas
para hacer que el
árbol se vea más
frondoso.
3.
Desconecte las
secciones B y A.
4.
Consulte el dibujo
sobre cómo
reempacar su árbol.
¡Felicidades!
Ya su árbol está
terminado y listo
para decorar.
Paso A: Doble cuidadosamente las ramas hacia arriba
y hacia el centro. Tenga cuidado para evitar daños a
las luces.
A
B
COPA
Importante: Guarde la caja de cartón de manera
organizada en un lugar fresco y seco protegido contra
la luz solar para prolongar así la vida útil del árbol y
mantener los juegos de luces en mejores condiciones.
No coloque una carga pesada sobre la caja para no
dañar o aplastar la caja y el árbol en su interior.
Renuncia de responsabilidades: NO USE NI INSTALE
NINGÚN ADORNO NAVIDEÑO O LUZ ADICIONAL QUE
REQUIERAN ELECTRICIDAD PROVENIENTE DEL
PORTALÁMPARA DE UNA BOMBILLA YA QUE ESTO PUEDE
DAÑAR SU ÁRBOL DE NAVIDAD O PROVOCAR LESIONES
PERSONALES. EL HACER ESTO ANULARÁ LA GARANTÍA
LIMITADA DE ESTE PRODUCTO.
Piezas de respuesto: Su árbol incluye una bolsa plástica
que contiene luces de LED de repuesto.
1. Si el árbol no se enciende, presione el PEDAL DE ENCENDIDO/
APAGADO. Si el árbol está conectado a un tomacorriente
controlado por interruptor, asegúrese de que el interruptor
esté ENCENDIDO.
Apriete el tornillo
para fijar la
sección A en la
base del árbol.
NOTA: Retire el sujetador que sostiene los
Preguntas frecuentes
Almacenamiento del árbol
Consejos para la detección de
problemas
A
16.7"X11.2"
muestra. Hale
suavemente la capa
exterior de las ramas
hacia abajo e inserte
completamente la copa
del árbol en la parte superior
del poste en la sección
B (o C). Alinee la copa a lo
largo de las marcas
blancas que se indican.
Antes de colocar la próxima sección, siga las
instrucciones para dar forma que se encuentran
abajo en el NOTA.
B
BASE DEL
ÁRBOL
la copa del árbol
5 Sostenga
con una mano como se
2. Si una sección del árbol no se enciende, verifique que no haya luces
de LED sueltas o faltantes, que todas las conexiones de fábrica estén
bien hechas o que usted hizo bien todas las conexiones eléctricas
entre cada sección del árbol.
Repita el Paso 3.
3. Además, verifique que el conector en el enchufe principal esté
completamente asegurado.
4. Todas las secciones deben estar acopladas, totalmente
insertadas y alineadas por las marcas blancas que se indican.
Distribuido por Nicolas Holiday Inc.,
Para uso en interiores solamente
©2015 Nicolas Holiday Inc.,
9 F., No. 37, Guangfu North Rd.
Taipéi, Taiwán 10560
Todos los derechos reservados.
ESTO NO ES UN JUGUETE Y SOLO SE DEBE USAR
PARA FINES DECORATIVOS.
Impreso en China
HG15-LED-ONEPLUG-SP