Transcript
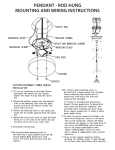
1) Decide desired height of supports over window. Install the L—brackets no more than 3” from the ends of the rod.
Make sure the supports are level.
SCREW ‘A’
2) Place cradle bracket over L-bracket and secure with screw ‘A’,
CRADLE
BRACKET
3) For 10 foot rods, screw both rods together with included joiner screw,
4) Place rings onto the rod at this time if needed,
5) Place rod into Cradle bracket and tighten with screw ‘B’.
L–BRACKET
SCREW ‘B’
Style A) Place finial over end of rod and tighten with set screw. (see photo 1)
Style B) For Resin finial - screw finial into plastic plug already inserted into end of rod. (see photo 2)
PHOTO 1
PHOTO 2
Cutting down a rod if necessary:
1) Measure rod and determine your cut.
2) Cover area with masking tape 1” on either side of determined cut to avoid scratching the surface of rod.
3) Cut rod with hack saw or pipe cutter then push out plastic plug and reinsert into new end. (only appies to for resin finials)