Transcript
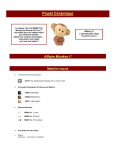
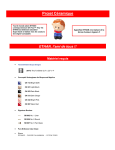
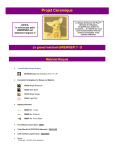
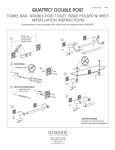
D024 1 pdf 10/12
SINE
MIRROR INSTALLATION INSTRUCTIONS
Complement your purchase with other fine accessories from GINGER®.
=
VERTICAL
E
(2) FOR DRYWALL ER
less RA) E
y. DONOT DRILL
“te PIVOT BRACKET ON CENTER
SCREW TO LEVEL BRACKET.
TIGHTEN ALL SCREWS.
(2) FOR TILE OR SOLID WALLS
of
Bon MARKS MADE IN STEP 4 HORIZONTAL
Se, DRILL 144" [66]
8. fr —
237" [506]
de.
A.
Determine the location of the mounting bracket on the wall. (See illustration 5)
1. Position the mounting bracket as shown. The bracket should be 2. For tile or solid wall installation:
level and in the center of the desired mirror location. Mark the Drill 1/4” (6mm) on marks made in Step 1. Insert plastic wall anchors
location of the mounting bracket screw holes on the wall. and tap flush with wall.
2. For drywall installation: 3. Position mounting bracket over anchors and insert screws.
Using a No.2 Phillips screwdriver, push and turn zinc anchors
in a clock-wise direction until flush with wall surface. If wood 4. Level mounting bracket. Tighten screws.
cross bracing or a stud is present, pre-drill a 1/4” (6mm) diameter
hole and install small plastic anchor in place of the zinc anchor. 2. Slide mirror down wall until mirror is supported by the mounting
bracket.
Tools needed: Pencil, Tape measure, Phillips Screwdriver, Drill and Level.
GINGER
Luxury For Your Lifest
2001 CARNEGIE AVENUE
SANTA ANA, CA 92705
949-417-5207
www.gingerco.com