1
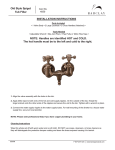
Tub Rim-Mounted
Faucet with
Hand Shower
Cat. No.
4601
INSTALLATION INSTRUCTIONS
Parts Included
• 1 Valve Body • 1 Shower Head • 1 Hose • 1 Cradle • 4 Washers • 1 Elephant Spout • 2 6” Elbow Mounts •
• 2 Cone Washers • 2 Large Locknuts • 2 Connecting Nuts •
Tools Needed
• Adjustable Wrench • Slip Joint Pliers • Pipe Putty or Teflon Pipe Tape •
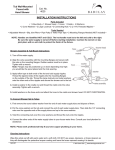
NOTE: Handles are identified HOT and COLD. The hot handle must be to the left and cold to the right.
Be sure the water supply is turned off before starting installation. Cushion the wrench or slip
joint pliers with an old cloth to protect the finish of the fixture.
Shower Assembly & Tub Mount Instructions
1. Turn off the water supply.
2. Align the valve assembly with the elbow mounts and secure with the
nuts on the elbow mounts. Tighten with a wrench or pliers.
3. Apply teflon tape to both ends of the hot and cold supply nipples.
Tread the tapered ends of the nipples into the elbow mounts on the
outside of the tub. Thread the large locknuts onto the other ends of
the nipples and secure the shower set to the tub.
4. Install a washer in the cradle nut and thread the cradle onto the valve
assembly. Tighten with a wrench.
5. Install washers on the hose ends and attach the hose to the cradle
and shower head. DO NOT OVER TIGHTEN.
6. Connect the water supply nipples to the water supply tubes for tub mounting of the water supply tubes with 1/2"
threads. For mounting of the shower set to the house water supply line see your local plumber.
To Connect Shower Set to Tubes
1. First remove the round rubber washer from the end of each water supply tube and dispose of them.
2. Put the cone washers on the tub and connect the end of each water supply tube. Then slide the 1/2” connecting
nuts over the opposite ends of the supply tubes and up to the cone washers.
3. Twist the connecting nuts over the cone washers and thread the nuts onto the nipples.
4. Connect the other ends of the water supply tubes to your house water lines. Consult your local plumber for
assistance.
NOTE: Please seek professional help if you have copper plumbing in your home.
Cleaning Instructions
Wipe this whole set off with warm water and a soft cloth. DO NOT use soaps, cleansers, or brass cleaners as
they will disintegrate the protective lacquer coating and leave the brass exposed causing it to tarnish.
12/21/07
P 847•244•1234
www.barclayproducts.com
Straight Bath
Supply
Cat. No.
5577
INSTALLATION INSTRUCTIONS
Parts Included
• 4 Cone Washers • 2 Decorative Locknuts • 2 Supply Tubes •
• 2 Escutcheons • 2 Locknuts •
Tools Needed
• Adjustable Wrench • Set of Crescent Wrenches • Pliers • Teflon Tape (use as a sealant on all male threaded tubing) •
This water supply tube kit includes the parts listed above ONLY. The faucet must
be purchased separately.
To Assemble Tubes
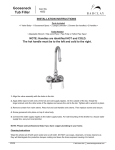
1. First be sure to shut off the the water supply. Remove old water supply tubing. Put a cone washer, with the
wide end of the washer inward, onto the upper end of each supply tube.
2. Slide a decorative locknut up to the top of each supply tube and put on a cone washer.
3. On the bottom of each supply tube, slide one of the escutcheons up the tube partway, then slide the
locknut up the end of each tube directly under the escutcheon.
4. Put another cone washer with the wide end of the washer upward onto the bottom end of the tube.
To Install Tubes
1. Attach the bottom end of each supply tube to the water supply tubing in your floor by screwing the
locknut down tightly. Let the escutcheons slide down to the floor.
2. Attach the upper end of one supply tube to the “cold side” faucet supply tube located on the rear of your tub
by inserting the supply tube into the faucet supply tube and tightly screw the decorative locknut over the two
for a tight fit.
3. Repeat steps 1-2 using the other supply tube and connecting it to the “hot side” faucet supply tube.
NOTE: Please seek professional help if you have copper plumbing in your home.
Cleaning Instructions
Wipe this whole set off with warm water and a soft cloth. DO NOT use soaps, cleansers, or brass cleaners as they
will disintegrate the protective lacquer coating and leave the brass exposed causing it to tarnish.
3/17/08
P 847•244•1234
www.barclayproducts.com
Leg Tub
Drain
Cat. No.
5599
INSTALLATION INSTRUCTIONS
Parts Included
• Top Overflow Tube (1) • Bottom Shoe (2) • Top Waste Flange (3) • Face Plate (4) • Exposed Tee (5) •
• Face Sponge Gasket (6) • Waste Gasket (7) • Lift Stop (8) • 2- 1 1/2” Nut and Washers (9) • Face Plate Screw (10) •
•1 1/2” x 6” Tube (11) • 1 1/2” O.D. Escutcheon (12) •
Tools Needed
• Wrench • Pliers • Teflon Tape (use as a sealant on all male threaded tubing) • Tube Cutter • Plumbers Putty •
To Assemble Tubes
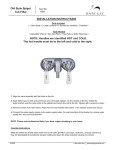
1. Assembled #3 and #8 screw into #2.
#7 is on top of #2 beneath the tub.
Place a bead of plumbers putty around
bottom of #3, to seal to tub and protect
from leaks. Then tighten #3 into #2.
2. Assemble overflow. (Follow diagram)
3. Set #1 in place.
4. Place Tee (#5) on shoe.
Cleaning Instructions
5. Trim bottom of tube #1 to fit into Tee (#5).
Wipe this whole set off with warm water and a
soft cloth. DO NOT use soaps, cleansers, or
brass cleaners as they will disintegrate the
protective lacquer coating and leave the brass
exposed causing it to tarnish.
6. Trim tube #11 to fit.
7. Tighten the nuts.
NOTE: Please seek professional help if you have copper plumbing in your home.
1/8/08
P 847•244•1234
www.barclayproducts.com
“D”
Shower Rod
Cat. No.
4145
INSTALLATION INSTRUCTIONS
Parts Included
• 2 Corner pieces • 1 Back bar (no inserts) • 1 Front bar with grey inserts •
• 2 #331 D-Rod loops • 2 #300 Flanges • 8 Wall screws • 2 Set screws •
Tools Needed
• Pencil • Drill • Measuring Tape •
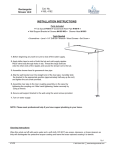
1. Attach the bent corner rods to the straight rods by sliding on to the gray inserts on straight rods.
2. The large straight rod fits into the #331 D-Rod loops.
3. The looped portion of the #331 fits over the D-Rod corner pieces as shown.
4. The flanges attach to the wall (measure for proper distance).
5. The D-Rod assembly fits into flanges and is secured with set screws.
***** To attach faucet assembly: use #336 Double eye loop (sold separately)*****
6. The #336 double eye loop must be put on the desired side of the D-Rod before
back straight rod is attached.
7. The riser for the faucet assembly will fit through the other opening in the #336.
9/14/09
P 847•244•1234
www.barclayproducts.com