1
Design House is a registered
brand of DHI Corp.
Mequon, WI 53092
1-800-558-8700
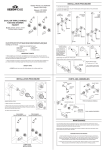
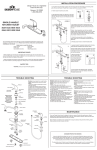
INSTALLATION PROCEDURE
1. Shut off main water supply.
2. Connect water supply lines using 1/2" threaded pipes and 90 degree elbows. Wrap all threaded
connections with Teflon tape.
2
UP
SINGLE HANDLE
TUB AND SHOWER
FAUCET
Models 527770, 528182, 528190
527408, 527754, 528117, 528166
528604, 528620, 529271, 529636
527804, 528075, 529172, 529230
527507, 528414, 528463, 528356
528364, 528380, 528372, 528125
527887, 525949, 525956, 525964
525915, 525923, 525931, 525907
526814, 526822, 526830, 526913
526905, 526897
TUB
ONLY
C
2
TUB
AND
SHOWER
SHOWER
ONLY
PLUG
(WRAP WITH
TEFLON TAPE)
2
H
2
PLUG
(WRAP WITH
TEFLON TAPE)
COLD
Your new Design House faucet will give you years of trouble free performance. Thank you for
choosing our product for your home. Please read all of these instructions carefully before
installing your new faucet.
Helpful tools to install this faucet:
basin wrench
silicon sealer
Teflon tape
flashlight
(2) crescent wrenches
90 degree elbows
1/2" copper pipe
HOT
COLD
COLD
HOT
HOT
Note: Water limit screw stops are preset at the factory if they are
present on valve. Modification is not required.
3
3. Plaster guard and guard are preinstalled. The front surface of
the plaster guard should sit flush with the finished surface of the
wall.
4. To remove the plaster guard, loosen and remove the 2 screws.
Pull the guard straight out to remove. Discard before installing
escutcheon. Trim sleeve will remain in place.
IMPORTANT POINTS
When installing your new faucet, hand tighten the connector nuts, then use one wrench to
anchor the fitting and a second wrench to tighten the nut one additional turn. Connections that are
too tight will reduce the integrity of the system.
Wrap all threaded connections with Teflon tape available from your local hardware or plumbing
supply store. Always wrap in a counter-clockwise direction.
5. With gasket in place, slide escutcheon over trim sleeve.
Fasten escutcheon to faucet body and tighten to finished wall
surface using two mounting screws.
4
5
SAFETY TIPS
C
ALWAYS protect your eyes with safety glasses
(X2)
H
(X2)
PARTS AND ASSEMBLIES
INSTALLATION PROCEDURE
SHOWER HEAD
INSTALLATION
6
8
7
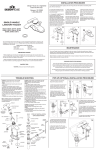
6. Insert shower arm
through wall hole and
thread to appropriate
line. REMEMBER TO
WRAP THREADED
CONNECTIONS
WITH TEFLON TAPE.
FAUCET BODY
FLANGE
PLASTER GUARD
(Not required for installation)
SHOWER
HEAD
GASKET
WATER LIMIT
SCREW STOPS
7. Slide flange onto shower arm. Push to wall.
8. Attach shower head to shower arm by threading clockwise.
ESCUTCHEON
MOUNTING
SCREWS
SCREWS
9
10
SILICON
SEALER
SPOUT INSTALLATION
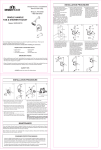
9. Thread spout to 1/2" pipe.
GUARD
(Not required for installation)
C
10. Run a bead of silicon sealer
around spout to secure to wall.
TRIM
SLEEVE
H
SPOUT
11
HOT/COLD
DIVERTER INDICATOR
COVER
HANDLE INSTALLATION
HANDLE
12. Depending on model,
secure handle with set screw
and provided allen wrench (as
shown) OR place handle onto
faucet body, insert screw
through handle and thread to
faucet body.
H
C
12,
13
13. Attach hot/cold indicator
cover over set screw.
CAP
NUT
SET SCREW
11. Slide handle onto square
shaft.
C
SHOWER
ARM
MAINTENANCE
Your new Design House faucet is designed to give you years of trouble free performance. Keep it
looking new by cleaning it periodically with a soft cloth. Avoid abrasive cleaners, steel wool and harsh
chemicals that will dull the finish and void your warranty.
Brass finishes are polished, then protected with a lacquer coating to help prevent tarnishing. Clean
these surfaces only with a damp, soft cloth.
CH
C
CONSUMER PROTECTION WARNING
Under the Safe Drinking Water Act, the U.S. Environmental Protection Agency restricts the
amount of lead used in brass and solder. Your new faucet is made in strict compliance with all
government standards. The materials used in the manufacture of this faucet are of industry
standard quality and are similar to other plumbing products having brass fittings.
H
To reduce the amount of lead in your drinking water, allow the water to run for a moment before
filling your glass and remember to always use cold water for drinking purposes.
COMPLETED
INSTALLATION
Design House es una marca
registrada de DHI Corp.
Mequon, WI 53092
1-800-558-8700
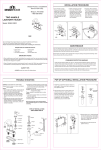
PROCEDIMIENTO DE INSTALACIÓN
1. Desconecte el suministro principal de agua.
2. Conecte las líneas de agua usando los tubos roscados de 1/2" y los codos a 90 grados. Envuelva
todas las conexiones roscadas con cinta de teflón.
2
UP
2
2
TINA
Y DUCHA
DUCHA
SOLAMENTE
GRIFO DE UNA LLAVE
PARA TINA Y DUCHA
2 TINA SOLAMENTE
H
Modelos 527770, 528182, 528190
527408, 527754, 528117, 528166
528604, 528620, 529271, 529636
527804, 528075, 529172, 529230
527507, 528414, 528463, 528356
528364, 528380, 528372, 528125
527887, 525949, 525956, 525964
525915, 525923, 525931, 525907
526814, 526822, 526830, 526913
526905, 526897
TAPÓN
(ENVUELVA
CON CINTA
DE TEFLÓN)
C
TAPÓN
(ENVUELVA
CON CINTA
DE TEFLÓN)
CALIENTE
CALIENTE
Su nuevo grifo de Design House le dará años de funcionamiento sin problemas. Gracias por
escoger nuestro producto para su hogar. Por favor lea todas estas instrucciones con cuidado
antes de instalar su nuevo grifo.
Herramientas útiles para instalar este grifo:
Llave para lavabo
Sellador de silicona
Cinta de teflón
Linterna
Dos (2) llaves
Codos a 90 grados
Tubo de cobre de 1/2"
Nota: los tornillos de detención del límite de agua están previamente
ajustados en la fábrica si están presentes en la válvula.
No se necesita modificación alguna.
3
3. El protector de yeso y protector están previamente instalados. La
superficie frontal del protector de yeso debe quedar a ras de la
superficie terminada de la pared.
4. Para retirar el protector de yeso, afloje y retire los 2 tornillos. Jale el
protector directamente hacia fuera para retirarlo. Deséchelo antes de
instalar el escudo. La manga permanecerá en su lugar.
5. Con el empaque en su lugar, deslice el escudo sobre la manga. Fije
el escudo al cuerpo del grifo y apriételo en la superficie acabada de la
pared usando los dos tornillos de montaje.
PUNTOS IMPORTANTES
Cuando instale su nuevo grifo, apriete a mano las tuercas de conector, luego use una llave para
anclar el conector y otra para apretar la tuerca una vuelta más. Las conexiones que estén
demasiado apretadas reducirán la integridad del sistema.
CALIENTE
FRÍA
FRÍA
FRÍA
4
5
Envuelva todas las conexiones roscadas (salvo la rosca del aireador en la boquilla) con teflón disponible en su ferretería local o en la tienda de suministros de plomería. Envuelva siempre en
dirección opuesta a la de las manecillas del reloj.
C
CONSEJOS DE SEGURIDAD
(X2)
H
Proteja SIEMPRE sus ojos con gafas de seguridad
(X2)
PARTES Y ENSAMBLAJES
PROCEDIMIENTO DE INSTALACIÓN
INSTALACIÓN DE LA
REGADERA
6
8
7
6. Inserte el brazo de la
regadera a través del
agujero en la pared y
enrósquelo en la línea
apropiada. RECUERDE
ENVOLVER LAS
CONEXIONES
ROSCADAS CON
CINTA DE TEFLÓN.
BRIDA
CUERPO DEL GRIFO
BRAZO
DE LA REGADERA
PROTECTOR DE YESO
(no se requiere para la instalación)
REGADERA
EMPAQUE
TORNILLOS
DE DETENCIÓN
DEL LÍMITE
DE AGUA
7. Deslice la brida por el brazo de la regadera. Empújela hacia la pared.
8. Acople la regadera al brazo enroscando en sentido de las manecillas del reloj.
ESCUDO
TORNILLOS
DE MONTAJE
TORNILLOS
9
10
INSTALACIÓN DE LA BOQUILLA
9. Enrosque la boquilla en el tubo
de 1/2".
Sellador
de silicona
PROTECTOR
(no se requiere para la instalación)
C
MANGA
H
10. Aplique sellador de silicona
alrededor de la boquilla para
fijarla en la pared.
BOQUILLA
TUERCA
DE TAPA
TORNILLO DE FIJACIÓN
DESVIADOR
11
CUBIERTA INDICADORA
DE FRÍO/CALIENTE
LLAVE
INSTALACIÓN DE LA LLAVE
11. Deslice la llave sobre el eje
cuadrado.
C
12. Dependiendo del modelo,
asegure la llave con el tornillo
de fijación y la llave allen
provista (como se muestra) O
coloque la llave en el cuerpo del
grifo, inserte el tornillo a través
de la llave y enrósquela en el
cuerpo del grifo.
H
C
12,
13
13. Acople la cubierta
indicadora de frío/caliente sobre
el tornillo de fijación.
MANTENIMIENTO
Su nuevo grifo de Design House está diseñado para darle años de funcionamiento sin problemas.
Manténgalo viéndose como nuevo limpiándolo periódicamente con un paño suave. Evite usar
limpiadores abrasivos, lana de acero y químicos fuertes que opacarán el acabado y anularán la
garantía.
CH
C
Los acabados en latón están pulidos y luego protegidos con una capa de laca para ayudar a prevenir
su pérdida de lustre. Limpie estas superficies solamente con un paño húmedo y suave.
GARANTÍA DE PROTECCIÓN DEL CONSUMIDOR
Bajo la Ley de Agua Potable Segura, la Agencia de Protección Ambiental de Estados Unidos
restringe la cantidad de plomo usado en el latón y la soldadura. Su nuevo grifo está hecho
cumpliendo estrictamente con todos los estándares gubernamentales. Los materiales usados en
la fabricación de este grifo son de calidad con estándar industrial y son
similares a otros productos de plomería que tienen conectores de latón.
H
INSTALACIÓN COMPLETA
Para reducir la cantidad de plomo en su agua potable, permita que el agua corra por un momento
antes de llenar su vaso y recuerde siempre usar agua fría para tomar.