Transcript
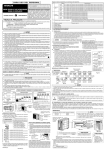
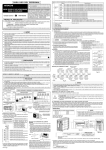
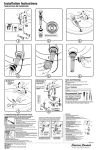
Installation Instructions
Instruccions de Instalación
Install Handle Escutcheon kit if provided loose.
Instale el equipo de Escudo de Mango si
proporcionado suelto.
Seal
Sello
Remove
Quite
Blue
Stripe
Fría
Hot
Caliente
!
A
Cold
UNSCREW BEFORE
Seal
Sello
INSTALLING
B
Raya Azul
Off
Cerrado
Off
Cerrado
1
C
Remove prior to
mounting spout
Remover antes de
instalar el cuerpo
Red Stripe
Raya Roja
2
B
3
Slot Must be in this Position
Apertura Debe estar en esta Posición
4
5
6
B
7
Check Operation of Pop-up
Comprobación del
Funcionamiento del Tapón
9
8
Care and Cleaning:
Do: Simply rinse the product clean with clear water, dry with
a soft cotton flannel cloth.
Do Not: Clean the product with soaps, acid, polish, abrasives,
harsh cleaners, or a cloth with a coarse surface.
Para el Cuidado:
Debe: Lavar el producto sólo con agua limpia. secar con un paño suave de algodón.
No Debe:
Make Water Supply and
Waste Connections
Limpiar el producto con jabones, ácido, productos para pulir, abrasivos,
limpiadores duros ni con un paño grueso.
Conexiones del Suministro
de Agua y Drenaje
Note: Supplies and P-Trap not included and must
be purchased separately
Test Installed Fitting
Prueba del Accesorio Instalado
Cold
Fría
On
Nota: No están incluidos los suministros flexibles o elevadores
de cabeza redonda y se deben comprar por separado.
Abrir
Service
Hot
Caliente
If Faucet Drips Proceed As Follows:
On
Abrir
• Turn HANDLES in OFF position.
• If spout drips, operate HANDLES several times from OFF to ON position.
Do not force HANDLES they turn only 90˚.
• AERATOR may accumulate dirt causing distorted and reduced water flow.
Remove AERATOR and rinse clean.
10
If you are experiencing loose or binding Handles:
•
Troubleshooting Speed Connect® Drain
Drenaje Speed Connect® Guía de solución de problemas
the sink, pull up the handle and base, confirm that the black rubber gasket is in place under
the decorative ring at the bottom of the handle base. Then hand tighten the decorative ring
clockwise until it stops, making sure that the gasket stays in place. To align the handle move
it to the off position, hold it in place, then firmly tighten the attachment nut under the sink.
To Change Handle Position:
If sink does not hold water even though
Stopper is in the “down” position:
• Remove INDEX BUTTON (1), HANDLE SCREW (2) and HANDLE (3).
• Remove RETAINING O-RING (4).
• Lift and turn STOP WASHER (5) 90˚.
• Replace RETAINING O-RING (4). Replace HANDLE.
90°
Si el lavabo no retiene el agua aun cuando el tapón esté en la posición "inferior":
Logo
Logo
180˚
Loop Toward
Rear of Sink
Aro Hacia la
Parte Trasera
del Lavabo
1
2
3
Logotipo
Logotipo
Stopper Removal Procedure:
4
5
Loop Toward
Front of Sink
Aro Hacia la
Parte Frontal
del Lavabo
Servicio
Aerator
Aireador
90°
Si el grifo gotea, realice lo siguiente:
• Gire la válvula a la posición de cierre.
• Si el pico del grifo gotea, abra y cierre los MANERAL varias veces. No fuerce los maneral, sólo giran 90°.
• El AIREADOR puede acumular suciedad y causar un flujo de agua distorsionado y reducido.
Retire el AIREADOR y enjuáguelo para limpiarlo.
Si usted experimenta Mangos sueltos u obligatorios:
• Del fregadero desatornillan la tuerca de accesorio que sostiene la válvula en el lugar. De la cumbre del
Locked Mode (Vandal Proof)
Procedimiento de Extracción del Tapón
Marquette™ 8" Widespread Faucet
7768 SERIES
Marquette ™ 8" Robinet espacé pour lavabo
7768 SERIE
Modo bloqueado (Para seguridad)
Unlocked Mode
Modo desbloqueado
fregadero, tirón el mango y base, confirman que la junta de goma negra está en el lugar bajo el anillo
decorativo en el fondo de la base de mango. Entonces la mano aprieta el anillo decorativo dextrórsum hasta
que esto se pare, asegurándose que la junta se queda en el lugar. Alinear el mango lo mueven al de la
posición, lo sostienen en el lugar, entonces firmemente aprietan la tuerca de accesorio bajo el fregadero.
Para cambiar el sentido de la manija:
• Remueva BOTÓN INDICADOR (1) MANIJA TORNILLO (2) y MANIJA (3).
• Remueva RETENCION Oel ANILLO (4).
• Levante y gire el PARADA (5) 90°.
• Reemplace el RETENCION oel ANILLO (4) Reemplace la MANIJA (1).
M965215_REV. 1.1_SP_EZ