1
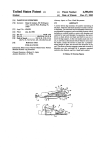
WS-300
WS-301
WS-302
Do not dispose this product as unsorted municipal
waste. Collection of such waste separately for special
treatment is necessary.
WS-300A
WS-301A
WS-302A
Sanitary Ware Expert
Your best choice!
01
50/60H Z
Water Volatge
0.1~0.2Mpa
Power of steam generator
3KW
Roof lamp
Speaker
Ozone
Top shower
CD
Pc control
Telephone
back jet
Temperature needle
Hot
water
pipe
Cold
water
pipe
Power
Earth line
Dark red
(live)
Blue
(neutral)
Twin Line
(ground)
Steam generator
AC220V ( ±10%)
Frequency
Exhaust fan
Antenna
Steam generator
Voltage
Back light
Electric box
TECHNIQUE PARAMETER
WATER AND ELECTRIC CIRCUIT SKETCH
Hand-held shower
ATTENTIONS
1.It is recommended to fix a reliable leakage protector and earth line.
Test the leakage protector every time before use.
2.Drunk, high blood pressure, heart disease people are not allowed to
use this product, Children should be guided by adults.
3.Adjust the water temperature before taking shower, don't spray hot
water to your body. Steam outlet and drain pipe may be in high
temperature, keep away from them.
4.Watch out to advoid falling down when entering the steam room,
don't put hands into the door gap.
5.Please don't use hard wares to knock at the steam room.
6.Clean the tray after taking shower, to remove the soap or foam on
the tray.
7.If the glass seal separate from the door, please refix it to advoid
leaking water.
8.Use the tooth paste to clean the dirt on the tray.
9.Keep the tray clean to advoid blocking the drain.
10.Please don't hang heavy articles on the steam room or handrail.
11.After use, please turn off water and power supply, to advoid long
time working of the product.
12.Please dispose of the product according to the local law when it is
out of use.
13.Please contact the dealer if you have any problems.
8、Install the gliding glass door
1.Adjust the tray
to be horizontal by
a horizontal meter.
2.Fasten the up
and down nail (no
space left), at the
same time keep the
back and side
glass body vertical
to the tray.
3.Fix the hinge
onto the fixed
glass door, make it
be horizontal to
the tray.
4.Put the sliding
glass door on a
wood a little
higher than the
tray, then fix it
with the hinge.
(G lass door seal )
Dear users:
Thanks for choosing our products, for the purpose of safety,
please read this manual carefully before use.
The instruction manual be the same with the following steam
room:
WS-300/A
WS-301/A
WS-302/A
WS-303/A
WS-304/A
Drainage
Steam outlet
WS-300/A
14
10
300/300A STRUCTURE SKETCH
(Other models can refer to this model)
6、Install the glass top
(G
la
(S
ss
id
e
to
gl
(N
p)
ut
)
1
11
12
13
14
2
s
as
go
dy
3
)
(G
las
op
st
(G
(S
15
)
e
cr
as
wM
t
ke
6X
(N
)
)
20
ut
(S
ide
gla
s
o
sg
dy
)
16
17
4
5
6
18
7
19
)
20
7、Fix the nail
21
(N
ut
)
(S
cr
M
ew
6X
16
)
(
(G
(S
id
as
la
eg
ke
s
r
Sc
ew
M
5
5
X2
9
t)
22
10
o
sg
(
dy
)
a
Tr
(N
ut
)
23
y)
p)
d
te
ra
co r a
e
D t
(
13
09
8
)
Ex
ca
1.glass roof
2.speaker
3.side glass body
4.mirror
5.glass rock
6.hot/cold mixer
7.spuarejet
٨.steam outlet
9.glass back body
10.drainage
11.top lamp
12.top shower
13.exhaust fan
14.ozone
15.wall lamp
16.hand held shower
17.control panel
18.shift volve
19.side glass body
20.Aluminium board
21.seat
22.glass back body
23.tray
WS-300/A
02
300/300A ACCESSORIES
(Other models can refer to this model)
4、Install the right body
(Connect the water seal)
(Plastic pad)
(Glass door seal)
(Glass door seal)
al)
r
te
se
a
(W
(Plastic seal)
(Fixed glass door and sliding glass door)
(Connect the water seal)
(Connecting seal)
5、Install the fixed glass door
(W
ae
03
rs
ea
l)
WS-300/A
08
12
INSTALLATION PROCESS OF 300/300A
(Other models can refer to this model)
1、Install the bottom tray:
If the ground is not horizontal, please regulate the screw of the bottom tray , make the
bottom tray and ground keep competence.
(Glass rack)
2、Install the aluminium panel and the back glass body
(Hand-held shower)
Screw of
M4x20(10pcs)
(P
las
tic
)
(P
las
tic
pa
d)
(P
las
(Connect the water seal)
3、Install the left body
)
tic
tic
)
(Nail)
(Hinge)
as
Pl
(
07
11
WS-300/A
04
THE DRAFT AND SIZE FOR THE DIFFERENT MODELS
Model:WS-300(clear glass)
Model:WS-300A(blue glass)
Size:1200*900*2150mm
Model:WS-303(clear glass)
Model:WS-303A(blue glass)
Size:800*800*2150mm
900*900*2150mm
1000*1000*2150mm
1200
900
850
345
600
Model:WS-301(clear glass)
Model:WS-301A(blue glass)
Size:900*900*2150mm
1000*1000*2150mm
Model:WS-304(clear glass)
Model:WS-304A(blue glass)
Size:750*900*2150mm
800*1000*2150mm
800*1200*2150mm
900
900
850
345
450
INSTALLATION GUIDE
345
960
05
1800mm
960
350
So
cke
pow
soc ert of
teleket supp
phoof ly
ne
lin
e
Ho
wa t
t
pip er C
e wold
piapter
e
1250mm
Model:WS-302(clear glass)
Model:WS-302A(blue glass)
Size:900*900*2150mm
960*960*2150mm
1.The plumbing and the circuit of this product
must be installed by the qualified mechanic or the
professional personnel who is appointed by the
distributor. It is recommended to install the general
switch of the power supply and the leakage protector.
2.The socket of the power supply must be installed
above the steam generator; the power source wire
must be long enough to reach waterproof area; the
distance from the socket to the ground should be
more than 1800mm.
3.It is recommended to install the general switch
for cold and hot water supply, and connect the
drain pipe to the limbers.
4.After the position is confirmed, assemble the
steam room according to the installation sketch.
WS-300/A
06