1
CE Chandelier 3 LT Bronze
SKU# XXX-XXX
Use and Care
Guide
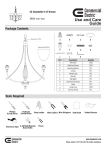
Package Contents
Top loop
A
B
C
D
E
F
G
H
I
J
K
Glass shape (3PCS) L
Bottom nipple (1PC) M
Decorative head (1PC) N
Ball shape nut (1PC) O
Part
Description
Quantity
A
Wire Nuts
3PCS
B
Outlet box Screws
2PCS
C
Mounting Bracket
1PC
D
Canopy
1PC
E
Canopy Loop
1PC
F
Hex Nut
1PC
G
Top Nipple
1PC
H
Green Ground Screw
1PC
I
Chain
1PC
J
Socket ring
3PCS
K
Hex nut wrench
1PC
Tools Required
Philips
Screw driver
Flathead
Screw driver
Step Ladder
Electrical Tape 3-60 Watt Medium
Base Bulbs
Wire Cutters Wire Strippers
Soft Cloth
Safety Glasses
Pliers
WWW.HOMEDEPOT.COM
Please contact 1-877-527-0313 for further assistance.
Installation
1.
A2
Fix the top nipple(G) with hex nut(F)
onto the mounting bracket(C)
B2
A1
C2
B1
C1
8.1. Take the black wire (A1) from the
ceiling junction box and the smooth wire
(A2) from the fixture and twist the bare
ends together.
8.2. Twist a wire nut (A) onto the
twisted end until snug.
8.3. Repeat the same process with the
white wire (B1) from the junction box
and the ribbed wire (B2) from the
fixture.
NOTE: Twist the wires together in the
same direction you twist the wire nuts
onto the wires.
8.4. Attach the ground wire (C2) from
the junction box (Green or Bare Copper)
and the bare copper wire (C1) from the
fixture together. If the junction box has
no ground wire, attach the bare copper
wire from the fixture (C1) to the green
ground screw (H) on the mounting
bracket (C) .
2.
Attach the mounting bracket(C) to
junction box by using the outlet box
screw(B).
3.
Rotate and spread the fixture arms
evenly. Check to make sure hex nuts
are secure at each joint. Tighten any
loose hex nuts.
4.
Fix the bottom nipple(M) to the bottom
of the fixture, cover the bottom nipple
with the decorative head(N), attach the
ball shape nut(O) to the bottom
nipple(M), and then tighten the nut.
9.
Tape the nuts and the wires together.
5.
Measure the desired length of chain (I).
Open the end link of the chain (I). Use
a pair of pliers and a screw-driver as
shown. Wrap a soft cloth around the
pliers to protect the finish.
10.
Attach canopy loop(E) to the top
nipple(G) and tighten the nut.
6.
Hook one end link of chain (I) to the top
loop of fixture and the other end link to
the canopy loop (E). Close the end
links.
11.
Add glass shade(L) and secure with
socket ring(J).
7.
Weave electrical wires and ground
wire up through the chain(I), the
canopy loop (E), the top nipple and the
canopy(D). Insert the wires into the
junction box.
12.
Install light bulbs. Use 3-60 Watt
maximum medium based bulbs. Do
not overtighten.
Care & Cleaning
To clean, unplug lamp and wipe with a damp, non-abrasive cloth.
WWW.HOMEDEPOT.COM
Please contact 1-877-527-0313 for further assistance.
Safety Information
WARNING
Turn off electricity at main fuse box (or circuit breaker box) before beginning installation by removing fuse (or switching off circuit
breaker).
Caution
• All electrical connections must be in agreement with local codes, ordinances or the national electric code (NEC). Contact your
municipal building department to learn about your local codes, permits and/or inspections.
• Risk of fire – most dwellings built before 1985 have supply wire rated for 140℉ /60℃ . Consult a qualified electrician before
installation.
• Do not connect this fixture to an electrical system that does not provide a means for equipment grounding. Never use a fixture in
a two-wire system that is not grounded.
• If you are not sure your lighting system has a grounding means, do not attempt to install this fixture. Consult a qualified, licensed
electrician for information with regards to proper grounding methods as required by the local electrical code in your area.
• If a dimmer control switch is used with this fixture, obtain professional advice to determine the correct type and electrical rating
required.
Troubleshooting
Minor problems often can be fixed without an electrician. Before doing any work on the light, shut off power
supply to avoid electrical shock.
Problem
Bulbs won't light
Cause
Solution
Bulbs are burned out
Power is off
Replace the bulb
Bad wire connection
Check if power supply is on
Check wiring
Bad switch
Test or replace the switch
Consult a qualified electrician
Fuse blows or circuit breaker trips when
the lamp is turned on.
Crossed wires or power wire is
grounding out.
Check the wiring connection
Consult a qualified electrician
Warranty
Manufacturer warrants all of its lighting fixtures against defects in materials and workmanship for one (1) year from the date of
purchase. If within this period the product is found to be defective in material or workmanship, please contact the manufacturer.
Copy of the original sales receipt will be required as proof of purchase. The manufacturer will, at its option , repair or replace the
product. This warranty does not cover fixtures becoming defective due to misuse, accidental damage, improper handling and/or
installations on an implied warranty, the above exclusions and limitations may not apply to you. This warranty gives you
specifically rights, and you may have other rights that vary from state to state.
WWW.HOMEDEPOT.COM
Please contact 1-877-527-0313 for further assistance.
Candelabro CE de 3
Luces en Bronce
SKU Núm.: xxx-xxx
Guía de Uso
y Mantenimiento
Contenido del Paquete
Gancho Superior
A
B
C
D
E
F
G
H
I
J
K
Pantalla de vidrio (3 PIEZAS) L
Boquilla roscada (1 PIEZA) M
Cabezal decorativo (1 PIEZA) N
Tuerca esférica (1 PIEZA) O
Pieza
Descripción
Cantidad
A
Tuercas para Cable
3PCS
B
Tornillos de la Caja Eléctrica
2PCS
C
Soporte de Montaje
1PC
D
Cubierta
1PC
E
Gancho de la Cubierta
1PC
F
Tuerca Hexagonal
1PC
G
Boquilla Superior
1PC
H
Tornillo Verde a Tierra
1PC
I
Cadena
1PC
J
Anillo del portabombilla
3PCS
K
Llave para tuerca hexagonal
1PC
Herramientas Necesarias
Destornillador Destornillador
de Cabeza Plana
Phillips
Cinta de
Electricista
Escalera
3 Bombillas de 60 Vatios,
de Base Media
Cortacables
Pelacables
Paño Suave
Gafas de
Seguridad
Alicates
WWW . HOMEDEPOT . COM
Llama al 1 - 877 - 527 - 0313 para obtener asistencia .
Instalación
1.
A2
Asegura la boquilla superior (G) con
la tuerca hexagonal (F) en el soporte
de montaje (C).
B2
A1
C2
B1
C1
8.1 Toma el cable negro (A1) de la caja de
conexiones del techo y el cable liso (A2)
de la lámpara y amárralos para unir los
dos extremos pelados.
8.2 Enrosca una tuerca para cable (A) en
el extremo roscado hasta que quede
firme.
8.3 Repite el mismo proceso con el cable
blanco (B1) de la caja de conexiones y el
cable acanalado (B2) de la lámpara.
NOTA: Tuerce los cables entre sí para
unirlos en la misma dirección en la que
tuerces las tuercas para cables en los
cables.
8.4 Une el cable a tierra (C2) de la caja de
conexiones (Verde o Cobre Pelado) y el
cable de cobre pelado (C1) de la lámpara.
Si la caja de conexiones no tiene un cable
a tierra, conecta sólo el cable pelado de
la lámpara (C1) al tornillo verde a tierra
(H) del soporte de montaje ©.
2.
Une el soporte de montaje (C) a la caja
eléctrica con el tornillo de la caja
eléctrica (B).
3.
Rota y extiende los brazos de la lámpara
uniformemente. Revisa para asegurarte
de que las tuercas hexagonales estén
seguras en cada unión. Aprieta
cualquier tuerca hexagonal que esté
floja.
4.
Ajusta la boquilla inferior (M) a la parte
inferior de la lámpara, cubre la
boquilla inferior con el cabezal
decorativo (N), une la tuerca esférica
(O) a la boquilla inferior (M), y luego
ajusta la tuerca.
9.
Une con cinta adhesiva los cables y las
tuercas.
5.
Mide la longitud deseada de la cadena
(i). Abre el enlace del extremo de la
cadena (i). Utiliza un par de alicates y
un destornillador como se muestra.
Envuelve los alicates con un paño
suave para proteger el acabado.
10.
Une el pasador de la cubierta (E) a la
boquilla superior (G), ajusta la tuerca.
6.
Engancha el enlace de uno de los
extremos de la cadena (i) a la cubierta
superior de la lámpara y el enlace del
otro extremo en el pasador de la
cubierta (E). Cierra los enlaces de los
extremos.
11.
Coloca la pantalla de vidrio (L) y
asegura con el aro del portabombilla
(J).
7.
Entrelaza los cables eléctricos y el
cable a tierra a través de la cadena (I),
el aro de la cubierta (E) y la boquilla
superior y la cubierta (D). Coloca los
cables dentro de la caja eléctrica.
12.
Instala las bombillas.
Usa 3 bombillas de base media de 60
vatios como máximo. No aprietes
demasiado.
Cuidado y Limpieza
Para limpiar, desconecta la lámpara y limpia con un paño húmedo no abrasivo.
WWW . HOMEDEPOT . COM
Llama al 1 - 877 - 527 - 0313 para obtener asistencia .
Información de Seguridad
ADVERTENCIA
Apaga la electricidad en la caja de fusibles antes de comenzar la instalación sacando el fusible (o desconectando el
cortacircuitos).
Precaución
Todas las conexiones se deben hacer conforme a los códigos locales, ordenanzas o códigos nacionales de electricidad (NEC).
Comunícate con el departamento municipal de construcciones para obtener los códigos locales, permisos y/o las inspecciones.
Riesgo de incendio, la mayoría de las viviendas construidas antes de 1985 tienen cables de suministro con clasificación de 140˚F
/60˚C. Consulta a un electricista calificado antes de la instalación.
No conectes esta lámpara a un sistema eléctrico que no tenga conexión a tierra. Nunca uses una lámpara en un sistema de dos
cables que no tenga conexión a tierra.
Si no estás seguro de si el sistema de iluminación tiene conexión a tierra, no intentes instalar esta lámpara. Consulta con un
electricista calificado y con licencia para obtener información sobre los métodos adecuados de conexión a tierra según lo
requiere el código local de electricidad de tu área.
Si utilizas un interruptor con regulador de intensidad con esta lámpara, busca asesoramiento profesional para determinar el tipo
correcto y la calificación eléctrica que se requieren.
Solución de problemas
A menudo, los problemas menores se pueden solucionar sin la intervención de un electricista. Antes de realizar
cualquier trabajo en la lámpara, desconecta el suministro de electricidad para evitar una descarga eléctrica.
Problema
Causa
Las bombillas están fundidas
Las bombillas no encienden
Solución
Reemplaza la bombilla
No hay electricidad
Revisa que el suministro de electricidad esté
encendido
Conexión de cables incorrecta
Revisa el cableado
Interruptor dañado
Prueba o reemplaza el interruptor
Consulta a un electricista calificado.
El fusible se funde o el cortacircuito se
activa cuando se enciende la luz.
Los cables están cruzados o el
cable de alimentación
está haciendo tierra.
Revisa la conexión del cableado
Consulta a un electricista calificado.
Garantía
El fabricante garantiza que ninguna de las lámparas presentarán defectos materiales o de fabricación por un período de (1) año a
partir de la fecha de compra. Si este producto presentara defectos materiales o de fabricación durante el período de garantía,
comuníquese con el fabricante. Se requiere copia del recibo de compra original como comprobante de compra. El fabricante, a su
discreción, reparará o reemplazará el producto. Esta garantía no cubre piezas que se vuelvan defectuosas debido a uso indebido,
daños accidentales, instalaciones y/o manejo inadecuados con una garantía implícita. Es posible que las exclusiones y
limitaciones anteriores no se apliquen en su caso. Esta garantía otorga derechos específicos y es posible que tenga derechos
adicionales que varían según el estado.
WWW . HOMEDEPOT . COM
Llama al 1 - 877 - 527 - 0313 para obtener asistencia .