Transcript
SWP & SWC Fixtures
Fluorescent Pendant Fixture
Models SWC313 & SWP313
Safety Precautions
Read all safety precautions and installation instructions carefully
before installing or servicing this fixture. Failure to comply with
these instructions could result in potentially fatal electric shock
and/or property damage.
It is recommended that a qualified electrician perform all wiring. This
fixture must be wired in accordance with all national and local
electrical codes.
Do not handle any energized fixture or attempt to energize any
fixture with wet hands or while standing on a wet or damp surface or
in water.
This fixture is designed for use in a 110-120VAC, 60Hz fused circuit.
Do not use on a dimming circuit.
To reduce the risk of electrical shock, and to assure proper operation,
this fixture must be adequately grounded. To accomplish proper
grounding, there must be a separate ground wire (green) or bare metal
contact (metal conduit) between this fixture and the ground
connection of your main power supply panel. The green ground
screw location is clearly marked on the fixture housing.
This fixture is intended to be used for general indoor lighting in dry
or damp locations only.
Assembly Instructions
1.
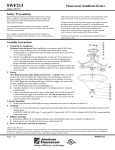
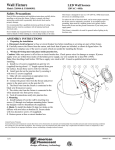
SWC313 model shown
Preparing for installation
A. Disconnect electrical power before installing or servicing this fixture.
B. Carefully remove all components from packaging.
2.
Fixture Assembly
A. Determine desired chain length, open link of chain (7) at desired length, insert
canopy loop (6) to chain, then close chain link.
B. Open one chain link and attach chain to loop (8); close chain link and thread loop
onto tube.
C. Weave fixture cord through chain as desired.
D. Insert wire through canopy ring (5).
E. Insert loop nut (5) thru ring & canopy (4), and secure it to canopy with nut (3).
F. Pull the wires tight and cut cord allowing for 6 inches of wire for junction box
wiring. Carefully remove outer insulation from cord without damaging lead wires.
Strip lead wires back 3/8 inch for wire nut connections. WARNING: Inspect
modified cord and wires for any damaged insulation.
G. Attach three (SWC models) or four (SWP models) decorative bars to tube by
securing them with ball nuts.
H. Thread decorative base (13) onto tube and attach securely.
3.
Fixture mounting.
A. Install mounting bracket (1) to outlet box (not supplied) with #8-32 x 1” screws.
B. Pass wires through nipple (2) in mounting bracket.
4. Wiring. All wiring must take place inside junction box.
3
Caution: Make sure power is off at fuse or circuit breaker box. Check power wires for
damage or scrapes. If power supply wires are within three inches of ballast use wire suitable for at least 90C (194F). Note: Most
dwellings built before 1985 have supply wire rated to 60C. Consult a qualified electrician before installing.
A. This unit will not operate properly unless connected to a “grounded” electrical circuit.
Electrical shock, overheating, low or no light output, and shortened lamp life can result if proper grounding is not done.
Securely attach bare ground wire to supply ground and attach to green ground screw on mounting bracket (x).
B. Using wire connectors connect white, ribbed or flat-sided fixture wire to the white supply wire. Connect black, smooth or
round fixture wire to the black hot supply wire. Do not mix wires. Pull on each wire lead to make sure connections are
secure. Make certain no bare wires are exposed outside of wire connectors.
C. Install canopy (4) flush to ceiling, and thread loop nut (6) onto nipple (2).
5. Diffuser Mounting
A. Install glass (11) into cup over threaded socket (12), and secure with threaded socket collar attachment (10).
6. Lamping
A. Install 13-watt self-ballasted compact fluorescent spiral lamp (9) (provided) into socket by inserting pins into holder and twist
until it locks in place. CAUTION - RISK OF FIRE, Max. 13-watt type GU-24, TCP 33113SP or Maxlite MLS13GUWW
recommended for replacement only.
7. Power to fixture can now be restored
Limited Factory Warranty:
American Fluorescent Corporation hereby warranty that this fixture is free from defects in materials and workmanship when installed and used under normal operating
conditions for a period of 2 years from date of purchase. This warranty covers all component parts and extends only to replacement of defective fixture or components;
it does not cover failure due to improper installation, misuse, mishandling or damage incurred in transit.
Page 1 of 1
8060614 R1