1
Installation – Surface Mounting
1
□
Preparing the lights for the
first time
2
□
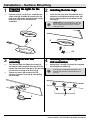
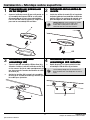
Separate the trim ring (B) that is attached to the
single-cord LED assembly (A) by pushing on the
back of the LED module through the trim ring (B).
Repeat this step for the remaining LED
assemblies.
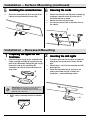
Installing the trim rings
Install the trim rings (B) to the underside of the
cabinet by inserting two mounting screws (AA)
into the mounting holes on the bottom of each
trim ring (B).
IMPORTANT:: Do not fully tighten the screws into
the trim ring as the cords from the LED modules will
need to be pulled through the notches on the trim
ring before securing.
B
A
B
AA
3
□
□
Installing the first LED
assembly
4
□
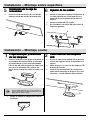
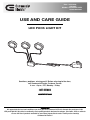
Take the cord from the LED puck assembly (A)
and feed the cord through the trim ring (B) at the
notches. Do not pull the cord tight as you will now
need to finish screwing in the trim ring (B).
Tighten the screws (AA) and push the LED
assembly (A) into the trim ring (B) while pulling
the cords tight.
Installing the remaining two
LED assemblies
Repeat steps 1 through 3 to install the remaining
two LED puck assemblies (A).
IMPORTANT:: Ensure that you measure the distance of
every LED puck assembly (A) before installation. The
minimum distance between every LED (A) must be at
least 12 in.
B
AA
A
A
5
HOMEDEPOT.COM
Please contact 1-877-527-0313 for further assistance.