1
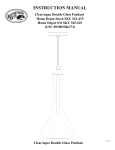
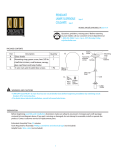
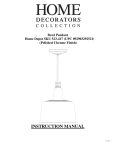
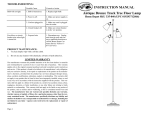
Blue Swirl Pendant
Home Depot SKU 494-989 (UPC 092903283550)
(Brushed Nickel Finish)
INSTRUCTION MANUAL
Page 1
Thank you for purchasing this Home Decorators Collection interior pendant fixture. This
product has been manufactured to the highest standards of safety and quality. The durable
finish and glass shade provide for care -free maintenance. Simply wipe with a clean towel
to keep looking new.
FEATURES:
1. Durable easy to maintain finish; simply wipe with a clean soft cloth to keep looking new.
2. Type A medium base bulb lamp holder may be fitted with a CFL equivalent energysaving bulb (bulbs not included).
3. 6 Ft. cord included.
QUESTIONS, PROBLEMS, MISSING PARTS:
Before returning to your Home Depot, please call our Customer Service Team at 1-877-385-2907
or visit www.homedepot.com. Please reference your SKU 494-989 when speaking to a Customer
Service agent.
ASSEMBLY INSTRUCTIONS
CAUTION:
1. Before starting to assemble your pendant fixture, spread all parts out on a clean flat
surface. Inspect each part for defects that may have occurred during shipping.
Important: Inspect the wire insulation for any cuts, abrasions or exposed copper that may have
resulted during shipping. If there is a defect in the wire, DO NOT continue the assembly
operation. Please call our Customer Service Team at 1-877-385-2907.
2. CONSULT A QUALIFIED ELECTRICIAN IF YOU HAVE ANY ELECTRICAL
QUESTIONS.
3. Keep your receipt and these Instructions for Proof of Purchase.
Page 2
TOOLS REQUIRED FOR ASSEMBLY:
Phillips screwdriver
(not included)
Flathead screwdriver
(not included)
Light Bulb (not included)
(60-watt maximum Type A or CFL equivalent)
PARTS INCLUDED FOR ASSEMBLY (parts are not to scale):
1 ea – Mounting
Bracket (A)
1 ea – Canopy (F),
Lamp Holder (I)
2 ea – Outlet
Box Screw (B)
3 ea –Wire Nut (C)
1 ea – Glass Shade (H)
1 ea – Socket
Nut (G)
2 ea – Mounting
Screw (D)
2 ea – Decorative
Nut (J)
1 ea – Green
Screw (E)
2 ea – Mounting
Screw Nut (K)
1 ea – Metal
Spacer (L)
Page 3
ASSEMBLY INSTRUCTIONS
1. TURN OFF ELECTRICITY at main fuse box (or
circuit breaker box) before beginning installation by
switching circuit breaker off or removing fuse. MIN
90º C SUPPLY CONDUCTORS. CONSULT A
QUALIFIED ELECTRICIAN TO ENSURE CORRECT BRANCH CIRCUIT CONDUCTOR.
2. To adjust length of cord, loosen screw on cord fastener slipping cord through it to shorten or lengthen cord
to desired length. Tighten the mounting screws (D) into
the mounting bracket (A) and secure with mounting
screw nuts (K). Fasten mounting bracket (A) onto the
outlet box using two outlet box screws (B). Ensure that
all supply circuit wires protrude out of the outlet box.
Strip ¾ in. of insulation from wire ends of fixture and of
supply circuit wires. Attach ground supply circuit wire
and ground fixture wire with_ v symbol label together
with wire nut (C). Never connect ground wire to black
or white power supply wires. Twist stripped wire ends
of fixture and supply circuit wires together black to wire
with L symbol label (hot) and white to wire with N
symbol label (neutral). Twist on wire nuts (C). Tape
wire nuts and wires together. Carefully tuck connected
wires and wire nuts into outlet box.
(Alternatively, if there is no ground supply circuit wire,
only attach the ground fixture wires to the mounting
strap (A) with the green screw (E)).
3. Place the canopy (F) onto the mounting bracket (A);
Both ends of the mounting screws (D) are to come out
through the canopy (F). Tighten decorative nuts (J) onto
the mounting screws (D).
4. Attach glass shade (H) to lamp holder (I) and secure
in place by placing metal spacer (L) onto lamp holder
and then tighten the socket nut (G) onto lamp holder (I).
Install light bulb (not included). Only use bulb of the
specified type and maximum rated wattage or less.
Page 4
K
E
D
B
Ground supply wire
Black (hot)
A
L
Ground
fixture wire
Hot
C
Ground
White (neutral)
F
N
J
Neutral
Cord fastener
I
H
L
G
TROUBLESHOOTING:
Bulb will not light.
Possible Cause
1. Bulb is burned out.
2. Power is off.
3. Cord not plugged in.
4. Circuit breaker off.
Fuse blows or circuit 1. Exposed wire
breaker trips when
light is turned on.
Corrective Action
1. Replace light bulb.
2. Make sure power
supply is on.
3. Make sure cord is
plugged into the outlet.
4. Make sure circuit
breaker is to the ‘on’
position.
1. Discontinue use.
Unplug unit from the wall
and contact a qualified
electrician or call the
Home Depot Customer
Service Team at 1-877385-2907.
PRODUCT MAINTENANCE:
1. To clean simply wipe with a soft dry cloth.
2. Do not use any cleaners with chemicals, solvents or harsh abrasives.
LIMITED WARRANTY
The manufacturer warrants this pendant fixture to be free from defects in materials and workmanship for a
period of one (1) year from date of purchase. This warranty applies only to the original consumer purchaser and
only to products used in normal use and service. If this product is found to be defective, the manufacturer’s only
obligation, and your exclusive remedy, is the repair or replacement of the product at the manufacturer’s discretion,
provided that the product has not been damaged through misuse, abuse, accident, modifications, alterations, neglect
or mishandling. This warranty shall not apply to any product that is found to have been improperly installed, setup,
or used in any way not in accordance with the instruction supplied with the product. This warranty shall not apply
to a failure of the product as a result of an accident, misuse, abuse, negligence, alteration, or faulty installation, or
any other failure not relating to faulty material or workmanship. This warranty shall not apply to the finish on any
portion of the product, such as surface and/or weathering, as this is considered normal wear and tear. The
manufacturer does not warrant and specially disclaims any warranty, whether express or implied, of fitness
for a particular purpose, other than the warranty contained herein. The manufacturer specifically disclaims
any liability and shall not be liable for any consequential or incidental loss or damage, including but not
limited to any labor / expense costs involved in the replacement or repair of said product.
Page 5
Lámpara Colgante con Volutas Azules
Home Depot SKU 494-989 (UPC 092903283550)
(Acabado en níquel cepillado)
MANUAL DE INSTRUCCIONES
Page 6
Gracias por comprar esta lámpara colgante de la colección Home Decorators. Este producto se
ha fabricado con las normas de seguridad y calidad más elevadas. El acabado duradero apenas
necesita mantenimiento. Simplemente pásale una toalla limpia para que se siga viendo como
nueva.
CARACTERÍSTICAS:
1. Acabado duradero y fácil de mantener; simplemente pásale un paño limpio para que se
siga viendo como nueva.
2. Portalámpara mediano Tipo A acepta bombillas CFL equivalentes que ahorran electric
idad (no incluida).
3. Cable de 182,88 cm incluido.
PREGUNTAS, PROBLEMAS O PIEZAS FALTANTES:
Antes de devolver el producto a The Home Depot, llama por favor a nuestro Equipo de Servicio al Cliente al 1-877-385-2907 o visita www.homedepot.com. Usa como referencia el SKU
494-989 cuando hables con un agente de Servicio al Cliente.
INSTRUCCIONES DE ENSAMBLAJE
PRECAUCIÓN:
1. Antes de empezar a ensamblar tu lámpara colgante, ordena todas las piezas sobre una superficie plana y limpia. Verifica que ninguna de las partes haya sufrido daños durante el envío.
Importante: Revisa que el aislamiento de los cables no haya sufrido ningún corte, abrasión ni
filamentos de cobre expuestos durante el envío. Si hay un defecto en el cable SUSPENDE el
ensamblaje. Llama a nuestro equipo de Servicio al Cliente al 1-877-385-2907.
2. SI TIENES ALGUNA PREGUNTA SOBRE ELECTRICIDAD, CONSULTA A UN
ELECTRICISTA CALIFICADO.
3. Conserva el recibo y estas instrucciones como Comprobante de Compra.
Page 7
HERRAMIENTAS NECESARIAS PARA
: EL ENSAMBLAJE:
Destornillador Phillips
(no incluidos)
Destornillador de cabeza plana
(no incluidos)
Bombilla (no incluida)
(No mayor de 60 vatios de base mediana Tipo A o equivalente CFL)
PIEZAS INCLUIDAS PARA EL ENSAMBLAJE (no se muestran a escala):
(1) Soporte de
Montaje (A)
(1) Cubierta (F),
Portalámpara (I)
(2) Tornillos de la
Caja Eléctrica (B)
(3) Tuercas para
Cable (C)
(1) Pantalla de cristal (H)
(2) Tornillo
de montaje (D)
(1) Tuerca del
portalámpara (G)
(2) Tuercas
decorativas (J)
(1) Tornillo
Verde (E)
(2) Tuercas para
tornillos de
montaje (K)
(1) Espaciador
de metal (L)
INSTRUCCIONES DE ENSAMBLAJE
1. APAGA LA ELECTRICIDAD en la caja de fusibles antes de comenzar la instalación desconectando el cortacircuitos o sacando el fusible. CONDUCTORES DE
CORRIENTE, MÍNIMO 90º C. CONSULTA A UN ELECTRICISTA CALIFICADO
PARA GARANTIZAR UNA CONEXIÓN CORRECTA DEL CONDUCTOR DEL
CIRCUITO DERIVADO.
Page 8
INSTRUCCIONES DE ENSAMBLAJE
2. Para ajustar el largo del cordón, afloje el tornillo en el
aseguraror del cordón deslizando el cordón a través del
mismo para acortar o alargar el cordón como se desee.
Atornille los tornillos de montaje (D) en el soporte de
montaje (A) y asegure con las tuercas para tornillos de
montaje (K). Ajusta el soporte de montaje (A) en la caja
eléctrica usando los dos tornillos incluidos (B).
Asegúrate de que todos los cables de entrada del circuito
sobresalgan de la caja eléctrica. Pela 1,9 cm de aislamiento de los extremos de los cables de la lámpara y del
circuito de entrada. Une el cable a tierra del circuito y de
la lámpara con simbolo
y una con tuerca para cables
(C). Nunca conectes el cable a tierra a los cables de
entrada de corriente negro o blanco. Enrosca con tuercas
para cables (C) los extremos de los cables pelados de la
lámpara y de la entrada de corriente del circuito negro
con cable con simbolo L (positivo) y blanco con cable
con simbolo N (neutral). Une con cinta adhesiva los
cables y las tuercas. Coloca con cuidado los cables
conectados dentro de la caja eléctrica. (Si no hay cable
de tierra en el circuito, fija entonces el cable a tierra de la
lámpara al soporte de montaje (A) con el tornillo verde
(E)).
3. Coloca la cubierta (F) en el soporte de montaje (A),
ambos cabezales de los dos tornillos de montaje (D)
sobresaldrán en los orificios de la cubierta (F). Apriete
las tuercas decorativas (J) sobre los tornillos de montaje
(D)
4. Coloca la pantalla de cristal (H) al portalámpara (I) y
fíjalo colocando el espaciador de metal (L) en el portalámpara y luego aprieta la tuerca del portalámpara (G)
en el portalámpara (I). Instala la bombilla (no incluida).
Usa solamente bombillas del tipo especificado y del
vataje indicado o menor.
Page 9
K
E
D
Cable de suministro a tierra
A
Negro (positivo)
L
B
Cables a
tierra de la
lámpara
Positivo
C
Tierra
Blanco (neutral)
F
N
J
Neutral
Asegurador
de cordón
I
H
L
G
SOLUCIÓN DE PROBLEMAS:
La bombilla no
enciende.
Causa Posible
1. La bombilla está
fundida.
2. No hay electricidad.
3. El cable no está
enchufado.
4. El cortacircuitos está
apagado.
El fusible se funde o el 1. Un cable expuesto
cortacircuitos salta
cuando se enciende la
luz
Solución
1. Reemplaza la bombilla.
2. Asegúrate de que la
corriente esté encendida.
3. Asegúrate de que el
cable esté conectado al
tomacorriente.
4. Asegúrate de que el
cortacircuitos esté en la
posición de ‘on’
(encendido).
1. No uses la lámpara.
Desconéctala de la pared y
contacta a un electricista
calificado o llama al equipo
de Servicio al Cliente de
The Home Depot al 1-877385-2907.
MANTENIMIENTO DEL PRODUCTO:
1. Para limpiarla simplemente usa un paño suave y seco.
2. No uses limpiadores con químicos, solventes o productos abrasivos.
GARANTÍA LIMITADA
El fabricante garantiza que esta lámpara no presentará defectos materiales o de fabricación por un período de (1)
año a partir de la fecha de compra. Esta garantía es válida sólo para el comprador original y cubre solamente los
productos en uso y funciones normales. Si se descubre algún defecto en este producto, la única obligación del
fabricante, y el exclusivo remedio del comprador, es la reparación o el reemplazo del producto a discreción del
fabricante, siempre y cuando el producto no se haya dañado por mal uso, abuso, accidente, modificaciones,
alteraciones, negligencia o manejo indebido. Esta garantía no cubre ningún producto que se instale, configure o
use incorrectamente sin seguir las instrucciones adjuntas al producto. Esta garantía no cubre fallas del producto a
consecuencia de un accidente, mal uso, abuso, negligencia, modificaciones o instalaciones defectuosas, o cualquier
otra falla no relacionada con defectos materiales o de fabricación. Esta garantía no se aplica al acabado de ninguna
parte del producto, como el de la superficie, y al deterioro por condiciones ambientales, ya que eso se considera un
desgaste normal. El fabricante no garantiza y rechaza especialmente toda garantía, ya sea expresa o
implícita, de idoneidad para un propósito en particular distinto de la garantía aquí indicada. El fabricante
se exime específicamente de cualquier obligación y no es responsable por daños o pérdidas directas o
indirectas, lo que incluye cualquier costo de mano de obra o gastos relacionados con el reemplazo o
reparación de dicho producto.
Page 10