1
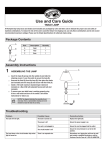
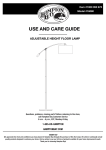
Use and Care Guide
ACCENT LAMP
All Hampton Bay lamp bases and shades (not included) are packaged by color and letter code to indicate the proper size and safety of
matched combinations. To reduce the risk of fire and to avoid the fixture from tipping over, use only these combinations and do not exceed
recommended maximum wattage. Please see the Shade Specifications for alternate shade sizing.
Assembly Instructions
1
ASSEMBLING THE LAMP
Place the shade (not included) onto the socket (1) of the
base.
Install a 40-watt maximum standard type A bulb (not
included) or a Max 13W self-ballasted fluorescent bulb
(not included).
1
To ensure your new accent lamp is working properly,
plug it into a wall outlet and turn on the switch. Save
these instructions for future use.
NOTE: The above diagram illustrates the assembly
of your new lamp. This is a representative drawing
and is not intended to match the style of your lamp.
Troubleshooting
Problem
Possible Cause
Corrective Action
The bulb will not light.
The bulb is burned out.
Replace the light bulb.
The power is off.
Ensure the power supply is on.
The cord is not plugged in.
Ensure the cord is plugged into the outlet.
The circuit breaker is off.
Ensure the circuit breaker is set to the
ON position.
Discontinue use. Unplug the unit from the wall
and contact a qualified electrician or call the
Customer Service Team at 1-855-HD-HAMPYON.
The fuse blows or the circuit breaker trips when
light is turned on.
There is an exposed wire.
Maintenance
1. Use only a dry soft cloth to dust or wipe carefully.
2. Do not use any cleaners with chemicals, solvents or harsh abrasives.
3. Do not immerse fixture in water. Doing so will damage the wire.
Shade Specifications
WARNING: ALTERNATE SHADE SIZING. The recommended shades shown on the back of the lamp package are properly sized for use with the lamp. If an
alternate shade is used, measurements must be checked according to the Specifications this section.
Caution: Using an oversized shade may cause fixture to easily tip over.
Choose bulb wattage. Do not exceed socket label rating.
Find the minimum Cylinder Diameter (CD) of a shade that matches your selected bulb wattage. Choose a shade with at least that minimum Cylinder
Diameter (CD).
For that selected wattage, measure the Critical Height (H) from the socket bottom.
Use only shades that exceed the minimum Critical Radius (r) for that bulb wattage to all points on shade sides.
(CD)
Lamp Center line Length
***(h) Critical Height
Bulb
Lamp holder
base size
(r)
Bulb Filament
(h)
Minimum Opening
*(CD) Cylinder Diameter
Minimum Lamp to Shade distance
**(r) Critical Radius
Wattage
Type
Inches
(mm)
Inches
(mm)
Inches
(mm)
Medium
25 W
A
2-3/4
(69.8)
3
(76.2)
1-5/8
(41.2)
Medium
40 W
A
3-1/4
(82.5)
3.5
(88.9)
2
(50.8)
Medium
60 W
A
3-1/4
(82.5)
3.5
(88.9)
2-1/2
(63.5)
Medium
75 W
A
3-1/4
(82.5)
3.5
(88.9)
2-7/8
(73.0)
Medium
100 W
A
3-1/4
(82.5)
4
(101.6)
3-1/2
(88.9)
Medium
150 W
A
3-1/4
(82.5)
4.5
(114.3)
4-3/4
(120.6)
*CD = Cylinder Diameter
The minimum diameter of a cylinder, as determined by the bulb wattage in the chart, which must be
able to pass through the openings in the top and bottom of the shade
**r = Critical Radius
The critical radius is determined by measuring the minimum distance from the center point of the
bulb filament to nearest point on a shade.
***h = Critical height
The critical height is measured from a horizontal line through the depresses center contact of the
vertically mounted Edison base lamp-holder to the line where the bulb filament crosses the bulb
centerline.
Warranty
The manufacturer warrants this portable luminaire to be free from defects in materials and workmanship for a period of one (1) years from date of
purchase. This warranty applies only to the original consumer purchaser and only to products used in normal use and service. If this product is found to
be defective, the manufacturer’s only obligation, and your exclusive remedy, is the repair or replacement of the product at the manufacturer’s discretion,
provided that the product has not been damaged through misuse, abuse, accident, modifications, alterations, neglect or mishandling. This warranty shall
not apply to any product that is found to have been improperly installed, set-up, or used in any way not in accordance with the instructions supplied with
the product. This warranty shall not apply to a failure of the product as a result of an accident, misuse, abuse, negligence, alteration, or faulty installation,
or any other failure not relating to faulty material or workmanship. This warranty shall not apply to the finish on any portion of the product, such as
surface and/or weathering, as this is considered normal wear and tear. The manufacturer does not warrant and specially disclaims any warranty, whether
expressed or implied, of fitness for a particular purpose, other than the warranty contained herein. The manufacturer specifically disclaims any liability and
shall not be liable for any consequential or incidental loss or damage, including but not limited to any labor/expense costs involved in the replacement or
repair of said product.
Contact the Customer Service Team at 1-855-HD-HAMPTON or visit www.HAMPTONBAY.com
Guía de Uso y Mantenimiento
LAMPARA DECORATIVA
Todas las bases y pantallas (no incluidas), Hampton Bay, están empacadas por color y un código de letra que indica el tamaño adecuado y
la seguridad de las posibles combinaciones. Para reducir el riesgo de incendio y evitar la caída de la lámpara, use solo las combinaciones
sugeridas y no exceda el watage máximo recomendado. Por favor, refiérase a las especificaciones de las pantallas para tamaños
alternativos.
Instrucciones de Montaje
1
MONTAJE DE LA LAMPARA
Coloque la pantalla (no incluida) en el receptáculo (1) de
la base.
Instalar una bombilla de 40-watts máximo de tipo
A standard (no incluida) o una bombilla fluorescente
compacta de 13 watts (no incluida).
1
Para asegurarse que su nueva lámpara decorativa
trabaje apropiadamente, conecte el cable eléctrico en
el receptáculo de la pared y coloque el interruptor en
la posición de encendido. Conserve estas instrucciones
para uso futuro.
NOTA: El diagrama de arriba ilustra el montaje de su
nueva lámpara. Este es un dibujo representativo y no está
diseñado para indicar el estilo específico de su lámpara.
Solución de problemas
Problema
Posible Causa
Solución
La lámpara no enciende.
La bombilla está fundida.
Reemplaza la bombilla.
La electricidad está apagada.
Asegúrate de que el suministro de electricidad
esté encendido.
El cable eléctrico no está conectado.
Asegúrese que el cable eléctrico esté conectado.
El interruptor automático de sobrecarga está
apagado.
Asegúrese que el interruptor automático de
sobrecarga esté en la posición de encendido.
Hay un cable descubierto.
Deje de usar la lámpara. Desconecte la lámpara
de la corriente y contacte a un electricista
calificado o contacte al equipo de Servicio al
Cliente al 1-855-HD-HAMPTON.
El fusible se funde o el interruptor automático
se activa cuando se enciende la luz.
Mantenimiento
1. Usa sólo un paño suave y seco para desempolvar o limpiar con cuidado.
2. No uses limpiadores con químicos, solventes ni productos abrasivos.
3. No sumergir la lámpara en agua. Si lo hace, se dañaran los cables eléctricos.
Especificaciones de las pantallas
ATTENCION: TAMANO DE PANTALLA ALTERNATIVA. El tamaño de la pantalla que aparece en la parte de atrás de la caja de la lámpara es el tamaño propiamente
recomendado que se debe usar con esta lámpara. Si desea utilizar un tamaño alternativo, asegúrese de verificar las dimensiones acorde a las especificaciones en
esta sección.
CUIDADO: El uso de una pantalla mas grande de lo recomendado, puede causar la caída de la lámpara por desbalance.
Seleccione el watage de la bombilla. No debe exceder el grado indicado en la etiqueta del receptáculo.
Encuentre el Diámetro del Cilindro mínimo (CD) de la pantalla que corresponde con el watage de la bombilla seleccionada. Seleccione la pantalla que
tenga al menos el Diámetro del Cilindro mínimo.
Para el watage seleccionado, mida la Altura Crítica (h) desde la parte inferior del receptáculo.
Solo use pantallas que excedan el Radio Crítico (r) para el watage de la bombilla a todos los puntos de los costados de la pantalla.
(CD)
Tamaño de
la base de
sujeción de
la bombilla
(r)
Filamento de
la bombilla
(h)
Longitud de la línea central
de la bombilla
***h = Altura Crítica
Bombilla
Watage
Tipo
Pulgadas
(mm)
Mediano
25 W
A
2-3/4
(69.8)
Mediano
40 W
A
3-1/4
(82.5)
Mediano
60 W
A
3-1/4
(82.5)
Mediano
75 W
A
3-1/4
Mediano
100 W
A
Mediano
150 W
A
Abertura mínima
* (C D ) Diámetro del Cilindro
Pulgadas
Distancia mínima de la bombilla a
la pantalla.
**(r) Radio Crítico
(mm)
Pulgadas
(mm)
3
(76.2)
1-5/8
(41.2)
3.5
(88.9)
2
(50.8)
3.5
(88.9)
2-1/2
(63.5)
(82.5)
3.5
(88.9)
2-7/8
(73.0)
3-1/4
(82.5)
4
(101.6)
3-1/2
(88.9)
3-1/4
(82.5)
4.5
(114.3)
4-3/4
(120.6)
*CD=Diámetro de Cilindro
El diámetro mínimo del cilindro, está determinado por el watage de la bombilla que aparece en la
tabla, tiene que pasar a través de las aberturas de las partes superior e inferior de la pantalla.
**r = Radio Crítico
El radio crítico está determinado por la medida de la distancia mínima desde el punto central del
filamento de la bombilla al punto mas cercano de la pantalla.
***h = Altura Crítica
La altura crítica se mide desde la línea horizontal a través del contacto central de la base
del soporte de la bombilla Edison, instalada verticalmente, a la línea donde el filamento de la
bombilla atraviesa la línea central de la bombilla.
Garantía
El fabricante garantiza que esta lámpara portable esta libre de defectos en materiales y mano de obra por un período de un año desde la fecha de compra.
Esta garantía aplica solo a los compradores originales y solo a los productos que son usados y serviciados de forma adecuada si este producto resulta ser
defectuoso, la única obligación del fabricante, y la única solución para usted, es la reparación o remplazo del producto a discreción del fabricante, siempre
y cuando el producto no haya sufrido daños por mal uso, abuso, accidente, modificación, alteraciones, negligencia o mala manipulación. Esta garantía no
aplica a ningún producto que haya sido mal instalado, montado, o usado de una manera no adecuada sin seguir las instrucciones suministradas con el
producto. Esta garantía no aplica a fallos del producto como resultado de accidente, mal uso, abuso, negligencia, alteraciones o mala instalación, u otro
fallo no relacionado con un defecto de material o mano de obra. Esta garantía no aplica al terminado o cualquier porción del producto, como la superficie
y/o desgaste, lo que es considerado como uso normal. El fabricante no garantiza, y en especial rechaza cualquier garantía, ya sea expresada o implícita,
que se ajuste a un objetivo en particular, ajeno a los que contiene esta garantía. El fabricante específicamente rechaza cualquier responsabilidad y no será
responsable por cualquier consecuencia o perdida incidental o daño, incluyendo pero no limitado a cualquier pago de labor/gasto que incluya el remplazo
o mantenimiento de este producto.
Contacte al equipo de Servicio al Cliente al 1-855-HD-HAMPTON o visite la pagina web www.HAMPTONBAY.com.