1
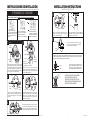
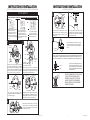
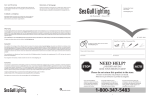
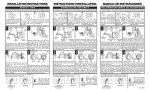
Care and Cleaning
Entretien et Nettoyage
To clean, wipe fixture with a soft cloth. Clean glass with a mild soap. Do
not use abrasive materials such as scouring pads or powders,steel wool or
abrasive paper.
Nettoyer le luminaire en l’essuyant avec un chiffon doux. Utiliser un savon
doux pour le verre. Ne pas utiliser de matières ou substances abrasives
telles que tampons ou poudres à récurer, paille de fer ou papier de verre.
Customer Care Center
800-347-5483
SeaGullLighting.com
Cuidado y Limpieza
Para limpiar, limpie el accesorio con un trapo suave. Lave el vidrio con
jabón suave. No use materiales abrasivos tales como almohadillas o
polvos abrasivos, lana de acero o papel abrasivo.
Warranty
Sea Gull Lighting fixtures and components, when properly installed and under normal conditions of use, are warranted to be free from defects in materials and
workmanship for one year from date of sale. ENERGY STAR® labeled products are warranted for three years. Sea Gull Lighting at its sole option will repair or
replace, F.O.B. Factory, freight prepaid, any Sea Gull Lighting product defective in materials or workmanship. Such replacement is the exclusive remedy against
Sea Gull Lighting should any of the products delivered prove defective. Invoices for labor charges and/or charge backs for labor will be denied unless prior written
approval is given.
HC-1911FS 022412
Any modification to a Sea Gull Lighting product not made at the factory will void the UL or ETL listing as well as the Sea Gull Lighting warranty policy.
To register your fixture, please visit our website: SeaGullLighting.com
Helpful Tools / Outils Utiles / Herramientas Útiles
To register your fixture, please visit our website:
SeaGullLighting.com
Garantie
A la condition d’un montage et d’une utilisation dans les normes, les Luminaires et pièces Sea Gull Lighting sont garantis sans défauts des matériaux et dans
leur fabrication pour une durée d’un an à compter de la date d’achat. Les produits labellisés ENERGY STAR® sont garantis pour trois ans. A sa seule discrétion,
Sea Gull Lighting réparera ou remplacera tout produit Sea Gull Lighting défectueux dans ses matériaux ou dans sa fabrication, F.O.B. Usine fret payé d’avant. Un
remplacement selon ces conditions est l’unique recours à l’encontre de Sea Gull Lighting dans le cas où les produits livrés se révèlent défectueux. Toute facture
concernant des frais de main d’oeuvre et/ou toute demande de remboursement de main d’oeuvre sera rejetée à moins qu’un accord écrit ait été consenti au
préalable.
Toute modification non effectuée par l’usine d’un produit Sea Gull Lighting conduira à l’annulation des enregistrements UL ou ETL ainsi que du contrat de
garantie Sea Gull Lighting.
Please record for future reference:
Item Number
Date Purchased
Pour enregistrer votre luminaire, veuillez consulter notre site web : SeaGullLighting.com
NEED HELP?
Garantía
Los accesorios y componentes Sea Gull Lighting, cuando son correctamente instalados bajo condiciones de uso normal, se garantizan a estar libres de defectos
en materiales y trabajo manual por un año de la fecha de compra. Los productos etiquetados ENERGY STAR® se garantizan por tres años. Sea Gull Lighting a
su propia opción reparará o reemplazará, F.O.B. Factory, flete pre pagado, cualquier producto de Sea Gull Lighting defectuoso en materiales o trabajo manual. Tal
reemplazo es el remedio exclusivo en contra de Sea Gull Lighting en caso de que cualquiera de sus productos entregados esté defectuoso. Facturas por cargos de
labor y/o cargos al usuario por labor serán negados a menos de que se haya recibido permiso previo por escrito.
Cualquier modificación hecha a un producto de Sea Gull Lighting no llevado a cabo en la fábrica
anulara el listado de UL o ETL al igual que la póliza de garantía de Sea Gull Lighting.
Para registrar su accesorio, por favor visite nuestra página web: SeaGullLighting.com
STOP
¿NECESITA AYUDA?
AVEZ-VOUS BESOIN D’AIDE?
Please do not return this product to the store.
Por favor no devuelva este producto a la tienda.
Prière de ne pas retourner ce produit au magasin.
If you need installation
assistance, replacement parts,
or have questions regarding
our warranty, please call our
customer care center:
Si necesita asistencia en la
instalación, piezas de repuesto, o
tiene preguntas acerca de nuestra
garantía, por favor llame a nuestro
centro de servicio al cliente:
Si vous avez besoin de pièces de
rechange, d ’aide pur l’installation ou
si vous avez des questions concernant
notre garantie, veuillez appeler nos
conseillers en produits au :
1-800-347-5483
8
ALTO
1
INSTRUCCIONES DE INSTALACIÓN
INSTALLATION INSTRUCTIONS
CONTINUED FROM OTHER SIDE
R E A D I M P O R TA N T S A F E T Y T I P S B E F O R E P R O C E E D I N G W I T H I N S TA L L AT I O N
6
SAFETY TIPS
IF YOU ARE UNFAMILIAR WITH ELECTRICAL INSTALLATIONS, WE RECOMMEND YOU HAVE A QUALIFIED ELECTRICIAN DO
YOUR INSTALLATION. DO NOT USE THIS FIXTURE WITH A DIMMING CIRCUIT.
7
fixture
bulb
OR
diffuser
thumb nuts
Turn fixture off! (Place wall switch
in off position, if fixture has built-in
switch or chain pull, switch or pull
chain so fixture is off.)
1
Next - go to the main fuse box. If
your fuse box has an ON/OFF switch,
simply place main power switch in
OFF position.
2
Omit this step if unit you purchased has canopy attached to
roof.
photo sensor
(optional)
8
calafatear
NOTA: El portalámparas se debe sellarse con un sellador
acrílico donde aparato cumple con la superficie de
montaje. Esto proporciona un agua de sello hermético
cuando la luminaria esté instalada.
nut
roof
accesorio
del dosel
louver
3-inch long
self -tapping screws
Feed wires from roof thru large round hole in canopy.
Align two bosses on canopy with bosses in roof and insert
canopy into roof. Be sure canopy fits flush with roof.
Insert carriage bolt into square opening in back of canopy,
and secure with acorn nut.
3
Align posts on top of one louver and insert into holes on
bottom of other louver. Align posts on top louver with bosses
on roof and secure with 3-inch long self-tapping screw
4
screws
mounting
plate
fixture
wires
5
outlet box
BASE DE LA CAMPANA Y ES AJUSTABLE.
CAMPANA PUEDE GIRARSE Y BASE PUEDE SER LA
CUT SOBRE LA LÍNEA PUNTEADA PARA REDUCIR
LONGITUD TOTAL. FUNCIONAMIENTO ENTRADA
ANTES DE CORTE DE LA BASE.
HOOD
BASE
wire connectors
LIMPIAR SOLAMENTE CON JABON SUAVE Y
AGUA. EVITE ROCIAR CON PRODUCTOS DE
LIMPIEZA, INSECTICIDAS Y PESTICIDAS QUE
SON PRODUCTOS DERIVADOS DEL PETRÓLEO
DE LOS HIDROCARBUROS. ESTAS DEGRADARÁ
LUMINARIA.
fixture wires
Thread one inch long screws into mounting plate and
feed fixture wires through the hole in the center of the
mounting plate.
outlet box
ESTE ARTEFACTO PUEDE TENER UN SENSOR FOTO INTEGRAL QUE CONVIERTE EL FIXTURE OFF DURANTE EL DÍA Y
DE NOCHE. LA FOTO SENSOR NO ES AJUSTABLE. LA LÁMPARA PODRÍA ACTIVARSE Y DESACTIVARSE DEBIDO A LA
LUZ REFLEJADA DESDE CERCA DE SUPERFICIES EN LA FOTO SENSOR. SI EL CICLISMO EL CASO, QUITE LA TUERCA
DEL SENSOR FOTO Y INSTALACIÓN DE LA CAMPANA Y LA BASE GIRATORIA.
lampholder
mounting
plate
louver
carriage
bolt
screws
(provided)
Instale la lámpara integrada de lastre. El uso integrado de
lámpara / lastre especificados en el artefacto. Sujete la base
de plástico, inserte las clavijas en el enchufe y girar las
agujas del reloj hasta que quede firme.
Presione el conector del cable conectado al cable negro
y rojo en la caja de salida. Coloque el artefacto sobre el
artefacto los tornillos de montaje y asegure con tuercas
previstas.
Screw-in type fuses - unscrew the fuse
or fuses that control the power to the
fixture or room you are working in.
CONNECT THE WIRES. NOTE: Attach black fixture wire to
black supply wire, white fixture wires to white supply wire.
Do not mix them up. Use wire connectors (not provided).
screws
Attach swivel bar to outlet box with two 8-32 screws (not
provided). These screws should be inserted through
appropriate rectangular opening in plate and into swivel bar.
Tighten screws.
swivel bar
2
HC-1911FS 022412
7
HC-1911FS 022412
INSTRUCCIONES DE INSTALACIÓN
INSTALLATION INSTRUCTIONS
LEA LAS EXTREMIDADES IMPORTANTES DE SEGURIDAD ANTES DE PROCEDER CON LA INSTALACIÓN
EXTREMIDADES DE SEGURIDAD
CONTINUED FROM OTHER SIDE
6
SI USTED ES DESCONOCEDOR CON LAS INSTALACIONES ELÉCTRICAS, LE RECOMENDAMOS TENEMOS UN ELECTRICISTA
CUALIFICADO HACEMOS SU INSTALACIÓN. NO UTILICE ESTE ACCESORIO CON Un CIRCUITO QUE AMORTIGUA.
7
fixture
bulb
OR
diffuser
thumb nuts
COLOQUE EL INTERRUPTOR EN
APAGADO. (SI LA INSTALACION TIENE
UN INTERRUPTOR INTEGRADO O DE
CADENA, ASEGURARSE QUE ESTE
APAGADO).
1
VAYA A LA CAJA PRINCIPAL DE
FUSIBLES DE SU CASA. SI TIENE
INTERRUPTOR DE APAGADO/
ENCENDIDO, COLOCAR EN APAGADO.
Push wire connector attached to black and red wire into
outlet box. Position fixture over fixture mounting screws
and secure with provided thumb nuts.
8
2
Omita este paso si la unidad que usted compró tiene pabellón
unido a la azotea.
fotosensor
(opcional)
FUSIBLES DESATORNILLABLES.
DESATORNILLE LOS FUSIBLES QUE
CONTROLAN LA ELECTRICIDAD EN
EL CUARTO QUE VA A TRABAJAR.
tuerca
THIS FIXTURE MAY HAVE AN INTEGRAL PHOTO SENSOR THAT TURNS THE FIXTURE OFF DURING THE DAY AND
ON AT NIGHT. THE PHOTO SENSOR IS NOT ADJUSTABLE. THE FIXTURE COULD POSSIBLY CYCLE ON AND OFF DUE
TO LIGHT REFLECTED FROM NEAR BY SURFACES INTO THE PHOTO SENSOR. IF CYCLING OCCURS, REMOVE THE
PHOTO SENSOR NUT AND INSTALL THE SWIVEL HOOD AND BASE.
lumbrera
lumbrera
3-inch desean
los tornillos que
golpean ligeramente del uno mismo
Alimente los alambres de la azotea por el agujero redondo
grande en pabellón. Alinee dos jefes en el pabellón con los
jefes en pabellón de la azotea y del relleno en la azotea. Sea
ajustes seguros del pabellón a ras de la azotea. Inserte el
perno de carro en la abertura cuadrada adentro detrás del
pabellón, y asegure con la tuerca de la bellota.
3
placa de
montaje
4
alambres del
accesorio
5
caja del enchufe
THE HOOD AND BASE IS ADJUSTABLE. HOOD
CAN BE ROTATED AND BASE CAN BE CUT ALONG
DOTTED LINE TO REDUCE OVERALL LENGTH.
CHECK OPERATION BEFORE CUTTING THE BASE.
HOOD
BASE
conectadores del alambre
CLEAN ONLY WITH MILD SOAP AND WATER.
AVOID SPRAYING WITH CLEANSERS,
INSECTICIDES, AND PESTICIDES THAT ARE
PETROLEUM BASED HYDROCARBON PRODUCTS.
THESE WILL DEGRADE LUMINAIRE.
alambres del accesorio
CONECTE LOS ALAMBRES. NOTA: Una el alambre negro
del accesorio al alambre negro de la fuente, alambres
blancos del accesorio al alambre blanco de la fuente.
No los mezcle para arriba. Utilice los conectadores del
alambre (no proporcionados).
Rosque los tornillos de una pulgada de largo en los
alambres del accesorio de la placa y de la alimentación
de montaje a través del agujero en el centro de la placa
de montaje.
caja del enchufe
placa de
montaje de la
portalámpara
Alinee los postes encima de un lumbrera y relleno en los
agujeros en fondo de la otra lumbrera. Alinee los postes en la
lumbrera superior con los jefes en la azotea y asegúrelos con
el tornillo self-tapping largo 3-inch
tornillos
NOTE: Fixture MUST be caulked with an acrylic caulk
where fixture meets mounting surface. This provides a
water tight seal when fixture is installed.
fixture
canopy
azotea
pernoscrews
de carro
(provided)
caulk
Install integrated lamp/ballast. Use integrated lamp/ballast
specified on fixture. Grasp the plastic base, insert pins into
socket and rotate clockwise until secure.
tornillos
Una la barra del eslabón giratorio a la caja del enchufe con
dos 8-32 tornillos (no proporcionados). Estos tornillos se
deben insertar con la abertura rectangular apropiada en
placa y en barra del eslabón giratorio. Apriete los tornillos.
barra del eslabón giratorio
6
HC-1911FS 022412
3
HC-1911FS 022412
INSTRUCTIONS D'INSTALLATION
INSTRUCTIONS D'INSTALLATION
LISEZ LES TIP IMPORTANTS DE SÛRETÉ AVANT DE PROCÉDER À L'INSTALLATION
SUITE DE L'AUTRE CÔTÉ
TIP DE SÛRETÉ
6
SI VOUS ÊTES PEU FAMILIER AVEC LES INSTALLATIONS ÉLECTRIQUES, NOUS VOUS RECOMMANDONS AVONS UN
ÉLECTRICIEN QUALIFIÉ FAISONS VOTRE INSTALLATION. N'EMPLOYEZ PAS CE MONTAGE AVEC Un CIRCUIT OBSCURCISSANT.
7
montage
ampoule
OU
diffuseur
Eteindre l'appareil d'éclairage (PLACER
l'interrupteur mural à "OFF".) Si
l'appareil d'éclairage est pourvu d'un
commutateur incorporé ou d'une
chaînette, la mettre à la position "OFF".
Tirer sur la chaînette pour que l'appareil
soit éteint.
1
Ensuite, se rendre à la boite des
fusibles principale de la maison. Si
la boite des fusibles est pourvue
d'un interrupteur a mancheite, metire
l'interrupteur d'alimentation pricipal à
la position, "OFF".
8
écrou
auvent
3-inch désirent
ardemment les vis de
tapement d'art de l'auto-portrait
3
4
plat de
support
fils de
montage
5
boîte de sortie
LE CAPOT ET BASE EST RÉGLABLE. HOTTE PEUT
ÊTRE TOURNÉ ET BASE PEUT ÊTRE COUPÉ LE
LONG DU POINTILLÉ POUR RÉDUIRE LA DURÉE
GLOBALE. FONCTIONNEMENT CONTRÔLER AVANT
DE COUPER LE BASE
HOOD
BASE
NETTOYEZ SEULEMENT AVEC DE L'EAU LE SAVON
ET DOUX. ÉVITEZ DE PULVÉRISER AVEC DES
ÉPIERREUSES, INSECTICIDES, ET PESTICIDES
QUI SONT LES PRODUITS D'HYDROCARBURE
BASÉS PAR PÉTROLE. CEUX-CI DÉGRADERONT
L'APPAREIL D'ÉCLAIRAGE.
connecteurs de fil
fils de montage
Filetez les vis d'un pouce de long dans des fils de
montage de plat et d'alimentation de support par le trou
au centre du plat de support.
boîte de sortie
plat de support
de douille de
lampe
Alignez les poteaux sur une auvent et insertion dans des
trous sur le fond de l'autre auvent. Alignez les poteaux sur
l'auvent supérieur avec des patrons de toit et les fixez avec la
longue art de l'auto-portrait-tapping vis de 3-inch
vis
NOTE : Le montage DOIT être calfeutré avec de l'acrylique
calfeutrent où le montage rencontre la surface de montage.
Ceci fournit un joint serré de l'eau quand le montage est
installé.
CE LUMINAIRE PEUT AVOIR UN CAPTEUR PHOTO INTÉGRÉ QUI TOURNE LA FIXATION OFF PENDANT LA JOURNÉE ET
LA NUIT. LA CAPTEUR PHOTO N'EST PAS RÉGLABLE. LA FIXATION POURRAIENT EVENTUELLEMENT S'ALLUMENT
ET S'ÉTEIGNENT DUE À LA LUMIÈRE RÉFLÉCHIE PAR NEAR PAR DES SURFACES DANS LE CAPTEUR PHOTO. SI LE
CYCLE SE PRODUIT, RETIREZ L'ÉCROU DU CAPTEUR PHOTO ET INSTALLATION DE LA HOTTE PIVOTANT ET BASE.
auvent
Alimentez les fils du toit par le grand trou rond dans la
verrière. Alignez deux patrons de verrière avec des patrons
dans la verrière de toit et d'insertion dans le toit. Soyez des
ajustements sûrs de verrière à affleurement du toit. Insérez
le boulon de chariot dans l'ouverture carrée dedans en
arrière de la verrière, et fixez avec l'écrou de gland.
calfeutrez
verrière de
montage
toit
boulon
de
screws
chariot
(provided)
Installez la lampe intégrée / ballast. Utilisez la lampe
intégrée / ballast spécifiée sur le luminaire. Saisir la base en
plastique, épingles à insérer dans la douille et tournez dans
le sens horaire jusqu'au blocage.
Poussez le connecteur de fil attaché au fil noir et rouge
dans la boîte de sortie. Placez le montage au-dessus des
scrws de support de montage et le fixez avec les écrous
fournis de pouce.
Dans le cas des fusibles pouvant être
vissées, d'évisser la ou les fusibles
qui contrôlent l'alimentation à la pièce
dans laquelle l'installation a lieu.
2
Omettez cette étape si l'unité que vous avez achetée a la
verrière fixée au toit.
photodétecteur
(en option)
écrous de pouce
RELIEZ LES FILS. NOTE : Attachez le fil noir de montage
au fil noir d'approvisionnement, fils blancs de montage au
fil blanc d'approvisionnement. Ne les mélangez pas vers
le haut. Utilisez les connecteurs de fil (non fournis).
vis
Attachez la barre de pivot dans la boîte de sortie avec deux
8-32 vis (non fournies). Ces vis devraient être passées dans
l'ouverture rectangulaire appropriée dans le plat et dans la
barre de pivot. Serrez les vis.
barre de pivot
4
HC-1911FS 022412
5
HC-1911FS 022412