Transcript
SEMI-FLUSH
MOUNTING AND WIRING INSTRUCTIONS
WARNING: RISK OF FIRE, MOST DWELLINGS BUILT BEFORE
1985 HAVE SUPPLY WIRE RATED 60°C. CONSULT A QUALIFIED
ELECTRICIAN BEFORE INSTALLING.
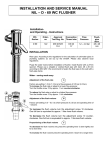
1) Run wire from center stem through hole in center of canopy
Secure in place with lockwasher and hexnut.
2) Turn off power.
3) Assemble mounting screws to outlet box. (Screws not provided)
4) Attach mounting strap to outlet box. (Screws not provided)
5) Grounding instructions: (See Illus. A or B).
A) On fixtures where mounting strap is provided with a hole and
two raise dimples. Wrap ground wire from outlet box around
green ground screw, and thread into hole.
B) On fixtures where a cupped washer is provided. Attach ground ~center stem
wire from outlet box under cupped washer and green ground
screw, and thread into mounting strap.
If fixture 1s provided with ground wire. Connect fixture ground wire
to outlet box ground wire with wire connector. (Not provided.) After
round locker—@ A Ф
following the above steps. g
Never connect ru wire to black or white power supply wires.
В
BOX "ING PROVIDED) ——— hasten
e 7
ores an aforo "пи \ — asen { J-£1nia
GREEN GROUND SCREW
6) Make wire connections (connectors not provided.) Reference
Chart below for correct connections and wire accordingly.
Connect Black or Connect
Red Supply Wire to: White Supply Wire to:
Black White
*Parallel cord (round & smooth) | *Parallel cord (square & ridged)
Clear, Brown, Gold or Black Clear, Brown, Gold or Black with
without tracer tracer
Insulated wire (other than green) | Insulated wire (other than green)
with copper conductor with silver conductor
Note: When parallel wire (SPT 1 & SPT II) is
used. The neutral wire is square shaped or >=
„”
ridged and the other wire will be round in shape MRT, wo
or smooth. (See Illus.)
7) Push fixture to ceiling, carefully passing mounting screws
through holes.
8) Secure fixture to ceiling with knurl knot.
9) Insert lamps and attach glass with trim (if provided) and finial.