1
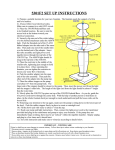
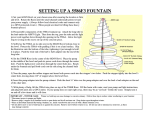
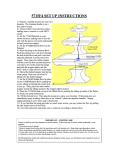
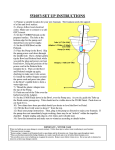
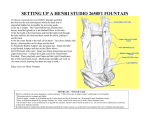
SETTING UP A HENRI STUDIO VESUVIO FOUNTAIN
1) Position the fountain bowl on a level, firm base which will not
change over time. Note that a channel runs under the bowl to the
center hole. This allows for two power cords and an air tube to be
pulled out of the bowl. Make sure that the positioning of the
bowl will allow for these lines to be pulled through.
2) Find the long air tube and the light. Place the two-hole stopper
around the air tube and the light power cord, allowing about 6” of
each to extend about the stopper.
3) Attach the “H” shaped tee assembly to the end of the air tube
as shown in the drawing below.
4) Attach a short air tube and air stone to each of the remaining
“H” tee assembly ends as shown in the drawing below.
5) From the top of the concrete vase (you can tip it or lay it down
according to your preference) insert both the other end of the long
air tube and of the light power cord through the large hole in the
floor of the vase. Pull them through gently until the two-hole
stopper is near the hole. Then firmly press the stopper into the hole.
6) From the top of the vase, insert the short brass nipple into the
other, smaller hole in the vase floor.
7) Thread the brass check valve onto the nipple.
8) Now moving under the vase, thread the ½” barbed adapter into
the smaller hole.
9) Attach the water tube to this adapter and secure with a clamp.
10) Slip the restrictor onto the other end of the water tube and
tighten it enough that it holds firmly in place on the tube, about 6”
from the open end.
11) Thread the ¾” barbed adapter into the water pump exhaust (top
of pump).
12) Attach the open end of the water tube to the pump exhaust
adapter and secure with a clamp.
13) Find the three-hole stopper. This will make the bowl
water-tight while allowing the power cords and air tube to
exit the bowl.
14) Place the three-hole stopper around the air tube, light
power cord, and water pump power cord. It should be
positioned on all three lines about 24” from the floor
bottom of the vase.
15) Insert these three lines through the center hole of the
bowl and pull them out to the side of the bowl. Make sure
they run along the bowl’s built-in channel underneath.
16) Once most of the lines are pulled out, have one
person hold the vase in the middle of the bowl. Tip it
back so the lines can be watched. Have another person
outside of the bowl to pull the air line and power cords
out the channel until little slack remains under the vase.
17) While the person continues to hold the vase tipped,
the other installer should firmly press the three-hole
stopper into place in the bowl’s center hole. Then set the
vase down.
17) Reach into the vase to move one air stone into
position under each window. This will give optimum
bubbling visibility. ( This may also be a good time to
place any desired colored lenses onto the light.
Customers have found the red lens to give a “volcanic”
appearance while no colored lens provides the brightest
effect. )
18) Fill the bowl with water. Read the instructions for
the pumps and light kit. Do not use any of these devices
unless protected by a GFCI.
19) Turn on the water pump. Once the vase fills, check to make sure it is level – that water is running down all sides evenly. If not, you
can adjust the level by inserting the shims provided under the bottom of the vase.
20) Attach the light power cord to the light transformer and plug in according to instructions.
21) Insert the air check valve into the air line, with the arrow on the valve pointing toward the center of the fountain. Attach another short
air line and then attach to the exhaust fitting on top of the air pump. If your air pump has two air outlets at the top, take the rubber cap off
the side intake of the pump and place over the unused line on the top fitting. Plug in your air pump and enjoy your new fountain.
IMPORTANT – WINTER CARE
Winter ice build-up can cause damage to concrete statuary. Follow these tips to reduce winter weathering to your fountain:
* Disconnect power to pumps and lights.
* Remove plugs / stopper in all fountain bowls to open drains and let all moisture out. Keep drains open throughout winter.
* Place an absorbant material like burlap, blankets, etc. inside vases/bowls and cover all with a Henri fountain cover.
* Do not allow snow or ice to build up on or against the concrete. Remove snow before it turns to ice. Do not use salt or chemical
ice removers as these may damage concrete.
By following these simple and sensible precautions during the winter season, you will protect your fountain for years of beauty
and enjoyment.