1
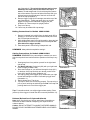
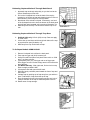
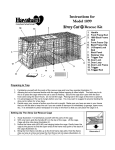
Setting up Collapsible Cage Trap Models 1088 & 1089
1. Study illustration 1 to familiarize yourself with the parts of the
trap.
2. With one hand, grab the handle (#1) on the top of the cage.
Lift the trap. Trap will drop into place (illustration 2).
3. Notice the frame rods (#2 & #3) are hanging below the trap.
Note: Model 1088 has only one frame rod(#2) that is
attached to the top front of the cage trap. Gently lower the
trap to the ground so that the open ends of the frame rods
point to the back of the trap (illustration 3).
4. Bring the front frame rod (#2) up to the front frame clips (#4).
Hold the frame clips out one at a time and snap the front
frame rod into place (illustration 4). Remember to clip both
sides of the front frame rod.
5. For Model 1089 only: Repeat step 4 for the back frame rod
(#3). Remember to clip both sides of the back frame rod
into the back frame clips (#5). Does not apply to Model
1088.
6. Remove the U-shaped lock rod (#6) from storage area at top
of the trap (illustration 5). After removing the lock rod, close
back panel (#7). Back panel should swing down when lock
rod is removed.
7. Turn trap so you are facing the back panel (#7). With the
straight end of the U-shaped lock rod (#6) closest to the
ground, take your right hand and thread the straight end of
the lock rod through the bottom hole of the retainer clip (#8)
and the hooked part of the lock rod through the side of the
Illustration 2
Illustration 3
trap (illustration 6). Thread rod through two retainer rings
attached to the back panel so the back of the trap is
secure. Thread straight end of lock rod through the bottom
hole of the retainer clip on the left side of the trap. With your
left hand secure the hooked part of the lock rod to the left
side of the trap (illustration 7).
8. Remove trigger rod (#14) from storage area at the top of the
trap (illustration 8). Tipping trap away from you, thread
trigger into loops on the underside of trigger pan (# 9,
illustration 9). Return trap to its upright position.
9. Trap is now set up.
10. Carton may be retained for trap storage.
Illustration 4
Baiting Instructions for Models 1088 & 1089
1. Remove U-shaped lock rod (#6) from the back panel (#7) by
pressing in on left side of trap to release hooked part of lock
rod. Pull back panel toward you.
2. While holding back panel in an upright position, place the bait
approximately two inches from the back of the trap. Do not
place bait on the trigger pan(#9).
3. Close back panel & relock using U-shaped lock rod.
Illustration 5
REMEMBER: Always bait the trap before setting it.
Setting Instructions for Models 1088 & 1089
REMEMBER: REMEMBER: Any camouflage or material you use to
hide the trap should not interfere with the operation of the trap in any
way.
1. Viewing trap from front, position yourself on the right-hand
side of trap.
2. For Model 1089 only: lift the lock (#10) with your right hand.
Does not apply to Model 1088.
3. Place the forefinger of your left hand through the loop (#11)
on the door of the trap and with your thumb, push the lock
frame (#12) and lift the door (illustration 10).
4. Set trap by pulling metal trigger (#13) forward with your right
thumb and forefinger until door is secured by trigger hook
(illustration 11).
5. Gently release door. Trap is set.
6. Trip trap to make sure it is working properly. Trip trap using a
pen or pencil, sticking an end through the side of the trap and
pushing down on the end of the trigger pan.
Illustration 6
Illustration 7
Tips: For smaller animals, use a light trigger release setting. Place
just the tip of the trigger rod under the door cross rod (illustration 12).
Release/Relocation of Captured Animals
Note: Note: Check with your local or state Game Commission to
determine the lawful method of disposing of a captured wild or
nuisance animal.
Caution: DO NOT ATTEMPT TO HANDLE CAPTURED ANIMALS.
DO NOT LEAVE CHILDREN UNATTENDED NEAR A CAPTURED
ANIMAL.
Illustration 8
Releasing Captured Animal Through Back Panel
1. Approach trap cautiously and quietly so you don't excite the
animal. Stand trap on front door.
2. Pull out the U-shaped lock rod at the back of the trap by
pressing in on left side of trap and releasing hook on lock rod.
When finished, return trap to its normal position.
3. Stand clear of the animal's exit path. If necessary, use hook
of the U-shaped lock rod to hook the bottom of the back panel
and pull back panel outward--pull out and up (illustration 13).
4. Walk away from the trap. The animal will exit the trap on its
own.
Illustration 9
Releasing Captured Animal Through Trap Door
1. On Model 1089 only: Lift lock (#10) on trap. Does not apply
to model 1088.
2. Lift the door up and insert stick through both sides of the trap
to prop the door open (illustration 14).
3. Walk away from trap. Animal will exit trap.
Illustration 10
To Collapse Models 1088 & 1089
1. Remove U-shaped lock rod from the back panel.
2. Face trap so trigger rod (#14) is toward you.
3. Unclip front and back frame rods (back frame rod is on 1089
only). Lay frame rods flat.
4. Tip trap away from you, pull trigger rod out of trigger pan.
Place trigger rod end into the storage area in the mesh at the
top of the trap.
5. For Model 1089 only: With right hand, lift door lock on trap.
Does not apply to Model 1088.
6. Lift trap door and hold open with left hand.
7. With right hand, push back panel toward the front of trap and
hold it open.
8. Collapse trap by pushing top of trap away from you and then
down. Fold bottom of trap under the top of trap.
9. Place U-shaped lock rod in the storage area (top one inch of
mesh) at the back of the trap so that back panel is secure.
10. Retain carton for trap storage.
Illustration 11
Illustration 12
Illustration 13
Illustration 14