1
Tools Required:
• Ruler/Tape Measure
• Masking Tape
• Caulk
• Hammer
• Drill
•
•
•
•
Safety Glasses
Screwdriver
1 -1/4" Hole Saw
Saber Saw
(if counter top
cutout is required)
Herramientas Necesarias:
• Regla/Cinta Métrica
• Cinta Adhesiva Protectora
• Calafateo
• Martilo
• Taladro
• Lentes de Seguridad
• Destornillador
• Sierra de Agujos de 1 -1/4"
• Sierra Sable (si se requiere
recorte de la superficie
del mostrador)
QZSB-2522
QZDB-3322, QZLS-3322, QZAD-3322
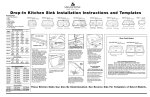
Drop-In Kitchen Sink Installation Instructions and Templates
Las Instrucciones y Plantillas de Instalación de las Tarjas de Cocina de Sobreponer
INSIDE BOWL DIMENSIONS /
LAS DIMENSIONES DEL INTERIOR DE LA PILETA
Model / Modelo A
B
C
D
QZSB-2522
21-1/8" 17-5/8"
(537mm) (447mm)
15-5/8"
(397mm)
––
QZDB-3322
14-15/16" 18-7/8"
(379mm) (479mm)
13-3/4"
(349mm)
QZLS-3322
17-1/4"
18"
(437mm) (457mm)
11"
15-1/4"
(279mm) (387mm)
QZAD-3322
29-1/2"
18"
(748mm) (457mm)
15-1/4"
(387mm)
B
15-1/4"
(387mm)
B
C
B
D
B
D
A
A
A
A
––
C
C
C
SINK CUTOUT MEASUREMENTS
/
LAS MEDIDAS DEL RECORTE DE LA TARJA DE LA COCINA
Model / Modelo
Width/ Anchura Depth/ Profundidad
QZSB-2522
24-1/4" (615mm)
21-1/4" (539mm)
QZDB-3322
32-1/4" (819mm)
21-1/4" (539mm)
QZLS-3322
32-1/4" (819mm)
21-1/4" (539mm)
QZAD-3322
32-1/4" (819mm)
21-1/4" (539mm)
QZDB-3322
Depth 9" (229mm)
Profundidad 9" (229mm)
QZSB-2522
Depth 9" (229mm)
Profundidad 9" (229mm)
QZLS-3322
Depth 10" (254mm); 7-1/2" (191mm)
Profundidad 10" (254mm); 7-1/2" (191mm)
QZAD-3322
Depth 10" (254mm); 5-5/16" (135mm)
Profundidad 10" (254mm); 5-5/16" (135mm)
Measure the cutout line or the pre-cut opening to be sure it conforms to the sizes listed.
Mida la línea de cortar o la apertura precortada para asegurar que se someta a los
tamaños notados.
NOTE
Taladre el Agujero Inicial al
Reverso Termine Taladrando el
Agujero de la Superficie
CUT OUT AREA
EL ÁREA CORTADO
MASKING TAPE
LA CINTA ADHESIVA PROTECTORA
Drop in side:
1. Select the drop-in kitchen sink template
that applies to the model sink you are
installing. Cut out the inside of the template
and discard the cutout portion. Locate the
template front to rear and right to left on
the countertop so the bowl will not interfere
with the cabinets below. Attach the template
to the countertop with masking tape and
draw a pencil line around the inside of the
template. Discard the template.
CUT INSIDE OF LINE
TALADRE
UN AGUJERO
PARA COMENZAR
DENTRO DE LA LÍNEA
PARA CORTAR
DRILL STARTER
HOLE INSIDE
OF CUTOUT
LINE
2. Drill starter hole inside of cutout
line.
caulk
calafateo
CORTE POR
DENTRO DE
LA LÍNEA
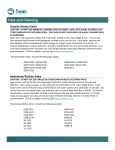
Everyday Cleaning:
3. Using a saber saw, cut inside of
cutout line. Trial fit sink to check
proper fit.
4. Identify fixture hole locations.
Drill a starter hole from reverse side.
Working from the top side as illustrated, position a hole saw on the
starter hole and drill to complete the
fixture hole. To cool the hole saw and
sink surface, a light application of
water, periodically, is necessary. Attach
faucet, drain, and accessories according to manufacturer’s instructions.
2. Taladre un agujero para comenzar
dentro de la línea para cortar.
3. Empleando una sierra sable, corte
por dentro de la línea para cortar.
Haga la prueba si cabe con la tarja.
1. Selecione la plantilla de la tarja de cocina
de sobreponer que aplica al modelo que se
está instalando. Corte la parte interior de la
plantilla y deshágase de la parte cortada.
Ubique la platilla de frente a atrás y de
derecha a izquierda en el mostrador para
que la tarja no interfiera los armarios de
abajo. Amarre la plantilla al mostrador con
la cinta adhesiva protectora y dibuje una
línea con lápiz por el interior de la plantilla.
Deshágase de la parte cortada.
Invierta la tarja de cocina y colóquela en el
mostrador. Ubique la tarja de cocina de
frente para atrás para que no interfiera los
armarios de abajo. Dibuje una línea con
lápiz alrededor del borde exterior de la
tarja y quite la tarja del mostrador. Mida
desde el interior 3/8" del contorno inicial y
dibuje una segunda línea dentro de la
primera. Dibuje un radio de 1-1/2" en cada
esquina. La segunda línea interior será la
línea para cortar.
Wash your sink using warm water, a soft cloth
or non-abrasive woven nylon pad, and a nonabrasive liquid cleaner or detergent. This can
be done as often as the sink is used.
5. Insert the sink clips into the slots
of each sink boss. Apply a bead of
caulk (not included) to the underside
of the sink flange. For final fit, make
sure each sink clip is pulled back as
illustrated. Position the sink into the
countertop opening.
6. Secure the sink by pivoting the
sink clips into the position illustrated and tighten screws in the front,
then tighten rear and side screws.
7. Connect all faucet supply lines, disposal (if
available), and drain trap fittings per manufacturer’s instructions.
CHECK FOR LEAKS:
• Supply user tubes to faucet
• Supply riser tubes to shut off valves or
lower connections
IMPORTANT: OPTIMAL COUNTERTOP THICKNESS IS 1-1/2”
(38.1 mm). THINNER COUNTERTOPS WILL REQUIRE SHIMS
UNDER SINK CLIPS TO PROPERLY SECURE SINK.
4. Identifique las situaciones de los
agujeros de la instalación. Taladre un
agujero inicial al reverso. Trabajando
del lado superior como ilustrado,
coloque una sierra de agujero encima
del agujero inicial y taladre para
completer el agujero de la instalación.
Para refrigerar la sierra de agujero y
la superficie de la tarja, se necesita
una aplicación ligera de agua, de
vez en cuando. Sujete el grifo, el
desagüe y los accesorios según las
instrucciones del fabricante.
5. Meta las grapas de la tarja en las
ranuras de cada tarja principal.
Aplique una gotita de calafateo (no
incluído) a la parte inferior del reborde. Por el cabe final, asegure que se
retire cada grapa de la tarja como
está ilustrado. Coloque la tarja en la
apertura del mostrador.
6. Afiance la tarja para hacer girar
las grapas como la posición ilustrada
y apriete los tornillos enfrente. Luego,
apriete los tornillos de atrás y de los
lados.
Wipe the sink using a soft cloth or non-abrasive woven nylon pad and a liquid scouring
product. Apply the liquid scouring product
sparingly and rub lightly. Repeat as necessary
until sink is clean.
Hard Water, Calcium and Lime Deposits:
Wipe with a non-abrasive woven nylon pad and
white vinegar. Rinse after 20 minutes.
• Release water from sink and check for
possible leaks
Do Not Use:
7. Conecte todas las líneas de abastecimiento
del grifo, el triturador de basura (si está
disponible) y los accesorios de la trampa del
desagüe según las instrucciones del fabricante.
REVISIÓN DE GOTERAS:
• Suministre los tubos del usuario al grifo
• Suministre los tubos a las válvulas de
apagar o las bajas conexiones
IMPORTANTE: EL GROSOR IDEAL DE LA ENCIMERA ES DE
1-1/2" (38.1 mm). EN EL CASO DE LAS ENCIMERAS MÁS
DELGADAS, DEBERÁN COLOCARSE ESPACIADORES DEBAJO
DE LOS SOPORTES DEL LAVAPLATOS PARA FIJAR
ADECUADAMENTE EL LAVAPLATOS.
Metallic Abrasions or Heavy Stains:
• Fill sink with water and check for leak
around drain
• Tighten as needed
El lado de sobreponer:
O
Granite Sink Care & Cleaning Instructions
NOTE
Drill starter hole from bottom
Finish drilling hole from top
Or
Invert sink and position onto the countertop. Locate sink front to rear and right to
left so the bowl will not interfere with the
cabinets below. Trace a pencil line around
the outside edge of the sink and remove
the sink from the countertop. Measure in
3/8" (10mm) from the initial sink outline
and draw a second line inside the first.
Draw a 1-1/2" radius at each corner. The
second interior line will be your cut out line.
1-1/2”
(38.1 mm)
• Llene la tarja con agua y revise por las
goteras alrededor del desagüe
• Suelte el agua de la tarja y revise de
goteras posibles
• Apriete como sea necesario
Abrasive cleansers, abrasive scrub pads, or
alkali cleaners such as ammonia.
Las Instrucciones para El Cuidado y La
Limpieza de la Tarja de Granito
La Limpieza Diaria:
Lave su tarja con agua tibia, un trapo suave o
estropajo tejido de nilón suave, y un limpiador
líquido o detergente. Se puede hacer este con
cada uso de la tarja.
Abrasiones Metálicas o Manchas Fuertes:
Limpie frotando suavemente la tarja usando un
trapo suave o estropajo tejido de nilón no
abrasivo y un limpiador líquido. Aplique el
limpiador líquido con moderación y limpie
frotando suavemente. Repita si es necesario
hasta que esté limpia la tarja.
Agua Dura, Calcío y Depósitos de Lima:
These Kitchen Sinks Can
Also Be Undermounted. See
Reverse Side for Templates
The Swan Corporation
515 Olive Street
Suite 1800
Pase un estropajo tejido de nilón no abrasivo
y el vinagre blanco a la tarja. Aclare 20 minutos más tarde.
También Se Pueden Fijar Abajo
Estas Tarjas de la Cocina. Vea
el Dorso para las Plantillas.
St. Louis, MO 63101
p (800) 325-7008
No Emplee:
Detergentes abrasivos, estropajos abrasivos ni
limpiadores álcali tal como el almoníaco.
f (314) 231-8165
Form #885 05-10
Esta plantilla únicamente pertenece a la opción
de Colocar Parcialmente Unos Sobre Otros.
Additional installation options are: Seamless and Reveal
Opciones adicionales de la instalación son: Sin Soldadura y de Revelar
Counter Top
El Mostrador
Kitchen Sink
La Tarja de Cocina
Seamless
Sin Soldadura
These templates are for undermount
installation only of models: QZSB-2522,
QZDB-3322, QZLS-3322 and QZAD-3322.
This procedure should be performed by a
professional fabricator. If an undermount kitchen
sink installation is desired, the template is to
be used by a professional fabricator.
Reveal
Revelar
Estas plantillas son para la instalación del
tipo fijado abajo solamente de los modelos:
QZSB-2522, QZDB-3322, QZLS-3322 y
QZAD-3322.
Solo un fabricante profesional debe hacer
este procedimiento. Si se desea una tarja de
cocina de tipo fijado abajo, solo un fabricante
profesional debe utilizar la plantilla.
QZDB-3322
Overlap
Colocar Parcialmente
Unos Sobre Otros
QZSB-2522
This template drawing accommodates the
Overlap mounting option only.
QZLS-3322
QZAD-3322
Undermount Templates
Plantillas de Tipo Fijado Abajo