1
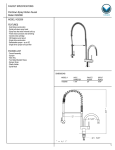
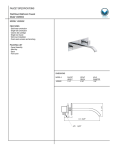
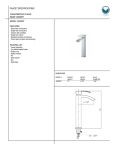
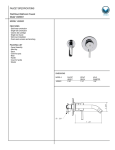
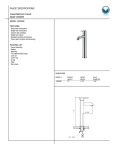
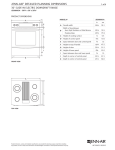
FAUCET SPECIFICATIONS
Pull-Down Spray Kitchen Faucet
Model VG02007
MODEL VG02007
FEATURES
PACKING LIST
DIMENSIONS
MODEL #
27 1/4" *
VG02007
HOLE
DIAMETER
1 3/8"
FAUCET
HEIGHT
27 1/4"
SPOUT
REACH
10 1/8"
8 1/8"
10 1/8"
* = +/- 1"
1
27 1/4"
8 1/8"
9 3/4"
10 1/8"
13 3/8"
2 1/2"
4 1/4"
6"
10 1/8"
11 1/2"
3/4"
1 7/8"
2 3/8"
VG02007
THE MEASUREMENTS IN INCHES ARE ROUNDED TO THE NEAREST 1/8"
2
PACKAGE CONTENT
ASSEMBLY
SPIRAL NECK
RING
WRENCH
METAL NUT
SPRAY HOLDER
1. SHUT OFF WATER SUPPLY.
REMOVE THE OLD FAUCET AND
FLEXIBLE HOSES. CLEAN SINK
SURFACE WITH A NON ABRASIVE
CLEANER IN PREPARATION FOR
THE NEW FAUCET.
1
!
2. REMOVE METAL NUT, RUBBER RING,
AND METAL RING FROM THE FAUCET.
ATTACH METAL BRAIDED HOSES TO
THE FAUCET.
2
ENSURE THAT YOU USE PIPE TAPE
AND DO NOT OVER TIGHTEN THE
SUPPLY LINE NUTS AS THIS COULD
CAUSE PRODUCT FAILURE LEADING
TO WATER DAMAGE.
SPRAYER
SPRAY HOSE
HOLLOW PIN
PLASTIC
HOLDER
COPPER PIN
FAUCET
ASSEMBLY
RUBBER RING
METAL SCREW
ALLEN KEY
TWO METAL
BRAIDED
HOSES
3. POSITION THE FAUCET IN THE 1 3/8"
COUNTERTOP HOLE, FROM BENEATH THE
COUNTERTOP HOLE ASSEMBLE THE
PLASTIC HOLDER, RUBBER RING, AND
METAL RING IN THE ORDER DEPICTED IN
THE DIAGRAM. THEN THREAD METAL NUT
ONTO HOLLOW PIN. TIGHTEN THE METAL
NUT UNTIL FAUCET IS SECURE.
METAL RING
3
!
REQUIRED TOOLS
Adjustable wrench
Allen key - supplied (to remove cartridge if needed)
Plumber's putty - optional
Pipe tape
Flat screwdrivers
ENSURE THAT PARTS ARE
ASSEMBLED IN THE ORDER AS
DEPICTED IN DIAGRAM TO PREVENT
DAMAGE TO FAUCET AND SUPPLY
LINES.
STABILIZES FAUCET
UNDER COUNTERTOP
METAL NUT
!
SAFETY TIPS
If you use soldering for the installation of the faucet, the seats, cartridges and
washers will have to be removed before using flame. Damage caused by
improper soldering will void the warranty.
Protect your eyes with safety glasses when cutting or soldering water supply
lines.
4. IF SPRAY HOLDER IS NOT ATTACHED,
ATTACH THE SPRAY HOLDER AND
SPRAY HOSE TO THE FAUCET AND
TIGHTEN SCREW UNTIL SPRAY HOLDER
IS SECURE.
4
ENSURE METAL SCREW
ALIGNS WITH NOTCH
ON WHITE WASHER IN
FAUCET BODY.
METAL SCREW
IMPORTANT POINTS
Prior to beginning installation, turn off the cold and hot water lines and open the
hot and cold knobs on the old faucet to release pressure.
When installing your new faucet, turn the connector nuts finger-tight, then use
one wrench to anchor the fitting and a second wrench to tighten the nut.
Connections that are too tight will reduce the integrity of the system. and
potentially cause product failure which could lead to water damage.
Wrap all threaded connections with pipe tape available at your local hardware or
plumbing supply store. Always wrap in a clockwise direction.
Not all necessary supplies to install your faucet are included, however, they are
available wherever plumbing supplies are sold.
Prior to installing the faucet please FLUSH THE HOT AND COLD WATER
SUPPLY LINES that are or will be connected to the new faucet to remove scale,
solder or their impurities which could damage the faucet and potentially void the
warranty.
MAINTENANCE
Your new faucet is designed for years of trouble-free performance.
Keep it looking new by cleaning it periodically with a soft cloth. Avoid abrasive
cleaners, steel wool and harsh chemicals as these will scratch, dull, and/or
damage the finish and void the warranty.
5. FEED SPRAY HOSE THROUGH SPIRAL NECK ENSURING THE FEMALE SPRAYER
CONNECTION IS POSITIONED TOWARD TOP OF SPIRAL NECK. ATTACH MALE SPRAYER
CONNECTION TO TOP OF FAUCET BODY WITH ADJUSTABLE WRENCH UNTIL TIGHT.
SEAT SPIRAL NECK INTO SPRAY HOLDER AND FIRMLY PRESS DOWN UNTIL SECURE.
SPRAYER
WASHER
FLOW
HOSE
RESTRICTER
CONNECTION
!
VISUALLY INSPECT MALE AND FEMALE
SPRAYER HOSE CONNECTIONS AND
FAUCET BODY TO ENSURE THE WASHERS
AND FLOW RESTRICTORS ARE PRESENT.
MISSING OR DAMAGED WASHERS AND
FLOW RESTRICTORS COULD CAUSE
PERSONAL INJURY OR WATER DAMAGE.
SPRAY WASHER
6. ATTACH SPRAYER TO FEMALE CONNECTION OF SPRAYER
HOSE BY HAND AND TIGHTEN UNTIL SECURE.
7. ATTACH THE FEMALE
CONNECTIONS OF THE METAL
BRAIDED HOSES TO THE COLD
AND HOT WATER SUPPLY .
7
!
6
ENSURE THAT YOU USE PIPE TAPE
AND ADJUSTABLE WRENCH, DO NOT
OVER TIGHTEN AS THIS COULD
CAUSE PRODUCT FAILURE LEADING
TO WATER DAMAGE.
INSTALLATION
Installation must be done by a qualified licensed plumber.
Prior to installation please read the instructions thoroughly, confirm that all parts
are included and visually inspect the unit for any defects.
If you have any questions please contact our Technical Support Department
before proceeding with installation.
8. AFTER INSTALLATION IS COMPLETE, TURN ON THE WATER SUPPLY AND ALLOW BOTH
HOT AND COLD WATER TO RUN SEPARATELY FOR AT LEAST TWO MINUTE EACH. WHILE
WATER IS RUNNING, CHECK FOR LEAKS. IT IS IMPORTANT TO VIEW THE CONNECTIONS AT
THE MALE AND FEMALE FLEXIBLE HOSE CONNECTIONS. IF LEAKS ARE DETECTED, REFER
BACK TO THE INSTRUCTIONS AND ADJUST ACCORDINGLY. TIGHTENING NUTS SLIGHTLY
MAY STOP ANY MINOR LEAKS.
3
TROUBLESHOOTING
PROBLEM
POTENTIAL CAUSE
1 - Leaks from Handle
1.A - Cartridge unseated
1.B - Cartridge defective
2 - Insufficient Flow Rate
3 - Leak at Connection Points
1.A - Remove cartridge from housing, was thoroughly with hot
water and reseat in housing.
1.B - Contact Vigo Technical Support for replacement.
2.A - Dirty aerator
2.B - Clog in supply hose / line
4 - Loose Spiral Neck
5 - Loose Faucet Body
CORRECTIVE ACTION
3.A - Sprayer hose not tight
3.B - Flexible hose leaking at body or connection point
4 - Metal screw is not locked into internal white washer hole
location
5 - Metal nut became loose
2.A - Remove and soak / clean with a non abrasive agent (i.e.
vinegar).
2.B - Remove sprayer or supply line and flush lines
3.A - Remove spiral neck by loosing the metal screw and pulling
up on the spiral neck exposing the spray hose. Make sure the
washer is seated properly and retighten with an adjustable
wrench.
3.B - Tighten hoses. If this does not resolve the issue, remove
the flexible hose and rethread, checking to make sure the
connection is secure. Make sure to use pipe tape.
4 - Loosen metal screw, lift off the spiral neck and reseat making
sure to thread the metal screw into the white washer housing.
5 - From under the counter, use an adjustable wrench and
tighten the metal nut to the hollow pipe. Make sure the faucet is
perpendicular to the counter.
PARTS LIST - For any parts needed but not shown, please contact Vigo Technical Support
PART
Sprayer
Spray hose
Pot Filler Handle
Pot Filler Handle Lever
Pot Filler Set Screw
Pot Filler Cartridge
Handle Lever
Handle Set Screw
Handle
Sedal Cartridge
Metal Braided hose
PART #
FINISH
SUPPLY DATE INDICATOR (INTERNAL USE ONLY)
78021
74017
78064A
78064B
78064C
78065
78027A
78027B
78027C
74040
74020
CH, ST
CH, ST
CH, ST
CH, ST
CH, ST
CH, ST
CH, ST
-
W
W
W
W
W
W
W
W
W
W
W
TOLL FREE: (866) 591 - 7792
E-Mail: [email protected]
www.vigoindustries.com
NSF / ANSI 61
4
VIGO INDUSTRIES, LLC ("VIGO")
FAUCET LIMITED LIFETIME WARRANTY
EFFECTIVE APRIL 1, 2013
VIGO offers the following limited warranty on each of its Faucet products (the "Product") and the components thereof. This warranty extends only to the original owner
for personal household use. For commercial uses, additional limitations apply.
VIGO warrants the structure of the Product to be free from defects in workmanship and materials under normal use and service for the period commencing from the
initial date of purchase by the owner, contractor, or builder, from VIGO or an authorized VIGO dealer, through the lifetime of the original owner or end-user.
VIGO warrants the cartridge component of the Product to be free from defects in workmanship and materials under normal use and service for a period of five (5) years
from the initial date of purchase by the owner, contractor, or builder, from VIGO or an authorized VIGO dealer.
VIGO warrants the diverter component and/or pot filler components of the product to be free from defects in workmanship and materials under normal use and service
for a period of two (2) years from the initial date of purchase by the owner or end-user, contractor, or builder from VIGO or an authorized VIGO dealer.
Subject to the Warranty Service provision below, any product reported to the authorized dealer or to VIGO as being defective within the warranty period will be repaired
or replaced (with a product of equal value) at the option of VIGO. This warranty extends to the original owner and is not transferable to a subsequent owner.
Neither the distributor, authorized VIGO dealer, nor any other person has been authorized to make any affirmation, representation, or warranty other than those
contained in this warranty. Any affirmation, representation, or warranty other than those contained in this warranty shall not be enforceable against VIGO or any other
person.
VIGO reserves the right to modify this warranty at any time, it being understood that such modifications will not alter the warranty conditions applicable at the time of
sale of the products in question.
Limitations
This warranty shall not apply to instances of incorrect operating procedures, breakages, or damages caused by fault through improper installation, carelessness, abuse,
misuse, misapplication, improper maintenance, or alteration of the Product, as well as chemical or natural corrosion, accident, fire, flood, an act of God, or any other
casualty. Avoid abrasive cleaners, steel wools, and harsh chemicals as these will scratch, damage, and / or dull the product and / or finish and void this warranty. The
owner of the Product covered by the present warranty is entirely responsible for its proper installation and any applicable plumbing or electrical wiring. VIGO neither
installs nor supervises the installation nor hires a contractor for this purpose; consequently, VIGO cannot be held responsible for any default, breakage, or damages
caused thereby or resulting thereof, either directly or indirectly.
The owner must provide access to the components of the Product as described in the installation guide so that VIGO can execute the warranty specified herein. If such
access is not available, all expenses to provide said access will be the responsibility of the owner.
This warranty does not apply to Products that have not been installed or operated in accordance with instructions supplied by VIGO and all applicable rules, regulations,
and legislation pertaining to such installations.
This warranty does not apply unless the VIGO Product is installed by fully insured licensed professionals. Vigo strongly recommends that such licensed professionals
have experience in the installation of bathroom and kitchen products. [Installation of certain products, including without limitation glass products (i.e., shower doors and
glass sinks) by an inexperienced person may result in product failure including, but not limited to, glass breakage which could result in personal injury or death.]
VIGO is not liable for personal injuries or deaths to any persons or for any direct, special, incidental, or consequential damage, loss of time, loss of profits,
inconvenience, incidental expenses, labor or material charges, or any other costs resulting from the use of the product or equipment or pertaining to the application of
the present warranty, or resulting from the removal or replacement of any product or element or part covered by this warranty.
EXCEPT AS OTHERWISE PROVIDED ABOVE, VIGO MAKES NO WARRANTIES, EXPRESSED OR IMPLIED, INCLUDING WARRANTIES OF MERCHANTABILITY
AND FITNESS FOR A PARTICULAR PURPOSE OR COMPLIANCE WITH ANY CODE.
In any case, VIGO cannot be held liable for any amount over and above the purchase price paid for the Product by the owner/end-user, contractor, or builder.
Commercial Limitations
In addition to the above conditions and limitations, the warranty period for products installed for commercial applications or used in commercial ventures is one (1) year
from the initial date of purchase by the owner, contractor, or builder from an authorized dealer. VIGO is not responsible for loss of use or profit under any circumstances.
If the product is used as a display, the warranty period begins from the date of purchase. This warranty gives the owner specific legal rights. The owner may also have
other rights which can vary from one state or province to another.
Warranty Service
In order to obtain service provided under this warranty during regular business hours, contact the dealer or distributor who sold the unit, or contact VIGO directly. VIGO
will provide the warranty service described above when the following conditions have been met: the failure is of the nature or type covered by the warranty; the user has
informed an authorized VIGO Agent or VIGO's warranty service department representative of the nature of the problem during the warranty period; conclusive evidence
(e.g., proof of purchase or installation) is provided to the foregoing by the user proving that the failure occurred or was discovered within the warranty period; an
authorized independent service person or company representative has been permitted to inspect the product during regular business hours within a reasonable time
after the problem was reported by the user. Vigo's warranty obligation shall be discharged upon tender of replacement or repair. The customer's refusal to accept the
tender terminates VIGO's warranty obligations.
Certification may be ended by VIGO or certification agencies without notice.
5