Transcript
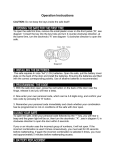
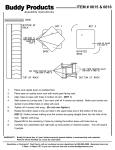
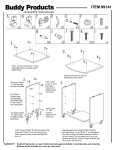
NOTE: THIS PRODUCT IS PACKAGED UPSIDE DOWN FOR SAFE TRANSIT
PLEASE READ CAREFULLY BEFORE OPENING THE BOX
**THIS PRODUCT REQUIRES TWO PEOPLE TO UNPACK**
1
If unit is shipped as one, separate the two cartons by cutting the
REF 1
banding that’s holding the boxes together.
2
Using two people turn the larger unit (the rack) upside down - Do
this BEFORE you cut open the box. REF 1
Using scissors cut and remove the banding that surrounds the
box. REF 1
4
Remove the cardboard lid on top of the box. REF 2
5
Using a utility knife cut the box along the edges from top to bottom.
6
Remove carton and remove the plastic from the unit.
This Side Up
3
REF 2
REF 3
Base
8
Unwrap the base which comes in a separate package. Place
the base on the upside down rack with the wood grain facing
the rack. REF 3
Bottom
of rack
Remove packing support in the rack and turn the base to find
mounting holes. Align holes in base with the holes in the bottom
of the rack. REF 4
9
Start screws by turning only 1 turn each until all 4 screws are
started. Make sure screws are started in pre-drilled holes or
sides will crack.
10
Tighten all 4 screws until snug. (Do not over tighten)
This Side Up
7
REF 4
Remove
packaging
and turn
base to
find holes
Top of rack
11
12
Rotate the bottom base to line up holes in the upper base and in
the bottom of the rack (REF 5). Fasten screws making sure the
screws are going straight down into the hole of the rack. Tighten
until snug.
REF 5
Line up holes
for step 6
Repeat #11 for the remaining 3 holes by rotating the bottom base
until the holes line up.
Rotated
Base
13
Carefully turn assembled rack right side up and position in
desired location and fill with your favorite magazines! NOTE:
Turning the unit over will require 2 people.
Use these
Use these
mounting
holes for step
11 &12
(REF 5)
mounting
holes for step
8 (REF 4)
Chicago, IL 60608
z
www.buddyproducts.com
Bottom of rack