1
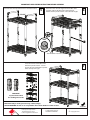
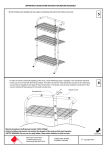
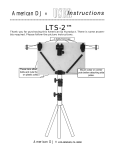
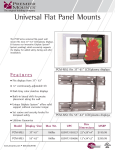
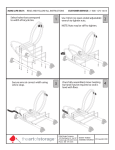
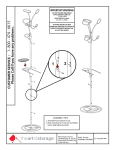
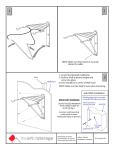
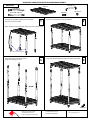
IMPORTANT: READ ENTIRE INSTRUCTION BEFORE ASSEMBLY PARTS LIST SHELF X 3 TOP TUBE X 2 LEG TUBE X 4 EXTENSION TUBE X 4 COLLAR X 4 JOINER X 2 Insert the 4 leg tubes (rubber feet on bottom) into the corners of a shelf. 1 Slide on next shelf to rest on the bottom 2 Place top shelf onto plastic collars on extension tubes. 4 Note: Shelves can be mounted either way, as tray or flat shelf Note: Holes face inwards Insert extension tubes with joiners Keep holes facing inwards. 3 “CLICK” SEE OVER Delta Cycle Corporation 125 Washinton Street Foxborough, MA 02035 USA 3 SHELF UNIT WS1003 ASSEMBLY DIAGRAM Copyright 2010 IMPORTANT: READ ENTIRE INSTRUCTION BEFORE ASSEMBLY Connect the two top tubes to the 4 extension tubes. Determine the desired height of the middle shelf and then slide shelf above the selected holes. Attach the four plastic collars at the desired height. 5 6 “CLICK” TOP Tab inside fits into tube hole Press the corners of middle shelf onto the 4 plastic collars. Seat all corners of each shelf onto its plastic collar to keep unit rigid. 7 INCLUDED: 2 spare Joiners allow for stacking extra racks. Maximum load per shelf (spread evenly): 160lbs (75kgs) SAFTEY WARNING: Do not use as a step ladder. Never allow children to climb on rack Delta Cycle Corporation 125 Washington Street Foxborough, MA 02035 USA 3 SHELF UNIT WS1003 ASSEMBLY DIAGRAM SEE OVER © Copyright 2010