1
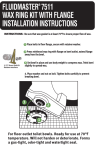
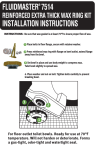
Toilet Flange Template
1.
2.
Getting ready to mark and cut tile around flange using
(Use 3” or 4” side depending on size of flange)
3.
Inserting (3” or 4”) circular extension into flange
4.
Tool is inserted and set flat on flange. Tool’s length is designed
to clear all bathroom walls and it can swivel 360 degrees and
can mark tile from any angle depending on position of tile in
relation to flange
Tile is laid out and placed flat between 2 arms
JAMKO Inc.
5.
6.
Top arm is lowered down flat on tile
7.
Tile is marked without measuring
8.
Top arm lifted and mark is complete
Perfect cut from 1st time.
JAMKO Inc.