1
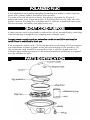
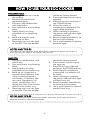
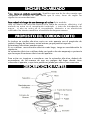
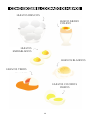
Automatic Easy Egg Cooker Hervidor de Huevos Automatico Model EGC-007(A~Z) Instruction Manual Before operating your new appliance, please read all instructions carefully and keep for future reference IMPORTANT SAFEGUARDS 1. READ ALL INSTRUCTIONS CAREFULLY. 2. Remove all packaging and labels from appliance prior to use. 3. To protect against risk of electrical shock, do not put cords, plugs or the appliance in or near water or any other liquid. 4. Keep appliance away from children when in use. 5. Only use approved ingredients with this product – other food may damage the appliance. 6. Unplug from outlet when not in use, during assembly, during disassembly and before cleaning. 7. Avoid contact with heating parts. 8. Do not operate this appliance with a damaged cord, damaged plug, after the appliance malfunctions, is dropped, or damaged in any manner. 9. Make sure the Egg Cooker is off before plugging in. 10. Do not use outdoors. 11. Do not leave eggs in Egg Cooker after timer has finished. 12. Do not let the cord hang over the edge of a table, edge of a counter, over the sink or touch any hot surfaces. 13. Do not put your hands or other objects into the Egg Cooker while it is in 14. 15. 16. 17. 18. 19. 20. 21. operation. If food spills on the heating platform, make sure the Egg Cooker is turned off and cool before cleaning. Keep hands and utensils away from heating platform while cooking eggs to reduce the risk of severe injury or damage to the Egg Cooker. Internal base and contents (water and eggs) of the Egg Cooker are hot when in use. Let cool before handling/or cleaning. Do not place on or near a hot gas burner, hot electric burner or in a heated oven. Use extreme caution when handling the measuring cup, as it contains a sharp pin located on the bottom which may cause injury. When cleaning the body, do not submerse in any liquid. Instead, use a soft, wet cloth to wipe it down. The shell lid becomes very hot while in use- do not touch while the eggs are cooking. Let it cool before touching. Be certain the lid is securely in place before engaging appliance. Do not put the appliance in the refrigerator. Do not use expired eggs, expired egg whites, or expired liquid eggs. SAVE THESE INSTRUCTIONS THIS PRODUCT IS FOR HOUSEHOLD USE ONLY! 1 POLARIZED PLUG If this appliance has a polarized plug (meaning one blade is wider than the other one), please follow the below instructions: To reduce the risk of electric shock, this plug is intended to fit into a polarized outlet only in one direction. If the plug does not fit fully into the outlet, reverse the plug. If it still does not fit, contact a qualified electrician. Do not attempt to modify the plug in any way. SHORT CORD PURPOSE A short power cord is provided to reduce the risk of personal injury resulting from becoming entangled in or tripping over a longer cord. Longer power-supply cords or extension cords are available and may be used if care is exercised in their use. If an extension cord is used: (1) the marked electrical rating of the extension cord should be at least as great as the electrical rating of the product; (2) the extension cord should be arranged so that it will not drape over the countertop or tabletop where it can unintentionally be pulled on or tripped over by children or pets. PARTS IDENTIFICATION 2 CHOOSE YOUR FAVORITE EGGS 3 BEFORE FIRST USE 1. 2. Rinse all removable parts in hot, soapy water. DO NOT submerge body in any liquids. Base can be wiped clean with a damp cloth. Please refer to the Cleaning Instructions for more information. Place poaching tray, measuring cup, bowl, lid and egg rack next to the unit. CAUTION: Piercing pin is on 3. 4. 5. the base of the cup and is extremely sharp. Position the egg tray over the base. The side handles should be facing upward. Place the shell lid over the cooking tray. Plug in the power cord. Your egg cooker is now assembled for use. Soft Boiled Eggs Medium Eggs Hard-boiled Eggs 1 – 7 Eggs 6 Minutes 1 – 7 Eggs 9 Minutes 1 – 7 Eggs 12 Minutes NOTES AND TIPS #1 Refrigerate eggs until ready to use. Always use cold eggs – do not bring them to room temperature before using or the eggs will be slightly overcooked. HOW TO USE YOUR EGG COOKER 6. Place the egg tray over the base of the unit. The side handles should be facing upward. 7. Using the piercing pin located under the cup, pierce top side of each egg and place in cooking rack. Make sure the holes pierced in the eggs are pointing upwards when placing eggs onto the rack. Do not let the eggs touch the heating plate. Rinse pin after use. 8. Place lid on top of the unit and push the POWER button. 9. When the water is completely evaporated, the eggs will be cooked. 10. When cooking is complete, the power and indicator light will both turn off. 11. Remove eggs immediately and rinse under cold water to prevent overcooking. SOFT, MEDIUM AND HARD-BOILED EGGS 1. 2. 3. 4. 5. Place Egg Cooker appliance on a clean, dry surface. Remove lid and all other removable parts. Fill the measuring cup (Figure 1) to the appropriate line. For best results, use distilled watertap water contains minerals Figure 1 that can cause eggs to discolor. Pour cold water into heating plate. Rinse the number of eggs desired- cook up to 7 eggs at a time. 4 HOW TO USE YOUR EGG COOKER POACHED EGGS: 1. Place Egg Cooker on a clean, dry surface. 2. Remove lid and all other removable parts. 3. Fill cup to the Medium line with cold water. 4. Pour cold water into heating plate. 5. Lightly butter or spray vegetable oil on poaching tray. 6. Break one egg for each poaching section. 7. Place egg tray over the base of the unit. The side handles should be facing upward. Place poaching tray on top of egg rack. 9. Place lid on top of unit press the POWER button. 10. When the water is completely evaporated, the eggs will be poached. 11. When cooking is complete, the power and indicator light will both turn off. 12. Remove eggs immediately to prevent overcooking. 13. Use a small spatula to remove poached eggs. 8. NOTES AND TIPS #2 To find out if your eggs are fresh, place them in a bowl of salted, cool water. If they sink, they are fresh. If they float, they are not. OMELETS: 1. Fill cup to the Hard line with cold water. 2. Pour cold water into heating plate. 3. Lightly butter or spray vegetable oil on omelet tray. 4. Break up to 3 eggs into a separate bowl and mix. Add water to desired omelet consistency. If desired, add non-meat ingredients (i.e. chives, mushrooms, etc.) during this time. Pour beaten mixture into omelet tray. 5. Place egg tray over the base of the unit. The side handles should be facing upward. Place omelet tray on top of the egg tray. 7. Place lid on top of the unit and press the POWER button. 8. When liquid is completely evaporated, the omelet will be ready. 9. When cooking is complete, the power and indicator light will both turn off. 10. Remove omelet immediately to prevent overcooking. 11. Use a small spatula to remove omelet from tray. 6. NOTES AND TIPS #3 The recommended water levels are a guide, and water levels may need to be adjusted to achieve desired consistency. 5 HOW TO CLEAN YOUR EGG COOKER 1. 2. 3. 4. 5. Always unplug your Egg Cooker appliance from the electrical outlet and allow to cool completelybefore cleaning. Clean heating plate and main body with a wet cloth. Wash the attachments and lid in the sink with hot, soapy water. Remove any mineral deposits left behind from water by wiping the plate with a paper towel moistened with one tablespoon of white vinegar. White vinegar also works as an antibacterial agent. CAUTION: Base is extremely hot after use. Allow unit to cool before handling or 6. 7. 8. cleaning. NOTE: If unit is not cleaned with white vinegar on a regular basis, minerals naturally occurring in water will build up causing discoloration of eggshells. However, this does not affect the taste of the eggs. Wipe main body housing with a damp cloth. DO NOT immerse in water. Place clean egg tray, omelet and poaching trays, and cup inside the Egg Cooker body to store. Any other servicing should be performed by an authorized service representative. YOUR EGG COOKER IS NOT DISHWASHER SAFE. TROUBLESHOOTING PROBLEM Power Indicator Light is already ON after plugging into power outlet. There are brown stains on the heating plate. CAUSE The Power Button was unintentionally pushed to ON prior to plugging into power outlet. POSSIBLE SOLUTION You cannot push the Power button again to turn the egg cooker OFF. Fill Measuring Cup to "Soft" line, pour into heating plate and plug the cooker into power outlet. The egg cooker will cycle through and power OFF automatically once all water has evaporated. The Power Indicator Light will turn off. Allow the unit to rest/cool for 5 minutes and proceed to follow the instructions in this manual to use as normal. Residue from usage. Use a paper towel or a dish rag and white vinegar to clean the heating plate. 6 RECIPES Recipes included in this manual are courtesy of www.recipezaar.com and www.fastcooking.ca. DEVILED EGGS Makes 20 servings • • • • • • • • • • 1. 2. 10 large hard-boiled eggs, cooled just enough to handle* 1⁄3 cup mayonnaise 1¼ teaspoons Dijon mustard 1¼ teaspoons fresh lemon juice 1¼ teaspoons Worcestershire sauce 2½ tablespoons capers, drained ½ teaspoon kosher salt 2 pinches freshly ground white or black pepper Peel the cooked eggs and carefully slice in half lengthwise. Place the egg white halves on a clean work surface. Put the yolks into the work 3. 4. bowl of a food processor fitted with the metal chopping blade; process until no longer grainy, about 45 to 60 seconds. Pulse in the remaining ingredients and process until smooth, about 45 seconds to 1 minute. Taste and adjust seasoning accordingly. You may either carefully scoop the filling into the whites, or for a beautiful presentation, fit a pastry bag with a small star tip. Fill the pastry bag with the egg filling and pipe a large rosette onto each white in place of the yolk. Sprinkle with paprika before serving. EGG SALAD Makes about 3 cups • • • • • • • • 10 hard cooked eggs, completely cooled 1 stalk celery, about 4 inches, cut into 1-inch pieces ½ cup mayonnaise 3 teaspoons Dijon mustard ¼ teaspoon kosher salt 1⁄8 teaspoon freshly ground white or black pepper 2. 3. NOTE: The egg salad can be made two ways, either pulsed in a food processor for a creamier version, or diced as traditionally served in sandwiches. Both are delicious – you decide which way you prefer. 1. Remove shells from eggs and 4. 5. 7 discard. Cut eggs into quarters and reserve. Place the celery in the work bowl of a food processor fitted with the metal chopping blade. Pulse to chop, about 5 to 10 times; scrape into the work bowl. Add the quartered eggs to the work bowl; pulse 3 to 4 times to roughly chop. Add mayonnaise, mustard, salt and pepper. Pulse until mayonnaise and mustard are completely mixed in and desired texture is reached, 10 to 20 times. FOR DICING INSTRUCTIONS: Remove shells from eggs and discard. First halve eggs, and RECIPES (CONT.) 6. then cut each half into ¼- to ½inch dice. Reserve in a large mixing bowl. Cut the celery into the same size as the diced eggs, ¼ to ½inch dice. Put in the bowl with the eggs. EGGS BENEDICT Makes 4 servings • • • • 1. 4 slices Canadian bacon 4 poached eggs 2 English muffins, split and toasted ½ cup hollandaise sauce Heat a large sauté pan over medium- high heat. Sauté the Canadian bacon, turning once, 2. until browned, about 2 to 4 minutes per side. Keep warm. On each muffin half, place one slice of the Canadian bacon. Top with a poached egg; finish with about 2 tablespoons of hollandaise sauce. EGGS FLORENTINE Makes 4 servings 4 cups spinach, packed ½ – 1 tablespoon olive oil 4 poached eggs 2 English muffins, split and toasted ½ cup hollandaise sauce 2. In large sauté pan, heat the oil over medium heat. Add the spinach, a little bit at a time. 4. • • • • • 1. 3. 8 Cook until bright and just wilted. Keep warm. On each muffin half, evenly distribute the spinach. Place one poached egg on top; finish with the hollandaise sauce (about 2 tablespoons per serving). Serve immediately. RECIPES (CONT.) HOLLANDAISE SAUCE Makes about 1 cup • • • • • • • 1. 4 egg yolks 1 tablespoon lemon juice ½ cup melted butter, kept warm ½ to ¾ teaspoon kosher salt pinch ground white pepper pinch cayenne water, to thin if necessary In a medium bowl, whisk yolks and lemon juice until just thickened. Place the bowl over a pot of simmering, NOT boiling, water; while whisking constantly, whisk the mixture until it has increased in volume 2. 3. 9 and has thickened, about 8 to 10 minutes. The eggs must not cook, so if it seems as though the mixture is getting above body temperature, whisk the mixture off of the heat a bit, and, then place back onto the pot of water. Once thickened, slowly whisk in the melted butter until completely combined. Stir in spices. If sauce is too thick, thin out with some water or extra lemon juice. Use immediately. LIMITED WARRANTY* ONE (1) YEAR WARRANTY IS ONLY VALID WITH A DATED PROOF OF PURCHASE 1. 2. 3. 4. 5. 6. 7. Your small kitchen appliance is built with precision, inspected and tested before leaving our factory. It is warranted, to the original purchaser to be free from any manufacturing defects under normal use and conditions for one (1) year, cord excluded. This Warranty applies only to the original purchaser of this product. If you need to exchange the unit, please return it in its original carton, with a sales receipt, to the store where you purchased it. If you are past the stores allowed return policy period, please see the enclosed Warranty. If you use your appliance for household use and according to instructions, it should give you years of satisfactory service. During the one-year warranty period, a product with a defect will be either repaired or replaced with a new or reconditioned comparable model (at our option) when the product is returned to our Service Center. (See the “Returns” section below). The repaired or replacement product will be in warranty for the remaining balance of the one-year warranty period and an additional one-month period. This limited warranty covers appliances purchased and used within the 50 contiguous states plus the District of Columbia and does NOT cover: - Damages caused by unreasonable use, neglect, normal wear and tear, commercial use, improper assembly or installation of product. - Damages caused in shipping. - Damages caused by replacement or resetting of house fuses or circuit breakers. - Defects other than manufacturing defects. - Breakage caused by misuse, abuse, accident, alteration, lack of proper care and maintenance, or incorrect current or voltage. - Lost or missing parts of the product. Parts will need to be purchased separately. - Damages of parts that are not electrical; for example: cracked or broken plastic or glass. - Damage from service or repair by unauthorized personnel. - Extended warranties purchased via a separate company or reseller. - Consumer’s remorse is not an acceptable reason to return a product to our Service Center. *One Year Limited Warranty valid only in the 50 contiguous states plus the District of Columbia, excluding Puerto Rico and the Virgin Islands. This warranty is effective only if the product is purchased and operated in the USA; product usage which is in violation of the written instructions provided with the unit will void this warranty. For international warranty, please contact the local distributor. **Any instruction or policy included in this manual may be subject to change at any time. MAXI-MATIC, USA 18401 E. Arenth Ave. City of Industry, CA 91748 Customer Service Dept: (626) 912-9877 Ext: 120/107 MON-FRI 8am-5pm PST Website: www.maxi-matic.com email: [email protected] 10 RETURN INSTRUCTIONS RETURNS: A. B. Any return of defective merchandise to the manufacturer must be processed accordingly by first contacting customer service (contact information shown below) to obtain an RA # (Return Authorization Number). We will not accept any returns of merchandise without an applicable RA #. IMPORTANT RETURN INSTRUCTIONS. Your Warranty depends on your following these instructions if you are returning the unit to Maxi-Matic USA: 1. Carefully pack the item in its original carton or other suitable box to avoid damage in shipping. 2. Before packing your unit for return, be sure to enclose: a) Your name, full address with zip code, daytime telephone number, and RA#, b) A dated sales receipt or PROOF OF PURCHASE, c) The model number of the unit and the problem you are having (Enclose in an envelope and tape directly to the unit before the box is sealed,) and d) Any parts or accessories related to the problem. 3. Maxi-Matic USA recommends you ship the package U.P.S ground service for tracking purposes. We cannot assume responsibility for lost or damaged products returned to us during incoming shipment. For your protection, always carefully package the product for shipment and insure it with the carrier. C.O.D shipments cannot be accepted. 4. All return shipping charges must be prepaid by you. 5. Mark the outside of your package: MAXI-MATIC USA 18401 E. ARENTH AVE. CITY OF INDUSTRY, CA 91748 6. Once your return has been received by our warehouse, Maxi-Matic USA will repair or replace the product if it is defective in material or workmanship, subject to the conditions in paragraph B. 7. Maxi-Matic will pay the shipping charges to ship the repaired or replacement product back to you. 11 IMPORTANTES MEDIDAS DE SEGURIDAD Cuando use aparatos eléctricos, precauciones básicas de seguridad siempre deberá de seguir incluyendo las siguientes. Lea todas las instrucciones cuidadosamente. 1. Remueva todo material de empaque. 2. Para protegerse de una descarga eléctrica, no ponga el cordón, enchufe o el aparato en o cerca del agua o ningún otro líquido. 3. Mantenga el aparato lejos de los niños cuando este en uso. 4. Únicamente utilice ingredientes aprobados con esta unidad otra clase de alimentos podrán dañar su aparato. 5. Desconecte de la toma corriente cuando no esté en uso, durante el ensamblado, desensamblado y antes de limpiar. 6. Evite el contacto con partes calientes 7. No utilice el aparato con el enchufe averiado o si el cordón de alimentación es dañado, este debe ser reemplazado por el fabricante, personal capacitado o agente de servicio, para evitar riesgos. 8. Asegúrese que la unidad este apagada antes de conectar al tomacorriente. 9. No lo use a la intemperie 10. No deje los huevos en la unidad después de haberlos cocinado 11. No deje que el cordón eléctrico cuelgue de la orilla de la mesa, mostrador o Lavabo o toque superficies calientes. 12. No ponga sus manos u otros objetos dentro del aparato mientras este en uso. 13. Mantenga los utensilios y las manos lejos de la plataforma caliente mientras este cocinando los huevos para reducir el riesgo de daños severos o al aparato. 14. La base interna y el contenido (Agua y huevos) están muy calientes cuando está en uso. Déjelo enfriar antes de tocarlo o limpiar. 15. No lo ponga en o sobre estufa de gas, parrilla eléctrica o en un horno caliente. 16. Tenga mucha precaución Cuando maneje la taza medidora, Tiene una aguja localizada en el fondo, le podría causar daño. 17. Cuando limpie el aparato no lo sumerja en ningún líquido, limpie con un trapo húmedo. 18. La tapadera se pone muy caliente cuando está en uso no lo toque cuando este cocinando los huevos, deje enfriar antes de tocar. 19. Asegure de que la tapadera este bien colocada antes de encender el hervidor. 20. No ponga el hervidor en el refrigerador. No use huevos o huevos líquidos con el tiempo expirado. GUARDE ESTAS INSTRUCCIONES ESTE PRODUCTO ES PARA USO DOMESTICO UNICAMENTE! 12 ENCHUFE POLARIZADO Ésta tiene un enchufe polarizado. Significa que una de las dos navajas que componen el enchufe es más ancho que el otro, favor de seguir las siguientes recomendaciones: Para reducir el riesgo de una descarga eléctrica. Este enchufe solo se conecta de una sola manera en la toma de corriente eléctrica, si el enchufe no entra en el receptáculo inviértalo y trate de introducirlo de nuevo, si aún no entra en el receptáculo, contacte a un electricista calificado. No intente modificar el enchufe de ninguna manera. PROPOSITO DEL CORDON CORTO Se incluye un cordón eléctrico corto en este aparato con el propósito de reducir riesgos de lastimarse usted mismo ya que podría tropezar. Extensiones eléctricas pueden usarse. Si va a utilizar una extensión eléctrica más larga, tenga en consideración lo siguiente: La extensión eléctrica a utilizar debe ser igual o de más amperaje o potencia que las especificaciones eléctricas del aparato. Para evitar un tropiezo o enredarse con la extensión eléctrica, deberá de acomodarse de tal manera de que no cuelgue del lugar donde tiene colocado el aparato, o que éste pueda ser jalado por niños o sus mascotas. DESCRIPCION DE PARTES 13 COMO ESCOJER EL COCINADO DE HUEVOS HUEVOS FRESCOS HUEVO MEDIO COLIDO HUEVOS ENDIABLADOS HUEVOS BLANDOS HUEVOS TIBIOS HUEVOS COCIDOS DUROS 14 ANTES DEL PRIMER USO 1. 2. Lave todas las partes en agua caliente y jabón. No sumerja el aparato en agua o ningún líquido. La cubierta puede ser limpiada con un trapo húmedo. Favor de leer la sección de limpieza. Ponga la charola, taza, tazón, tapadera y estante de huevo, a un lado de la unidad. 3. 4. 5. PRECAUCION: La aguja perforadora está en la taza y es extremadamente filosa. Coloque el estante de huevo en la base. Coloque la tapadera sobre el estante de huevo. Conecte al tomacorriente, su hervidor de huevos está listo para usar. Huevos Blandos Huevos a Medio Cocer 1 – 7 Huevos 6 Minutos 1 – 7 Huevos 9 Minutos Huevo toTalmente Cocido 1 – 7 Huevos 12 Minutos SUGERENCIAS #1: Refrigere los huevos entes de cocinar. Siempre cocine huevos fríos. No los deje a la temperatura ambiente antes de usar o se sobrecoserán un poco. HUEVOS BLANDOS, MEDIOS O DUROS: 1. 2. 3. 4. 5. Coloque el aparato en una superficie limpia y plana. Remueva la tapadera y otras partes. Llene la tacita medidora con agua hasta la línea indicadora apropiada (Figura 1)Para mejores resultados use agua destilada, agua de tubería contiene minerales que pueden causar que los huevos se descoloren. Vacíe el agua en el plato térmico. Enjuague el número de huevos deseados, Cocine hasta 7 huevos a la vez. Figura 1 15 6. Coloque el estante de huevos en la base. 7. Utilizando la aguja bajo la taza medidora perfore la parte superior de cada uno de los huevos y póngalos en el estante de huevos asegúrese de que los hoyos perforados estén hacia arriba. No deje que los huevos toque el plato térmico. 8. Ponga la tapadera sobre la unidad y encienda empujando el interruptor. 9. Cuando el agua este completamente evaporada, los huevos estarán cocidos 10. Cuando termine el ciclo de cocinar la unidad se apagara automáticamente. 11. Remueva los huevos inmediatamente y enjuague con agua fría. ANTES DEL PRIMER USO HUEVOS COCIDOS: 1. 2. 3. 4. 5. 6. 7. Coloque el aparato en una superficie limpia y seca. Quite la tapadera y demás accesorios. Llene la taza con agua fría hasta la línea media. Vacíe el agua en el plato térmico Ligeramente rocíe aceite vegetal o mantequilla en el estante de huevos. Rompa un huevo y vacíe en el tazón. Coloque el estante de huevos en la base. 8. Ponga el tazón sobre el estante de huevos. 9. Ponga la tapadera en la unidad y encienda. 10. Cuando el agua se evapore completamente los huevos estarán cocidos. 11. Cuando termina el ciclo de cocinar la unidad se apagara automáticamente. 12. Remueva los huevos inmediatamente para prevenir que se sobre cocinen. 13. Use una espátula para remover los huevos. SUGERENCIAS #2 Para saber si los huevos están frescos, Vacíe agua con sal en un tazón, coloque los huevos dentro. El huevo que flote no es fresco, el que se hunde es fresco. OMELETES: 1. 2. 3. 4. 5. Llene la taza con agua hasta la línea de (Hard line) con agua fría. Vacié el agua en el plato térmico Ligeramente rocié aceite vegetal o mantequilla. Rompa hasta 3 huevos en una vasija aparte y mezcle, agregue agua y los ingredientes. Vacíe la mexcla en la bandeja para omeletes. Coloque el estante de huevos sobre la base. 6. Ponga la bandeja de omelets sobre el estante de huevos. 7. Coloque la tapadera en la unidad y enciendala. 8. Cuando el agua se haya evaporado completamente el omlete estará listo. 9. Cuando termina el ciclo de cocinar la unidad se apagara automáticamente. 10. Remueva el omelete inmediatamente para prevenir que se sobre cocinen. 11. Use una espátula para removerlos. SUGERENCIAS #3 Los niveles de agua recomendados son solo una guía, los niveles pueden ser ajustados para obtener la consistencia deceada. 16 COMO LIMPIAR 1. 2. 3. 4. 5. Siempre desconecte el hervidor de agua del tomacorriente y permita que enfrié antes de limpiar. Limpie el plato térmico y la base con un trapo húmedo. Lave los accesorios en el lavamanos con agua caliente y jabón. Quite cualquier deposito de mineral dejado por el agua, limpiando el plato térmico con una toalla de papel húmedo con una cucharada de vinagre. También trabajara como agente anti bacteria. CUIDADO: La base está extremadamente caliente después de usar. 6. 7. 8. 17 NOTA: Si la unidad no a sido limpiada con vinagre blanco regularmente, minerales naturalmente se acumularan causando descoloración en la cascara de huevo. Esto no afecta el sabor de los huevos. Limpie la base con un trapo húmedo, no lo sumerja en agua. Coloque todos los accesorios dentro de la unidad para guardar. Cualquier otro tipo de servicio deberá ser por un representante de servicio calificado y autorizad. GARANTÍA LIMITADA DE * UN (1) AÑO LA GARANTIA ES VALIDA CON UNA PRUEBA DE COMPRA FECHADA 1. 2. 3. 4. 5. 6. 7. - Su aparato de cocina está construido con precisión, inspeccionados y probados antes de salir de nuestra fábrica. Se garantiza, al comprador original, de estar libres de defectos de fabricación en condiciones de uso normales y las condiciones para un (1) año, cordones excluidos. Esta garantía se aplica sólo al comprador original de este producto. Si necesita cambiar la unidad, devuélvala en su caja original, con el recibo de compra, a la tienda donde lo compró. Si usted está más allá del plazo concedido para el retorno por la política de la tienda, por favor consulte la garantía incluida. Si utiliza el aparato para uso doméstico y de acuerdo con las instrucciones, debería ofrecerle años de servicio satisfactorio. Durante el período de garantía de un año, un producto con un defecto será reparado o reemplazado por un modelo nuevo o reacondicionado (a nuestro criterio) cuando el producto sea devuelto a nuestro Centro de Servicio. (Consulte la sección "Devoluciones" a continuación). El producto reparado o reemplazado estará garantizado por el saldo restante del período de garantía de un año y un plazo adicional de un mes. Esta garantía limitada cubre los aparatos comprados y usados en los 50 estados contiguos y el Distrito de Columbia, y no cubre: Los daños causados por el uso excesivo, negligencia, uso y desgaste normal, uso comercial, montaje o instalación incorrecta del producto. Los daños causados durante el envío. Los daños causados por la sustitución o reposición de fusibles o disyuntores. Defectos que no sean defectos de fabricación. Rotura causada por mal uso, abuso, accidente, alteración, falta de cuidado y mantenimiento, o incorrecta de corriente o voltaje. Pérdida o falta alguna pieza del producto. Las piezas se deben comprar por separado. Daños de piezas que no sean eléctricos; por ejemplo: agrietado o roto de plástico o de vidrio. Daños por servicio o reparación por personal no autorizado. Las garantías extendidas compradas a través de una empresa independiente o revendedor. Remordimiento del consumidor no es una razón aceptable para devolver un producto a nuestro Centro de Servicio. * Un año de garantía limitada válida solamente en los 50 estados contiguos y el Distrito de Columbia, excluyendo Puerto Rico y las Islas Vírgenes. Esta garantía es válida sólo si el producto es comprado y operado en los EE.UU., el uso del producto que se encuentra en violación de las instrucciones escritas proporcionadas con la unidad anulará esta garantía. Para la garantía internacional, por favor póngase en contacto con el distribuidor local. ** Cualquier instrucción o política incluida en este manual puede estar sujeta a cambios en cualquier momento. MAXI-MATIC, EE.UU. 18401 E. Ave Arenth. City of Industry, CA 91748 Departamento de Atención al Cliente: (626) 912-9877 Ext: 120/107 Lunes a viernes 8am-5pm PST Sitio web: www.maxi-matic.com email: [email protected] 18 INSTRUCCIONES DE DEVOLUCIÓN DEVOLUCIONES: A. B. Cualquier devolución de mercancía defectuosa al fabricante deben ser procesados apropiadamente contactando primero al servicio al cliente (información de contacto se muestra a continuación) para obtener un # RA (Número de autorización de devolución). No se aceptará ninguna devolución de mercancía sin un # RA aplicable. INSTRUCCIONES IMPORTANTES DE RETORNO. Su garantía depende que usted siga estas instrucciones si va a devolver la unidad a Maxi-Matic EE.UU.: 1. Empaque cuidadosamente el producto en su caja original o en otra caja adecuada para evitar daños durante el envío. 2. Antes del envío de la devolución unidad, asegúrese de adjuntar: a) Su nombre, dirección completa con código postal, número de teléfono durante el día, y #RA b) Un recibo de compra fechado o COMPROBANTE DE COMPRA, c) El número de modelo de la unidad y el problema que tiene (Encierre en un sobre y pegue directamente a la unidad antes de sellar la caja) y d) Todas las piezas o accesorios relacionados con el problema. 3. Maxi-Matic EE.UU. recomienda enviar el paquete de servicio terrestre de UPS para fines de seguimiento. No podemos asumir la responsabilidad por productos perdidos o dañados devueltos a nosotros durante el transporte entrante. Para su protección, siempre cuidadosamente empaquetar el producto para su envío y asegurarlo con la compañía. Envíos C.O.D no puede ser aceptado. 4. Todos los gastos de envío de devolución debe ser pagado por usted. 5. Marque el exterior del paquete: MAXI-MATIC EE.UU. 18401 E. ARENTH AVE. CITY OF INDUSTRY, CA 91748 6. Una vez que su devolución ha sido recibida por nuestro almacén, MaxiMatic EE.UU. se compromete a reparar o sustituir el producto si presenta defectos de materiales o mano de obra, sujeto a las condiciones del apartado B. 7. Maxi-Matic pagará los gastos de envío para enviar el producto reparado o reemplazado de nuevo a usted. 19