1
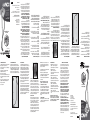
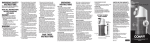
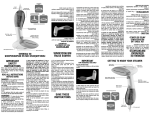
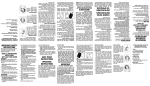
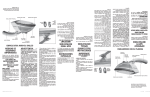
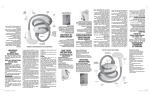
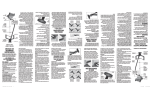
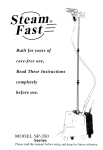
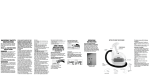
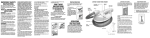
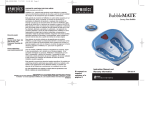
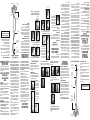
On/Off
switch
Built-in
cord wrap
Removable,
easy-to-fill and
easy-to-clean
water tank with
integrated carry
handle
Removable
5-ft. hose
in use. Avoid prolonged contact.
Caution: Hose will be hot when
OPERATING THE STEAMER
1. Make sure the On/Off switch is in the off
position.
2. Make sure all hose connections are secure
and tight.
3. Make sure the rod is fully assembled and the
hose is not twisted or kinked.
4. Plug the steamer cord into a normal electrical outlet.
5. Turn the On/Off switch to the on position.
6. The switch will light to indicate when power
is on.
7. Steam will be produced from the nozzle in
about one minute.
MEDIDAS DE
SEGURIDAD
IMPORTANTES
2. Push down.
FILLING THE WATER Tank
(PRIOR TO PLUGGING IN THE APPLIANCE)
Remove the water tank with the handle and
turn upside down. Unscrew the valve cap in
the center of the base. Fill tank by holding
tank under a source of running cold water
until the tank is filled to the desired level. Do
not overfill. Screw the valve cap onto the
water tank and return the tank to the upright
position. Place the water tank onto the base
and make
certain it is seated properly in the cavity.
DO NOT FILL THE Tank WITH HOT WATER.
Support rod with
built-in hanger
hook to hold
several garments
at once
T-nozzle cradle
Getting to know your steamer
Siempre que use aparatos eléctricos, especialmente en la presencia de niños, debe
tomar precauciones básicas de seguridad,
entre las cuales las siguientes:
Casters for rolling
steamer anywhere
Hose may be stiff upon removal from box.
Hose will relax after initial use. T-handle will
sit properly on pole support once hose is
relaxed.
3. Continue to turn
until hose is released.
1. One quarter turn.
Removing the Steamer Hose
(make sure unit has cooled)
To remove, turn counterclockwise to release.
Turn slowly.
BEFORE FILLING THE WATER Tank
Turn the water tank upside down and inspect
to make sure the valve and spring assembly
are functioning. Place the tank in the reservoir and check that it is seated securely. If
the tank has been stored with water inside, it
may be necessary to remove the water and
clean the tank. Follow the steps for care and
cleaning.
T-handle steam nozzle
with stay-cool handle
and turbo steam jets
OPERATING
INSTRUCTIONS
LEA TODAS LAS
INSTRUCCIONES
ANTES DE USARLO
MANTÉNGALO ALEJADO
DEL AGUA
PELIGRO —
20. Siempre retire el depósito de agua de
la base para llenarlo. Llene el depósito con
agua solamente.
2.Turn.
Connecting the Lint and Bristle Brush
Attachments (if model comes with
accessories)
Cualquier aparato
enchufado permanece bajo tensión, aunque
esté apagado.
Para reducir el riesgo de muerte o herida por
descarga:
1. Siempre desconecte el aparato inmediatamente después de usarlo.
2. No coloque ni guarde este producto donde
pueda caer o ser empujado a una bañera o
un lavabo.
3. No coloque el aparato ni lo deje caer al
agua u otro líquido.
4. Si el aparato cayera al agua, desconéctelo
inmediatamente. No toque el agua.
Fig. c
Slide the T-nozzle cradle
onto pole (Fig. c).
Fig. b
GUARDE ESTAS
INSTRUCCIONES
Afloje los conectores
de plástico y extienda
el soporte telescópico.
Apriete los conectores de
plástico para mantener el
soporte extendido (Fig. b).
Instale el soporte de la
boquilla sobre el soporte
telescópico (Fig. c).
PARA USO DOMÉSTICO
SOLAMENTE
DESEMPACADO
Ponga la caja sobre una superficie espaciosa,
llana y segura. Retire el aparato del material
de embalaje. Mantenga las bolsas de plástico
fuera del alcance de los niños.
ENSAMBLADO
PASO 1 - Ensamblado del soporte
telescópico
1. El soporte telescópico viene en una parte e
incluye un soporte para la boquilla.
Fig. a Inserte la parte inferior
del soporte en la base del
aparato (Fig. a). Enrosque
el tornillo de metal ubicado en la parte trasera
de la base para sujetar el
soporte.
Fig. c
PASO 2 - Conexión de la manguera
Encaje la manguera en la base y gírela en
sentido horario para sujetarla.
1. Insertar.
Open the plastic connectors and extend the
telescopic pole. Close the
plastic connectors so the
pole locks in place (Fig. b).
3. Lock.
1. Insert.
STEP 2 - Attaching the Steamer Hose
Insert hose cap into steamer housing and twist
clockwise to securely lock hose onto housing.
ADVERTENCIA –
Fig. b
STEAMER ASSEMBLY
STEP 1 - Assembling the Support Rod
1. The telescopic support rod comes in one
part: 1 collapsed pole (with plastic connectors
on it) with one T-nozzle cradle.
Insert the larger metal
Fig. a
bottom of the pole into the
holder on the unit base
(Fig. a). Twist the metal
screw on the back of the
unit base until it is tight.
UNPACKING INSTRUCTIONS
Place the box on a large, sturdy flat surface.
Carefully remove the appliance from the
packing material. Keep all plastic bags away
from children.
FOR HOUSEHOLD USE ONLY
9. No utilice una extensión con este aparato.
10. La superficie de este aparato puede volverse muy caliente durante el uso. Mantenga
los ojos y la piel alejados de las superficies
calientes.
11. No coloque la boquilla en ninguna superficie mientras esté caliente o mientras el
aparato esté conectado. Manténgala alejada
del cable eléctrico. Utilice el soporte incluido.
12. Desenchufe el aparato antes de llenar el
depósito de agua. No sobrellene el depósito.
13. El vapor que sale de la boquilla es muy
caliente. Siga las instrucciones de uso al
pie de la letra y no permita que el vapor
haga contacto con la piel, el cuero cabelludo o los ojos. Para reducir el riesgo de
quemadura, pruebe el vapor lejos de su
cuerpo antes de usarlo.
14. Nunca opere el aparato con el depósito
de agua vacío.
15. Siempre mantenga la boquilla y la manguera a un nivel más alto que el depósito.
16. Nunca jale el cordón para desconectarlo;
cójalo por la clavija.
17. Las partes de metal calientes, el agua
caliente y el vapor pueden causar heridas.
Tenga cuidado al vaciar el depósito de agua
o al voltear el aparato, puesto que el depósito
interno puede contener agua caliente.
18. Para evitar una sobrecarga eléctrica, no
conecte otro aparato de alta potencia en el
mismo circuito eléctrico.
19. Si debe usar el aparato con una extensión, utilice una extensión de 15 amperios.
Una extensión de menor amperaje podría
calentar excesivamente. Coloque la extensión
de manera que nadie la pueda jalar o tropezar con ella.
Conexión de los aditamentos (opcionales)
Cómo desconectar la manguera
Permita que el aparato enfríe.
Gire la manguera lentamente en sentido
antihorario.
1. Un cuarto de turno.
2. Oprimir.
SAVE THESE
INSTRUCTIONS
13. While emitting steam, this appliance
may cause burns if it is used too closely
to the skin, scalp or eyes, or if it is used
incorrectly. To reduce the risk of contact
with hot water emitting from steam vents,
test appliance before each use by holding
it away from body.
14. Do not operate steamer without properly
filling the water tank.
15. Always keep the hose and nozzle
elevated above the water tank.
16. Never yank cord to disconnect from outlet;
instead, grasp plug and pull to disconnect.
17. Burns could occur from touching hot
metal parts, hot water, or steam. Use care
when removing water tank or when you turn
a steam appliance upside down – there may
be hot water in reservoir.
18. To reduce likelihood of circuit overload,
do not operate another high wattage appliance on the same circuit.
19. If an extension cord is absolutely necessary, a 15 ampere rated cord should be used.
Cords rated for less amperage may overheat.
Care should be taken to arrange the cord so
that the cord cannot be pulled or tripped over.
20. Never pour water directly into reservoir.
Put water in water tank only.
2. Este aparato no debería ser usado por,
sobre o cerca de niños o personas con
alguna discapacidad.
3. Utilice este aparato únicamente con el
propósito para el cual fue diseñado y solamente según las instrucciones. Sólo use
accesorios recomendados por el fabricante.
4. No opere este aparato si el cordón o
la clavija estuviesen dañados, después
de que hubiese funcionado mal o que se
hubiese caído o si estuviese dañado. No
intente reparar el aparato. El ensamblar
las partes de manera incorrecta aumenta
los riesgos de incendio, electrocución y
heridas. Regrese el aparato a un centro
de servicio autorizado para su revisión,
reparación o ajuste.
5. No permita que el cordón haga contacto
con las partes calientes. No jale ni retuerce
el cordón. Permita que el aparato enfríe
completamente antes de guardarlo. Enrolle el
cable sin apretar alrededor del aparato para
guardarlo.
6. El cable de este aparato está dotado de
una clavija polarizada (una pata es más
ancha que otra). Como medida de seguridad,
se podrá enchufar de una sola manera en el
tomacorriente polarizado. Si no entrara en el
tomacorriente, inviértela. Si aún no entrara
completamente, comuníquese con un electricista. No intente ir en contra de esta función
de seguridad.
7. Nunca deje caer ni inserte un objeto en
ninguna de las aberturas.
8. No lo utilice en exteriores, ni lo haga
funcionar donde se estén usando productos
en aerosol (spray) o donde se esté administrando oxígeno.
DE OPERACIÓN
INSTRUCCIONES
ANTES DE LLENAR EL DEPÓSITO DE AGUA
Voltee el depósito e inspecciónelo para
asegurarse que la válvula y el resorte estén
funcionando. Ponga el depósito de agua en
el depósito interno y compruebe que está
bien fijo. Si el depósito se ha almacenado
con agua adentro, puede que sea necesario
limpiarlo antes de volver a llenarlo. Véase las
instrucciones de limpieza.
LLENADO DEL DEPÓSITO(ANTES DE
CONECTAR EL APARATO)
Agarre el depósito de agua por el asa y
retírelo de la base. Voltéelo. Desentornille la
tapa. Llene el depósito con agua fría, hasta el
nivel deseado. No sobrellene el depósito.
Vuelva a instalar la tapa y voltee el depósito.
Coloque el depósito en la base y compruebe
que está bien fijo.
NO LLENE EL DEPÓSITO CON AGUA
CALIENTE.
3. Seguir girando
hasta aflojar la
manguera.
2. Girar.
4. Never operate this appliance if it has a
damaged cord or plug, if it is not working properly, or if it has been dropped or
damaged, or dropped into water. Do not
attempt to repair the appliance. Incorrect
reassembly or repair could cause a risk
of fire, electric shock, or injury to persons
when the appliance is used. Return the
appliance to an authorized service center
for examination and repair.
5. Do not allow cord to contact heated surfaces. Do not pull or twist cord. Let appliance
cool completely before putting away. Loop
cord loosely around appliance when storing.
6. This appliance has a polarized plug (one
blade is wider than the other). As a safety
feature, this plug will fit in a polarized outlet
only one way. If the plug does not fit fully
in the outlet, reverse the plug. If it still does
not fit, contact a qualified electrician. Do not
attempt to defeat this safety feature.
7. Never drop or insert any object into any
opening or hose.
8. Do not use outdoors or operate where
aerosol (spray) products are being used or
where oxygen is being administered.
9. Do not use an extension cord to operate
appliance.
10. Surfaces of this appliance may be hot
when in use. Do not let heated surfaces
touch eyes or bare skin.
11. Do not place the steam nozzle directly on
any surface or on the appliance power cord
while it is hot or plugged in. Use the stand
provided.
12. Unplug this appliance before filling or
emptying. Do not overfill.
Para reducir el
riesgo de quemaduras, electrocución, incendio o heridas:
1. Nunca deje el aparato desatendido
mientras esté conectado.
FAMILIARÍCESE CON SU
DESARRUGADOR DE PRENDAS
Boquilla con chorros de
vapor turbo y mango
aislante
Soporte para la
boquilla
Soporte con gancho
integrado para colgar
varias prendas a
la vez
Manguera
amovible de
1.50 m
burns, electrocution, fire, or injury to persons:
1. This appliance should never be left
unattended when plugged in.
2. This appliance should not be used by, on,
or near children or individuals with certain
disabilities.
3. Use this appliance only for its intended use
as described in this manual. Do not use attachments not recommended by the manufacturer.
WARNING — To reduce the risk of
cally live even when the switch is off.
To reduce the risk of death by electric shock:
1. Always unplug appliance immediately
after using.
2. Do not place or store appliance where it
can fall or be pulled into a tub or sink.
3. Do not place in, or drop into water or other
liquids.
4. If an appliance falls into water, unplug it
immediately. Do not reach into the water.
READ ALL INSTRUCTIONS
BEFORE USING
KEEP AWAY FROM
WATER
DANGER — Any appliance is electriWhen using electrical appliances, especially
when children are present, basic safety precautions should always be taken, including
the following:
IMPORTANT SAFETY
INSTRUCTIONS
FUNCIONAMIENTO DEL APARATO
1. Asegúrese que el aparato esté apagado
(OFF).
2. Asegúrese que la manguera esté debidamente conectada.
3. Asegúrese que el soporte telescópico esté
debidamente ensamblado y que la manguera
esté bien recta.
4. Enchufe el cordón en un tomacorriente.
5. Encienda el aparato (ON).
6. El interruptor se encenderá.
7. El aparato empezará a producir vapor
después de aproximadamente un minuto.
Precaución: La manguera se
vuelve muy caliente durante el uso.
Evite tocarla.
Tanque extraíble
con asa, fácil de
llenar y limpiar
Espacio para
guardar el
cordón
Puede que la manguera esté rígida al principio. Después de usarla, se relajará. La
boquilla encajará entonces en el soporte.
3. Sujetar.
Ruedecillas para
mayor movilidad
Botón de encendido/apagado
Con práctica, desarrugar prendas se volverá
más fácil y rápido cada vez y usted aprenderá cual telas necesitan varias pasadas.
Las telas densas pueden necesitar más de
una pasada. Repita cuantas veces sea necesario.
NOTA: Haga una prueba en un área discreta
de la tela antes de desarrugar la prenda. Se
le hará más fácil desarrugar toallas, servilletas y manteles si están colgados en una
barra.
• PROBLEMA - El aparato produce poco
vapor
CAUSA - Depósitos de sarro
SOLUCIÓN - Elimine el sarro
• PROBLEMA - La boquilla borbota
CAUSA - Condensación en la manguera
SOLUCIÓN - Alce la manguera para que el
agua baje
• PROBLEMA - Gotas de agua salen de la
boquilla
CAUSA - Condensación en la manguera
SOLUCIÓN - Alce la manguera para que el
agua baje
• PROBLEMA - El aparato no produce vapor
CAUSA - El nivel de agua está bajo
SOLUCIÓN - Apague el aparato y llene el
depósito
RESOLUCIÓN DE PROBLEMAS
• PROBLEMA - El aparato no calienta
CAUSA - El aparato no está enchufado
SOLUCIÓN - Enchufe el cordón en un tomacorriente
HOW TO STEAM
Grasp the T-handle steam nozzle with the
steam jets facing away from you. Begin at
the bottom of the fabric to allow the steam
to rise inside and outside, removing
wrinkles. Slowly move the nozzle from the
bottom to the top of the fabric. Remove the
nozzle from the garment and smooth the
fabric with your free hand. Some fabrics are
best steamed on the underside of the material. This will allow the fibers of the fabric to
relax, eliminating wrinkles.
Do not directly touch velvet or silk with the
steam head.
Always steam with hose in upright
position, so any condensation is free
to flow back into the steamer.
If you steam with hose not upright, condensation will collect inside the hose. This will
cause gurgling and some water droplets to
form near the steam jets on the T-handle.
To avoid this, frequently lift the steam handle
upward until the hose is extended to its full
height.
TO STEAM DRAPES
Wash and dry drapes as directed according
to fabric type. Re-hang drapes and steam
drapes when in place.
• PROBLEM - Water drips from nozzle
CAUSE - Condensation in hose
SOLUTION - Hold the hose vertically
and allow water to drain back into unit
• PROBLEM - Nozzle gurgles
CAUSE - Condensation in hose
SOLUTION - Hold the hose vertically
and allow water to drain back into unit
• PROBLEM - Poor steam performance
CAUSE - Sediment in tank
SOLUTION - Decalcify reservoir and water
tank
Note: Minerals in water will vary in
different areas. To ensure continued operation of the steamer, never store without
cleaning and removing excess water from
the reservoir and water tank.
IMPORTANTE
Puede que la manguera borbote durante
el uso. Esto es el resultado normal de la
acumulación de condensación adentro de la
misma. Si esto ocurriera, simplemente alce la
manguera hasta que quede completamente
extendida. Esto permitirá que la condensación baje hacia el depósito de agua.
No permita que la boquilla haga contacto con
seda o terciopelo.
• PROBLEM - No steam
CAUSE - Water level is low
SOLUTION - Turn On/Off switch off and
refill water tank
ELIMINACIÓN DEL SARRO
Si nota que el aparato produce menos vapor
o funciona de manera intermitente, o si el
indicador de agua baja se enciende aunque
el depósito de agua está lleno, puede ser
necesario eliminar el sarro de su desarrugador de prendas. Depósitos de sarro pueden
acumularse en las partes metálicas internas
del aparato. Para lograr un desempeño
óptimo, deberá eliminarlos regularmente. La
frecuencia de la limpieza dependerá de la
dureza del agua y de la frecuencia de uso del
aparato.
Siempre sostenga la boquilla recta y alta,
para que la condensación baje hacia el
depósito.
Heavier fabrics may require repeated steaming. Repeat as necessary.
LIMITED ONE-YEAR WARRANTY
Conair will repair or replace (at our option)
your unit free of charge for 12 months from
the date of purchase if the appliance is
defective in workmanship or materials.
To obtain service under this warranty, return
the defective product to the service center
listed, together with your purchase receipt
and $3.00 for postage and handling. California
residents need only provide proof of purchase
and should call 1-800-366-0937 for shipping
instructions. In the absence of a purchase
receipt, the warranty period shall be 12
months from the date of manufacture.
ANY IMPLIED WARRANTIES, OBLIGATIONS
OR LIABILITIES, INCLUDING BUT NOT
LIMITED TO THE IMPLIED WARRANTY OF
MERCHANTABILITY AND FITNESS FOR A
PARTICULAR PURPOSE, SHALL BE LIMITED
IN DURATION TO THE 12-MONTH DURATION
OF THIS WRITTEN, LIMITED WARRANTY.
Some states do not allow limitations on how
long an implied warranty lasts, so the above
limitations may not apply to you.
IN NO EVENT SHALL CONAIR BE LIABLE
FOR ANY SPECIAL, INCIDENTAL, OR
CONSEQUENTIAL DAMAGES FOR BREACH OF
THIS OR ANY OTHER WARRANTY, EXPRESS
OR IMPLIED, WHATSOEVER. Some states do
not allow the exclusion or limitation of special,
incidental, or consequential damages, so the
above limitation may not apply to you. This
warranty gives you specific legal rights, and
you may also have other rights, which vary
from state to state.
LIMPIEZA Y ALMACENAJE
Apague (OFF) y desconecte el aparato antes
de limpiarlo.
2. Permita que el aparato enfríe durante 30
minutos o más.
3. Desconecte el cable y enróllelo alrededor
de la base del aparato.
4. Desconecte la manguera.
5. Retire el depósito de agua de la base,
desentornille la tapa y tire el agua remanente
en el depósito. Permita que seque al aire
libre.
6. Vacíe el agua remanente en el depósito
interno, volteando el aparato encima del
fregadero.
7. Vuelva a instalar el depósito de agua.
8. Guarde el aparato.
TROUBLESHOOTING
• PROBLEM - Steamer fails to heat
CAUSE - Steamer not plugged in
SOLUTION - Plug into electrical outlet
With practice, you will gain speed and
efficiency. You will soon learn which fabrics
require multiple steam applications.
Remove excess water from the reservoir
by lifting the unit, inverting and pouring
the water into a sink, allowing it to drain
from internal reservoir. Repeat the above
procedure as many times as necessary until
a normal steam rate returns, usually 2–3
times. With each repeated cycle, use a fresh
solution of vinegar and water. Run one cycle
of fresh, cold water through the unit at the
completion of decalcification before using
the unit again to steam garments.
Vacíe entonces el depósito interno, sosteniendo el aparato al revés encima del fregadero.
Repita estos pasos 2 ó 3 veces, usando cada
vez una nueva mezcla de agua con vinagre,
hasta que el vapor salga normalmente de la
boquilla. Antes de volver a usar el aparato
para desarrugar prendas, repita estos pasos
con un depósito de agua fresca.
NOTE: Test fabric for color fastness in an
inconspicuous spot. Drape linens, towels,
handkerchiefs and napkins over a rod or
place on a towel rack.
Para eliminar el sarro: Mezcle 1/3 de vinagre
blanco con 2/3 de agua y vierta la mezcla
en el depósito de agua. Vuelva a colocar el
depósito en la base. Encienda el aparato.
Deje el aparato encendido hasta que la
mitad del líquido (1 litro) se haya evaporado.
Después, apague y desconecte el aparato, y
déjelo enfriar durante 30 minutos. Retire el
depósito de agua de la base.
Si la manguera no estuviera recta, condensación podría acumularse adentro de la
manguera, haciendo que ésta gorgotee y que
agua salga de la boquilla. Si esto ocurriera,
simplemente alce la manguera hasta que
quede completamente extendida.
Nota: El agua de la llave puede tener un
alto contenido en minerales. Para lograr
un desempeño óptimo, vacíe el agua
remanente en el depósito de agua y el
depósito interno después de cada uso.
To decalcify, use a solution of 1/3 white vinegar and 2/3 water in the water tank. Replace
the water tank in the unit. Plug the unit into
electrical outlet. Turn to the on position and
run until half the amount has steamed (1
liter). Turn the unit to the off position, unplug
from electrical outlet, and allow to sit for 30
minutes. Remove water tank.
CONSEJOS PARA DESARRUGAR CORTINAS
Lave y seque las cortinas según las instrucciones del fabricante. Vuelva a colgar las
cortinas antes de desarrugarlas.
DECALCIFICATION
If the appliance begins to produce steam
more slowly than usual, if the steamer stops
producing steam and then starts again, or
if the low-water indicator lamp illuminates
even with water tank full, you may need to
decalcify your steamer. Decalcification refers
to removing the calcium deposits that form
over time on the metal parts of the steamer.
For best performance from your Conair®
Fabric Steamer, decalcify the unit from time
to time. The frequency depends upon the
hardness of your tap water and how often
you use the steamer.
CÓMO DESARRUGAR PRENDAS
Sostenga la boquilla con los orificios frente
a la prenda. Mueva la boquilla lentamente
desde abajo hasta arriba, por dentro y por
fuera. Para terminar, aleje la boquilla y alise
la tela con la palma de su mano. Algunos
tejidos son más fáciles de desarrugar por
dentro. Esto relaja las fibras, lo que ayuda a
eliminar las arrugas.
10PA115424
IB-8758
®
©2010 Conair Corporation
East Windsor, NJ 08520/Glendale, AZ 85307
Para más información sobre los productos Conair,
llame al: 1-800-3-CONAIR o visítenos en:
www.conair.com
Para registrar su producto, visítenos en
www.conair.com/registration
Centro de servicio
Conair Corporation
Service Department
7475 N. Glen Harbor Blvd.
Glendale, AZ 85307
Para su seguridad y para
disfrutar plenamente de
este producto, siempre
lea las instrucciones
cuidadosamente antes
de usarlo.
Instrucciones
de uso
¡Desarruga y
refresca rápidamente!
Modelo GS7
último
desarrugador de
prendas
OTHER IMPORTANT NOTES
During operation, the steamer hose may
gurgle. This is a normal result of condensation collecting inside the hose. Simply lift the
T-handle upward until the hose is extended
to its full height. The gurgling will disappear
when the excess moisture inside the hose
has had a chance to drain back into the base.
GARANTÍA LIMITADA DE UN AÑO
Conair reparará o remplazará (a su opción) su
aparato sin cargo por un período de 12 meses
a partir de la fecha de compra si presentara
defectos de materiales o fabricación.
Para obtener servicio técnico bajo esta garantía,
regrese su aparato al Centro de Servicio
indicado a continuación, junto con su recibo de
compra y un cheque o giro postal de US$3.00
por gastos de manejo y envío. Los residentes
de California sólo necesitan dar una prueba de
compra y deben llamar al 1-800-366-0937 para
recibir instrucciones de envío. En ausencia del
recibo de compra, el período de garantía será
de 12 meses a partir de la fecha de fabricación.
CUALQUIER GARANTÍA, OBLIGACIÓN O
RESPONSABILIDAD IMPLÍCITAS, INCLUYENDO
PERO NO LIMITADAS A LA GARANTÍA
IMPLÍCITA DE COMERCIABILIDAD Y APTITUD
PARA UN PROPÓSITO ESPECÍFICO, ESTARÁN
LIMITADAS POR LOS 12 MESES DE LA
PRESENTE GARANTÍA ESCRITA. Algunos
Estados no permiten limitaciones sobre la
duración de una garantía implícita, de modo
que las limitaciones mencionadas pueden no
regir para usted.
CONAIR NO SERÁ RESPONSABLE EN
NINGÚN CASO POR ALGÚN DAÑO ESPECIAL,
INCIDENTAL O CONSECUENTE DEBIDO AL
INCUMPLIMIENTO DE ESTA O CUALQUIER
OTRA GARANTÍA, EXPRESA O IMPLÍCITA.
Algunos Estados no permiten la exclusión o
limitación de daños especiales, incidentales o
consecuentes, de modo que las limitaciones
mencionadas pueden no regir para usted. Esta
garantía le otorga derechos legales específicos
y usted puede tener otros derechos que varían
de un Estado a otro.
CLEANING AND STORING
I. Turn the On/Off switch to the off position
and unplug from the power source.
2. Wait for the steamer to cool completely (at
least 30 minutes).
3. Unplug power cord and gently wrap
around built-in cord wrap.
4. Remove the steamer hose.
5. Remove the water tank from unit, unscrew
valve cap and empty unused contents. Allow
to air dry.
6. Remove excess water from the reservoir
by lifting the unit and pouring into a sink.
7. Replace water tank.
8. Store the unit.
ultimate
fabric steamer
Model GS7
De-wrinkles and
Freshens Quickly!
Service Center
Conair Corporation
Service Department
7475 N. Glen Harbor Blvd.
Glendale, AZ 85307
Instructions
for Use
Please register this product at:
www.conair.com/registration
For your safety and
continued enjoyment
of this product, always
read the instruction book
carefully before using.
For information on any Conair product call:
1-800-3-CONAIR or visit us on the web at:
www.conair.com
©2010 Conair Corporation
East Windsor, NJ 08520/Glendale, AZ 85307
10PA115424
®
IB-8758