1
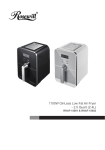
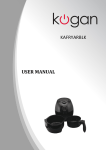
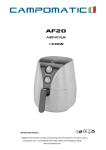
GLiP Oil-less AIR FRYER INSTRUCTION MANUAL MODEL: AF800 Introduction Thank you for your purchase and welcome to GLiP. Your new air fryer will help you to cook your favorite foods and snacks in a healthier way. The fat-free air fryer uses the principle of hot air combined with high speed air cycling (Fast Air Change). This process provides a one-time comprehensive heating, so, for most food, there is no need to add oil for cooking. With the additional roasting plate, you now have a more convenient way to make delicious foods like cake, biscuits, and much more. General Description (Fig. 1) A. B. C. D. E. F. G. H. I. J. K. L. Frying Basket Demounting Button of Frying Basket Handle of Frying Basket Fryer Frying Net Air Inlet Opening Temperature Control Button Indicator Timer Air Outlet Opening Storing Capsule of Power Wire Power Wire 1 Attention Before using this product, please read the instruction manual thoroughly. Keep this booklet for future reference. I. Important Safeguards 1. Do not soak the outer case in water or wash it under the tap, there are electronic and heating elements in the case. 2. Do not let water or other liquids flow into the product, as this may result in electric shock. 3. Always ensure that the food ingredients are in the frying basket before frying. Avoid contact with the heating elements. 4. While the product is working, do not cover the air inlet/outlet openings. 5. Never pour oil into the fryer, as this may cause a fire. 6. Do not touch the inside of the product while it is working. II. Warnings 1. Before plugging the product into an outlet, please check that the power provided is in accordance with the power rating of the product. 2. If there is damage to the plugs, power wire or the product, you should no longer use the product. 3. If the power wire is broken, it must be replaced by service technicians from the manufacturer, repair, or similar department to avoid danger. 4. This product can be used by children over the age of 8 and persons with disabilities, so long as supervision and assistance is provided, as needed, to ensure their safety. 5. Take care that children do not play with the product as a toy. 6. When the product is in use or is cooling, keep the unit and the power wire out of the reach of children under the age of 8. 7. Do not let the power wire touch hot surfaces. 8. Never touch the plug, wall socket, or control panel of the product with wet hands as this may cause an electric shock. 9. The product must be connected with a grounded socket and care must be taken that the plug has been inserted correctly to operate safely. 10. Never connect the product to an external timer, this may be dangerous. 11. Never put the product on or near combustible material like table cloth, curtain, etc. 12. Never put the product against a wall or other products. There should be at least 4 in. of free space on all sides of the product. Do not place things on top of the product. 13. Never use the product for purposes other than its intended use. 14. The product must be watched by someone while it is operating. 15. During operation, hot steam will be emitted from the air outlet opening. Make sure to keep your hands and face, as well as those of others, away from the steam and the air outlet opening. Also, watch out for hot steam and air while removing the fryer from the rest of the product. 16. When the product is in use and for a time after it has finished, the surface it touches might become very hot. (Fig. 2) 17. If the product is smoking, unplug the power immediately. Remove the fryer away from the product after it has stopped smoking. 2 18. Do not touch the surface of the product during or after use as it may be hot, use the knobs and handles. 19. To protect against electrical shock do not immerse the cord, plug, or appliance in liquid. 20. The use of accessory attachments is not recommended as it may be hazardous and cause injuries. 21. Do not place the product on or near a hot gas or electric burner, or on a heated oven. 22. Do not let the power wire hang over the edge of the table or counter where it is placed. Also, do not let the wire touch hot surfaces. 23. Always attach the plug to the appliance first, then plug the cord into the wall outlet. To disconnect, turn any control to OFF, then remove the plug from the wall outlet. 24. A short power supply cord should be used to reduce the risk resulting from becoming entangled in or tripping over a longer cord. However: Longer detachable power supply cords or extension cords are available and may be used if care is exercised in their use. If a longer detachable power-supply cord or extension cord is used: i. The marked electrical rating of the cord set or extension cord should be at least as great as the rating of the appliance; and ii. The cord set or extension cord should be a grounded 3-wire cord. iii. The cord should be arranged so that it will not drape over the counter or table where it can be pulled on by children or tripped over unintentionally. 25. Unplug the product from the outlet when it is not in use and before cleaning. Allow it to cool before putting on or taking off parts. 26. This product is for household use only. III. Notices 1. Place the product on a surface that is leveled, even, and stable. 2. The product is limited to normal domestic usage. It should not be used in the dining rooms of shops, offices, farms or other working environments. And should not be used by customers in hotels, motels, guest houses, breakfast rooms, or other accommodation environments. 3. If the customer has used the product incorrectly, or has used the product for professional or half-professional purposes, they are responsible for any of the damages caused by its improper usage. 4. The product can be only sent to a repairing center authorized by Glip for repairs. Do not repair the product by yourself, as this will invalidate the warranty. 5. Always unplug the power after use. 6. Before cleaning the product, allow for 30 minutes to pass so that the appliance may cool down. 7. Ensure that the food ingredients fried in the product turn to a golden color, and do not blacken or burn. Burned pieces should be discarded. IV. Automatic Turn Off This product is equipped with a timer. When the timer counts down to OFF, the product timer bell will ring and automatically turn off. To manually turn off the product, please turn the knob of the timer counterclockwise to OFF. 3 Before the First Use 1. Remove all the packing material. 2. Remove any stickers or labels from the product. 3. Clean the frying basket and the frying pan thoroughly with hot water, mild dish soap and a non-abrasive sponge. Tip: These parts can also be cleaned in a dishwasher. 4. Wipe the inside and outside of the product with a wet cloth. Operation Preparation 1. Place the product on a surface that is leveled, even, and stable. Do not place the product on surfaces that are not heat-resistant. Important: Never put things on top of the product, as this will impact the air flow and reduce the effect of Fast Air Change. 2. Place the frying basket into the fryer correctly. (Fig. 3) Important: Never pour oil or other liquid into the fryer. 3. Pull the wire out of the wire capsule at the bottom of the product. Operating this Product The fat-free fryer can be used to cook many types of food ingredients. The additional recipe cookbook will assist you in getting to know this product. I. Fat-Free Frying 1. 2. 3. 4. Insert the plug into a grounded socket. Pull out the frying pan carefully from the fat-free fryer. (Fig. 4) Put the food ingredients into the frying basket. (Fig. 5) Slide the frying pan back to the fat-free fryer. (Fig. 6) Important: Do not use the fryer before putting in the frying basket. 5. Adjust to the required temperature by turning the temperature control knob. Please refer to the “Settings” section of this chapter. (Fig. 7) Important: Do not touch the fryer shortly after it has begun to operate, as it is can get very hot. Only move the fryer by holding the handle. 6. Determine the time for cooking the food ingredients. Please refer to the “Settings” part of this chapter. 7. To turn on the product, please adjust the knob of the timer to the required time for cooking. (Fig. 8) If the product starts cold, the cooking time should be 3 minutes longer. Tip: If required, you can preheat the product without putting in the food ingredients. To do this, turn the timer knob to more than 3 minutes, then wait for the heating indicator lamp to turn off (about 3 minutes later). After that, put in the frying basket and adjust the timer knob to the required cooking time. 8. At this time, the power wire indicator lamp and the heating indicator lamp will turn on. (Fig. 9) Tip: During the operation of the fat-free fryer, the heating indicator lamp will turn on and off occasionally. This shows that the heating components are turning on and off, as to maintain the set temperature. 9. The timer will begin to count down the set cooking time. The excess oil from the food 4 ingredients will be collected at the bottom of the frying pan. 10. Some food ingredients require shaking halfway through cooking (refer to the “Settings” section of this chapter). To shake the food ingredients, hold the handle and pull out the frying pan from the product, and then proceed to shake. When finished, slide the frying pan back into the fat-free fryer.(Fig. 10) Important: Do not press the demounting button of the frying basket while shaking the food ingredients. (Fig. 11) Tip: To reduce the weight, you can remove the frying basket from the frying pan, so you only have to shake the basket. To do so, please pull out the frying pan from the product, put it on a heat resistant surface, then press the demounting button of the frying basket. Tip: If you set the time to only half of the cooking time, then you will hear the timer bell ring when the food needs to be shaken. Afterward, you must set the timer for the remaining preparation time to complete the cooking. 11. When the timer bell rings, the set preparation time has elapsed. Pull the frying pan out of the product, and place it on a heat-resistant surface. Tip: You can also turn off the product manually. To do this, turn the timer knob to OFF. (Fig. 12) 12. Check to see if the food ingredients thoroughly cooked. If the food ingredients require more cooking, then slide the frying pan into the product and set the timer to a few extra minutes. 13. To remove small food ingredients (e.g. fries), press the demounting button of the frying basket, and take the frying basket out of the frying pan. (Fig. 13) 14. 15. 16. 17. Important: Do not turn the frying basket upside down before demounting the frying pan, as this will cause the excess oil collected at the bottom of the pan to leak onto the food ingredients. To remove large or fragile food ingredients, use a pair of tongs to take them out of the basket. After cooking, the frying pan and the food ingredients are still very hot. Depending on the type of food ingredients in the fryer, steam may escape from the fryer. Empty the basket into a bowl or plate. (Fig. 14) After completing one batch of food ingredients, the fryer can begin to cook another batch immediately. II. Settings The following table will assist you to select the basic settings for the food ingredients you want to cook. 1. Please remember that these are only suggested settings. Food ingredients differ in source, size, shape, and brand. We cannot guarantee to provide the best settings for your food ingredients. 2. Since the Fast Air Change technology will rapidly reheat the air inside the product, briefly removing the frying pan from the fryer will hardly disturb the process of cooking. 3. Smaller food ingredients will require less time for cooking than larger ingredients. This should be considered when consulting the chart. Remember that food ingredients can be cooked for a few minutes more if they have not achieved a golden color, but if they are burned they should be discarded. 4. A larger amount of food ingredients will only require a small increase in cooking time. A smaller amount of food ingredients will only require a small decrease in cooking time. 5 5. Shaking smaller food ingredients halfway through cooking promotes even frying and golden color. 6. Add a small amount of oil to fresh potatoes for a crispier result. After adding the oil, let the food ingredients stand for a few minutes before frying them in the fat-free fryer and make sure to shake off excess oil. 7. Never cook greasy food in the fat-free fryer, like sausages. The high fat content may cause oil to leak into the pan and smoke. 8. Snacks that can be cooked in an oven can also be cooked in the fat-free fryer. Snacks the can only be prepared in a traditional fryer should not be fried in this product. 9. The best weight for preparing crisp fries is 1 lb/ 0.45 kg. 10. Snacks can be made quickly and conveniently with pre-made dough. Compared to homemade dough, pre-made dough requires a shorter cooking time. 11. You can use the fat-free fryer to reheat food ingredients. To reheat, please set the temperature to 300°F, for up to 10 minutes. Potatoes and Fries Type Minimum-Maximum Amount (oz) Time (minutes) Temperature Thin Frozen Potato Fries 10-25 12-16 390 Yes Thick Frozen Potato Fries 10-25 12-20 390 Yes Homemade Fries (¼ inch) 10-28 18-25 355 Yes Add 1/2 TBSP oil Homemade Potato Wedges 10-28 18-22 355 Yes Add 1/2 TBSP oil 12-18 355 Yes Add 1/2 TBSP oil Homemade Potato Cubes 10-25 (℉) Shake? Additional Information Meat and Poultry MinimumMaximum Amount (oz) Time (minutes) Temperature (°F) Steak 4-18 8-12 355 Pork Chops 4-18 10-14 355 Hamburger 4-18 7-14 355 Chicken Wings 4-18 13-15 355 Chicken Drumstick 4-18 18-22 355 Chicken Breast 4-18 10-15 355 Type 6 Shake? Additional Information Snacks MinimumMaximum Amount (oz) Time (minutes) Temperature Onion Rings 10-25 12-16 Frozen Chicken Nuggets 4-18 Frozen Fish Sticks Shake? Additional Information 390 Yes Use oven-ready 6-10 390 Yes Use oven-ready 4-16 6-10 390 Frozen Cheese Sticks 4-16 8-10 355 Mixed Vegetables 4-16 10 320 Type (℉) Note: If the fat-free fryer starts cold, the cooking time should be 3 minutes longer. III. Making Homemade Fries For the best result, we advise you to use pre-made fries (e.g. frozen fries). To make homemade fries from scratch, please follow the steps below: 1. Peel the potatoes and cut them into small fries. 2. Soak the fries in a bowl for at least 30 minutes, take them out, drain and dry them on a paper towel. 3. Pour ½ tablespoon of olive oil into a bowl, put the fries into the bowl and mix them around until all the fries are oiled evenly. 4. Remove the fries out of the bowl with your hands or a kitchen utensil, allowing the excess to collect in the bowl. Then place the fries into the frying basket. Tip: Do not pour the fries into the basket all at once, move them a small amount at a time allowing oil to drain off the fries. This will prevent excess oil from collecting at the bottom of the pan. 5. Cook the fries following the instructions in this chapter. Cleaning Clean the product after each use. The inside of the pan, basket and the product are all covered with non-stick coating. Do not use metal kitchen utensils or abrasive cleaning materials to clean the product or its parts, as this will damage the non-stick coating. 1. Unplug the product from the power socket and let it cool down. Tip: Removing the pan will allow the fryer to cool down more quickly. 2. Wipe the outside of the product with a moist cloth. 3. Clean the pan and basket with hot water, mild dish soap and a non-abrasive sponge. If grease sticks to the pan or basket please add hot water to the pan, and then soak the basket in the pan for 10 minutes. 4. Clean the inside of the product with hot water and a non-abrasive sponge. 5. Use a cleaning brush to gently clean the heating component of any remaining food residues. 7 Storage 1. Unplug the product and let it cool down thoroughly. 2. Make sure that all the components are cleaned and dried 3. Push the electric wire into the wire storing capsule. Warranty and Service If you need the service or information, or have any questions, you can communicate with us. Website: www.glipproducts.com Toll Free Number: 888-339-1178 E-mail: [email protected] Troubleshooting Problem Possible Causes The air fryer does not work. Solutions 1. The product is not plugged into 1. Insert the plug into a grounded power socket. the power socket. 2. Turn the timer knob to the required preparation time needed for 2. You have not set the timer. cooking, and then turn on the power. The ingredients are not fully 1. The amount of food ingredients 1. Put smaller batches in the basket. Small batches fry more evenly. cooked/ golden brown by the in the frying basket is too large. 2. Turn the temperature control knob to the required temperature. air fryer. 2. The temperature is set too low. (Refer to the “Settings” section in the chapter “Operating this Product.”) 3.Then cooking time is too short. 3. Turn the timer knob to the required time for cooking. (Refer to the “Settings” section in the chapter “Operating this Product.”) The ingredients are not cooked evenly by the air fryer. Some food ingredients should be Ingredients that lie on the top of or across other food (e.g. fries), must shaken halfway through cooking. be shaken in the process of cooking. Please refer to the “Settings” section in the chapter “Operating this Product.” Fried snacks coming out of The fried snack must be prepared Choose oven-ready snacks, or you can add some oil on the snack to the air fryer are not crisp. in a traditional fryer. make the snack crispier. White smoke is coming out of 1. 1. the product. 2. You are cooking greasy food When you are cooking greasy ingredients in the fryer, a large ingredients. amount of oil may leak into the frying pan. The oil will produce Grease residue from previous white smoke and the pan might get hotter than usual. But, this use is still inside the frying will not impact the final result or the product. pan. 2. White smoke is produced by heating the leftover oil and fat inside the frying pan. Make sure to clean the frying pan after each use. Homemade fries are not fried You did not soak the fries properly Soak the fries in a bowl for at least 30 minutes, take them out and dry evenly inside the air fryer. before frying them. them with a paper towel. Then proceed to fry them starting at step 3 per the instructions in the “Making Homemade Fries” section of the “Operating this Product” chapter. Homemade fries are not The crispiness of the fries depends crispy when they come out of on the amount of oil and water in the air fryer. the fries. 8 1. Make sure to drain and dry the fries correctly before adding oil to them. 2. Cut the fries smaller for a crispier result. 3. Add a small amount of oil for a crispier result.