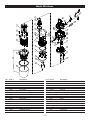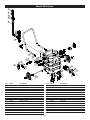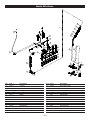
1
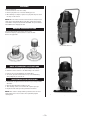
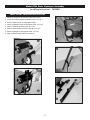
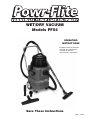
WET/DRY VACUUM
Models PF54
OPERATING
INSTRUCTIONS
Equipment must be operated,
serviced and maintained in
accordance with the
manufacturer’s instructions.
Save These Instructions
X8611 5/2006
SAVE THESE INSTRUCTIONS FOR FUTURE REFERENCE
*When using a wet/dry vacuum, basic precautions should be followed.
*Read all instructions before using your vacuum.
IMPORTANT SAFETY ADVICE
DRY OPERATION OF VACUUM
When using electrical equipment basic safety precautions should be followed including the following:
You must have training in the operation of this machine before using it.
Read all instructions carefully before use.
● Keep children and unauthorized persons away from the machine
when in use.
● Do not leave the machine plugged in when not in use.
● Switch the machine off before removing the plug from the outlet.
● When unplugging, pull the plug, not the cord.
The wet/dry vacuums are equipped with bypass motors. Install the cloth
filter, place the motor head on the canister and snap down the hold-down
clamps.
WET OPERATION OF VACUUM
The wet/dry vacuums are equipped with a bypass motor so that the working vacuum is separated from the cooling air flow. To pick up water, the
dry filters must be removed. The safety float assembly, located in the vacuum head, stops the vacuum motor when water in the tank exceeds the
safety level.
● The machine must be unplugged prior to cleaning or servicing
the machine .
WAND AND ATTACHMENT INSTRUCTIONS
● Keep the power cord clear of moving parts.
● Do not run the machine over the power cord.
● Do not operate the machine with a damaged power cord or plug,
or if the machine malfunctions or is damaged in any way.
● Do not use where hazardous dust is present.
● Do not use in an explosive atmosphere.
To assemble the two piece wand:
1. Match the alignment ridges of the upper and lower wand sections.
2. Push the upper wand into the lower wand.
To assemble tools:
1. Slide the swivel cuff of the tool onto the tapered lower wand.
2. Turn swivel cuff 1/4 turn to tighten.
● Do not use where flammable liquids or gasses are present.
● Do not use or pick up flammable chemicals or liquids with
this machine.
● Take care when using the machine near the top of stairs to avoid
overbalancing.
● Maintenance and repair must be done by authorized personnel only.
● Wear suitable footwear to avoid slipping.
● Do not operate this machine in bare feet or with open-toed shoes
or sandals.
● Do not smoke when using the machine.
● CAUTION:-This machine is for indoor use only and should not be
used or stored outdoors or in wet conditions.
–2–
DRAINING
When the tank is full.
1. Release drain hose from hose clamp.
2. Remove plug from hose end to start draining process.
3. When draining is complete, replace hose plug and snap hose back
into clips on side of tank.
NOTE: When the water level in the tank exceeds the safety level, the
safety device will automatically block the inlet, and the motor turning
sound will be changed, but power will remain ON. The power must be
turned OFF before emptying the tank.
REMOVE THE PAPER FILTER
The paper filter must be removed for wet recovery.
Push the metal ping counterclockwise to release the filter.
Remove the paper filter.
Model PF54 drain hose.
HOSE ATTACHMENT INSTRUCTIONS
The hose and swivel connector are pre-assembled at the factory.
To attach the swivel connector to the intake fitting of the canister:
1. Push the grooved cuff straight into the intake fitting.
2. To remove, press the release button on top of the intake fitting
while pulling the grooved cuff out.
MAINTENANCE AND SERVICING
1. To dismantle, unclip both latches and remove top housing and filter
with frame.
2. Wash the filter with water and allow it to dry.
3. After washing, remove excess water with a gentle squeegee.
4. Replace the filter and top housing and fasten the latches.
NOTE: This cleaner is designed with a powerful suction. Do not be
alarmed if the motor noise increases when performing tougher
cleaning work.
Model PF54 shown with optional front mounted squeegee.
–3–
Model PF54 Parts
3
2
19
1
27
5
7
6
29
44
24
30
23
9
46
31
10
12
11
32
45
12
22
34
48
12
37
13
20
19
38
15
39
17
49
41
50
17
19
43
51
ref # item #
52
81
77
1
2
803
5
6
67
7
9
10
12
13
15
17
19
22
23
24
27
70
68
description
ref # item #
description
WD20
WD66C
WD66
78
79 WD34
WD65
HANDLE
POWER CORD
EXTENSION CORD
CORD PROTECTOR
TOP COVER
29
30
31
32
34
WD68
WD70
WD69
WD85
WD166
MOTOR GASKET
SPONGE
SQUARE SPONGE
REAR WHEEL PLATE
PLATE B
WD15W
WD17
WD16
WD82
WD83
WD14B
WD84
WD53
69
WD67
WD206
MOTOR CONNECTION WIRE
WIRE PLATE
MIDDLE SEAT
LOWER BASE BLOCK
TOP BLOCK
64
MOTOR SEAT
BLOCKER
66
GASKET
POWER SWITCH
CAPACITOR
37
38
39
41
60
4361
44
46
47
48
49
50
51
WD87
WD201
WD10
WD165
WD9
WD8
WD37
WD35
WD36
WD7
HOUSING BASE
GASKET
BASE COVER
GASKET
FLOAT
FRAME
SPRING
110
HOOK
PAPER FILTER
111
FILTER FRAME
WD3
WD148
FILTER ASSY
112
FABRIC
WD207
WD15
59
62
TERMINAL BLOCK
MOTOR 91
113
92
93
–4–
114
109
31
12
Model PF54 Parts
22
34
48
90
12
32
45
37
20
89
19
38
88
87
39
86
49
41
50
19
85
43
84
83
51
82
52
81
80
76
79
77
78
75
74
70
73
59
72
71
60
61
64
66
68
62
69
67
107
91
ref # item #
description
ref # item #
description
52
59
60
61
62
64
66
67
68
69
70
71
72
73
74
75
WD120
WD50
TANK
RUBBER WASHER
WD128
WD44
CLIP BASE
92
HEX NUT
WD45
WD86
WD46
SUCTION COUPLER
BUTTON BASE
BUTTON
WD202
WD77
WD133
WASHER
93
RUBBER WASHER
COVER
WD167
WD123M
WD124M
WHEEL MOUNT BRACKET
FRONT WHEEL
REAR WHEEL
WD132
WD141
WD187
HANDLE
94
BEND CONNECTOR
95
BOTTOM SEAL
WD136
WD125
WD121
WHEEL COVER
AXEL
HOLDER
WD131
WD129
WD63
CLIP PIN
CLIP PIN
CLIP
76
77
78
79
80
81
82
83
84
85
86
87
88
89
90
WD127
WD52
106
CLAMP HOLDER
SPRING
102
WD188
101
WD189
WD143
TOP SEAL
FIXER PLATE
HOSE
97
WD190
WD146
WD144
CLAMP
HOOK
CONNECTOR B
98
WD145
TOP COVER
100
96
99
–5–
Model PF54 Parts
52
81
80
76
79
77
78
75
74
70
73
59
72
71
60
61
64
109
66
68
110
62
69
111
67
112
107
91
113
114
92
93
94
95
101
100
96
115
97
115
102
106
98
99
103
116
117
104
118
105
119
ref # item #
description
ref # item #
description
91
92
93
94
95
96
97
98
99
100
101
102
103
104
105
WD168
WD169
U-SHAFT
BUTTON
WD184
WD186
ADJUSTER LEVER
ADJUSTER LEVER KNOB
WD170
WD171
WD172
WD173
FIXED NUT
ADJUSTED WHEEL
BUTTON
WHEEL
WD191
WD24
WD25
WD26
GASKET
CONNECTOR
HOSE
CONNECTOR
WD174
WD175
WD176
SQUEEGEE BODY
BLADE BRACKET
BLADE
WD27
WD28
WD29
FIXER
BEND CONNECTOR
EXTENSION WAND
WD177
WD179
WD180
FIXED PLATE 2
PEDAL BRACKET
CONNECTOR
WD112
WD32
WD33
BRUSH NOZZLE ASS’Y
CREVICE TOOL
ROUND BRUSH
WD181
WD182
WD183
HOSE
BEND CONNECTOR
SEAL
106
107
109
110
111
112
113
114
115
116
117
118
119
WD30A
WD157
FM100H
SQUEEGEE NOZZLE ASS’Y
DRAIN HOSE ASS’Y
FRONT MOUNTED SQUEEGEE ASS’Y
–6–
Model PF54 Parts -Squeegee Assembly
Installing Instr uctions - FM100H
FRONT MOUNT SQUEEGEE INSTRUCTIONS
1.
2.
3.
4.
5.
6.
7.
Remove vacuum head and filters from the vacuum.
Install axle mounting plate to bottom of unit. See fig 1
Attach
Attach
Attach
Attach
Attach
handle bracket to squeegee bracket.
squeegee bracket to the axle bracket. See fig 2
handle to handle bracket. See fig 3
handle holder to machine handle. See fig 4
squeegee to squeegee bracket. See fig 5
8. Adjust compensating wheel as necessary.
❸
❶
❹
❷
❺
–7–
TROUBLE SHOOTING GUIDE
Loss of Suction
CAUSE:
1) Tank full.
2) Dry filter assembly clogged.
3) Clogged hose or wand.
4) Tank rim is dented.
5) Loose or broken fan.
6) Motor not working.
7) Float not functioning.
8) Seal worn.
SOLUTION:
1) Empty Tank
2) Clean cloth filter.
3) Remove obstruction.
4) Replace tank.
5) Contact manufacturer or service center.
6) Contact manufacturer or service center.
7) Check to see if float moves freely or tank is full.
8) Replace seal.
Motor is not running
CAUSE:
1) Broken switch.
2) Defective power cord.
3) Defective motor.
SOLUTION:
1) Contact manufacturer or service center.
2) Contact manufacturer or service center.
3) Contact manufacturer or service center.
Dust blowing from unit when running
CAUSE:
1) Cloth filter dirty.
2) Cloth filter is torn.
3) Cloth filter is not installed.
SOLUTION:
1) Clean cloth filter.
2) Replace filter.
3) Install cloth filter, when vacuuming very fine dust,
Water blowing from unit when running
CAUSE:
1) Tank is full of liquid.
2) Sudsy or foamy liquid is being picked up.
SOLUTION:
1) Empty tank.
2) Add defoamer to tank.
The Powr-Flite Limited Warranty
The manufacturer warrants to the original purchaser that products manufactured are free from defects, provided such goods are
installed, operated and maintained in accordance with written manuals or other instructions for a period of 1 year from date of purchase on workmanship, motor, and parts. In case you, as our customer, meet any trouble with your machine, contact a Powr-Flite
representative, who will be happy to be of service to you and will take care of any warranty issues.
3101 Wichita Court
Fort Worth, TX 76140
800.880.2913