1
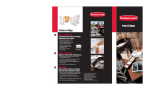
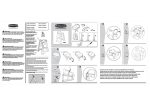
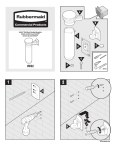
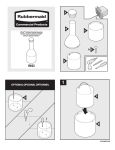
A
B x2
C
D
4212 & 4213
4212
4213
E
4215
1
2
A
B
Use a magazine to protect
your floor!
Employez un magasin pour
protéger votre plancher!
B
Utilice un compartimiento
para proteger su suelo!
C
#70-4212-88
4
3
4212 & 4213
E
1
D
2
If handle becomes disconnected, repeat step 3./ Si le traitement devient débranché,
répétez l'étape 3./ Si la manija se desconecta, relance el paso de progresión 3.
To Clean Sweeper (4212/4213 Only)—Maintain your sweeper by keeping the brush roll clean and free of accumulated hair, thread, and other fibrous materials.
There is a plastic comb enclosed with your sweeper which can be stored, and snapped on the handle. To remove the brush roll, turn the sweeper upside down, rest
it on the handle on the floor and then pull outward on the black tabs (4212) or the sidewall (4213) which hold the brush roll in place. At the same time, pull the
brush roll upward. After cleaning the brush roll, reinsert it in reverse making sure both ends of the brush roll are in place.
To Empy Sweeper (4212)—Empty your sweeper by turning it upside down with the handle grip on the floor. Then, with your thumbs, depress the areas marked
“PUSH”. Open both dust pans, turn the sweeper right side up over the wastebasket and then shake dirt into the wastebasket.
(4213/4215)—Empty your sweeper by holding the unit right side up over the wastebasket, and push down on the tabs on the side of the unit to open the dust
tray. There is an arrow and the word “PUSH” indicating the location of the dust tray tabs. Repeat for the other dust tray.
Nettoyage de la balayeuse (4212/4213 uniquement)—Pour un meilleur entretien de votre balayeuse, évitez les accumulations de cheveux, fils et autres
matières fibreuses et maintenez le rouleau à brosse propre. La balayeuse est fournie avec un peigne en plastic que vous pouvez ranger en le fixant sur le manche.
Pour retirer le rouleau à brosse, retournez la balayeuse, appuyez le manche sur le sol, puis tirez vers l’extérieur les languettes noires (4212) ou la bande latérale
(4213) maintenant le rouleau à brosse en place. En même temps, tirez le rouleau à brosse vers le haut. Après le nettoyage, remettez-le en position en suivant ces
instructions à l’inverse. Vérifiez que les deux extrémités du rouleau à brosse sont bien en place.
Vidage de la balayeuse (4212)—Pour vider la balayeuse, retournez-la de manière à ce que le manche soit au sol. À l’aide des pouces, appuyez sur les zones indiquées par
le mot « PUSH » (Pousser). Ouvrez les deux pelles à poussière, retournez la balayeuse au-dessus de la poubelle et secouez pour faire tomber la poussière dans la poubelle.
(4213/4215)—Pour vider la balayeuse, tenez-la dans le bon sens au-dessus de la poubelle et enfoncez les languettes latérales pour ouvrir le récipient à poussière. Une
flèche et le mot « PUSH » (Pousser) indiquent l’emplacement des languettes du récipient à poussière. Répétez la même opération pour l’autre récipient à poussière.
Para Limpiar la Barredora (Solo 4212/4213)—Para el mantenimiento de la barredora, mantenga el rollo del cepillo limpio y libre de pelo acumulado, hilo u otro
material de fibra. Hay una peinilla de plástico adjunta con su barredora que puede ser almacenada y encerrada en el mango. Para remover el rollo del cepillo, gire
la barredera hacia abajo, apóyela en el mango sobre el piso y luego tire hacia afuera de las lengüetas negras (4212) o de las paredes de los lados (4213) que mantienen al cepillo en su lugar. Al mismo tiempo, hale el rollo del cepillo hacia arriba. Después de limpiar el rollo del cepillo, vuélvalo a insertar en reverso asegurándose que los dos extremos del rollo del cepillo estén en su lugar.
Para Vaciar la Barredora (4212)—Vacíe su barredora girándola hacia abajo con el mango en el suelo. Después, con los dedos pulgares presione las áreas marcadas
“PUSH”. Abra los dos recipientes de polvo. De vuelta la barredora con el lado derecho hacia arriba sobre el basurero y después sacuda la basura sobre el basurero.
(4213/4215)—Vaciar su barredora manteniendo la unidad con el lado derecho hacia arriba sobre el basurero, y presionar las lengüetas de los lados de la unidad
para abrir los recipientes de polvo. Existe una flecha y la palabra “PUSH” indicando la ubicación de las lengüetas del recipiente de polvo. Para el otro recipiente de
polvo, repita la misma operación.
Products manufactured under quality management
system registered to ISO 9001:2000
©2007 Rubbermaid Commercial Products LLC
Printed in U.S.A.
Product # 4212, 4213, 4215
Rubbermaid Commercial Products LLC
3124 Valley Avenue
Winchester, VA 22601 U.S.A.
Phone: 540-667-8700
Fax: 540-542-8770
www.rubbermaidcommercial.com #70-4212-88