1
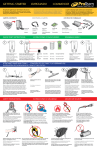
SP6768-3 PROTEAM 4 GALLON
10/22/12
7:01 PM
Page 5
ELECTRICAL CORD CARE
When vacuuming is complete, unplug the cord and wrap it around the motor cover.
If the power cord is damaged, it must be replaced by the manufacturer or their
service agent or by similarly qualified personnel to reduce the risk of accident.
NEVER stretch the cord tightly between the Vacuum and the outlet. A cord that is
stretched or pulled will not function properly and creates a danger.
After vacuuming, unplug the cord and wind it up as described on page 12.
DO NOT wind up the cord wrapping it around your hand and elbow.
Use only the designated ProTeam replacement cord.
Reference Important Safety Instructions item number 17.
Cord jacket type should be SJTW or better.
CARTON CONTENTS
OVERVIEW
•
•
•
•
•
•
•
•
• 4 Gallon Wet/Dry Vacuum (1)
• 4 Casters (2)
• Qwik Lock™ Fine Dust Cartridge
Filter (3)
• Master Floor Tool (4)
• Floor Brush Insert (5)
• Squeegee Insert (6)
• Carpet Insert (7)
Crevice Tool (8)
Dust Brush (9)
Claw Nozzle (10)
Diffuser (11)
Straight Wand (12)
Curved Wand (13)
Hose Assembly (14)
Owner’s Manual (15)
(5)
(1)
(6)
(7)
(8)
(2)
(11)
(3)
(14)
(12)
(13)
(10)
(4)
(15)
(9)
ProTeam
5
SP6768-3 PROTEAM 4 GALLON
10/22/12
7:01 PM
Page 6
PREPARATION FOR OPERATION
GETTING STARTED
This Wet/Dry Vacuum is intended for commercial use. It may be used for light
vacuuming of wet or dry media and may be used as a blower. The lightweight design
allows usage for most small vacuuming chores. Familiarize yourself with the
following product and features and read the entire manual for specific usage of your
new Wet/Dry Vacuum.
Familiarize yourself with the controls and features of your Wet/Dry Vacuum before
operating (Figure A).
Handle
Switch
Power
Head
Vacuum Port Inlet
Hose
Tank
Casters
Tank Latch
Power
Cord
Figure A
CASTER ASSEMBLY
Caster (4)
1. Turn the tank upside down on the
floor.
2. Insert the caster stem into the socket
on the bottom of the tank, as shown
(4 places). (Figure B).
3. Push the caster until the ball on the
caster stem is inserted all the way
into the socket. You will hear the ball
snap into the socket and the caster
will swivel easily when positioning is
correct.
Caster Stem
Caster Ball
Socket (4)
Tank
4. Turn the tank upright.
Figure B
6
ProTeam