Transcript
In2ition Installation Instructions
TM
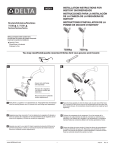
Parts Included
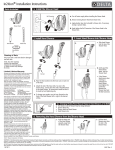
1. Install the shower head.
a. Make sure to turn off water supply before installing
the Shower Head.
b. Remove existing Shower Head from Shower Arm.
c. Apply Plumber tape to Shower Arm if necessary, to ensure a leak free connection.
d. Hand tighten the Ball Connector of the Shower Head
to the Shower Arm.
Shower Head
Hand Shower
Metal
Extendable
Hose
2. Install hand shower.
3.Insert hand shower into shower head.
a.
a. The Hand Shower
should be inserted
at an angle so the
tab on the top of
the Hand Shower
fits into the slot in
the Shower Head.
Insert Hand
Shower at an
Angle into the
Shower Head.
b. Gently push the
Hand Shower into
the Shower Head.
Hose Washer
(2)
Cleaning and care
Care should be given to the
cleaning of this product. Although
its finish is extremely durable, it can
be damaged by harsh abrasives or
polish. To clean, simply wipe gently
with a damp cloth and blot dry with
a soft towel.
b.
Limited Lifetime Warranty
All parts and finishes of the Delta® faucet
are warranted to the original consumer purchaser to be free from def ects in material &
workmanship for as long as the original consumer purchaser owns their home. Delta Faucet
Company recommends using a professional
plumber for all installation & repair.
Delta will replace, FREE OF CHARGE, during
the warranty period, any part or finish that proves
defective in material and/or workmanship under
normal installation, use & service. Replacement
parts may be obtained by calling 1-800-345-DELTA
(in the U.S. and Canada) or by writing to:
In the United States:
Delta Faucet Company
Product Service
55 E. 111th Street
Indianapolis, IN 46280
In Canada:
Masco Canada Limited, Plumbing Group
350 South Edgeware Road,
ST. Thomas, Ontairo, Canada N5P 4L1
This warranty is extensive in that it covers replacement of all defective parts and even finish, but
these are the only two things that are covered.
LABOR CHARGES AND/OR DAMAGE INCURRED
IN INSTALLATION,REPAIR, OR REPLACEMENT AS
WELL AS ANY OTHER KIND OF LOSS OR DAMAGES ARE EXCLUDED. Proof of purchase (original sales
receipt) from the original consumer purchaser must
be made available to Delta for all warranty claims.
THIS IS THE EXCLUSIVE WARRANTY BY DELTA
FAUCET COMPANY, WHICH DOES NOT MAKE
ANY OTHER WARRANTY OF ANY KIND, INCLUDING
THE IMPLIED WARRANTY OF MERCHANTABILITY.
© 2011 Masco Corporation of Indiana
www.deltafaucet.com
Hand
Shower
snaps in- • If the Shower Head
moves when
to place.
removing the Hand
Shower, tighten the
connection between
the Shower Head
and the Shower Arm.
a. Place the hose washers into the hose nuts on each
end of the hose.
b. All connections should be able to be made by hand
tightening.
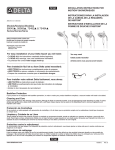
4. Removing the Hand Shower from the Shower Head.
a.
Pull the lower a. The Hand Shower
part of the
should be removed
Hand Shower
at an angle to
away from
release from the
the Shower
Shower Head.
Head.
b.
Pull the Hand b. Once the Hand
Shower down,
Shower is released
away from
from the lower clips
the slot in the
of the Shower Head,
Shower Head.
gently pull the Hand
Shower away from
the slot in the upper
portion of the
Shower Head.
WARNING: Plumbing Codes require that shower heads and hand showers provide a small but continuous flow of water (trickle) when in “PAUSE” mode. Because of this continuous flow, in certain circumstances
pressure variations in the water line and/or changes in the position of shower temperature control handle while in “PAUSE” mode could result in dramatic changes to the temperature of the water when the shower
head or hand shower is returned to the “ON” position.
ALWAYS point the shower head away from yourself when returning to the “ON” position and feel the water with your hand before resuming your shower to ensure the water flow is not too hot or too cold. DO NOT
allow children or others who might not understand this warning to use the “PAUSE” function.
67502 Rev. A