1
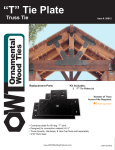
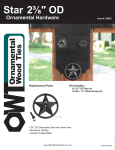
Butt Joint Plate
Truss Tie
Replacement Parts
Item #: 56613
Kit Includes:
2 Butt Joint Plates (a)
Number of Truss
Accent Kits Required:
Sold Separately
• Connector plate for Butt Joint • Designed for connection material >5 ½″
• Truss Accents, Hardware, & Hex Cap Nuts sold separately • 3/16″ thick steel
www.OZCOBuildingProducts.com
Butt Joint Plate
Truss Tie - Installation Guide
Item #: 56613
General Guidelines:
•Materials are heavy and bulky minimum of 2 people are required for most installations
•Brace and tie off large beams and posts until all connections are made
•Wear proper safety equipment
•Check with local authorities and home owners association before construction
•Check for underground and or hidden utilities that could be damaged
•Be sure to use the right tool for the job
•Plan ahead and have the required hardware, fasteners and tools close at hand before starting the
installation
Steps:
1.Locate the plate in the correct location
2.A clamp or similar device can be helpful to keep all parts tight and in place
3.Remove threaded covers from all Hex Cap Nuts
a. Insert Lag Bolts into Cap Nuts
b. OWT Lag Bolts require a 3/8” Hex Bit
4.Position the Truss Accent on the truss plate and attach with lag bolts
5.Repeat for all hardware locations
6.Replace Threaded Covers until flush with edge of the nut
7. HINT: Use tread lock on Threaded Covers in accessible areas
Use and Care: This hardware may not be suitable for every situation or installation application. A
design professional should be consulted to ensure the specific installation application meets local
building code requirements. If hardware becomes dirty clean with soap and water. Avoid abrasions to surface and touch up any
scrapes with paint. Rinse with fresh water if hardware comes in contact with ice salt or salt water. www.OZCOBuildingProducts.com