1
Mount Master
Installation Instructions
For use with standard and Insulated Siding
Series mount blocks.
Part No. PAPC8559
CAUTION: All electrical connections must be in accordance with state and local codes,
ordinances, and the National Electrical Code. If you are unfamiliar with methods of
installing electrical wiring and devices, secure the services of a qualified licensed
electrician.
-To be installed prior to siding-
Step 1
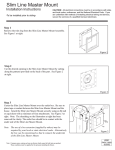
Remove the trim ring from the Mount Master Assembly.
See Figure 1 at right.
Figure 1
Step 2
Cut the desired opening in the Mount Master by cutting along
the patterns provided on the back of the part. See Figure 2
at right.
Figure 2
Step 3
Note: The use of a box extension (supplied by others) may be
required by your local or state electrical codes. Alternatively,
the box can be repositioned so that it contacts the underside
of the mount master.
Note: Common sense, caution and care are factors which cannot be built into any product.
These conditions must be supplied by the person(s) installing the fixture.
BOX
EXTENSION
(IF USED)
ELEC.
BOX
MOUNT
MASTER
STUD
Center the Mount Master over the outlet box. Be sure to place tape
or sealant between the Mount Master and the house. Attach the
Mount Master securely using an 8d nail or equivalent with a minimum
of four attachments. See Figure 3 at right. Note: The sheathing on the
illustration at right has been removed for clarity. The outlet box should
be in contact with the under side of the Mount Master.
Figure 3
I-0015
MIPC9075
4-30-07
Step 4
Cut the siding around the Mount Master. Install the siding
according to the manufacturer's installation instructions.
See Figure 4 at right.
Figure 4
Step 5
Install the trim ring by locking it into place See
Figure 5 at right.
Figure 5
Step 6
Install the light fixture or electrical device per the manufacturer's
installation instructions. Be sure that all electrical product
gaskets have the proper sealant. See Figure 6 at right.
Figure 6