1
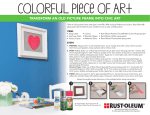
CRAFTY CRATE
GET YOUR CREATIVE JUICES FLOWING
Options are endless when it comes to uses for a wooden crate. Use a variety of
Varathane 3X Wood Stain colors to personalize your project.
ITEMS
• Drop Cloth
•Gloves
• Painter’s Tape
• High Quality Synthetic Bristle Brush
• Clean Lint Free Rags
• Sandpaper (120, 180, and 220-grit)
• Tack Cloth
• Varathane 3X Wood Stain
(Worn Navy, Bleached Blue,
Rustic Sage, Vintage Aqua pictured)
• Varathane Triple Thick Satin Polyurethane
• Wood Crate
STEPS
1. PREPARE: Always work in a well-ventilated area.
Cover the floor and nearby items with drop cloths.
2.SAND: Sand the surface of the crate lightly,
progressing through 120, 180, and 220-grit
sandpaper. Always sand in the direction of the
grain. Remove sanding dust between each grit of
sandpaper by lightly dragging the tack cloth across
the surface.
3.STAIN: Start with the inside of the crate. Tape off
the outside wood panels. Using a clean, lint-free
rag, generously cover the desired crate areas with
wood stain. Let the stain sit for 3-5 minutes (or as
instructed on the label) then wipe off any excess
using a clean rag. Wipe in the direction of the
wood grain. Ensure that all excess stain is removed
from the surface. Let dry for 1 hour. Remove tape
from outside wood panels. Tape off the wood
panels on the inside of the crate. Following the
same steps, apply stain to the outside panels. Let
dry for 1 hour. Remove tape from inside crate.
4.PROTECT: Protect your crate by applying 1
coat of Varathane Triple Thick Polyurethane. Allow
approximately 2 hours to dry to touch. Allow 48 hours to
cure before moderate use of project and 7 days for total
cure.
Always thoroughly review directions on the package before using any product.
BEFORE
As shown Varathane 3X Wood Stain in Vintage Aqua, Worn Navy, Rustic Sage,
Bleached Blue and Varathane Triple Thick Satin Polyurethane
AFTER
Visit www.homedepot.com/rustoleum
for other great ideas, products and inspiration.
VINTAGE COAT HANGER
GIVE YOUR ENTRYWAY STORAGE AND STYLE
Organizing has never looked so good. In a few simple steps, give your home a trendy,
vintage feel with the Varathane 3X Wood Stain color of your choice.
ITEMS
• Drop Cloth
•Gloves
• Clean Lint Free Rags
STEPS
• Sandpaper (120, 180, and 220-grit)
• Tack Cloth
• Varathane 3X Wood Stain
(Worn Navy pictured)
1. PREPARE: Always work in a well-ventilated area.
Cover the floor and nearby items with drop cloths.
2.SAND: Sand the surface of the coat hanger
lightly, progressing through 120, 180, and 220-grit
sandpaper. Always sand in the direction of the
grain. Remove sanding dust between each grit of
sandpaper by lightly dragging the tack cloth across
the surface.
3.STAIN: Using a clean, lint-free rag, generously
cover the coat hanger with wood stain. Let the
stain sit for 3-5 minutes (or as instructed on the
label) then wipe off any excess using a clean rag.
• Varathane Triple Thick
Semi-Gloss Polyurethane
• Wood Coat Hanger
• High Quality Synthetic Bristle Brush
Wipe in the direction of the wood grain. Ensure
that all excess stain is removed from the surface.
Let dry for 1 hour.
4.DISTRESS: After stain dries, sand corners and
desired areas to give your project a vintage inspired
look.
5.PROTECT: Protect your coat hanger by applying
1 coat of Varathane Triple Thick Polyurethane. Allow
approximately 2 hours to dry to touch. Allow 48 hours
to cure before moderate use of project and 7 days
for total cure.
6.FINISH: Mount on your wall and enjoy!
Always thoroughly review directions on the package before using any product.
BEFORE
As shown Varathane 3X Wood Stain in Worn Navy,
and Varathane Triple Thick Semi-Gloss Polyurethane
AFTER
Visit www.homedepot.com/rustoleum
for other great ideas, products and inspiration.
STEP STOOL
TRANSFORM YOUR PROJECT FROM DULL TO VIBRANT
In a few simple steps, you can add a pop of color to your home with the newest trendy
colors of Varathane 3X Wood Stain.
ITEMS
• Drop Cloth
•Gloves
• Clean Lint Free Rags
• High Quality Synthetic Bristle Brush
• Sandpaper (120, 180, and 220-grit)
• Tack Cloth
• Painter’s Tape
STEPS
1. PREPARE: Always work in a well-ventilated area.
Cover the floor and nearby items with drop cloths.
2.SAND: Sand the surface of the stool lightly,
progressing through 120, 180, and 220-grit
sandpaper. Always sand in the direction of the
grain. Remove sanding dust between each grit of
sandpaper by lightly dragging the tack cloth across
the surface.
3.STAIN: Tape off legs of step stool. Using a clean,
lint-free rag, generously cover the stool top
with Vintage Aqua stain. Let the stain sit for 3-5
• Varathane Triple Thick Satin Polyurethane
• Varathane 3X Wood Stain
(Vintage Aqua and Weathered
Gray pictured)
• Wood Step Stool
minutes (or as instructed on the label) then wipe
off any excess stain using a clean rag. Wipe in
the direction of the wood grain. Ensure that all
excess stain is removed from the surface. Remove
tape from legs. Following the same steps, apply
Weathered Gray stain to the legs. Let dry for 1
hour.
4.PROTECT: Protect your step stool by applying 1
coat of Varathane Triple Thick Polyurethane. Allow
approximately 2 hours to dry to touch. Allow 48
hours to cure before moderate use of project and
7 days for total cure.
Always thoroughly review directions on the package before using any product.
BEFORE
As shown Varathane 3X Wood Stain in Vintage Aqua,
Weathered Gray and Varathane Triple Thick Satin Polyurethane
AFTER
Visit www.homedepot.com/rustoleum
for other great ideas, products and inspiration.
TRENDY TRAY
IMPRESS YOUR GUESTS WITH A CHIC SERVING TRAY
Trays can be used for serving or as décor. Use the Varathane 3X Wood Stain color of your
choice to create a trend forward piece in a few easy steps.
ITEMS
• Drop Cloth
•Gloves
• Clean Lint Free Rags
STEPS
• Sandpaper (120, 180, • Varathane Triple Thick and 220-grit)
Semi-Gloss Polyurethane
• Tack Cloth
• Wood Tray
• Varathane 3X Wood Stain
• High Quality Synthetic Bristle Brush
(Kona pictured)
3.STAIN: Using a clean, lint-free rag, generously
1. PREPARE: Always work in a well-ventilated area.
Cover the floor and nearby items with drop cloths.
2.SAND: Sand the surface of the tray lightly,
progressing through 120, 180, and 220-grit
sandpaper. Always sand in the direction of the
grain. Remove sanding dust between each grit of
sandpaper by lightly dragging the tack cloth across
the surface.
cover the tray with wood stain. Let the stain sit for
2-3 minutes (or as instructed on the label) then
wipe off any excess using a clean rag. Wipe in the
direction of the wood grain. Ensure that all excess
stain is removed from the surface.
Let dry for 1 hour.
4.PROTECT: Protect your tray by applying 1
coat of Varathane Triple Thick Polyurethane. Allow
approximately 2 hours to dry to touch. Allow 48 hours
to cure before moderate use of project and 7 days
for total cure.
Always thoroughly review directions on the package before using any product.
BEFORE
As shown Varathane 3X Wood Stain in Kona,
and Varathane Triple Thick Semi-Gloss Polyurethane
AFTER
Visit www.homedepot.com/rustoleum
for other great ideas, products and inspiration.
WINE RACK
ADD CHIC DÉCOR TO YOUR WINE COLLECTION
All it takes is one coat of stain to create a fabulous display for your bottles. Choose from any
color in the Varathane 3X Wood Stain Palette.
ITEMS
• Drop Cloth
•Gloves
• Clean Lint Free Rags
• Sandpaper (120, 180, and 220-grit)
• Tack Cloth
• Varathane 3X Wood Stain
(Black Cherry pictured)
• Varathane Triple Thick Satin Polyurethane
• Wine Rack
• High Quality Synthetic Bristle Brush
STEPS
1. PREPARE: Always work in a well-ventilated area.
Cover the floor and nearby items with drop cloths.
2.SAND: Sand the surface of the wine rack
lightly, progressing through 120, 180, and 220-grit
sandpaper. Always sand in the direction of the
grain. Remove sanding dust between each grit of
sandpaper by lightly dragging the tack cloth across
the surface.
3.STAIN: Using a clean, lint-free rag, generously
cover the wine rack with wood stain. Let the stain
sit for 2-3 minutes (or as instructed on the label)
then wipe off any excess using a clean rag. Wipe
in the direction of the wood grain. Ensure that all
excess stain is removed from the surface. Let dry
for 1 hour.
4.PROTECT: Protect your wine rack by applying 1
coat of Varathane Triple Thick Polyurethane. Allow
approximately 2 hours to dry to touch. Allow 48 hours
to cure before moderate use of project and 7 days
for total cure.
Always thoroughly review directions on the package before using any product.
BEFORE
As shown Varathane 3X Wood Stain in Black Cherry,
and Varathane Triple Thick Satin Polyurethane
AFTER
Visit www.homedepot.com/rustoleum
for other great ideas, products and inspiration.
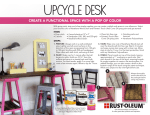
UPCYCLE DESK
CREATE A FUNCTIONAL SPACE WITH A POP OF COLOR
With spray paint, stain and a few simple supplies, you can create a stylish work space in one afternoon. Select
your favorite color of Varathane Wood Stain and Painter’s Touch Ultra Cover 2X spray paint and get started!
ITEMS
• Drop cloth
• 2 stools
STEPS
• Clean lint-free rags
• Finishing nails and
• Painter’s Touch Ultra hammer
Cover 2X spray paint • Varathane Polyurethane
• 4 wood planks at 15”x 4”
• Sandpaper (120, 180, and 220-grit)
• Varathane Wood Stain
1. PREPARE: Always work in a well-ventilated
area. Lightly sand all wood surfaces in the
direction of the grain progressing from 120-grit,
to 180-grit, finishing with 220-grit sandpaper.
Wipe clean with tack cloth, removing all dust.
3.STAIN: Wipe one coat of Varathane Wood stain all
over the boards with lint-free rag. Wait 2-3 minutes
and wipe excess stain away with a clean rag. Allow
stain to dry for 1 hour. For the best protection, finish
with any Varathane Polyurethane.
2.PAINT: Shake can for 1 minute after the ball
4.FINISH: Place boards on top of the stools, leaving
begins to rattle. Hold can 10-16” from the
approximately a 1” overhang on each side. Nail
surface and spray in a steady back and forth
each board to the top of the stool, ensuring boards
motion. For best results, apply 2 or more light
fit snugly together to create a flat work surface. For
coats a few minutes apart. Allow to dry for 1 hour.
added storage, you can also create a shelf on the
bottom rungs of the stool using the same technique.
Allow your project to dry overnight before use.
1
3
Always thoroughly
review directions on
the package before
using any product.
4
2
As shown Varathane Wood Stain in Kona; Painter’s
Touch Ultra Cover 2X Gloss Berry Pink; Varathane
Soft-Touch Polyurethane Matte Finish
Visit www.homedepot.com/rustoleum
for other great ideas, products and inspiration.
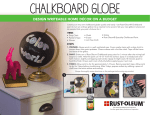
CHALKBOARD PARTY TRAY
NOTE YOUR NIBBLES ON A HANDMADE TRAY
Personalize with any Varathane Wood Stain, easy to apply Chalkboard brush paint and
stylish hardware. The perfect gift or addition to your party!
ITEMS
• Drop cloth
• Varathane Wood Stain
• Sandpaper (120, 180, and 220-grit) • Clean lint-free rags
• Wooden board (12” x 36”)
• Painter’s tape
• Foam roller
STEPS
1. PREPARE: Lightly sand all surfaces in the
direction of the grain progressing from
120-grit, to 180-grit, finishing with 220-grit
sandpaper. Wipe clean with tack cloth,
removing all dust.
2.STAIN: Wipe one coat of Varathane Wood
Stain all over the board with lint-free rag. Wait
2-3 minutes and wipe excess stain away with
clean rag. Allow stain to dry for 1 hour.
• Rust-Oleum Chalk Board Paint
• Superglue or hardware
•Handles
•Chalk
• Varathane Polyurethane
3.PAINT: Tape off the edges with painter’s tape.
Brush on one coat of Chalkboard Paint. Wait
one hour and apply a second coat. Repeat
process with a third coat.
4.FINISH: Allow paint to dry for at least 4 hours
before adding handles (securing with glue or
hardware). Then, allow paint to dry for 3 days.
Once dry, condition your surface by rubbing the
side of a piece of chalk over the entire surface and
erasing. For best protection, finish only stained
surfaces with any Varathane Polyurethane.
Always thoroughly review directions on the package before using any product.
1
2
As shown Varathane Wood Stain in Early American,
Rust-Oleum Chalkboard Brush Paint and Varathane Satin Polyurethane.
3
Visit www.homedepot.com/rustoleum
for other great ideas, products and inspiration.