1
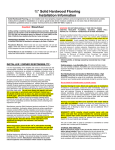
Solid American Wood Wainscot
32" Tongue and Groove Installation Instructions
INSTALLATION
IMPORTANT WARNING!
This product will expand . Loosely fit individual
boards together to allow for expansion.
DO NOT tightly press individual boards together.
They WILL buckle when expansion occurs.
Leave a minimum of 1/4" at the edge of first/last board
and corner. Best installed in a climate-controlled
environment. Allow ample time for product to
acclimate to room temperature.
(See Back)
PRIOR TO INSTALLATION:
• To minimize expansion of the
product, open all packages. Place
Wainscot Chair Rail
the pieces flat with space between
each for air to circulate. Allow
WALL PREPARATION:
• If walls are cracked, uneven
or extremely rough, planks
should be nailed to a
framework of 2" x 4",
1" x 3"or 1" x 4" strips of
kiln-dried wood.
• If walls are in good condition,
nail wainscot directly on
existing drywall, plywood
or paneling.
• Note: In rooms with extremely
high moisture (e.g., saunas,
bathrooms or laundry areas),
apply a vapor barrier, like 4
mil polyethylene, between the
studs and wainscot.
HOF#62
STEP 2: WAINSCOTING
• Start with grooved edge toward corner.
• Leave about 1/4" space between your first piece and corner,
allowing for expansion.
• Add new pieces of wainscot by placing the grooved edge
onto the tongue of piece already applied.
• Make sure first piece is plumb.
Secure first piece by nailing close to
wainscot base
with
the grooved edge with 1" finishing
grooved
side up
nails. (Also, nail first piece at an angle
on lip of plank so nails will not show.
.
23⁄4"
⁄16"
5
view from above
angled nail
32"
32" Wainscot
2"
72 hours for pieces to adjust to
the temperature and humidity
of the room in which they
will be installed – not in a
damp or unheated area.
• Finish or seal the front, back
and edges of each piece. Allow
them to dry completely.
Expansion and contraction are
inherent characteristics of wood
products due to humidity. The
manufacturer cannot be held
liable for contraction and
36"
expansion of planks.
• Arrange boards in desired
sequence of pattern – as solid
wood products vary in grain
and color.
STEP 1: BASE TRIM
• Nail wainscot base trim to wall – with grooved side up.
3"
2"
• Continue to nail additional pieces through the lip.
Leave approximately 1/16" (width of a nickel) between
pieces to allow for expansion.
• As you are working, check frequently for plumb with level
or tape measure.
• When you come to a corner, rip the piece to proper width.
Finish corner with quarter round, cove or square stock.
STEP 3:
CHAIR RAIL TRIM
• After all wainscoting has been applied,
install grooved Wainscot Chair Rail on
top of wainscot.
TIPS
• Nailing: Angle nails for greater holding
power. Finish with nail set. Position
nails on lip as shown in illustration
above. Use nail gun for fastest, easiest application.
• Check frequently for plumb with level or tape measure.
• To maintain House of Fara wood products, simply wipe with
damp cloth.
Wainscot
Base
House of Fara • LaPorte, IN • www.houseoffara.com
( OVER )