1
INSTALLATION INSTRUCTIONS
for Aluminum Windows with Nail Fin (JII004)
Thank you for selecting JELD-WEN products. Attached are JELD-WEN’s
recommended installation instructions for Aluminum windows with
an integral nail fin. While the use of these installation instructions is
recommended, installation in strict compliance with AAMA specifications
(2400-02) is an alternate method of window installation. Use of the AAMA
specifications (2400-02) will not affect application of the JELD-WEN
limited warranty.
Newer construction methods have led to an increase in air and water
tightness in buildings. This frequently leads to negative air pressure
inside the home, which can draw water through very small openings.
Our installation method integrates the window with the weather
barrier of the structure (typically building wrap).
Important Information & Glossary
Not all window types may be installed into every wall condition in all
areas. Consult your local building code official for applicable building
codes and regulations. Local building code requirements supersede
recommended installation instructions.
Please Note! Installations where the sill is higher than 35 feet above
ground level, or any product installation into a wall condition not
specifically addressed in these instructions, must be designed by an
architect or structural engineer. Failure to install windows into square,
level, and plumb openings could result in denial of warranty claims for
operational or performance problems.
Note to Installer: Provide a copy of these instructions to the building
owner. By installing this product, you acknowledge the terms and
conditions of the limited product warranty as part of the terms of the
sale.
Estimated Install
Time for New
Construction
First Time: 3 hrs
Experienced: 2 hrs
Professional: 1 hr
11 12 1
10
9
8
2
3
4
7
6
Glossary
Buck
A wood framework attached to the masonry inside a window or patio
door rough opening.
Mull Joint
The joint where two or more window units are structurally joined
together.
Mulled Unit
Two or more window units structurally joined together.
Precast Sill
A pre-formed concrete block placed in the sill of a masonry/block wall to
support a window.
Shiplap
The layering method in which each layer overlaps the layer below it so
that water runs down the outside.
Weep Hole (weep channel)
The visible exit or entry part of a water drainage system used to drain
water out of a window.
5
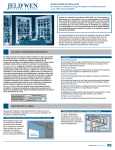
Rough openings
This installation guide specifically addresses masonry/block wall,
sheathed wall and open-stud construction.
MASONRY/BLOCK WALL CONSTRUCTION
This installation assumes that
a framework of studs (often
called a buck) has already been
properly fastened and sealed to
the concrete/masonry wall by a
building professional.
Buck
FULLY SHEATHED WALL CONSTRUCTION
The wall framing is covered by sheathing. Windows will be mounted
flush against the sheathing. This installation assumes building wrap is
properly installed prior to installation.
OPEN-STUD CONSTRUCTION
The wall framing must be
covered by backing support
before the window can be
installed. The window will be
mounted with the nail fin flush
against the applied backing
support.
Sheathed Wall
Header
King
stud
Trimmer
studs
This backing support should be a
Sheathing
non water-degradable, thin (max.
1/8" thick) sheet material such
as vinyl sheeting. Completely
surround the rough opening with
the backing support. Backing support must be applied before building
wrap.
INSTALLATION INSTRUCTIONS
for Aluminum Windows with Nailing Fin (JII004)
Safety & handling
SAFETY
MATERIALS AND WINDOW HANDLING
•Read and fully understand ALL manufacturers’ instructions before
beginning.
•Make sure operable windows are locked prior to installation.
•Do not work alone. Two or more people are required. Use safe lifting
techniques.
•Protect adhesive surfaces from dirt, moisture, direct sunlight and
folding over onto themselves.
•Use caution when handling glass. Broken or cracked glass can cause
serious injury.
•Handle in vertical position; do not carry flat or drag on floor.
•Wear protective gear (e.g. safety glasses, gloves, ear protection, etc.).
•Operate hand/power tools safely and follow manufacturer’s operating
instructions.
•Use caution when working at elevated heights.
•Heed material manufacturers’ handling and application instructions.
•Do not put stress on joints, corners or frames.
•Store window in dry, well-ventilated area in vertical, leaning position
to allow air circulation; do not stack horizontally.
•Protect from exposure to direct sunlight during storage.
•Install only into vertical walls and when conditions and sheathing are
dry.
IF INJURY OCCURS, IMMEDIATELY SEEK MEDICAL ATTENTION!
Needed Materials & tools
NEEDED Materials
Note! Follow all material manufacturers’ instructions for proper use
and compatibility.
•1 3/4" galvanized roofing nails. Nails must penetrate at least 1" into
framing (or as required by local code)
•For mulled and/or DP50 or above units: #10 x 1 1/2" truss head or
washer head (stainless steel recommended) screws. Screws must
penetrate at least 1" into framing (or as required by local code))
TOOLS
•Utility knife
•J-roller
•Hammer
•Tape measure
•Caulking gun
•Construction stapler with 3/8" staples
•Sealant (Protecto Wrap Protecto Sealant 25XL or equivalent)
•Level (4' minimum recommended)
•Backer rod
•Drill with bits
•Polyurethane low expansion foam (Dow Great StuffTM Window and
Door or equivalent)
•Shims – not water degradable or compressible
For installations into a stud-framed wall:
•JELD-WEN 4" drain mat material or equivalent
•JELD-WEN 4" wide self adhesive flashing or equivalent, 6" for
windows rated above DP50 (9" if required by local code)
•Spray adhesive/primer (Protecto Wrap Safseal Systems 5500 or as
recommended by the self-adhesive flashing manufacturer)
For installations into a buck:
•Liquid applied flashing (Protecto Wrap LWM 200 or equivalent)
2
INSTALLATION INSTRUCTIONS
for Aluminum Windows with Nailing Fin (JII004)
1
remove packaging & Inspect window
REMOVE PACKAGING
Remove shipping materials such as corner covers, shipping blocks or
pads. If there is a protective film on the glass, do not remove it until
installation and construction are complete.
•Splits, cracks, holes, missing sections or other damage to the nail fin
longer than 6" and/or within 1/2" of window frame
•For side-by-side mulled units, a drip cap that extends the length of the
frame plus 1/8" overhang on each end is required.
If any of the above conditions represent a concern, or if you expect
environmental conditions to exceed the window's performance rating,
do not install the window. Contact your dealer or distributor for
recommendations.
INSPECT WINDOW
•Cosmetic damage
•Product squareness (diagonal measurements not more than 1/8"
different)
•Correct product (size, color, grid pattern, handing, glazing, energyefficiency requirements, etc.)
2
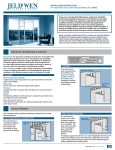
INSPECT ROUGH OPENING
•Verify the width and height
of the window are each 1/2"5/8" smaller than the rough
opening width and height.
Mulled units should be 3/4"
narrower.
•Verify the rough opening
is square. The (A) and (B)
measurements above should
be the same. Maximum
allowable deviation from
square is 1/8" for windows
20 sq. ft. and smaller, and
1/4" for windows larger than
20 sq. ft.
3
•Verify the rough opening is level and plumb (C) and (D). The
maximum allowable deviation is 1/16" for every 2' of rough opening
(not to exceed 1/8").
Verify Square, Level, & Plumb
•The rough opening sill must not be crowned or sagged (D).
•The exterior face of the rough opening must be in a single plane (E)
with less than 1/8" twist from corner to corner.
A
A
C
C
E
E
D
B B
D
PREPARE BUCK
Note! This section applies to
installations into a masonry
wall only. For installations
Liquid
into a stud-framed wall, begin
applied
with section 4, “PREPARE
flashing
STUD-FRAMED WALL.”
1.Seal any joint larger than
Sealant
1/16" in the buck and
joints
between the buck and the
concrete/masonry with
sealant.
2.Cover the buck and the
surrounding concrete/
masonry at the head and jambs with liquid applied flashing as shown.
3
•Verify the header is supported by trimmer studs.
3.If installing into a four-sided buck, seal the sill in a similar manner.
Note! Shims must be at least 1/4" shorter than the depth of the
window sill, should level the rough opening sill and be no more than
1/4" thick.
4.Shim the sill 4" from each corner, at 8" intervals, and underneath
mull joints, on both sides, with non water-degradable or compressible
shims. Secure shims with sealant. SKIP to section 5, “INSTALL
WINDOW.”
INSTALLATION INSTRUCTIONS
for Aluminum Windows with Nailing Fin (JII004)
4
prepAre sTud-FrAmed WAll
FOR RETROFIT INSTALLATIONS
After removing the old window, remove sufficient siding to expose
enough intact building wrap to properly seal the window to the
opening. If damaged, apply new building wrap in shiplap manner.
verify the rough opening framing is structurally sound. Continue with
the instructions.
PREPARE BUILDING WRAP
Note! Check with the building
wrap manufacturer to verify
the following steps will not
void their product warranty.
Follow manufacturers'
instructions.
1. Trim building wrap flush
with the rough opening.
2. At the head, cut building
wrapat45°andtapeupas
shown.
45°
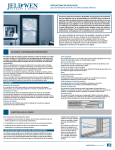
PREPARE SILL
1. measure the width of the
frame from the interior to
the nail fin and add 1/8".
Transfer this measurment
from the outside edge of
the rough opening sill and
draw a line all along the
rough opening sill. This
is where the back of the
Jeld-WeN drain mat will sit.
5
Interior
measure
frame
width
6"
Width of
rough opening
release
tape
Wicking
3"
Foam
wedge
3"
For
Narrow
Frames
Width of
frame
release
tape
Trim
Wicking
seal
corners
drain mat
strips (above
DP50only)
INsTAll WINdOW
WARNING! To avoid injury, use at least two people to install.
Adequately support the window until completely fastened.
1.ForunitsratedaboveDP50,runacontinuous3/8"beadofsealant
around the interior side of the nail fin where it will contact the rough
opening.
2. place window sill onto the
drain mat/liquid applied
flashing and tilt into the
rough opening. The window
3"-7"
sill must rest on and be fully
supported by the rough
opening.
3.Fastenwindowwitha
galvanizedroofingnail
through the nail fin between
3"-7"fromonelowercorner.
4. Shimsidejambs4"-6"from
4
2. Cut a piece of drain mat the
lengthofthesillplus6".
3.Withoutcuttingthedrain
matmaterial,remove3"of
the foam wedge from each
end of the Jeld-WeN drain
mat. If the width of the
frame is narrower than the
width of the foam wedge,
also trim the front edge of
the foam until it is the same
width as the frame.
4. place drain mat on rough
opening sill, wrapping the
drainmatup3"oneach
jamb as shown.
5.Pullreleasetapeandset
Jeld-WeN drain mat into
place.
6.Liftupthebackofthe
wicking and staple into
place on the sill.
7. Fold the drain mat down
onto the sheathing. staple
drain mat to the wall and seal
the corner edges as shown.
8. For additional drainage
for windows rated above
DP50,cuta2"widestrip
of drain mat and apply
vertically beneath the drain
mat at 12" intervals. slightly
overlap the drain mat with
the strips.
9.Smoothoutanybubblesor
creases with a J-roller.
each corner, at the center
point, and 8" apart.
5.Inspectwindowforsquare,
level, and plumb. Test for
proper operation (remove
and reinstall if necessary).
6"
Interlock
8"
Center
Jamb
rough
opening
shim
Interior
INSTALLATION INSTRUCTIONS
for Aluminum Windows with Nailing Fin (JII004)
5
INSTALL WINDOW - continued
secure window
Note! Fastener heads must be flush. Do not dent nail fin. The first 12"
beyond mull joints, on both sides, must be fastened through each nail
fin hole with #10 x 1 1/2" truss head screws.
4"
4"
4"
Window
3"- 7"
•Fasten windows rated DP50
or above every 4".
#10 x 1 1/2" Truss head screw
Window
•Fasten windows rated less
than DP50 through the nail
fin holes 3" - 7" from the
corners and 8" apart all the
way around the window.
Nail fin
8"
•Remove the shims from the
side jambs.
Mull joint
6
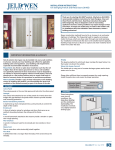
FLASH WINDOW - Windows installed into stud-framing only
Cut pieces of self-adhesive flashing as follows:
APPLY THE SELF-ADHESIVE FLASHING
DP50 or below
(4" flashing)
Above DP50
(6" flashing)
One header piece
10" longer than the
header
14" longer than the
header
Two side pieces
7" longer than the
jamb
10" longer than the
jamb
One sill piece
N/A
6" longer than the
sill
Apply spray adhesive (protect
window from overspray) as
instructed to nail fin and
building wrap around the
window as shown.
Sp
ray
Ad
hes
ive
spray adhesive/primer
Note! Keep the edge of the
JELD-WEN self-adhesive
flashing as close to the
window frame as possible and
apply over the nail fin.
1. If installing a window
rated above DP50, center
and apply 6" wide flashing
below the sill.
2. Apply the side pieces
starting 2" above the header
and overlap the drain mat
on the sill as shown.
3. Center and apply the header
piece above the header,
overlapping the side pieces
as shown.
4. Press the flashing down with
a J-roller, being careful to
remove any gaps or bubbles
beneath self-adhesive
flashing (remove and
replace if necessary).
Flashing
Drain mat
2"
2"
2"
5
INSTALLATION INSTRUCTIONS
for Aluminum Windows with Nailing Fin (JII004)
7
COmpleTe INsTAllATION
1. release the building wrap
from above the header
sealant
(previously taped up)
and overlap the header
flashing. seal the ends with
self-adhesive flashing or
building wrap tape.
2. Adjust window for best
operation.
3.Sealthetopcornersofthe
window with a 1/4" bead
of sealant. Tool into a fillet
sealant
shape.
4. Create a continuous air
seal on the interior by
integrating the rough
opening and the window
drain mat
frame with low expansion
polyurethane foam or
backer rod and sealant. If
Framing
installing into wood framing
with a drain mat, apply
sealant to the foam wedge
on the back of the drain mat, integrating the back of the drain mat
with the window frame and the rough opening.
5.Ensureweepholes/channelsareclearofdebrisforproperwater
drainage. do not seal weep holes/channels.
AFTER INSTALLATION
•Installexteriorwallsurfacewithin30daysofwindowinstallation.
•Maintaingapof1/4"-3/8"betweenwindowframeandfinalexterior
wall surface.
•Protectrecentlyinstalledunitsfromdamagefromplaster,paint,etc.
by covering the unit with plastic.
please visit jeld-wen.com/resources for warranty
and care and maintenance information.
Thank you for choosing
©2009JELD-WEN,inc.|JELD-WENandReliabilityforreallifeareregisteredtrademarksofJELD-WEN,inc.,OregonUSA.
All other trademarks are the property of their respective owners.
6
(03/09)