Transcript
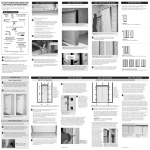
Install
IMPORTANT: READ THE INSTRUCTIONS COMPLETELY THROUGH BEFORE
THE DOOR UNIT.
1. PREPARE THE OPENING
• The three sides of the rough opening must be in the same plane for proper installation and operation of the door
(See figure A).
• The rough framed opening should be about 1 to 2 inches wider and taller than the door unit itself.
• The floor area should be clean, dry and level. Apply generous amounts of caulk to floor where the threshold will
rest (See figure A).
BEGINNING TO INSTALL
FIGURE C:
FIGURE D:
FIGURE A:
Security Plate
(Do not remove)
Shim at every arrow location.
(Be sure to shim
behind each hinge)
Caulk
2. BEFORE YOU INSTALL THE DOOR UNIT
• If your unit has any type of brace under the sill or skid protectors, please remove at this point.
• Before installing the door unit you must remove the screw from the pre-hanging plug before you begin installation
(See figure B).
• However, do not remove the pre-hanging plug itself until the unit is temporarily fastened in place. The Pre-hanging
plug is necessary to hold the door closed during installation.
• If your door unit has a security plate fastened to the lock jamb, do not remove it (See figure C).
5. PERMANENTLY FASTEN THE UNIT
• Important: We recommend replacing one screw on each jamb-side hinge with a 3” or 3-1/2” screw (not provided)
to securely fasten the unit on the hinge side of the door unit. Be sure you have shimmed behind each hinge.
• Be sure you have shimmed the lock side of the door unit in at least 3 places along the vertical lock jamb (See
figure D).
• Once alignment is correct, permanently screw the unit into place using 2” dry wall screws (not provided) through
the jamb and the shims then into the stud.
FIGURE E:
FIGURE B:
Bottom Door Sweep
Pre-hanging Plug:
Leave in place until unit
is temporarily fastened.
Pre-hanging Plug Screw:
Remove the screw
before fastening the unit.
3. SETTING THE UNIT
• From outside your home, center the door unit in the opening and tilt into position. Assure uniform spacing around
the unit (See figure C).
• Shim unit in place by driving the shims from the interior side. Be sure to shim behind each hinge (See figure D).
Note: shimming the header is not necessary.
• Plumb and square one vertical jamb, then temporarily fasten the unit into place using 3” drywall screws (not
supplied).
4. CHECK FOR PROPER ALIGNMENT
• Plumb and square the other vertical jamb. Shim between jamb and rough opening to assure proper alignment.
Also shim behind each hinge.
• Remove pre-hang plug from the bore hole. Open and close the door. There should be uniform spacing (1/8”)
between door and jamb on the two sides and the top of the door. Make any necessary adjustments to the unit
now, to assure uniform spacing around the door, before proceeding.
• Be sure the door sweep contacts the threshold evenly. Make necessary adjustments now, before proceeding.
• Test the adjustable threshold (See figure E). To test, place a sheet of paper over the threshold and close the door
then, pull on the paper. If the threshold adjustment is correct there will be some tension on the paper as you pull it.
If the paper tears, the threshold is too high. If there is no tension at all on the paper when you pull it, the threshold
is too low. To adjust the threshold, tighten or loosen all screws on the sill, 1/2 a turn at a time (left to loosen and
right to tighten. Then repeat the paper test. Remember you want the paper to have some tension as you pull it,
without tearing the paper.
Threshold Screws:
Adjust all sill screws
half turn up or down,
only if necessary.
6. COMPLETION STEPS
• Install lockset hardware in accordance with hardware manufacturer’s instructions.
• Apply interior and exterior casing or molding as desired. Note: Your door unit may already have exterior
brickmold applied.
• Caulk around the entire frame/brickmold of the exterior wall, using a high quality exterior grade caulk. Caulk
where the jambs and threshold meet, and on the exterior edge of the threshold. Then if needed add a bead of
caulk between the jamb and the threshold (See figure E).
• Follow the paint manufacturer’s instructions for painting or finishing the jamb.
• Remove adhesive backing from dust pad (included with these instructions).
• Place dust pad right above the sill with the thicker edge under the weather-stripping, making sure the thinner edge
does not protrude past the jamb.
(See figure E).
• Do not paint or finish the bottom door sweep, weather-stripping, or dust pad.
If these pieces are painted or finished your door will not seal properly.
• Make sure you leave the door open long enough to ensure proper drying after painting or finishing the jamb. This
is important, wet paint or finish will stick to the weather-stripping then alter its performance.